Author Archives: usernames

ASP.NET Core in Action 13 Creating a website with Razor Pages

Part 3 Generating HTML with Razor Pages and MVC

第 3 部分:使用 Razor Pages 和 MVC 生成 HTML

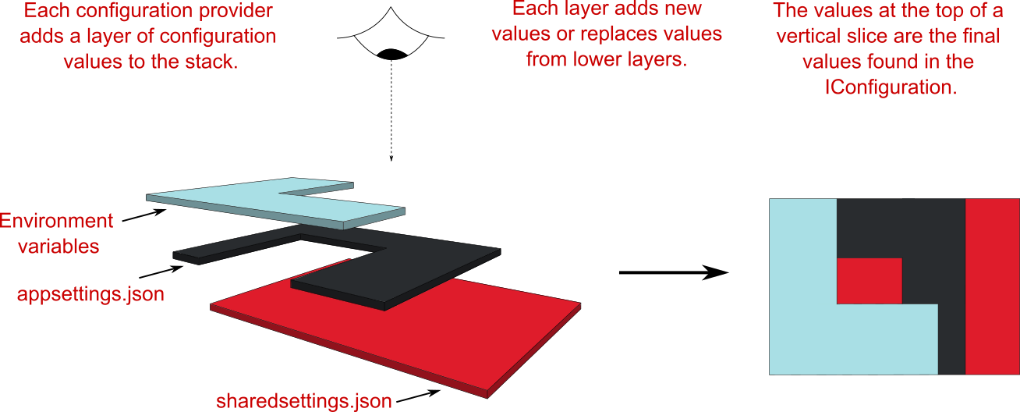
In parts 1 and 2 we looked in detail at how to create JSON API applications using minimal APIs. You learned how to configure your app from multiple sources, how to use dependency injection to reduce coupling in your app, and how to document your APIs with OpenAPI.

在第 1 部分和第 2 部分中,我们详细介绍了如何使用最少的 API 创建 JSON API 应用程序。您学习了如何从多个来源配置应用程序,如何使用依赖关系注入来减少应用程序中的耦合,以及如何使用 OpenAPI 记录 API。

API apps are everywhere these days. Mobile apps use them; clients-side Single Page Applications (SPAs) like Angular, React, or Blazor use them; even other apps use them for server-to-server communication. But in many cases, you don’t need separate server-side and client-side apps. Instead, you could create a server-rendered app.

如今,API 应用程序无处不在。移动应用程序使用它们;Angular、React 或 Blazor 等客户端单页应用程序 (SPA) 使用它们;甚至其他应用程序也使用它们进行服务器到服务器的通信。但在许多情况下,您不需要单独的服务器端和客户端应用程序。相反,您可以创建服务器呈现的应用程序。

With server-rendering, your application generates the HTML on the server and the browser displays this directly in the browser; no extra client-side framework required. You can still add dynamic client-side behavior using JavaScript, but fundamentally each page in your app is a standalone request and response, which gives a simpler developer experience.

使用服务器呈现时,应用程序会在服务器上生成 HTML,浏览器会直接在浏览器中显示 HTML;不需要额外的客户端框架。您仍然可以使用 JavaScript 添加动态客户端行为,但从根本上说,应用程序中的每个页面都是一个独立的请求和响应,这提供了更简单的开发人员体验。

In part 3, you’ll learn about the Razor Pages and MVC frameworks used by ASP.NET Core to create server-rendered apps. In chapters 13 through 16 we’ll examine the behavior of the Razor Pages framework itself, routing, and model binding. In chapters 17 and 18 we’ll look at how you can build the UI for your application using the Razor syntax and Tag Helpers, so that users can navigate and interact with your app.

在第 3 部分中,您将了解 ASP.NET Core 用于创建服务器渲染应用的 Razor Pages 和 MVC 框架。在第 13 章到第 16 章中,我们将研究 Razor Pages 框架本身的行为、路由和模型绑定。在第 17 章和第 18 章中,我们将介绍如何使用 Razor 语法和标记帮助程序为应用程序构建 UI,以便用户可以导航应用并与之交互。

In chapter 19 you’ll learn how to use the MVC framework directly, instead of Razor Pages. You’ll learn how to use MVC controllers to build server-rendered apps and when to choose MVC controllers instead of Razor Pages. In chapter 20 you’ll learn to how to use MVC controllers to build API applications, as an alternative to minimal APIs. Finally, in chapters 21 and 22 you’ll learn how to refactor your apps to extract common code out of your Razor Pages and API controllers using filters.

在第 19 章中,您将学习如何直接使用 MVC 框架,而不是 Razor Pages。您将学习如何使用 MVC 控制器构建服务器呈现的应用程序,以及何时选择 MVC 控制器而不是 Razor Pages。在第 20 章中,您将学习如何使用 MVC 控制器来构建 API 应用程序,作为最小 API 的替代方案。最后,在第 21 章和第 22 章中,您将学习如何重构应用程序,以使用筛选器从 Razor Pages 和 API 控制器中提取常见代码。

13 Creating a website with Razor Pages
13 使用 Razor Pages 创建网站

This chapter covers

本章涵盖

  • Getting started with Razor Pages
    Razor Pages 入门

  • Introducing Razor Pages and the Model-View-Controller (MVC) design pattern
    Razor Pages 和模型-视图-控制器 (MVC) 设计模式简介

  • Using Razor Pages in ASP.NET Core
    在 ASP.NET Core 中使用 Razor Pages

So far in this book you’ve built one type of ASP.NET Core application: minimal API apps that return JavaScript Object Notation (JSON). In this chapter you’ll learn how to build server-rendered, page-based applications using Razor Pages. Most ASP.NET Core apps fall into one of three categories:

到目前为止,在本书中,您已经构建了一种类型的 ASP.NET Core 应用程序:返回 JavaScript 对象表示法 (JSON) 的最小 API 应用程序。在本章中,您将学习如何使用 Razor Pages 构建服务器渲染的、基于页面的应用程序。大多数 ASP.NET Core 应用程序都属于以下三类之一:

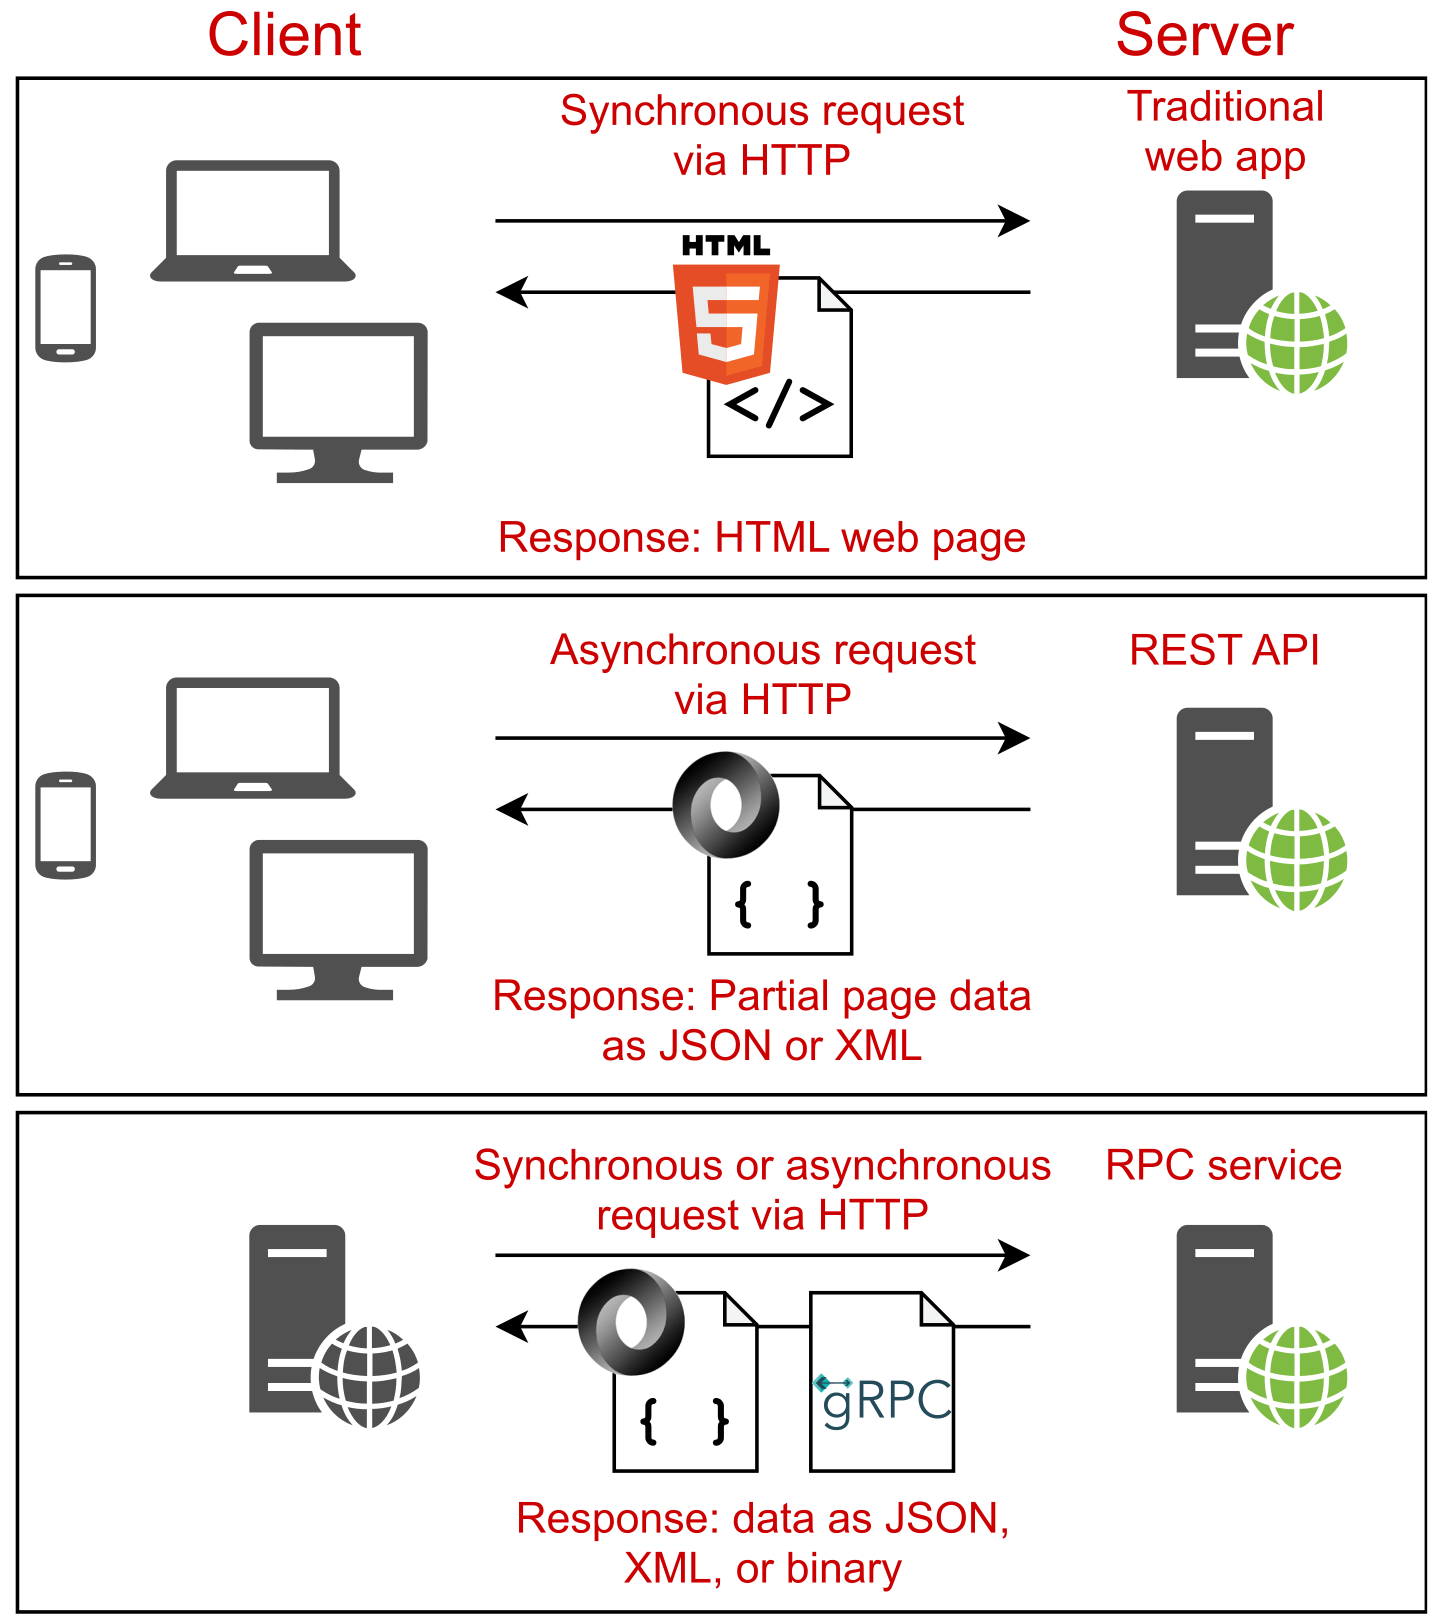
  • An API designed for consumption by another machine or in code—Web apps often serve as an API to backend server processes, to a mobile app, or to a client framework for building single-page applications (SPAs). In this case your application serves data in machine-readable formats such as JSON or Extensible Markup Language (XML) instead of the human-focused HTML output.
    供其他计算机使用或在代码中使用的 API — Web 应用程序通常用作后端服务器进程、移动应用程序或用于构建单页应用程序 (SPA) 的客户端框架的 API。在这种情况下,您的应用程序以机器可读格式(如 JSON 或可扩展标记语言 (XML))而不是以人类为中心的 HTML 输出提供数据。

  • An HTML web application designed for direct use by users—If the application is consumed directly by users, as in a traditional web application, Razor Pages is responsible for generating the web pages that the user interacts with. It handles requests for URLs, receives data posted via forms, and generates the HTML that enables users to view and navigate your app.
    专为用户直接使用而设计的 HTML Web 应用程序 – 如果应用程序由用户直接使用,就像在传统 Web 应用程序中一样,Razor Pages 负责生成用户与之交互的网页。它处理对 URL 的请求,接收通过表单发布的数据,并生成使用户能够查看和导航您的应用程序的 HTML。

  • Both an HTML web application and an API—It’s also possible to have applications that serve both needs, which can let you cater to a wider range of clients while sharing logic in your application.
    HTML Web 应用程序和 API — 也可以拥有同时满足这两种需求的应用程序,这样您就可以在应用程序中共享逻辑的同时满足更广泛的客户端需求。

In this chapter you’ll learn how ASP.NET Core uses Razor Pages to handle the second of these options: creating server-side rendered HTML pages. We’ll get started quickly, using a template to create a simple Razor Pages application and comparing the features of a Razor Pages app with the minimal API apps you’ve seen so far. In section 13.2 we look at a more complex example of a Razor Page.

在本章中,你将了解 ASP.NET Core 如何使用 Razor Pages 来处理第二个选项:创建服务器端呈现的 HTML 页面。我们将快速入门,使用模板创建简单的 Razor Pages 应用程序,并将 Razor Pages 应用的功能与你目前看到的最小 API 应用进行比较。在 Section 13.2 中,我们看一个更复杂的 Razor Page 示例。

Next, we take a step back in section 13.3 to look at the MVC design pattern. I discuss some of the benefits of using this pattern, and you’ll learn why it’s been adopted by so many web frameworks as a model for building maintainable applications.

接下来,我们在 Section 13.3 中后退一步,看看 MVC 设计模式。我将讨论使用此模式的一些好处,您将了解为什么它被如此多的 Web 框架用作构建可维护应用程序的模型。

In section 13.4 you’ll learn how the MVC design pattern applies to ASP.NET Core. The MVC pattern is a broad concept that can be applied in a variety of situations, but the use case in ASP.NET Core is specifically as a UI abstraction. You’ll see how Razor Pages implements the MVC design pattern and builds on top of the ASP.NET Core MVC framework.

在第 13.4 节中,您将了解 MVC 设计模式如何应用于 ASP.NET Core。MVC 模式是一个广泛的概念,可以应用于各种情况,但 ASP.NET Core 中的用例专门用作 UI 抽象。您将了解 Razor Pages 如何实现 MVC 设计模式并在 ASP.NET Core MVC 框架之上构建。

In this chapter I’ll try to prepare you for each of the upcoming topics, but you may find that some of the behavior feels a bit like magic at this stage. Try not to become too concerned about exactly how all the Razor Pages pieces tie together yet; focus on the specific concepts being addressed and how they tie into concepts you’ve already met. We’ll start by creating a Razor Pages app to explore.

在本章中,我将尝试让您为即将到来的每个主题做好准备,但您可能会发现,在这个阶段,某些行为感觉有点像魔术。尽量不要太关心所有 Razor Pages 作品究竟是如何联系在一起的;专注于要解决的具体概念以及它们如何与您已经遇到的概念相关联。首先,我们将创建一个 Razor Pages 应用进行探索。

13.1 Your first Razor Pages application

13.1 您的第一个 Razor Pages 应用程序

In this section you’ll get started with Razor Pages by creating a new application from a template. After you’ve created the app and had a look around, we’ll look at some of the similarities and differences compared with a minimal API application. You’ll learn about the extra middleware added in the default template, look at how HTML is generated by Razor Pages, and take a look at the Razor Page equivalent of minimal API endpoint handlers: page handlers.

在本部分中,你将通过从模板创建新应用程序来开始使用 Razor Pages。在您创建应用程序并环顾四周后,我们将了解与最小 API 应用程序相比的一些相似之处和不同之处。您将了解默认模板中添加的额外中间件,了解 Razor Pages 如何生成 HTML,并查看 Razor Page 等价的最小 API 端点处理程序:页面处理程序。

13.1.1 Using the Web Application template

13.1.1 使用 Web 应用程序模板

Using a template is a quick way to get an application running, so we’ll take that approach using the ASP.NET Core Web App template. To create a Razor Pages application in Visual Studio, perform the following steps:

使用模板是运行应用程序的一种快速方法,因此我们将使用 ASP.NET Core 来采用这种方法Web App 模板。要在 Visual Studio 中创建 Razor Pages 应用程序,请执行以下步骤:

  1. Choose Create a New Project from the splash screen or choose File > New > Project from the main Visual Studio screen.
    从初始屏幕中选择 Create a New Project,或从 Visual Studio 主屏幕中选择 File > New > Project。

  2. From the list of templates, choose ASP.NET Core Web App, ensuring you select the C# language template.
    从模板列表中,选择 ASP.NET Core Web App,确保选择 C# 语言模板。

  3. On the next screen, enter a project name, location, and solution name, and click Next. You might use WebApplication1 as both the project and solution name, for example.
    在下一个屏幕上,输入项目名称、位置和解决方案名称,然后单击 Next。例如,您可以使用 WebApplication1 作为项目和解决方案名称。

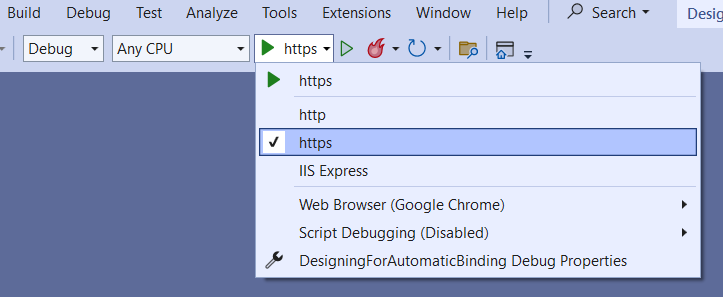
  4. On the following screen (figure 13.1), do the following:
    在以下屏幕(图 13.1)中,执行以下作:

  • Select .NET 7.0. If this option isn’t available, ensure that you have .NET 7 installed. See appendix A for details on configuring your environment.
    选择 .NET 7.0。如果此选项不可用,请确保您已安装 .NET 7。有关配置环境的详细信息,请参阅附录 A。
  • Ensure that Configure for HTTPS is checked.
    确保选中 Configure for HTTPS (为 HTTPS 配置)。
  • Ensure that Enable Docker is unchecked.
    确保 Enable Docker (启用 Docker) 处于未选中状态。
  • Ensure that Do not use top-level statements is unchecked.
    确保 Do Not Use Top-level Statements 未选中。
  • Choose Create.
    选择 Create (创建)。

alt text

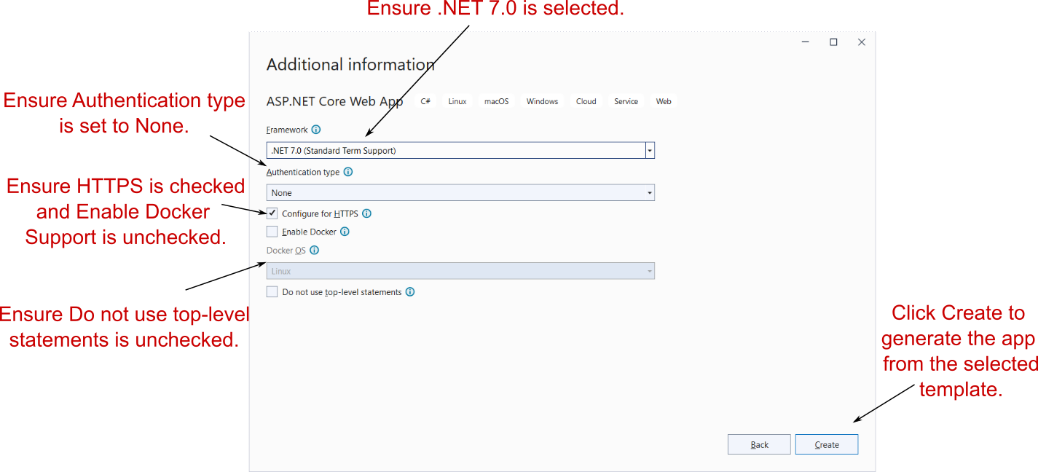
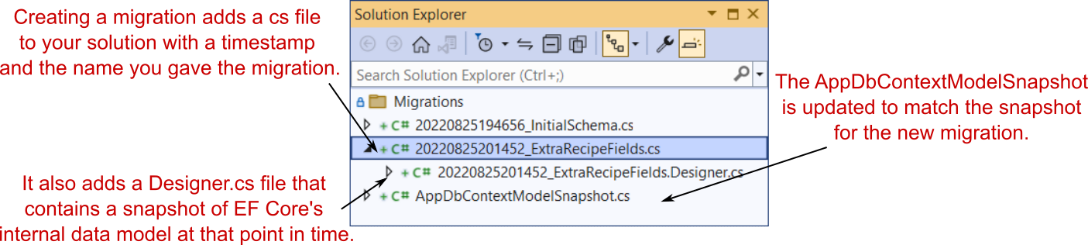
Figure 13.1 The additional information screen. This screen follows the Configure Your New Project dialog box and lets you customize the template that generates your application.
图 13.1 附加信息屏幕。此屏幕位于 Configure Your New Project 对话框之后,允许您自定义生成应用程序的模板。

If you’re not using Visual Studio, you can create a similar template using the .NET command-line interface (CLI). Create a folder to hold your new project. Open a PowerShell or cmd prompt in the folder (on Windows) or a terminal session (on Linux or macOS), and run the commands in the following listing.

如果不使用 Visual Studio,则可以使用 .NET 命令行界面 (CLI) 创建类似的模板。创建一个文件夹来保存您的新项目。在文件夹(在 Windows 上)或终端会话(在 Linux 或 macOS 上)中打开 PowerShell 或 cmd 提示符,然后运行以下列表中的命令。

Listing 13.1 Creating a new Razor Page application with the .NET CLI
清单 13.1 使用 .NET CLI创建新的 Razor Page 应用程序

dotnet new sln -n WebApplication1     ❶
dotnet new razor -o WebApplication1   ❷
dotnet sln add WebApplication1        ❸

❶ Creates a solution file called WebApplication1 in the current folder
在当前文件夹中创建名为 WebApplication1 的解决方案文件
❷ Creates an ASP.NET Core Razor Pages project in a subfolder, WebApplication1
在子文件夹 WebApplication1 中创建 ASP.NET Core Razor Pages 项目
❸ Adds the new project to the solution file
将新项目添加到解决方案文件中

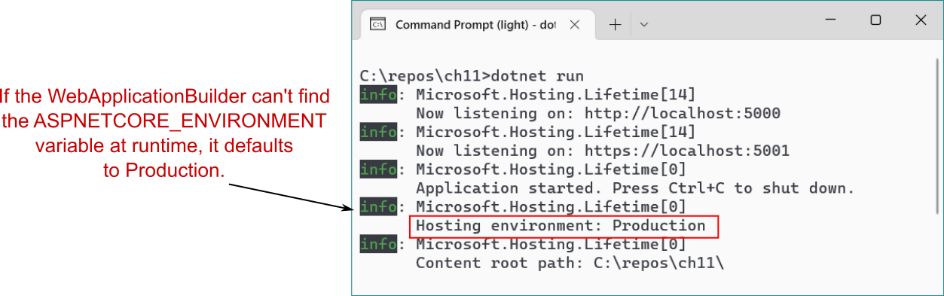
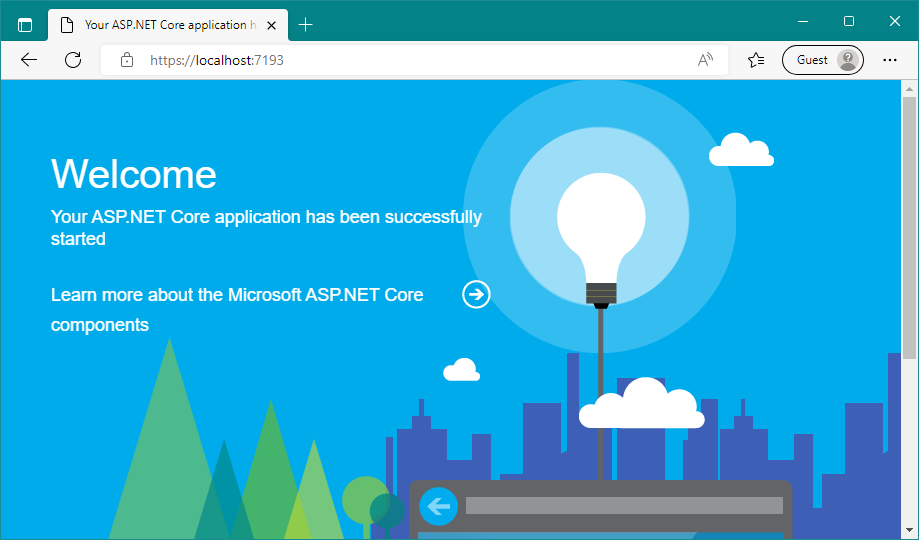
Whether you use Visual Studio or the .NET CLI, now you can build and run your application. Press F5 to run your app using Visual Studio, or use dotnet run in the project folder. This command opens the appropriate URL in a web browser and displays the basic Welcome page, shown in figure 13.2.

无论您使用的是 Visual Studio 还是 .NET CLI,现在都可以构建和运行应用程序。按 F5 使用 Visual Studio 运行应用,或使用项目文件夹中的 dotnet run。此命令在 Web 浏览器中打开相应的 URL,并显示基本的 Welcome 页面,如图 13.2 所示。

alt text

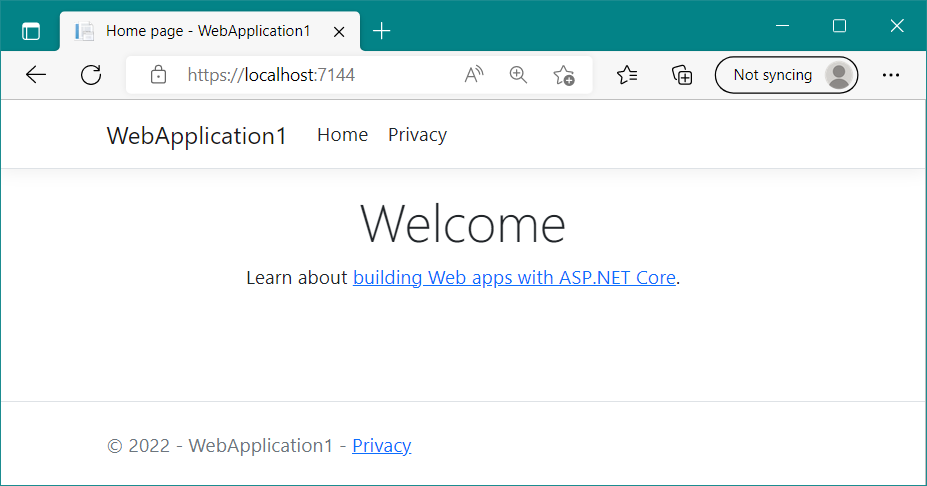
Figure 13.2 The output of your new Razor Pages application. The template chooses a random port to use for your application’s URL, which is opened automatically in the browser when you run the app.
图 13.2 新 Razor Pages 应用程序的输出。该模板选择一个随机端口用于应用程序的 URL,当您运行应用程序时,该端口会自动在浏览器中打开。

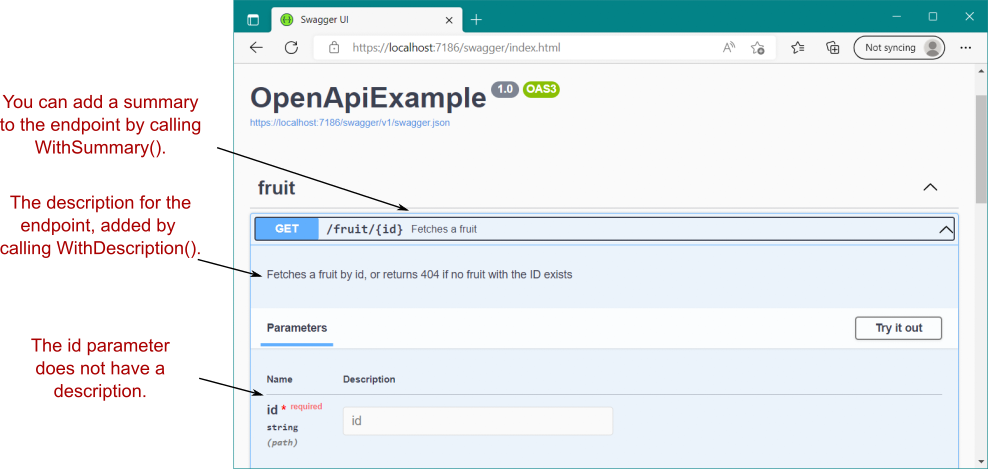
By default, this page shows a simple Welcome banner and a link to the official Microsoft documentation for ASP.NET Core. At the top of the page are two links: Home and Privacy. The Home link is the page you’re currently on. Clicking Privacy takes you to a new page, shown in figure 13.3. As you’ll see in section 13.1.3, you can use Razor Pages in your application to define these two pages and build the HTML they display.

默认情况下,此页面显示一个简单的欢迎横幅和一个指向 ASP.NET Core 的官方 Microsoft 文档的链接。页面顶部有两个链接:Home 和 Privacy。Home link (主页) 链接是您当前所在的页面。点击 Privacy 将带你到一个新页面,如图 13.3 所示。如第 13.1.3 节所示,您可以在应用程序中使用 Razor Pages 来定义这两个页面并构建它们显示的 HTML。

alt text

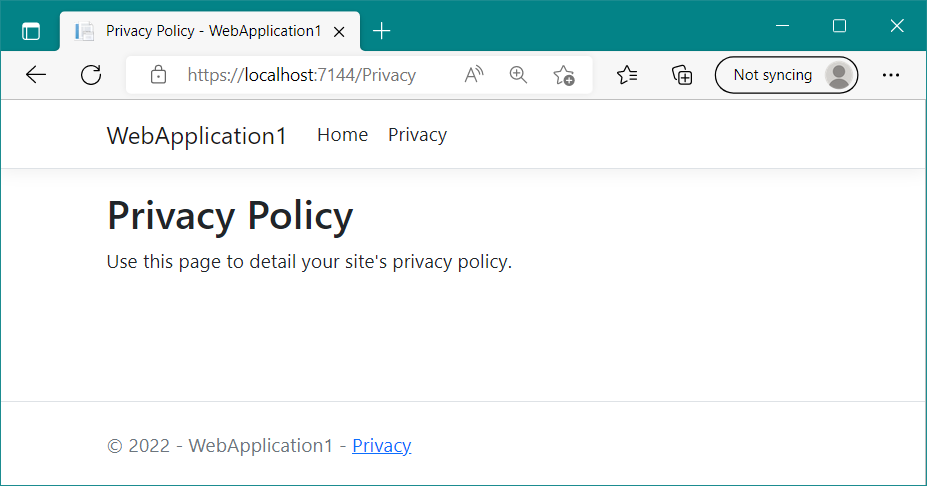
Figure 13.3 The Privacy page of your application. You can navigate between the two pages of the application using the Home and Privacy links in the application’s header. The app generates the content of the pages using Razor Pages.
图 13.3 应用程序的 Privacy 页面。您可以使用应用程序标题中的 Home 和 Privacy 链接在应用程序的两个页面之间导航。该应用使用 Razor Pages 生成页面内容。

At this point, you should notice a couple of things:
此时,您应该注意以下几点:

  • The header containing the links and the application title, WebApplication1, is the same on both pages.
    包含链接和应用程序标题 WebApplication1 的标题在两个页面上是相同的。

  • The title of the page, as shown in the tab of the browser, changes to match the current page. You’ll see how to achieve these features in chapter 17, when we discuss the rendering of HTML using Razor templates.
    页面的标题(如浏览器选项卡中所示)会更改以匹配当前页面。您将在第 17 章中了解如何实现这些功能,届时我们将讨论使用 Razor 模板呈现 HTML。

There isn’t any more to the user experience of the application at this stage. Click around a little, and when you’re happy with the behavior of the application, return to your editor, and look at the files included in the template.
在此阶段,应用程序的用户体验不再有任何变化。单击一下,当您对应用程序的行为感到满意时,返回到编辑器,并查看模板中包含的文件。

This Razor Pages app has much the same structure as the minimal API applications you’ve created throughout this book, as shown in figure 13.4. The overall structure is identical apart from two extra folders you haven’t seen before:
此 Razor Pages 应用程序的结构与您在本书中创建的最小 API 应用程序大致相同,如图 13.4 所示。除了两个您以前从未见过的额外文件夹外,整体结构是相同的:

  • Pages folder—This folder contains the Razor Pages files that define the various pages in your web app, including the Home and Privacy pages you’ve already seen.
    Pages 文件夹 - 此文件夹包含 Razor Pages 文件,这些文件定义 Web 应用程序中的各个页面,包括您已经看到的 Home 和 Privacy 页面。

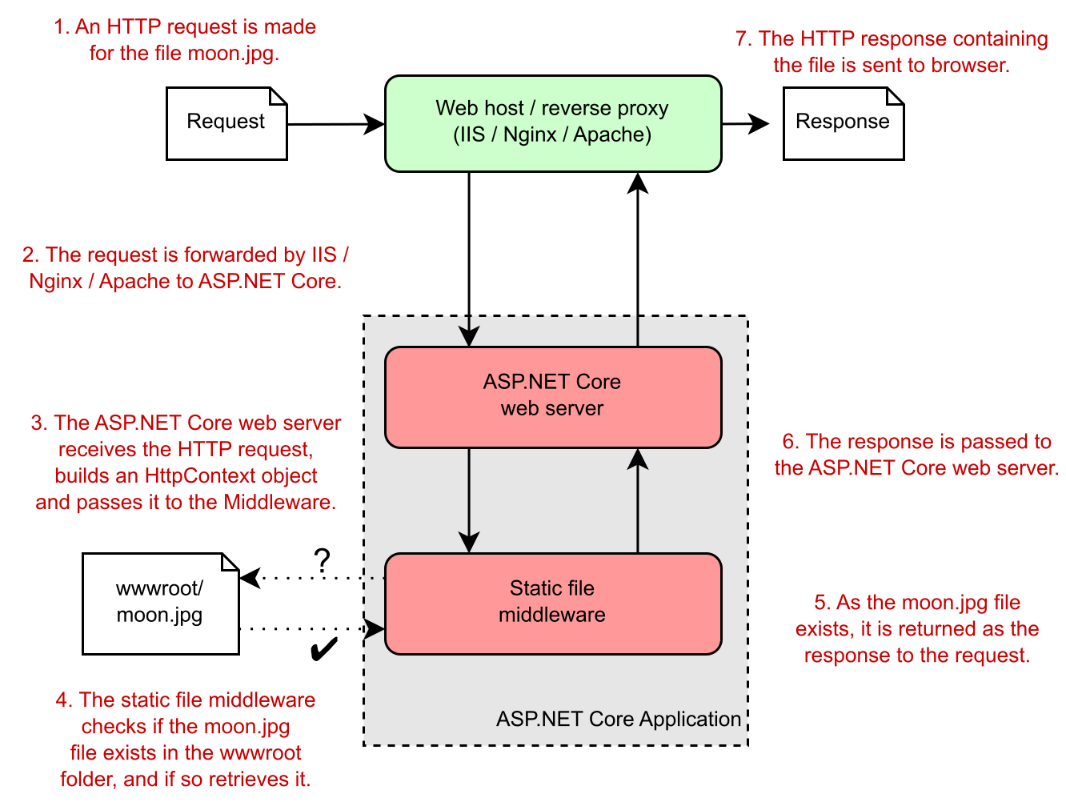
  • wwwroot folder—This folder is special in that it’s the only folder in your application that browsers are allowed to access directly when browsing your web app. You can store your Cascading Style Sheets (CSS), JavaScript, images, or static HTML files here, and the static file middleware will serve them to browsers when requested. The template creates subfolders inside wwwroot, but you don’t have to use them; you can structure your static files however you want inside wwwroot.
    wwwroot 文件夹 - 此文件夹很特殊,因为它是应用程序中唯一允许浏览器在浏览 Web 应用程序时直接访问的文件夹。您可以在此处存储级联样式表 (CSS)、JavaScript、图像或静态 HTML 文件,静态文件中间件将在需要时将它们提供给浏览器。该模板会在 wwwroot 中创建子文件夹,但您不必使用它们;您可以在 wwwroot 中根据需要构建静态文件。

alt text

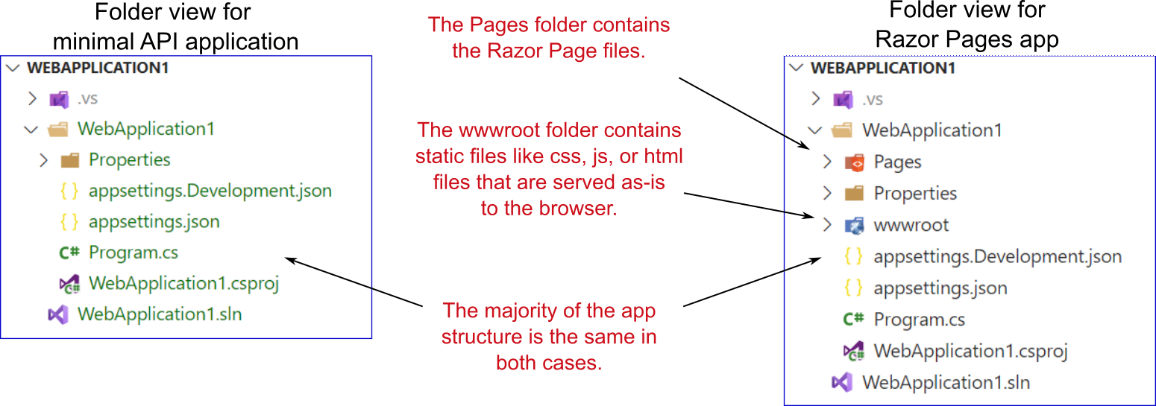
Figure 13.4 Comparing the project structure of a minimal API app with a Razor Pages app. The Razor Pages app contains all the same files and folders, as well as the Pages folder for the Razor Page definitions and the wwwroot file for static files that are served directly to the browser.
图 13.4 比较最小 API 应用与 Razor Pages 应用的项目结构。Razor Pages 应用包含所有相同的文件和文件夹,以及 Razor Page 定义的 Pages 文件夹以及 wwwroot 文件,用于直接提供给浏览器的静态文件。

Aside from these extra files, the only other difference between a Razor Pages app and a minimal API app is the Program.cs file. In section 13.1.2 you’ll see that the Razor Pages app uses the same basic structure in Program.cs but adds the extra services and middleware used in a typical Razor Pages app.

除了这些额外的文件之外,Razor Pages 应用和最小 API 应用之间的唯一其他区别是 Program.cs 文件。在第 13.1.2 节中,你将看到 Razor Pages 应用在 Program.cs 中使用相同的基本结构,但添加了典型 Razor Pages 应用中使用的额外服务和中间件。

13.1.2 Adding and configuring services

13.1.2 添加和配置服务

One of the nice things about working with ASP.NET Core applications is that the setup code is quite similar even for completely different application models. No matter whether you’re creating a Razor Pages application or using minimal APIs, your Program.cs contains the same six steps:

使用 ASP.NET Core 应用程序的一个好处是,即使对于完全不同的应用程序模型,设置代码也非常相似。无论您是创建 Razor Pages 应用程序还是使用最少的 API,您的 Program.cs 都包含相同的六个步骤:

  1. Create a WebApplicationBuilder instance.
    创建 WebApplicationBuilder 实例。

  2. Register the required services with the WebApplicationBuilder.
    将所需的服务注册到WebApplicationBuilder 的 Web 应用程序构建器。

  3. Call Build on the builder instance to create a WebApplication instance.
    在构建器实例上调用 Build() 以创建一个WebApplication 实例。

  4. Add middleware to the WebApplication to create a pipeline.
    将中间件添加到 WebApplication 以创建管道。

  5. Map the endpoints in your application.
    映射应用程序中的终端节点。

  6. Call Run() on the WebApplication to start the server and handle requests.
    在 WebApplication 上调用 Run() 以启动服务器并处理请求。

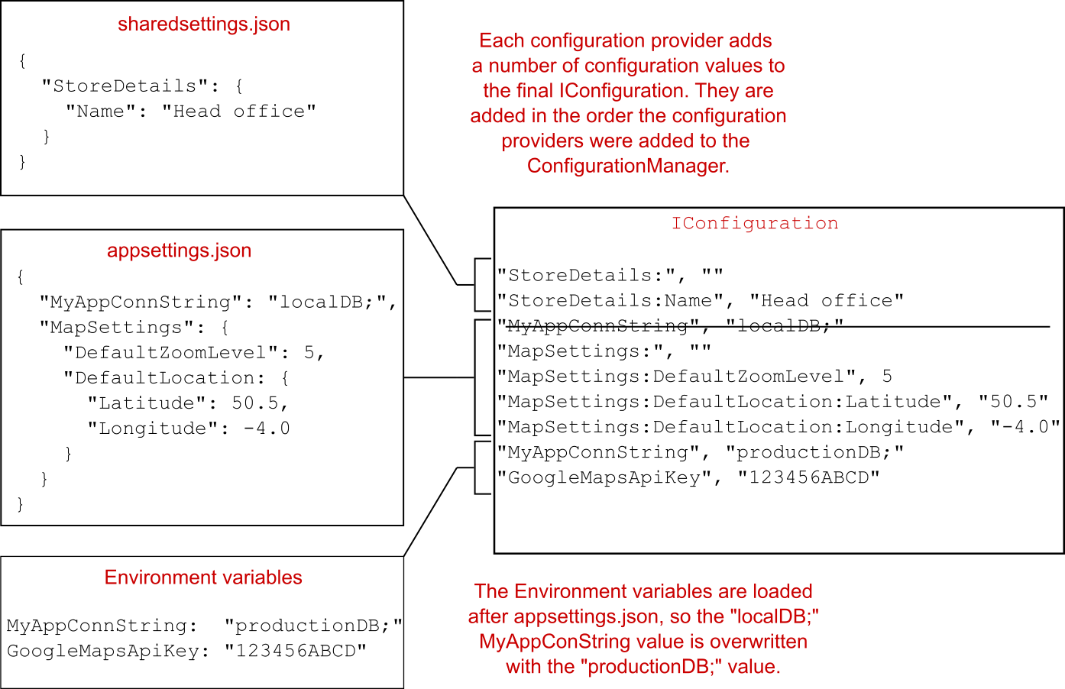
The following listing shows the Program.cs file for the Razor Pages app. This file uses a lot more middleware than you’ve seen previously, but the overall structure should be familiar.

以下清单显示了 Razor Pages 应用的 Program.cs 文件。此文件使用的中间件比您之前看到的要多得多,但整体结构应该很熟悉。

Listing 13.2 The Program.cs file for a Razor Pages app
列表 13.2 Razor Pages 应用程序的 Program.cs 文件

WebApplicationBuilder builder = WebApplication.CreateBuilder(args);

builder.Services.AddRazorPages();    ❶

WebApplication app = builder.Build();

if (!app.Environment.IsDevelopment())   ❷
{   ❷
    app.UseExceptionHandler("/Error");  ❷
    app.UseHsts()
}   ❷

app.UseHttpsRedirection();    ❸
app.UseStaticFiles();    ❸
app.UseRouting();     ❸
app.UseAuthorization();    ❸

app.MapRazorPages();    ❹

app.Run();

❶ Registers the required services to use the Razor Pages feature
注册使用 Razor Pages 功能所需的服务
❷ Conditionally adds middleware depending on the runtime environment
根据运行时环境有条件地添加中间件
❸ Additional middleware can be added to the middleware pipeline.
以将其他中间件添加到中间件管道中。
❹ Registers each Razor Page as an endpoint in your application
将每个 Razor 页面注册为应用程序中的终结点

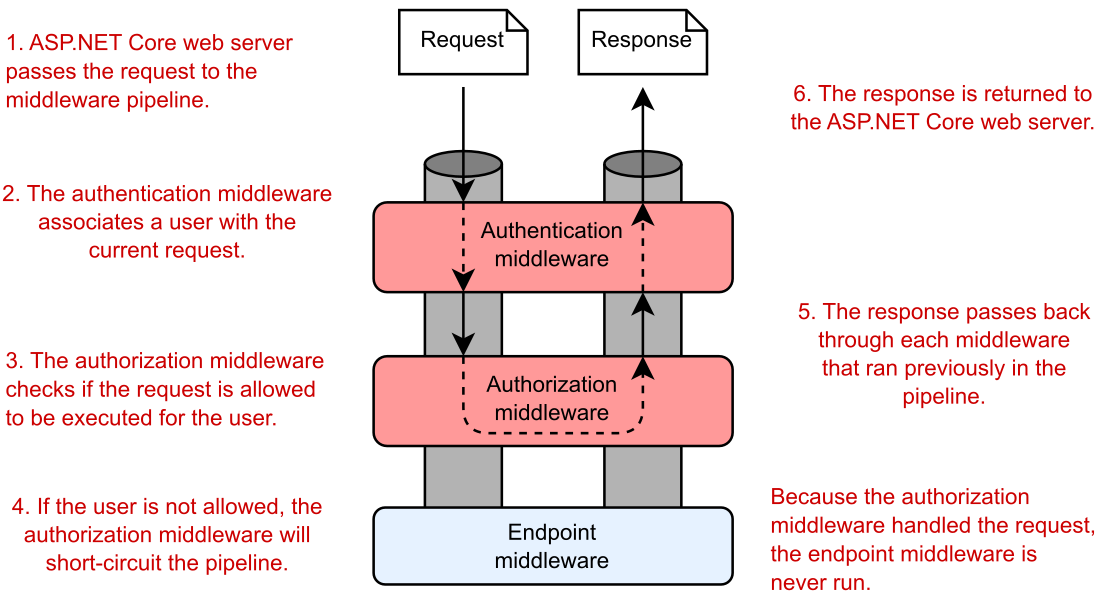
In chapter 4 you learned about middleware and the importance of ordering when adding middleware to the pipeline. This example adds six pieces of middleware to the pipeline, two of which are added only when not running in development:
在第 4 章中,您了解了中间件以及将中间件添加到管道时排序的重要性。此示例将 6 个中间件添加到pipeline 中,其中两个仅在未在 development 中运行时添加:

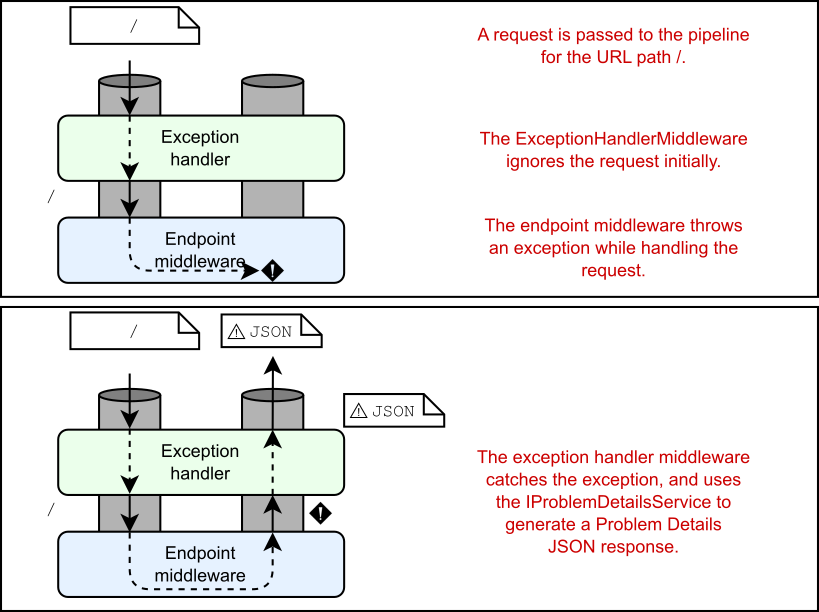
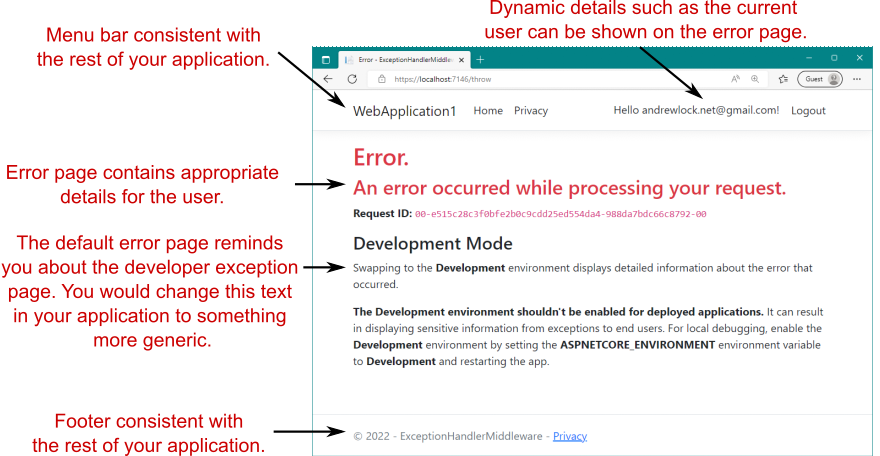
  • ExceptionHandlerMiddleware—You learned about this middleware in chapters 4 and 5. This middleware catches exceptions thrown by middleware later in the pipeline and generates a friendly error page.
    ExceptionHandlerMiddleware — 您在第 4 章和第 5 章中了解了此中间件。此中间件稍后在管道中捕获中间件引发的异常,并生成一个友好的错误页面。

  • HstsMiddleware—This middleware sets security headers in your response, in line with industry best practices. See chapter 28 for details about it and other security-related middleware.
    HstsMiddleware — 此中间件根据行业最佳实践在响应中设置安全标头。有关它和其他与安全相关的中间件的详细信息,请参见 Chapter 28。

  • HttpsRedirectionMiddleware—This middleware ensures that your application responds only to secure (HTTPS) requests and is an industry best practice. We’ll look at HTTPS in chapter 28.
    HttpsRedirectionMiddleware — 此中间件可确保您的应用程序仅响应安全 (HTTPS) 请求,是行业最佳实践。我们将在第 28 章中介绍 HTTPS。

  • StaticFileMiddleware—As you saw in chapter 4, this middleware serves requests for static files (such as .css and .js files) from the wwwroot folder in your app.
    StaticFileMiddleware — 如第 4 章所示,此中间件为应用程序中 wwwroot 文件夹中的静态文件(如 .css 和 .js 文件)的请求提供服务。

  • RoutingMiddleware—The routing middleware is responsible for selecting the endpoint for an incoming request. WebApplication adds it by default, but as discussed in chapter 4, adding it explicitly ensures that it runs after the StaticFileMiddleware.
    RoutingMiddleware — 路由中间件负责为传入请求选择终端节点。 WebApplication 默认会添加它,但正如第 4 章所讨论的,显式添加它可以确保它在 StaticFileMiddleware 之后运行。

  • AuthorizationMiddleware—This middleware controls whether an endpoint is allowed to run based on the user making the request, but requires you also to configure authentication for your application. You’ll learn more about authentication in chapter 23 and authorization in chapter 24.
    AuthorizationMiddleware — 此中间件根据发出请求的用户控制是否允许终端节点运行,但还要求您为应用程序配置身份验证。您将在第 23 章中了解有关身份验证的更多信息,在第 24 章中了解有关授权的更多信息。

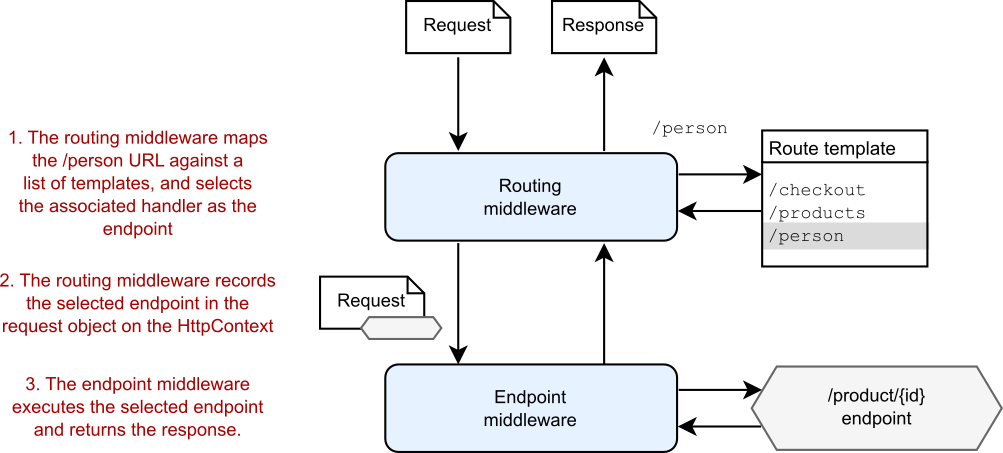
In addition to the middleware added explicitly, WebApplication automatically adds some extra middleware (as discussed in chapter 4), such as the EndpointMiddleware, which is automatically added to the end of the middleware pipeline. As with minimal APIs, the RoutingMiddleware selects which endpoint handler to execute, and the EndpointMiddleware executes the handler to generate a response.
除了显式添加的中间件之外,WebApplication 还会自动添加一些额外的中间件(如第 4 章所述),例如 EndpointMiddleware,它会自动添加到中间件管道的末尾。与最小 API 一样,RoutingMiddleware 选择要执行的端点处理程序,而 EndpointMiddleware 执行处理程序以生成响应。

Together, this pair of middleware is responsible for interpreting the request to determine which Razor Page to invoke, for reading parameters from the request, and for generating the final HTML. Little configuration is required; you need only add the middleware to the pipeline and specify that you want to use Razor Page endpoints by calling MapRazorPages. For each request, the routing middleware uses the request’s URL to determine which Razor Page to invoke. Then the endpoint middleware executes the Razor Page to generate the HTML response.

这对中间件共同负责解释请求以确定要调用的 Razor Page、从请求中读取参数以及生成最终 HTML。几乎不需要配置;您只需将中间件添加到管道,并通过调用 MapRazorPages 指定要使用 Razor Page 端点。对于每个请求,路由中间件使用请求的 URL 来确定要调用的 Razor Page。然后,终结点中间件执行 Razor Page 以生成 HTML 响应。

When the application is configured, it can start handling requests. But how does it handle them? In section 13.1.3 you’ll get a glimpse at Razor Pages and how they generate HTML.

配置应用程序后,它可以开始处理请求。但是它是如何处理的呢?在第 13.1.3 节中,您将了解 Razor Pages 以及它们如何生成 HTML。

13.1.3 Generating HTML with Razor Pages

13.1.3 使用 Razor Pages 生成 HTML

When an ASP.NET Core application receives a request, it progresses through the middleware pipeline until a middleware component handles it. Normally, the routing middleware matches a request URL’s path to a configured route, which defines which Razor Page to invoke, and the endpoint middleware invokes it.

当 ASP.NET Core 应用程序收到请求时,它会在中间件管道中前进,直到中间件组件处理该请求。通常,路由中间件将请求 URL 的路径与配置的路由匹配,该路由定义要调用的 Razor Page,然后终结点中间件调用它。

Razor Pages are stored in .cshtml files (a portmanteau of .cs and .html) within the Pages folder of your project. In general, the routing middleware maps request URL paths to a single Razor Page by looking in the Pages folder of your project for a Razor Page with the same path. If you look back at figure 13.3, for example, you see that the Privacy page of your app corresponds to the path /Privacy in the browser’s address bar. If you look inside the Pages folder of your project, you’ll find the Privacy.cshtml file, shown in the following listing.

Razor Pages 存储在项目的 Pages 文件夹中的 .cshtml 文件(.cs 和 .xhtml 的组合)中。通常,路由中间件通过在项目的 Pages 文件夹中查找具有相同路径的 Razor 页面,将请求 URL 路径映射到单个 Razor 页面。例如,如果你回头看一下图 13.3,你会看到你的应用程序的 Privacy 页面对应于浏览器地址栏中的路径 /Privacy。如果查看项目的 Pages 文件夹,您将找到 Privacy.cshtml 文件,如以下清单所示。

Listing 13.3 The Privacy.cshtml Razor Page
列表 13.3 Privacy.cshtml Razor 页面

@page       ❶
@model PrivacyModel         ❷
@{
    ViewData["Title"] = "Privacy Policy";       ❸
}
<h1>@ViewData["Title"]</h1>     ❹

<p>Use this page to detail your site's privacy policy.</p>    ❺

❶ Indicates that this is a Razor Page
表示这是一个 Razor 页面
❷ Links the Razor Page to a specific PageModel
将 Razor 页面链接到特定的 PageModel
❸ C# code that doesn’t write to the response
不写入响应的 C# 代码
❹ HTML with dynamic C# values written to the response
将动态 C# 值写入响应的 HTML
❺ Standalone, static HTML
独立的静态 HTML

Razor Pages use a templating syntax called Razor that combines static HTML with dynamic C# code and HTML generation. The @page directive on the first line of the Razor Page is the most important. This directive must always be placed on the first line of the file, as it tells ASP.NET Core that the .cshtml file is a Razor Page. Without it, you won’t be able to view your page correctly.

Razor Pages 使用一种称为 Razor 的模板语法,该语法将静态 HTML 与动态 C# 代码和 HTML 生成相结合。Razor 页面第一行上的 @page 指令是最重要的。此指令必须始终放在文件的第一行,因为它会告知 ASP.NET Core .cshtml 文件是 Razor 页面。没有它,您将无法正确查看您的页面。

The next line of the Razor Page defines which PageModel in your project the Razor Page is associated with:

Razor Page 的下一行定义 Razor Page 与项目中的哪个 PageModel 相关联:
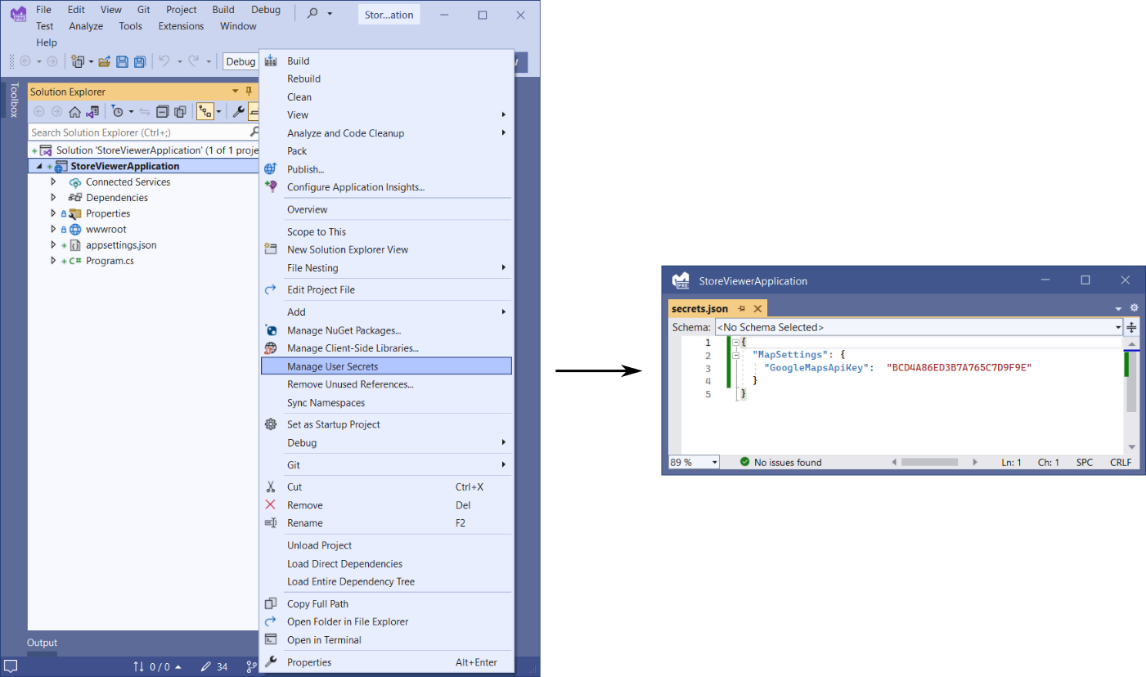
@model PrivacyModel

In this case the PageModel is called PrivacyModel, and it follows the standard convention for naming Razor Page models. You can find this class in the Privacy.cshtml.cs file in the Pages folder of your project, as shown in figure 13.5. Visual Studio nests these files underneath the Razor Page .cshtml files in Solution Explorer. We’ll look at the page model in section 13.1.4.

在这种情况下,PageModel 称为 PrivacyModel,它遵循命名 Razor Page 模型的标准约定。您可以在项目的 Pages 文件夹中的 Privacy.cshtml.cs 文件中找到此类,如图 13.5 所示。Visual Studio 将这些文件嵌套在 Razor 页面下.cshtml 文件。我们将在 13.1.4 节中查看页面模型。

alt text

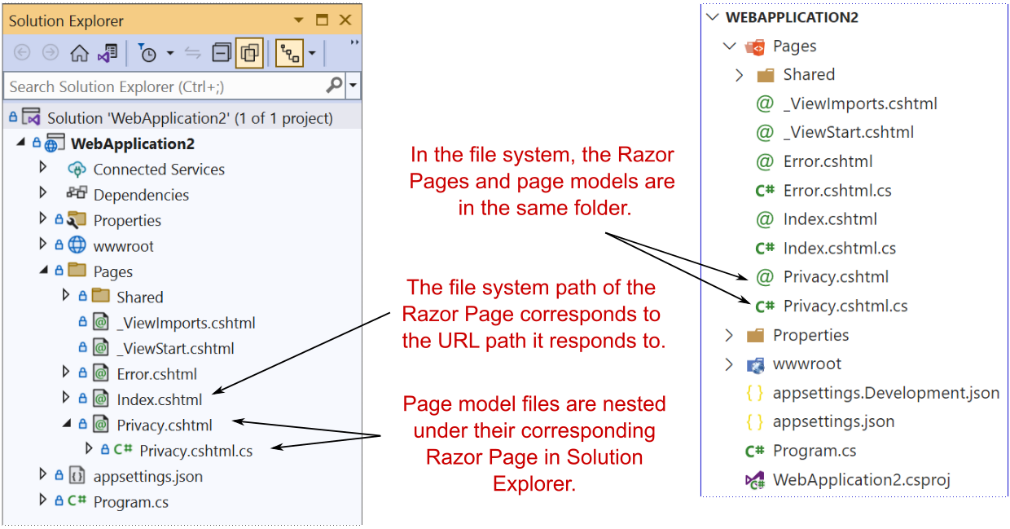
Figure 13.5 By convention, page models for Razor Pages are placed in a file with the same name as the Razor Page, with a .cs suffix appended. Visual Studio nests these files below the Razor Page in Solution Explorer.
图 13.5 按照惯例,Razor 页面的页面模型放置在与 Razor 页面同名的文件中,并附加了 .cs 后缀。Visual Studio 将这些文件嵌套在“解决方案资源管理器”中的 Razor 页面下方。

In addition to the @page and @model directives, static HTML is always valid in a Razor Page and will be rendered as is in the response:

除了 @page 和 @model 指令之外,静态 HTML 在 Razor 页面中始终有效,并将按原样在响应中呈现:

<p>Use this page to detail your site’s privacy policy.</p>

You can also write ordinary C# code in Razor templates by using this construct:
您还可以使用以下构造在 Razor 模板中编写普通的 C# 代码:

@{ /* C# code here */ }

Any code between the curly braces will be executed but won’t be written to the response. In the listing, you’re setting the title of the page by writing a key to the ViewData dictionary, but you aren’t writing anything to the response at this point:

大括号之间的任何代码都将被执行,但不会写入响应。在清单中,您通过向 ViewData 字典写入一个键来设置页面的标题 ,但此时您没有向响应写入任何内容:

@{
    ViewData["Title"] = "Privacy Policy";
}

Another feature shown in this template is that you can dynamically write C# variables and expressions to the HTML stream using the @ symbol. This ability to combine dynamic and static markup is what gives Razor Pages their power. In the example, you’re fetching the "Title" value from the ViewData dictionary and writing the values to the response inside an <h1> tag:

此模板中显示的另一个功能是,您可以使用 @ 符号将 C# 变量和表达式动态写入 HTML 流 。这种结合动态和静态标记的能力赋予了 Razor Pages 强大的功能。在此示例中,您将从 ViewData 字典中提取 “Title” 值,并将该值写入 <h1> 标签内的响应:

<h1>@ViewData["Title"]</h1>

At this point, you might be a little confused by the template in listing 13.3 when it’s compared with the output shown in figure 13.3. The title and the static HTML content appear in both the listing and figure, but some parts of the final web page don’t appear in the template. How can that be?

此时,当与图 13.3 中所示的输出进行比较时,您可能会对清单 13.3 中的模板感到困惑。标题和静态 HTML 内容同时显示在列表和图中,但最终网页的某些部分不会显示在模板中。这怎么可能呢?

Razor Pages have the concept of layouts, which are base templates that define the common elements of your application, such as headers and footers. The HTML of the layout combines with the Razor Page template to produce the final HTML that’s sent to the browser. Layouts prevent you from having to duplicate code for the header and footer in every page, and mean that if you need to tweak something, you’ll need to do it in only one place.

Razor Pages 具有布局的概念,布局是定义应用程序的常见元素(如页眉和页脚)的基本模板。布局的 HTML 与 Razor Page 模板相结合,以生成发送到浏览器的最终 HTML。布局可以防止你为每个页面的页眉和页脚重复代码,这意味着如果你需要调整某些内容,只需在一个地方进行。

Note I cover Razor templates, including layouts, in detail in chapter 17. You can find layouts in the Pages/Shared folder of your project.
注意 我在第 17 章中详细介绍了 Razor 模板,包括布局。您可以在项目的 Pages/Shared 文件夹中找到布局。

As you’ve already seen, you can include C# code in your Razor Pages by using curly braces @{ }, but generally speaking, you’ll want to limit the code in your .cshtml file to presentational concerns only. Complex logic, code to access services such as a database, and data manipulation should be handled in the PageModel instead.

如你所见,你可以使用大括号 @{ } 在 Razor Pages 中包含 C# 代码,但一般来说,你需要将 .cshtml 文件中的代码限制为仅表示性问题。复杂的逻辑、访问服务(如数据库)的代码以及数据作应该在 PageModel 中处理。

13.1.4 Handling request logic with page models and handlers

13.1.4 使用页面模型和处理程序处理请求逻辑

As you’ve already seen, the @page directive in a .cshtml file marks the page as a Razor Page, but most Razor Pages also have an associated page model. By convention, this page model is placed in a file commonly known as a code-behind file that has a .cs extension, as you saw in figure 13.5. Page models should derive from the PageModel base class, and they typically contain one or more methods called page handlers that define how to handle requests to the Razor Page.

如你所见,.cshtml 文件中的 @page 指令将页面标记为 Razor 页面,但大多数 Razor 页面也有关联的页面模型。按照惯例,此页面模型被放置在一个通常称为代码隐藏文件的文件中,该文件具有 .cs 扩展名,如图 13.5 所示。页面模型应派生自 PageModel 基类,并且它们通常包含一个或多个称为 page 的方法定义如何处理对 Razor Page 的请求的处理程序。

Definition A page handler is the Razor Pages equivalent of a minimal API endpoint handler; it’s a method that runs in response to a request. Razor Page models must be derived from the PageModel class. They can contain multiple page handlers, though typically they contain only one or two.
定义 页面处理程序相当于最小 API 端点处理程序的 Razor Pages;它是为响应请求而运行的方法。Razor Page 模型必须派生自 PageModel 类。它们可以包含多个页面处理程序,但通常只包含一个或两个。

The following listing shows the page model for the Privacy.cshtml Razor Page, located in the file Privacy.cshtml.cs.

以下列表显示了位于文件 Privacy.cshtml.cs 中的 Privacy.cshtml Razor 页面的页面模型。

Listing 13.4 The PrivacyModel in Privacy.cshtml.cs: A Razor Page page model
清单 13.4 Privacy.cshtml.cs中的 PrivacyModel:一个Razor 页面模型

public class PrivacyModel: PageModel        ❶
{
    private readonly ILogger<PrivacyModel> _logger;      ❷ 
    public PrivacyModel(ILogger<PrivacyModel> logger)    ❷ 
    {                                                    ❷ 
        _logger = logger;                                ❷ 
    }                                                    ❷ 

  public void OnGet()      ❸ 
    {
    }
}

❶ Razor Pages must inherit from PageModel.
Razor Pages 必须继承自 PageModel。
❷ You can use dependency injection to provide services in the constructor.
您可以使用依赖注入在构造函数中提供服务。
❸ The default page handler is OnGet. Returning void indicates HTML should be generated.
默认页面处理程序为 OnGet。返回 void 表示应生成 HTML。

This page model is extremely simple, but it demonstrates a couple of important points:
此页面模型非常简单,但它演示了几个要点:

  • Page handlers are driven by convention.
    页面处理程序由约定驱动。

  • Page models can use dependency injection (DI) to interact with other services.
    页面模型可以使用依赖关系注入 (DI) 与其他服务进行交互。

Page handlers are typically named by convention, based on the HTTP verb they respond to. They return either void, indicating that the Razor
Page’s template should be rendered, or an IActionResult that contains other instructions for generating the response, such as redirecting the user to a different page.

页面处理程序通常根据它们响应的 HTTP 动词按约定命名。它们返回 void(指示应呈现 Razor 页面的模板)或 IActionResult(包含用于生成响应的其他说明,例如将用户重定向到其他页面)。

The PrivacyModel contains a single handler, OnGet, which indicates that it should run in response to GET requests for the page. As the method returns void, executing the handler executes the associated Razor template for the page to generate the HTML.

PrivacyModel 包含一个处理程序 OnGet,它指示它应该运行以响应页面的 GET 请求。当该方法返回 void 时,执行处理程序将执行页面的关联 Razor 模板以生成 HTML。

Note Razor Pages are focused on building page-based apps, so you typically want to return HTML rather than JSON or XML. You can also use an IActionResult to return any sort of data, to redirect users to a new page, or to send an error. You’ll learn more about IActionResults in chapter 15.
注意 Razor Pages 专注于构建基于页面的应用,因此你通常需要返回 HTML,而不是 JSON 或 XML。您还可以使用 IActionResult 返回任何类型的数据、将用户重定向到新页面或发送错误。您将在第 15 章中了解有关 IActionResult的更多信息。

DI is used to inject an ILogger<PrivacyModel> instance into the constructor of the page model the same way you would inject a service into a minimal API endpoint handler. The service is unused in this example, but you’ll learn all about ILogger in chapter 26.

DI 用于将 ILogger<PrivacyModel> 实例注入页面模型的构造函数中,就像将服务注入最小 API 终端节点处理程序中一样。在此示例中,该服务未使用,但您将在第 26 章中了解有关 ILogger 的所有信息。

Clearly, the PrivacyModel page model doesn’t do much in this case, and you may be wondering why it’s worth having. If all page models do is tell the Razor Page to generate HTML, why do we need them at all?

显然,在这种情况下,PrivacyModel 页面模型的作用不大,您可能想知道为什么值得拥有它。如果所有页面模型都只是告诉 Razor 页面生成 HTML,那么我们为什么还需要它们呢?

The key thing to remember here is that now you have a framework for performing arbitrarily complex functions in response to a request. You could easily update the handler method to load data from the database, send an email, add a product to a basket, or create an invoice—all in response to a simple HTTP request. This extensibility is where a lot of the power in Razor Pages (and the MVC pattern in general) lies.

这里要记住的关键是,现在你有一个框架来执行任意复杂的功能以响应请求。您可以轻松更新处理程序方法,以从数据库加载数据、发送电子邮件、将产品添加到购物篮或创建发票 - 所有这些都是为了响应简单的 HTTP 请求。这种可扩展性是 Razor Pages(以及一般的 MVC 模式)中许多功能所在。

The other important point is that you’ve separated the execution of these methods from the generation of the HTML. If the logic changes, and you need to add behavior to a page handler, you don’t need to touch the HTML generation code, so you’re less likely to introduce bugs. Conversely, if you need to change the UI slightly (change the color of the title, for example), your handler method logic is safe.

另一个重要的一点是,您已经将这些方法的执行与 HTML 的生成分开。如果逻辑发生变化,并且您需要向页面处理程序添加行为,则无需接触 HTML 生成代码,因此不太可能引入错误。相反,如果您需要稍微更改 UI(例如,更改标题的颜色),则处理程序方法逻辑是安全的。

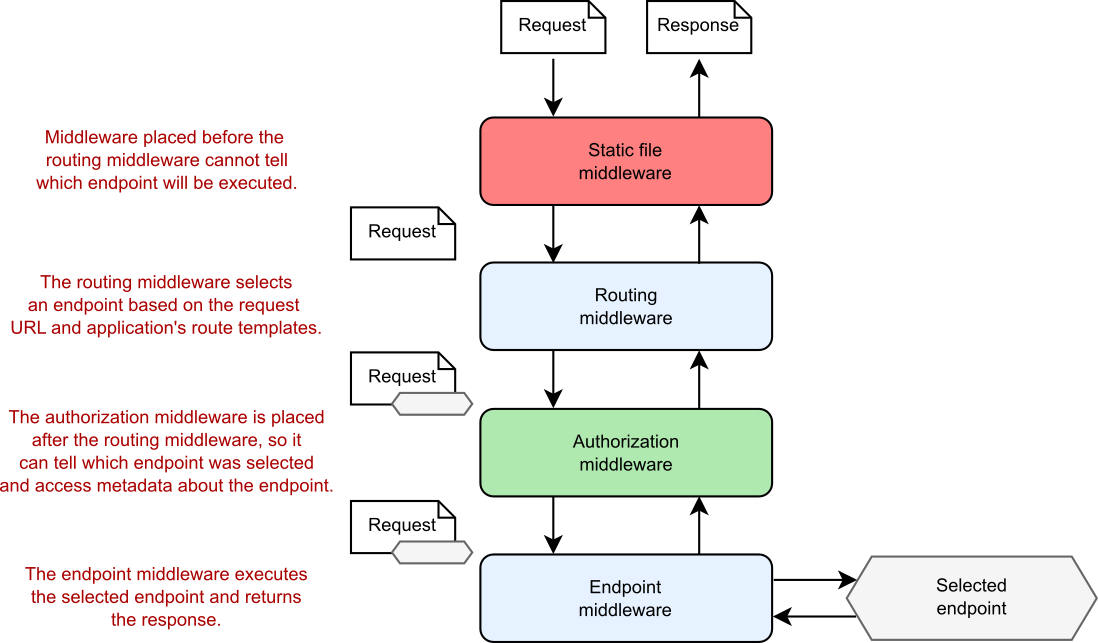
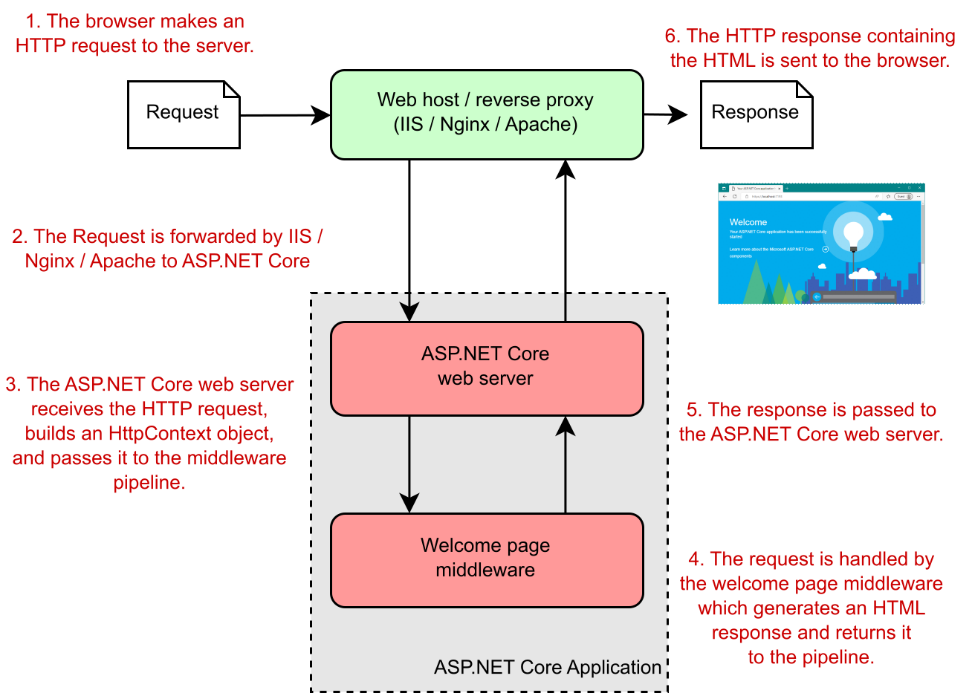
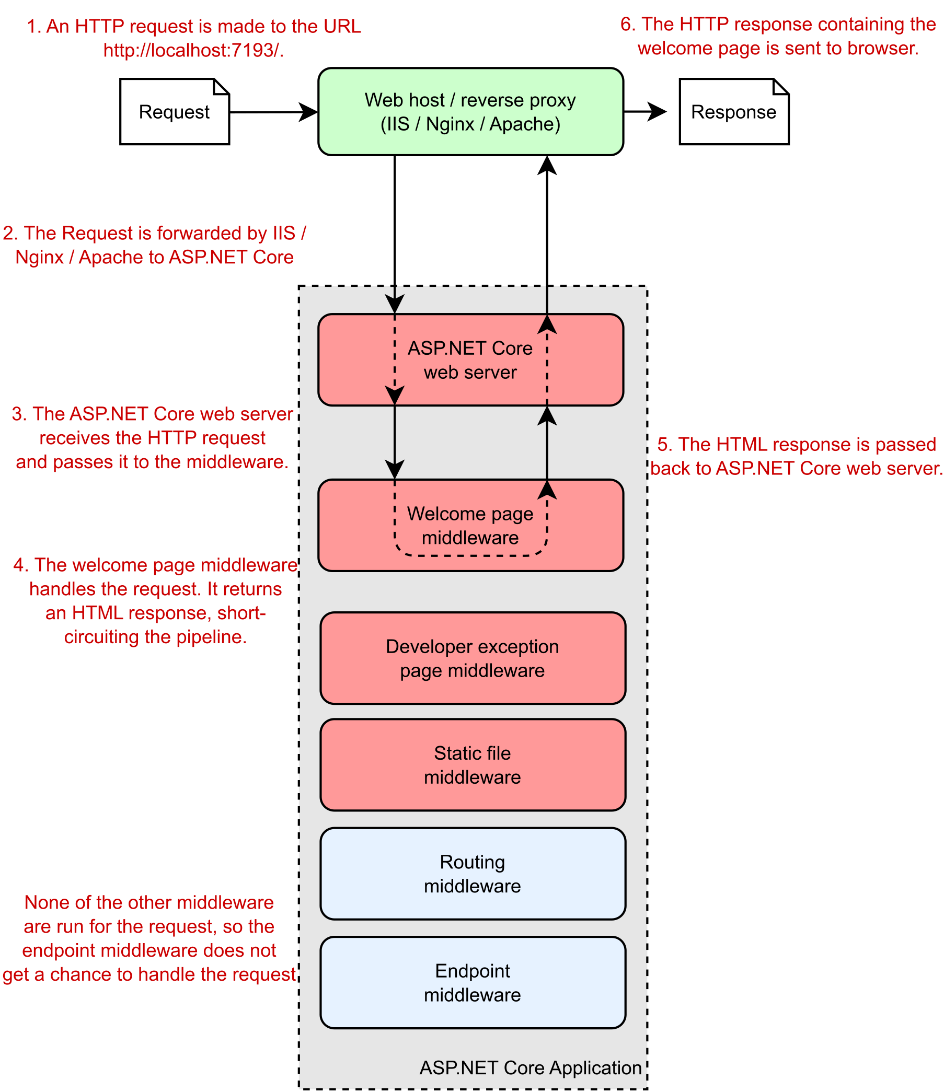
And there you have it—a complete ASP.NET Core Razor Pages application! Before we move on, let’s take one last look at how your application handles a request. Figure 13.6 shows a request to the /Privacy path being handled by the sample application. You’ve seen everything here already, so the process of handling a request should be familiar. The figure shows how the request passes through the middleware pipeline before being handled by the endpoint middleware. The Privacy.cshtml Razor Page executes the OnGet handler and generates the HTML response, which passes back through the middleware to the ASP.NET Core web server before being sent to the user’s browser.

这就是一个完整的 ASP.NET Core Razor Pages 应用程序!在继续之前,让我们最后看看您的应用程序如何处理请求。图 13.6 显示了对示例应用程序正在处理的 /Privacy 路径的请求。您已经在这里看到了所有内容,因此处理请求的过程应该很熟悉。该图显示了请求在由终端节点中间件处理之前如何通过中间件管道。Privacy.cshtml Razor 页面执行 OnGet 处理程序并生成 HTML 响应,该响应传回通过中间件发送到 ASP.NET Core Web 服务器,然后再发送到用户的浏览器。

alt text

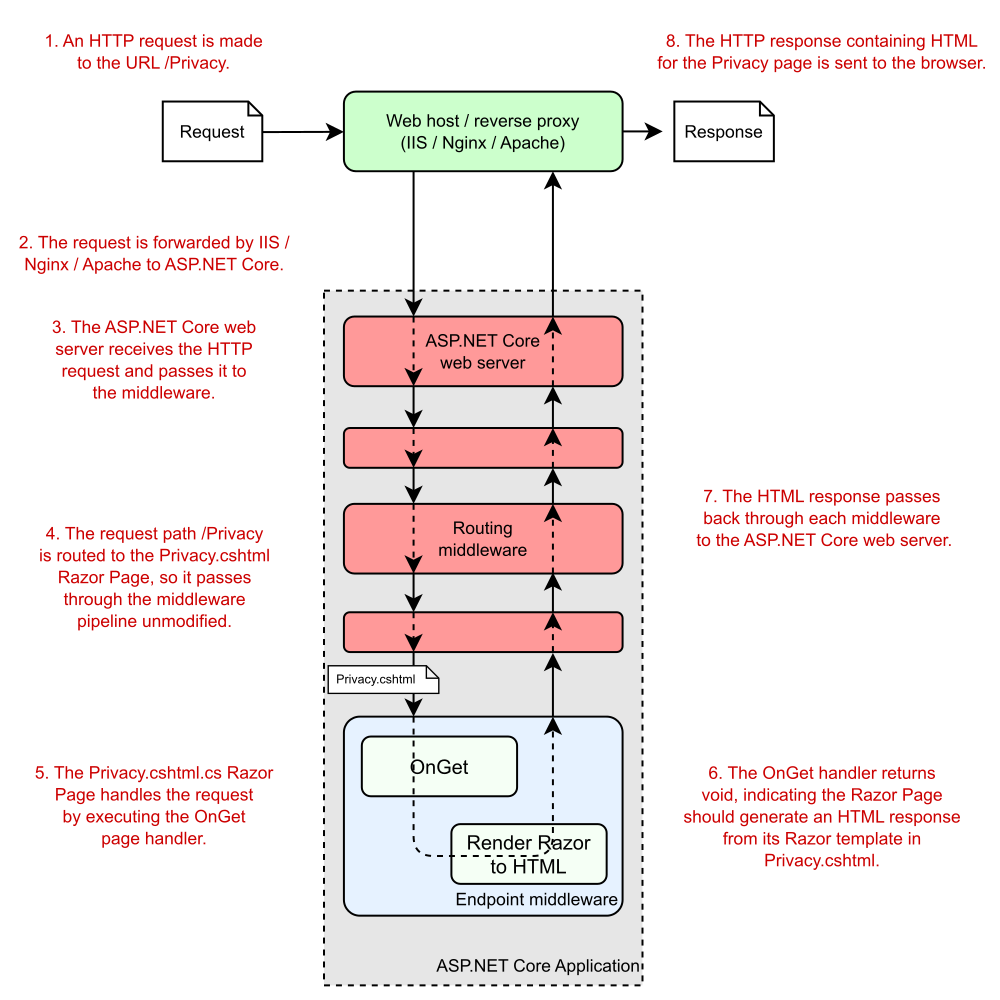
Figure 13.6 An overview of a request to the /Privacy URL for the sample ASP.NET Razor Pages application. The routing middleware routes the request to the OnGet handler of the Privacy.cshtml.cs Razor Page. The Razor Page generates an HTML response by executing the Razor template in Privacy.cshtml and passes the response back through the middleware pipeline to the browser.
图 13.6 对示例 ASP.NET Razor Pages 应用程序的 /Privacy URL 的请求概述。路由中间件将请求路由到 Privacy.cshtml.cs Razor Page 的 OnGet 处理程序。Razor 页面通过在 Privacy.cshtml 中执行 Razor 模板来生成 HTML 响应,并通过中间件管道将响应传回浏览器。

We’ve reached the end of this section working through the template, so you have a good overview of how an entire Razor Pages application is configured and how it handles a request using Razor Pages. In section 13.2 we take the basic Razor Pages in the default template a bit further, looking at a more complex example.

我们已完成本部分的末尾,逐步了解了模板的配置方式,以及它如何使用 Razor Pages 处理请求。在第 13.2 节中,我们将默认模板中的基本 Razor Pages 进一步介绍,并查看更复杂的示例。

13.2 Exploring a typical Razor Page

13.2 探索典型的 Razor 页面

The Razor Pages programming model was introduced in ASP.NET Core 2.0 as a way to build server-side rendered page-based websites. It builds on top of the ASP.NET Core infrastructure to provide a streamlined experience, using conventions where possible to reduce the amount of boilerplate code and configuration required. In this section we’ll look at a more complex page model to better understand the overall design of Razor Pages.

Razor Pages 编程模型是在 ASP.NET Core 2.0 中引入的,作为构建服务器端呈现的基于页面的网站的一种方式。它建立在 ASP.NET Core 基础设施之上,以提供简化的体验,并尽可能使用约定来减少所需的样板代码和配置的数量。本节内容我们将查看更复杂的页面模型,以更好地了解 Razor Pages 的整体设计。

In listing 13.4 you saw a simple Razor Page that didn’t contain any logic; instead, it only rendered the associated Razor view. This pattern may be common if you’re building a content-heavy marketing website, for example, but more commonly your Razor Pages will contain some logic, load data from a database, or use forms to allow users to submit information.

在清单 13.4 中,你看到了一个简单的 Razor 页面,它不包含任何逻辑;相反,它只呈现关联的 Razor 视图。例如,如果您正在构建内容繁重的营销网站,则此模式可能很常见,但更常见的是,您的 Razor 页面将包含一些逻辑、从数据库加载数据或使用表单来允许用户提交信息。

To give you more of a flavor of how typical Razor Pages work, in this section we look briefly at a slightly more complex Razor Page. This page is taken from a to-do list application and is used to display all the to-do items for a given category. We’re not focusing on the HTML generation at this point, so the following listing shows only the PageModel code-behind file for the Razor Page.

为了让您更深入地了解典型的 Razor 页面的工作原理,在本节中,我们将简要介绍一个稍微复杂一些的 Razor 页面。此页面取自待办事项列表应用程序,用于显示给定类别的所有待办事项。目前,我们不关注 HTML 生成,因此下面的清单仅显示 Razor Page 的 PageModel 代码隐藏文件。

Listing 13.5 A Razor Page for viewing all to-do items in a given category
清单 13.5 用于查看所有待办事项的 Razor 页面在给定类别中

public class CategoryModel : PageModel
{
    private readonly ToDoService _service;       ❶
    public CategoryModel(ToDoService service)    ❶
    {
        _service = service;
    }

    public ActionResult OnGet(string category)    ❷
    {
        Items = _service.GetItemsForCategory(category);     ❸
        return Page();     ❹
    }

    public List<ToDoListModel> Items { get; set; }    ❺
}

❶ The ToDoService is provided in the model constructor using DI.
ToDoService 是使用 DI 在模型构造函数中提供的。
❷ The OnGet handler takes a parameter, category.
OnGet 处理程序采用参数 category。
❸ The handler calls out to the ToDoService to retrieve data and sets the Items property.
处理程序调用 ToDoService 以检索数据并设置 Items 属性。
❹ Returns a PageResult indicating the Razor view should be rendered
返回一个 PageResult,指示应呈现 Razor 视图
❺ The Razor View can access the Items property when it’s rendered.
Razor 视图在呈现时可以访问 Items 属性。

This example is still relatively simple, but it demonstrates a variety of features compared with the basic example from listing 13.4:
这个例子仍然相对简单,但与 清单 13.4 中的基本例子相比,它演示了各种特性:

  • The page handler, OnGet, accepts a method parameter, category. This parameter is automatically populated using values from the incoming request via model binding, similar to the way binding works with minimal APIs. I discuss Razor Pages model binding in detail in chapter 16.
    页面处理程序 OnGet 接受方法参数 category。此参数通过模型绑定使用传入请求中的值自动填充,类似于绑定使用最小 API 的方式。我在第 16 章中详细讨论了 Razor Pages 模型绑定。

  • The handler doesn’t interact with the database directly. Instead, it uses the category value provided to interact with the ToDoService, which is injected as a constructor argument using DI.
    处理程序不直接与数据库交互。相反,它使用提供的 category 值与 ToDoService 交互,后者使用 DI 作为构造函数参数注入。

  • The handler returns Page() at the end of the method to indicate that the associated Razor view should be rendered. The return statement is optional in this case; by convention, if the page handler is a void method, the Razor view will still be rendered, behaving as though you called return Page() at the end of the method.
    处理程序在方法末尾返回 Page(),以指示应呈现关联的 Razor 视图。在这种情况下,return 语句是可选的;按照约定,如果页面处理程序是 void 方法,则仍将呈现 Razor 视图,其行为就像在方法末尾调用 return Page() 一样。

  • The Razor View has access to the CategoryModel instance, so it can access the Items property that’s set by the handler. It uses these items to build the HTML that is ultimately sent to the user.
    Razor 视图有权访问 CategoryModel 实例,因此它可以访问处理程序设置的 Items 属性。它使用这些项来构建最终发送给用户的 HTML。‌

The pattern of interactions in the Razor Page of listing 13.5 shows a common pattern. The page handler is the central controller for the Razor Page. It receives an input from the user (the category method parameter); calls out to the “brains” of the application (the ToDoService); and passes data (by exposing the Items property) to the Razor view, which generates the HTML response. If you squint, this pattern looks like the MVC design pattern.

清单 13.5 的 Razor Page 中的交互模式显示了一种常见模式。页面处理程序是 Razor Page 的中央控制器。它接收来自用户的输入(category 方法参数);调用应用程序的“大脑”(ToDoService);并将数据(通过公开 Items 属性)传递到 Razor 视图,后者会生成 HTML 响应。如果您眯着眼睛看,此模式看起来类似于 MVC 设计模式。

Depending on your background in software development, you may have come across the MVC pattern in some form. In web development, MVC is a common paradigm, used in frameworks such as Django, Rails, and Spring MVC. But as it’s such a broad concept, you can find MVC in everything from mobile apps to rich-client desktop applications. I hope that indicates the benefits of the pattern when it’s used correctly! In section 13.3 we’ll look at the MVC pattern in general and how ASP.NET Core uses it.

根据你的软件开发背景,你可能遇到过某种形式的 MVC 模式。在 Web 开发中,MVC 是一种常见的范式,用于 Django、Rails 和 Spring MVC 等框架。但是,由于 MVC 是一个如此广泛的概念,因此您可以在从移动应用程序到富客户端桌面应用程序的所有应用程序中找到 MVC。我希望这表明正确使用该模式的好处!在 Section 13.3 中,我们将大致了解 MVC 模式以及 ASP.NET Core 如何使用它。

13.3 Understanding the MVC design pattern

13.3 了解 MVC 设计模式

The MVC design pattern is a common pattern for designing apps that have UIs. The MVC pattern has many interpretations, each of which focuses on a slightly different aspect of the pattern. The original MVC design pattern was specified with rich-client graphical user interface (GUI) apps in mind, rather than web applications, so it uses terminology and paradigms associated with a GUI environment. Fundamentally, though, the pattern aims to separate the management and manipulation of data from its visual representation.

MVC 设计模式是设计具有 UI 的应用程序的常见模式。MVC 模式有多种解释,每种解释都侧重于模式的一个略有不同的方面。最初的 MVC 设计模式在指定时考虑了富客户端图形用户界面 (GUI) 应用程序,而不是 Web 应用程序,因此它使用了与 GUI 环境相关的术语和范例。不过,从根本上说,该模式旨在将数据的管理和作与其视觉表示分开。

Before I dive too far into the design pattern itself, let’s consider a typical Razor Pages request. Imagine that a user requests the Razor Page from listing 13.5 that displays a to-do list category. Figure 13.7 shows how a Razor Page handles different aspects of a request, all of which combine to generate the final response.

在深入研究设计模式本身之前,让我们考虑一个典型的 Razor Pages 请求。假设用户从显示待办事项列表类别的清单 13.5 中请求 Razor 页面。图 13.7 显示了 Razor Page 如何处理请求的不同方面,所有这些方面结合起来生成最终响应。

alt text

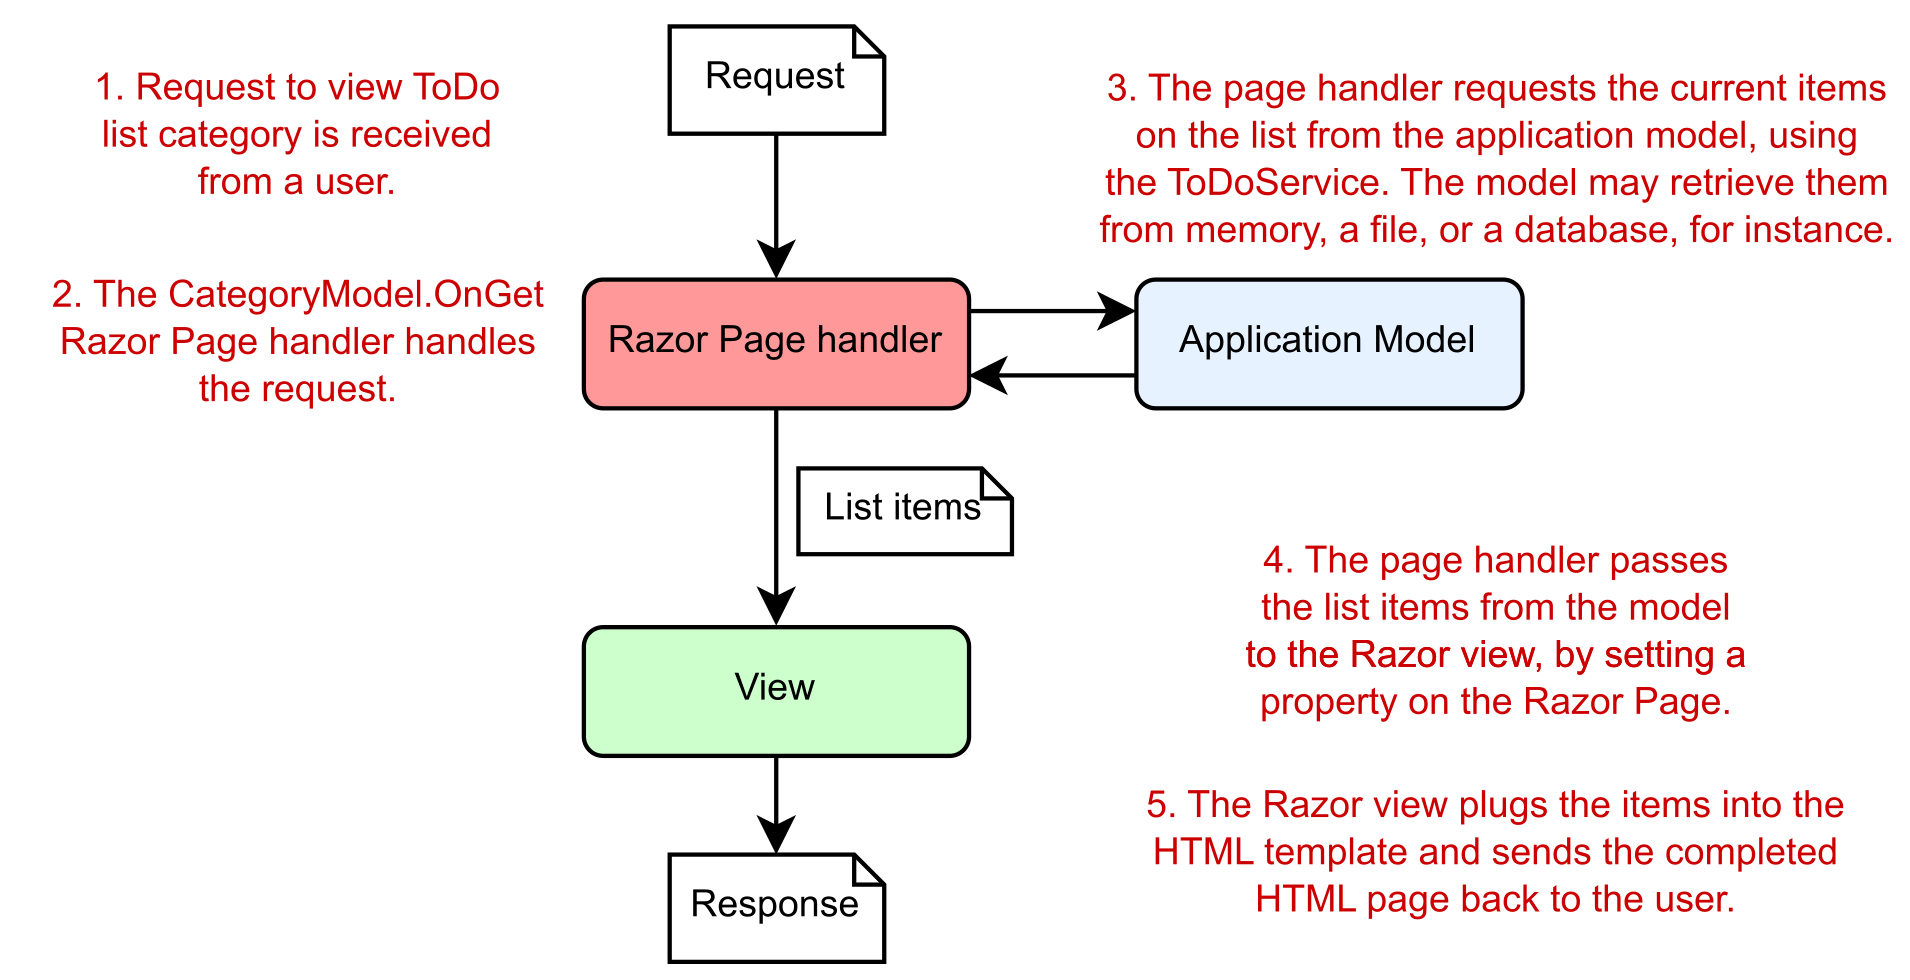
Figure 13.7 Requesting a to-do list page for a Razor Pages application. A different component handles each aspect of the request.
图 13.7 请求 Razor Pages 应用程序的待办事项列表页面。不同的组件处理请求的每个方面。

In general, three components make up the MVC design pattern:

通常,MVC 设计模式由三个组件组成:

  • Model—The data that needs to be displayed—the global state of the application. It’s accessed via the ToDoService in listing 13.5.
    Model (模型) - 需要显示的数据 - 应用程序的全局状态。它可以通过清单 13.5 中的 ToDoService 访问。

  • View—The template that displays the data provided by the model.
    View (视图) - 显示模型提供的数据的模板。

  • Controller—Updates the model and provides the data for display to the view. This role is taken by the page handler in Razor Pages—the OnGet method in listing 13.5.
    Controller (控制器) - 更新模型并提供数据以显示在视图中。此角色由 Razor Pages 中的页面处理程序(列表 13.5 中的 OnGet 方法)担任。

Each component of the MVC design pattern is responsible for a single aspect of the overall system, which, when combined, generates a UI. The to-do list example considers MVC in terms of a web application using Razor Pages, but a generalized request could be equivalent to the click of a button in a desktop GUI application.

MVC 设计模式的每个组件都负责整个系统的一个方面,当这些方面组合在一起时,将生成一个 UI。待办事项列表示例从使用 Razor Pages 的 Web 应用程序的角度考虑 MVC,但通用请求可能等效于单击桌面 GUI 应用程序中的按钮。

In general, the order of events when an application responds to a user interaction or request is as follows:

通常,应用程序响应用户交互或请求时的事件顺序如下:

  1. The controller (the Razor Page handler) receives the request.
    控制器 (Razor Page 处理程序) 接收请求。

  2. Depending on the request, the controller either fetches the requested data from the application model using injected services or updates the data that makes up the model.
    根据请求,控制器要么使用注入的服务从应用程序模型中获取请求的数据,要么更新构成模型的数据。

  3. The controller selects a view to display and passes a representation of the model (the view model) to it.
    控制器选择要显示的视图,并将模型的表示 (视图模型) 传递给该视图。

  4. The view uses the data contained in the model to generate the UI.
    该视图使用模型中包含的数据来生成 UI。

When we describe MVC in this format, the controller (the Razor Page handler) serves as the entry point for the interaction. The user communicates with the controller to instigate an interaction. In web applications, this interaction takes the form of an HTTP request, so when a request to a URL is received, the controller handles it.

当我们以这种格式描述 MVC 时,控制器(Razor Page 处理程序)将用作交互的入口点。用户与控制器通信以引发交互。在 Web 应用程序中,此交互采用 HTTP 请求的形式,因此当收到对 URL 的请求时,控制器会对其进行处理。

Depending on the nature of the request, the controller may take a variety of actions, but the key point is that the actions are undertaken using the application model. The model here contains all the business logic for the application, so it’s able to provide requested data or perform actions.

根据请求的性质,控制器可能会采取各种作,但关键是这些作是使用应用程序模型执行的。此处的模型包含应用程序的所有业务逻辑,因此它能够提供请求的数据或执行作。

Note In this description of MVC, the model is considered to be a complex beast, containing all the logic for how to perform an action, as well as any internal state. The Razor Page PageModel class is not the model we’re talking about! Unfortunately, as in all software development, naming things is hard.
注意 在 MVC 的这个描述中,模型被认为是一个复杂的野兽,包含如何执行作的所有逻辑,以及任何内部状态。Razor Page PageModel 类不是我们正在谈论的模型!不幸的是,就像在所有软件开发中一样,命名事物是困难的。

Consider a request to view a product page for an e-commerce application. The controller would receive the request and know how to contact some product service that’s part of the application model. This service might fetch the details of the requested product from a database and return them to the controller.

考虑查看电子商务应用程序的产品页面的请求。控制器将收到请求并知道如何联系属于应用程序模型的某些产品服务。此服务可能会从数据库中获取所请求产品的详细信息,并将其返回给控制器。

Alternatively, imagine that a controller receives a request to add a product to the user’s shopping cart. The controller would receive the request and most likely would invoke a method on the model to request that the product be added. Then the model would update its internal representation of the user’s cart, by adding (for example) a new row to a database table holding the user’s data.

或者,假设控制器收到将产品添加到用户购物车的请求。控制器将收到请求,并且很可能会调用模型上的方法以请求添加产品。然后,该模型将更新其用户购物车的内部表示,方法是向包含用户数据的数据库表添加新行(例如)。

Tip You can think of each Razor Page handler as being a mini controller focused on a single page. Every web request is another independent call to a controller that orchestrates the response. Although there are many controllers, all the handlers interact with the same application model.
提示 您可以将每个 Razor Page 处理程序视为一个专注于单个页面的迷你控制器。每个 Web 请求都是对编排响应的控制器的另一个独立调用。尽管有许多控制器,但所有处理程序都与相同的应用程序模型交互。

After the model has been updated, the controller needs to decide what response to generate. One of the advantages of using the MVC design pattern is that the model representing the application’s data is decoupled from the final representation of that data, called the view. The controller is responsible for deciding whether the response should generate an HTML view, whether it should send the user to a new page, or whether it should return an error page.

更新模型后,控制器需要决定要生成什么响应。使用 MVC 设计模式的一个优点是,表示应用程序数据的模型与该数据的最终表示形式(称为视图)分离。控制器负责决定响应是否应生成 HTML 视图,是否应将用户发送到新页面,或者是否应返回错误页面。

One of the advantages of the model’s being independent of the view is that it improves testability. UI code is classically hard to test, as it’s dependent on the environment; anyone who has written UI tests simulating a user clicking buttons and typing in forms knows that it’s typically fragile. By keeping the model independent of the view, you can ensure that the model stays easily testable, without any dependencies on UI constructs. As the model often contains your application’s business logic, this is clearly a good thing!

模型独立于视图的优点之一是它提高了可测试性。UI 代码通常很难测试,因为它依赖于环境;任何编写过模拟用户单击按钮和在表单中键入的 UI 测试的人都知道,它通常是脆弱的。通过使模型独立于视图,您可以确保模型易于测试,而不依赖于 UI 构造。由于该模型通常包含应用程序的业务逻辑,这显然是一件好事!

The view can use the data passed to it by the controller to generate the appropriate HTML response. The view is responsible only for generating the final representation of the data; it’s not involved in any of the business logic.

视图可以使用控制器传递给它的数据来生成适当的 HTML 响应。视图仅负责生成数据的最终表示形式;它不涉及任何业务逻辑。

This is all there is to the MVC design pattern in relation to web applications. Much of the confusion related to MVC seems to stem from slightly different uses of the term for slightly different frameworks and types of applications. In section 13.4 I’ll show how the ASP.NET Core framework uses the MVC pattern with Razor Pages, along with more examples of the pattern in action.

这就是 MVC 设计模式与 Web 应用程序相关的全部内容。许多与 MVC 相关的混淆似乎源于该术语对框架和应用程序类型的用法略有不同。在第 13.4 节中,我将展示 ASP.NET Core 框架如何将 MVC 模式与 Razor Pages 结合使用,以及该模式的更多实际示例。

13.4 Applying the MVC design pattern to Razor Pages

13.4 将 MVC 设计模式应用于 Razor Pages

In section 13.3 I discussed the MVC pattern as it’s typically used in web applications; Razor Pages use this pattern. But ASP.NET Core also includes a framework called ASP.NET Core MVC. This framework (unsurprisingly) closely mirrors the MVC design pattern, using controllers containing action methods in place of Razor Pages and page handlers. Razor Pages builds directly on top of the underlying ASP.NET Core MVC framework, using the MVC framework under the hood for their behavior.

在 Section 13.3 中,我讨论了 MVC 模式,因为它通常用于 Web 应用程序;Razor Pages 使用此模式。但 ASP.NET Core 还包括一个名为 ASP.NET Core MVC 的框架。此框架(不出所料)与 MVC 设计模式紧密镜像,使用包含作方法的控制器来代替 Razor Pages 和页面处理程序。Razor Pages 直接构建在基础 ASP.NET Core MVC 框架之上,并在后台使用 MVC 框架来实现其行为。

If you prefer, you can avoid Razor Pages and work with the MVC framework directly in ASP.NET Core. This option was the only one in early versions of ASP.NET Core and the previous version of ASP.NET.

如果愿意,可以避免使用 Razor Pages,直接在 ASP.NET Core 中使用 MVC 框架。此选项是 ASP.NET Core 早期版本和 ASP.NET 早期版本中的唯一选项。

Tip I look in greater depth at choosing between Razor Pages and the MVC framework in chapter 19.
提示 在第 19 章中,我将更深入地了解如何在 Razor Pages 和 MVC 框架之间进行选择。

In this section we look in greater depth at how the MVC design pattern applies to Razor Pages in ASP.NET Core. This section will also help clarify the role of various features of Razor Pages.

在本部分中,我们将更深入地了解 MVC 设计模式如何应用于 ASP.NET Core 中的 Razor 页面。这部分还将有助于阐明 Razor Pages 的各种功能的作用。

Do Razor Pages use MVC or MVVM?
Razor Pages 使用 MVC 还是 MVVM?
Occasionally, I’ve seen people describe Razor Pages as using the Model-View-View Model (MVVM) design pattern rather than the MVC design pattern. don’t agree, but it’s worth being aware of the differences.
有时,我看到人们将 Razor Pages 描述为使用模型-视图-视图模型 (MVVM) 设计模式,而不是 MVC 设计模式。我不同意,但值得意识到差异。
MVVM is a UI pattern that is often used in mobile apps, desktop apps, and some client-side frameworks. It differs from MVC in that there is a bidirectional interaction between the view and the view model. The view model tells the view what to display, but the view can also trigger changes directly on the view model. It’s often used with two-way data binding where a view model is bound to a view.
MVVM 是一种 UI 模式,通常用于移动应用程序、桌面应用程序和一些客户端框架。它与 MVC 的不同之处在于,视图和视图模型之间存在双向交互。视图模型告诉视图要显示什么,但视图也可以直接在视图模型上触发更改。它通常与双向数据绑定一起使用,其中视图模型绑定到视图。
Some people consider the Razor Pages PageModel to be filling this role, but I’m not convinced. Razor Pages definitely seems based on the MVC pattern to me (it’s based on the ASP.NET Core MVC framework after all!), and it doesn’t have the same two-way binding that I would expect with MVVM.
有些人认为 Razor Pages PageModel 正在扮演这个角色,但我不相信。在我看来,Razor Pages 绝对是基于 MVC 模式的(毕竟它基于 ASP.NET Core MVC 框架!),并且它没有我所期望的 MVVM 的双向绑定。

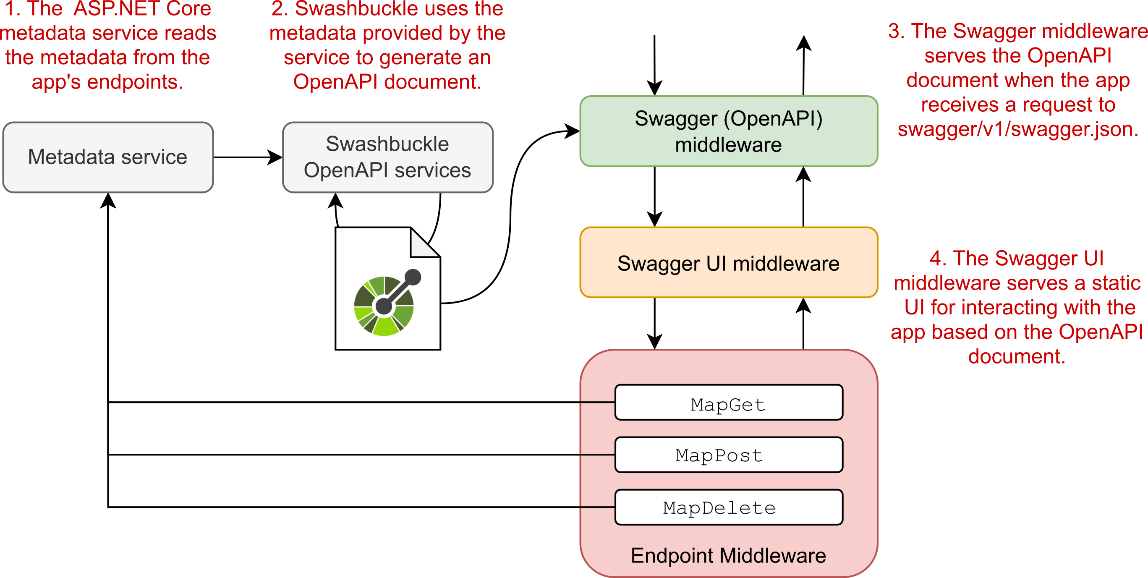
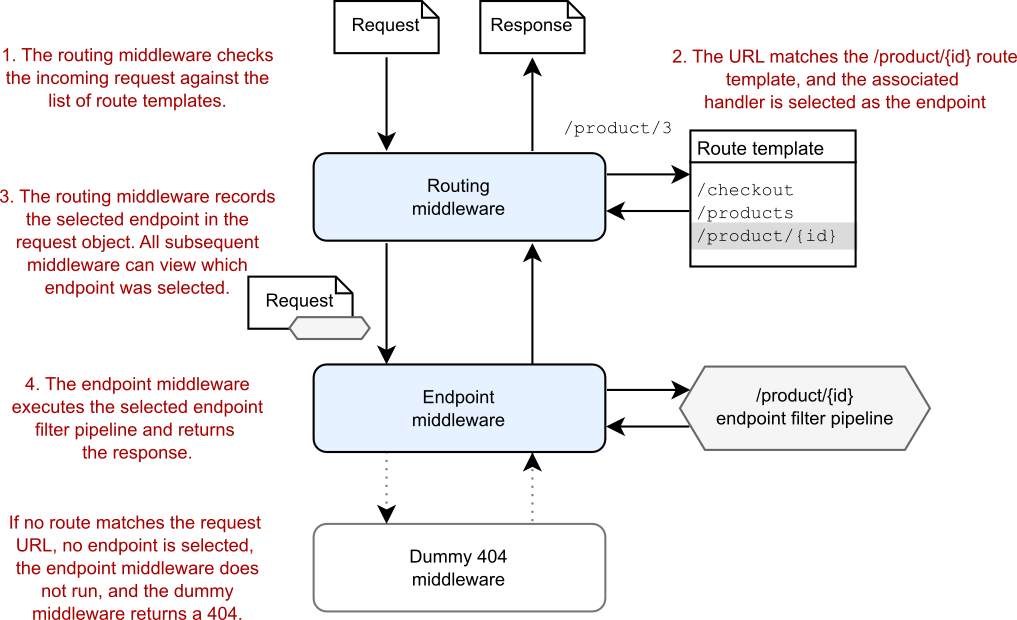
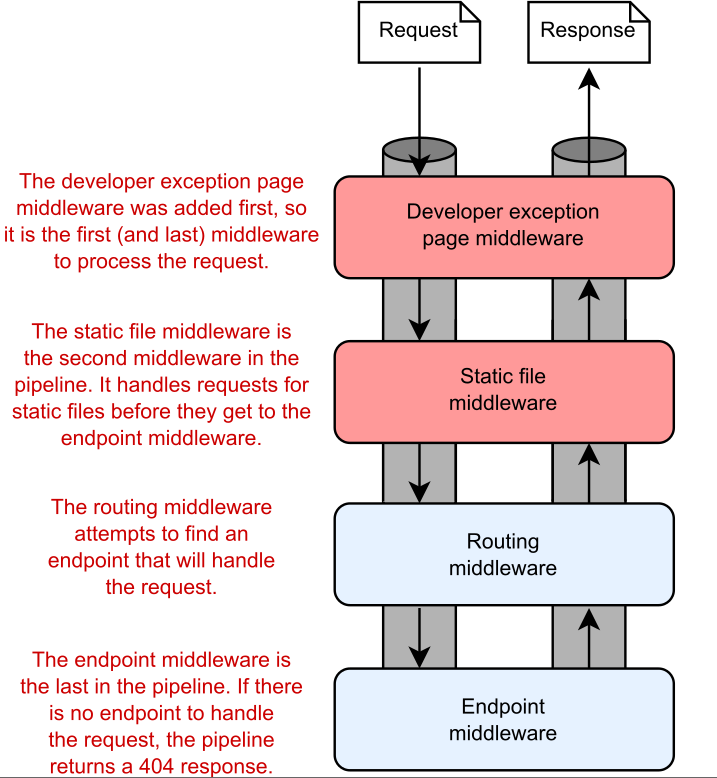
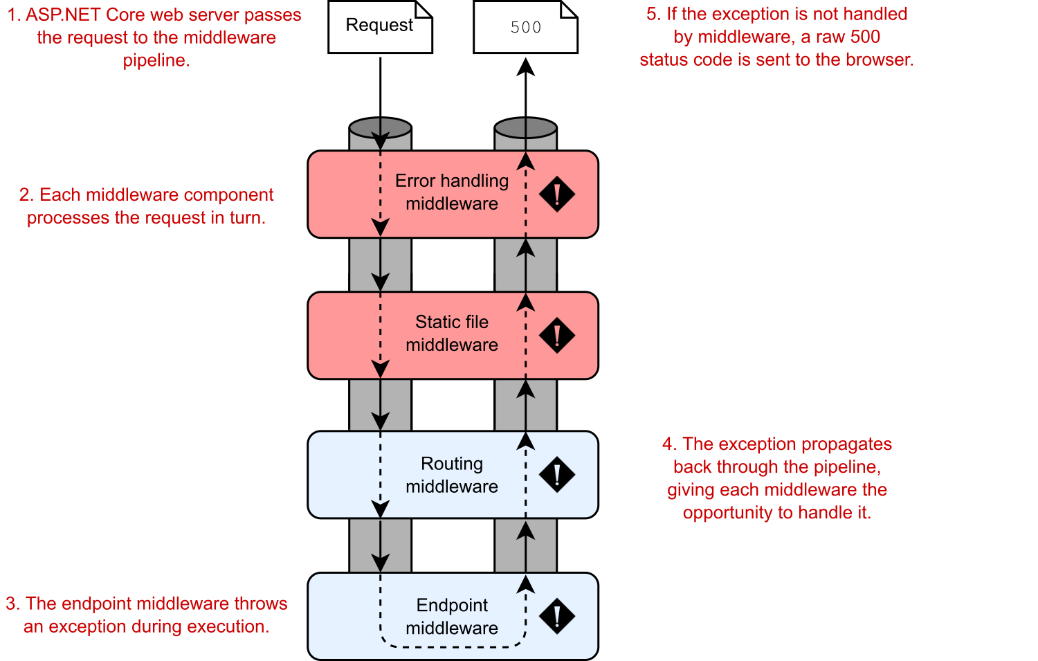
As you’ve seen in previous chapters, ASP.NET Core implements Razor Page endpoints using a combination of RoutingMiddleware and EndpointMiddleware, as shown in figure 13.8. When a request has been processed by earlier middleware (and assuming that none has handled the request and short-circuited the pipeline), the routing middleware selects which Razor Page handler should be executed, and the endpoint middleware executes the page handler.
如前几章所示,ASP.NET Core 使用 RoutingMiddleware 和 EndpointMiddleware 的组合实现 Razor Page 终结点,如图 13.8 所示。当请求由早期中间件处理时(并假设没有中间件处理请求并使管道短路),路由中间件将选择应执行哪个 Razor Page 处理程序,而终结点中间件将执行页面处理程序。

alt text

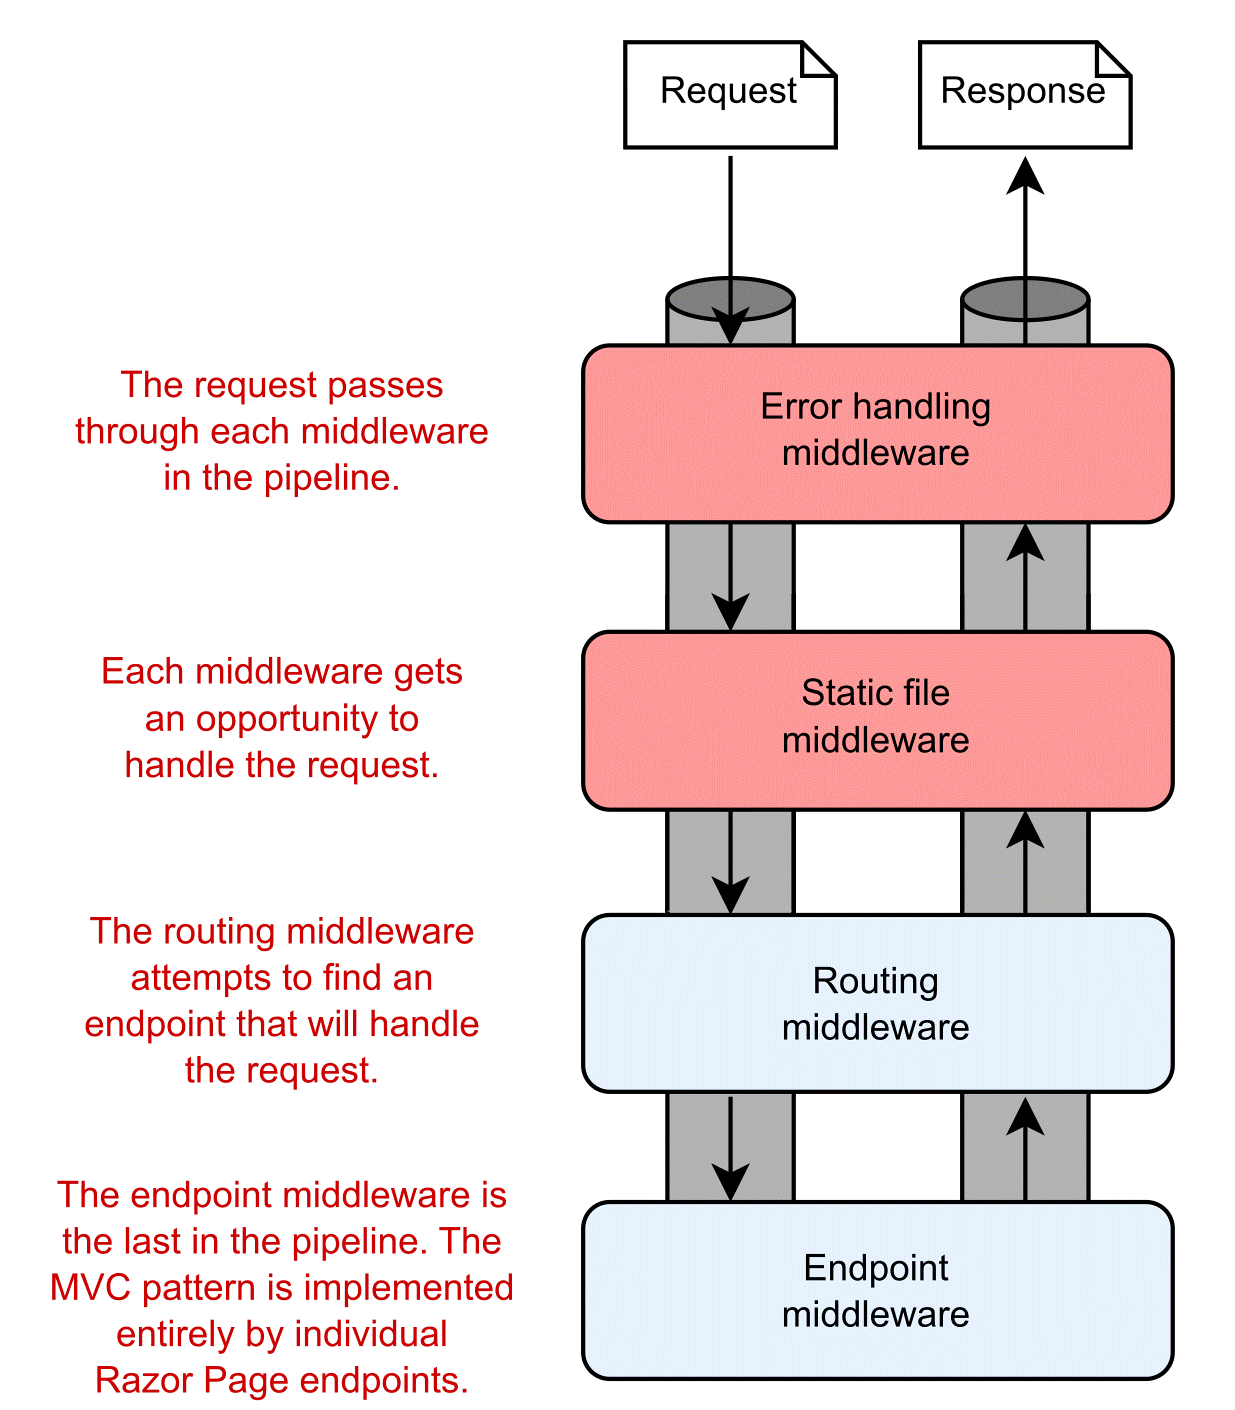
Figure 13.8 The middleware pipeline for a typical ASP.NET Core application. The request is processed by middleware in sequence. If the request reaches the routing middleware, the middleware selects an endpoint, such as a Razor Page, to execute. The endpoint middleware executes the selected endpoint.
图 13.8 典型 ASP.NET Core 应用程序的中间件管道。中间件会按顺序处理该请求。如果请求到达路由中间件,中间件会选择一个端点(例如 Razor Page)来执行。端点中间件执行选定的端点。

As you’ve seen in earlier chapters, middleware often handles cross-cutting concerns or narrowly defined requests, such as requests for files. For requirements that fall outside these functions or that have many external dependencies, a more robust framework is required. Razor Pages (and/or ASP.NET Core MVC) can provide this framework, allowing interaction with your application’s core business logic and the generation of a UI. It handles everything from mapping the request to an appropriate page handler (or controller action method) to generating the HTML response.

正如你在前面的章节中所看到的,中间件通常处理横切关注点或狭义定义的请求,比如文件请求。对于超出这些功能或具有许多外部依赖项的需求,需要更健壮的框架。Razor Pages(和/或 ASP.NET Core MVC)可以提供此框架,允许与应用程序的核心业务逻辑交互并生成 UI。它处理从将请求映射到适当的页面处理程序(或控制器作方法)到生成 HTML 响应的所有作。

In the traditional description of the MVC design pattern, there’s only a single type of model, which holds all the non-UI data and behavior. The controller updates this model as appropriate and then passes it to the view, which uses it to generate a UI.

在 MVC 设计模式的传统描述中,只有一种类型的模型,它包含所有非 UI 数据和行为。控制器会根据需要更新此模型,然后将其传递给视图,视图会使用它来生成 UI。

One of the problems when discussing MVC is the vague and ambiguous terms that it uses, such as controller and model. Model in particular is such an overloaded term that it’s often difficult to be sure exactly what it refers to; is it an object, a collection of objects, or an abstract concept? Even ASP.NET Core uses the word model to describe several related but different components, as you’ll see later in this chapter.

讨论 MVC 时的问题之一是它使用的术语模糊不清,例如 controller 和 model。特别是 Model 是一个超载的术语,以至于通常很难确定它到底指的是什么;它是一个对象、对象的集合还是一个抽象概念?Even ASP.NET Core 也使用单词 model 来描述几个相关但不同的组件,您将在本章后面看到。

13.4.1 Directing a request to a Razor Page and building a binding model

13.4.1 将请求定向到 Razor 页面并构建绑定模型

The first step when your app receives a request is routing the request to an appropriate Razor Page handler in the routing middleware. Let’s think again about the category to-do list page in listing 13.5. On that page, you’re displaying a list of items that have a given category label. If you’re looking at the list of items with a category of Simple, you’d make a request to the /category/Simple path.

应用收到请求时的第一步是将请求路由到路由中间件中的相应 Razor Page 处理程序。让我们再考虑一下清单 13.5 中的类别 to- do 列表页面。在该页面上,将显示具有给定类别标签的项目列表。如果您正在查看类别为 Simple 的项目列表,则需要向 /category/Simple 路径发出请求。

Routing maps a request URL, /category/Simple, against the route patterns registered with your application. You’ve seen how this process works for minimal APIs, and it’s the same for Razor Pages; each route template corresponds to a Razor Page endpoint. You’ll learn more about routing with Razor Pages in chapter 14.

路由将请求 URL /category/Simple 映射到应用程序中注册的路由模式。您已经了解了此过程如何适用于最小 API,对于 Razor Pages 也是如此;每个路由模板对应于一个 Razor Page 终结点。您将在第 14 章中了解有关使用 Razor Pages 进行路由的更多信息。

Tip I’m using the term Razor Page to refer to the combination of the Razor view and the PageModel that includes the page handler. Note that that PageModel class is not the model we’re referring to when describing the MVC pattern. It fulfills other roles, as you’ll see later in this section.
提示 我使用术语 Razor Page 来指代 Razor 视图和包含页面处理程序的 PageModel 的组合。请注意,PageModel 类不是我们在描述 MVC 模式时所指的模型。它履行其他角色,如本节后面所述。

When a page handler is selected in the routing middleware, the request continues down the middleware pipeline until it reaches the endpoint middleware, where the Razor Page executes.

在路由中间件中选择页面处理程序后,请求将继续沿中间件管道向下,直到到达执行 Razor Page 的终结点中间件。

First, the binding model (if applicable) is generated. This model is built from the incoming request, based on the properties of the PageModel marked for binding and the method parameters required by the page handler, as shown in figure 13.9. A binding model is normally one or more standard C# objects and works similarly to the way it works in minimal APIs, as you saw in chapter 6. We’ll look at Razor Page binding models in detail in chapter 16.

首先,生成绑定模型(如果适用)。此模型是根据传入请求构建的,基于标记为绑定的 PageModel 属性和页面处理程序所需的方法参数,如图 13.9 所示。绑定模型通常是一个或多个标准 C# 对象,其工作方式类似于它在最小 API 中的工作方式,如第 6 章所示。我们将在第 16 章中详细介绍 Razor Page 绑定模型。

alt text

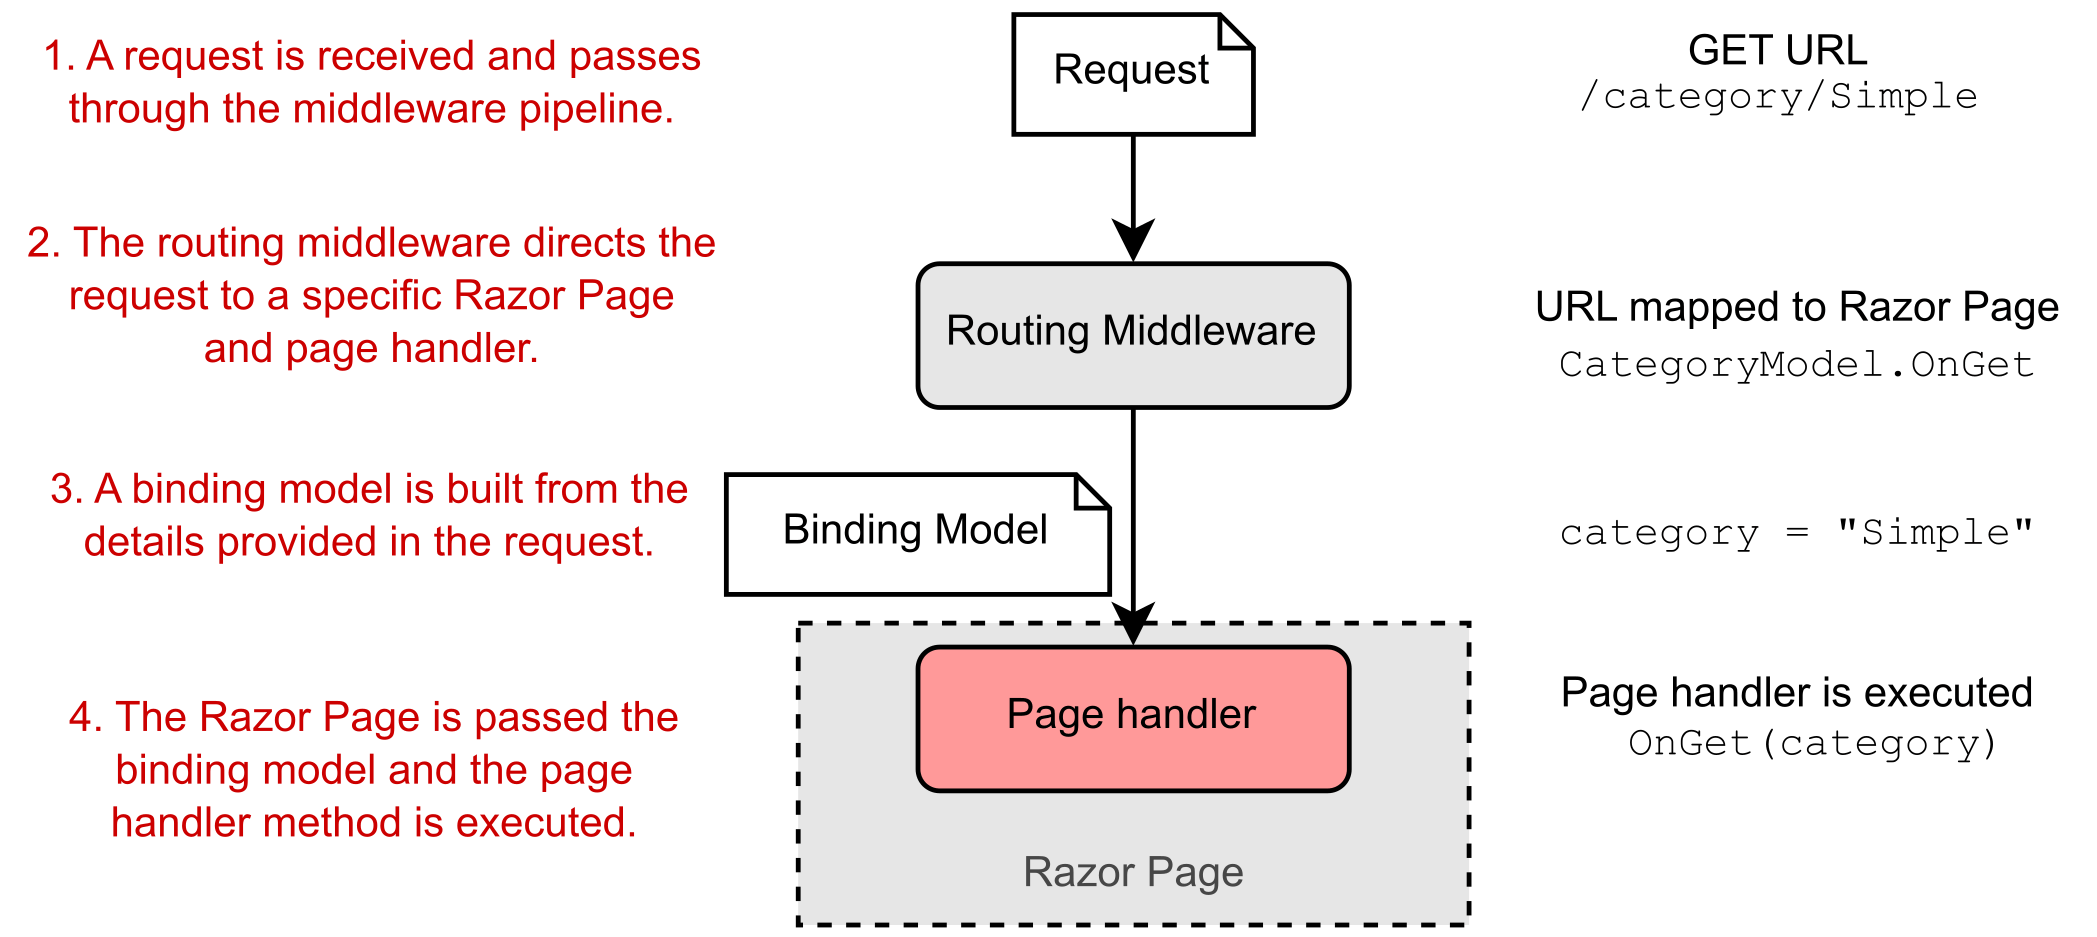
Figure 13.9 Routing a request to a Razor Page and building a binding model. A request to the /category/Simple URL results in the execution of the CategoryModel.OnGet page handler, passing in a populated binding model, category.
图 13.9 将请求路由到 Razor 页面并构建绑定模型。对/category/Simple URL 会导致执行 CategoryModel.OnGet 页面处理程序,并传入填充的绑定模型 category。

Definition A binding model is one or more objects that act as a container for the data provided in a request—data that’s required by a page handler.
定义 绑定模型是一个或多个对象,它们充当请求中提供的数据的容器,这些数据是由页面处理程序要求。

In this case, the binding model is a simple string, category, that’s bound to the "Simple" value. This value is provided in the request URL’s path. A more complex binding model could have been used, with multiple properties populated with values from the route template, the query string, and the request body.

在本例中,绑定模型是绑定到 “Simple” 值的简单字符串 category。此值在请求 URL 的路径中提供。可以使用更复杂的绑定模型,其中多个属性填充了路由模板、查询字符串和请求正文中的值。

Note The binding model for Razor Pages is conceptually equivalent to all the parameters you pass in to a minimal API endpoint that are populated from the request.
注意 Razor Pages 的绑定模型在概念上等效于您传递给从请求填充的最小 API 端点的所有参数。

The binding model in this case corresponds to the method parameter of the OnGet page handler. An instance of the Razor Page is created using its constructor, and the binding model is passed to the page handler when it executes, so it can be used to decide how to respond. For this example, the page handler uses it to decide which to-do items to display on the page.

在这种情况下,绑定模型对应于 OnGet 页面处理程序的 method 参数。Razor Page 的实例是使用其构造函数创建的,绑定模型在执行时传递给页面处理程序,因此可用于决定如何响应。在此示例中,页面处理程序使用它来决定要在页面上显示哪些待办事项。

13.4.2 Executing a handler using the application model

13.4.2 使用应用程序模型执行处理程序

The role of the page handler as the controller in the MVC pattern is to coordinate the generation of a response to the request it’s handling. That means it should perform only a limited number of actions. In particular, it should

在 MVC 模式中,页面处理程序作为控制器的角色是协调对它正在处理的请求的响应的生成。这意味着它应该只执行有限数量的作。特别是,它应该

  • Validate that the data contained in the binding model is valid for the request.
    验证绑定模型中包含的数据是否对请求有效。

  • Invoke the appropriate actions on the application model using services.
    使用 services 对应用程序模型调用适当的作。

  • Select an appropriate response to generate based on the response from the application model.
    根据应用程序模型的响应选择要生成的适当响应。

Figure 13.10 shows the page handler invoking an appropriate method on the application model. Here, you can see that the application model is a somewhat-abstract concept that encapsulates the remaining non-UI parts of your application. It contains the domain model, several services, and the database interaction.

图 13.10 显示了在应用程序模型上调用适当方法的页面处理程序。在这里,您可以看到应用程序模型是一个有点抽象的概念,它封装了应用程序的其余非 UI 部分。它包含域模型、多个服务和数据库交互。

alt text

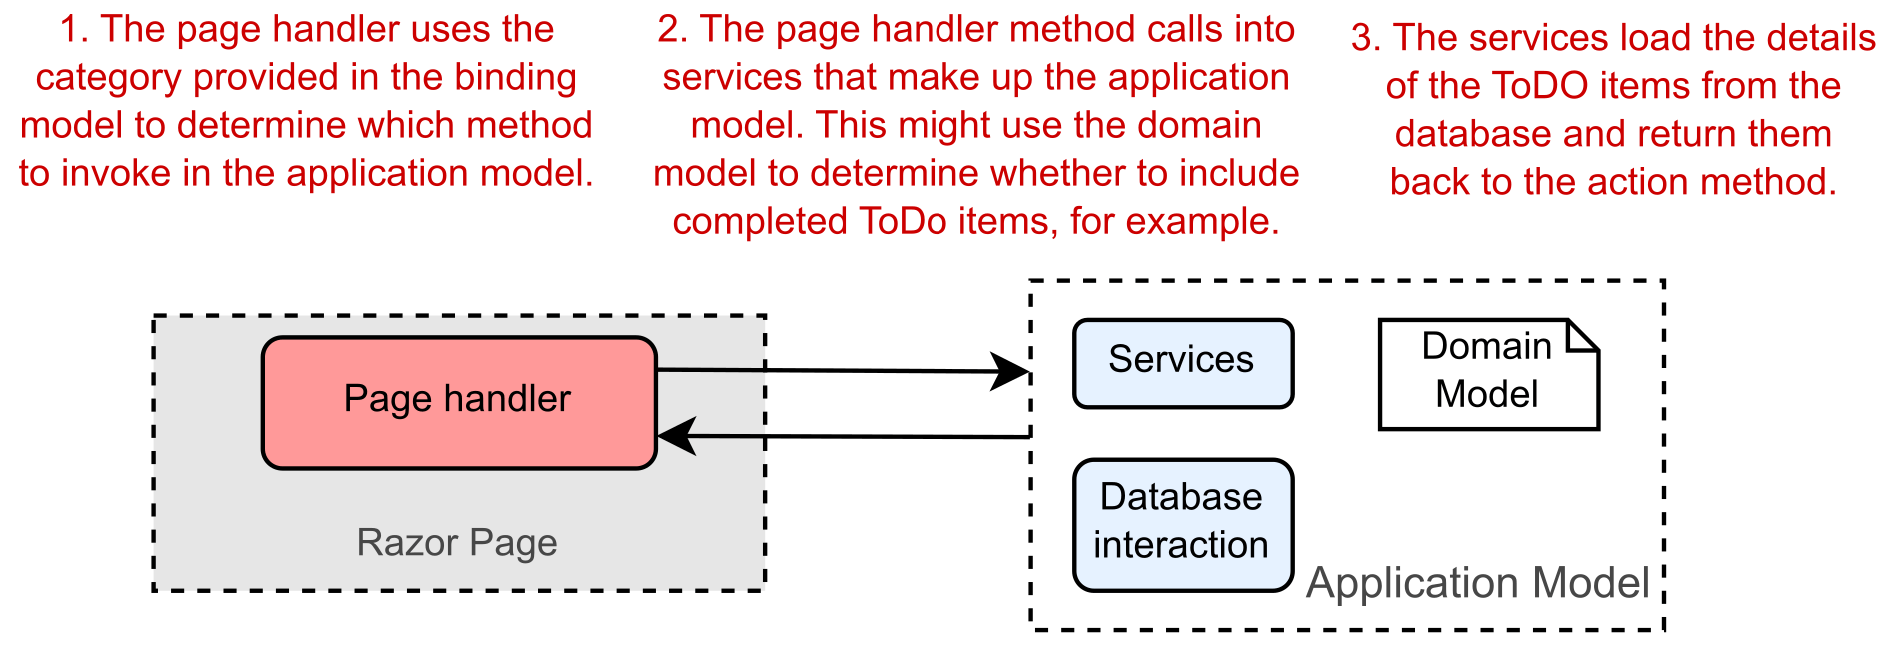
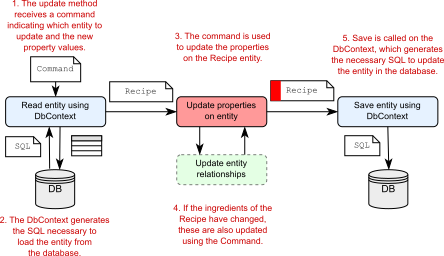
Figure 13.10 When executed, an action invokes the appropriate methods in the application model.
图 13.10 执行时,作会调用应用程序模型中的相应方法。

Definition The domain model encapsulates complex business logic in a series of classes that don’t depend on any infrastructure and are easy to test.
定义 域模型将复杂的业务逻辑封装在一系列不依赖于任何基础设施且易于测试的类中。

The page handler typically calls into a single point in the application model. In our example of viewing a to-do list category, the application model might use a variety of services to check whether the current user is allowed to view certain items, to search for items in the given category, to load the details from the database, or to load a picture associated with an item from a file. Assuming that the request is valid, the application model returns the required details to the page handler. Then it’s up to the page handler to choose a response to generate.

页面处理程序通常调用应用程序模型中的单个点。在查看待办事项列表类别的示例中,应用程序模型可能使用各种服务来检查是否允许当前用户查看某些项目、搜索给定类别中的项目、从数据库加载详细信息或从文件中加载与项目关联的图片。假设请求有效,应用程序模型会将所需的详细信息返回给页面处理程序。然后,由页面处理程序选择要生成的响应。

13.4.3 Building HTML using the view model

13.4.3 使用视图模型构建 HTML

When the page handler has called out to the application model that contains the application business logic, it’s time to generate a response. A view model captures the details necessary for the view to generate a response.

当页面处理程序调用了包含应用程序业务逻辑的应用程序模型时,就可以生成响应了。视图模型捕获视图生成响应所需的详细信息。

Definition A view model in the MVC pattern is all the data required by the view to render a UI. It’s typically some transformation of the data contained in the application model, plus extra information required to render the page, such as the page’s title.
定义 MVC 模式中的视图模型是视图呈现 UI 所需的所有数据。它通常是对应用程序模型中包含的数据进行一些转换,以及呈现页面所需的额外信息,例如页面的标题。

The term view model is used extensively in ASP.NET Core MVC, where it typically refers to a single object that is passed to the Razor view to render. With Razor Pages, however, the Razor view can access the Razor Page’s page model class directly. Therefore, the Razor Page PageModel typically acts as the view model in Razor Pages, with the data required by the Razor view exposed via properties, as you saw in listing 13.5.

术语“视图模型”在 ASP.NET Core MVC 中广泛使用,它通常是指传递给 Razor 视图进行渲染的单个对象。但是,使用 Razor 页面时,Razor 视图可以直接访问 Razor 页面的页面模型类。因此,Razor Page PageModel 通常充当 Razor Pages 中的视图模型,其中通过 properties 公开的 Razor 视图所需的数据,如清单 13.5 所示。

Note Razor Pages use the PageModel class itself as the view model for the Razor view by exposing the required data as properties.
注意 Razor Pages 通过将所需数据作为属性公开,使用 PageModel 类本身作为 Razor 视图的视图模型。

The Razor view uses the data exposed in the page model to generate the final HTML response. Finally, this data is sent back through the middleware pipeline and out to the user’s browser, as shown in figure 13.11.

Razor 视图使用页面模型中公开的数据来生成最终的 HTML 响应。最后,这些数据通过中间件管道发送回用户的浏览器,如图 13.11 所示。

alt text

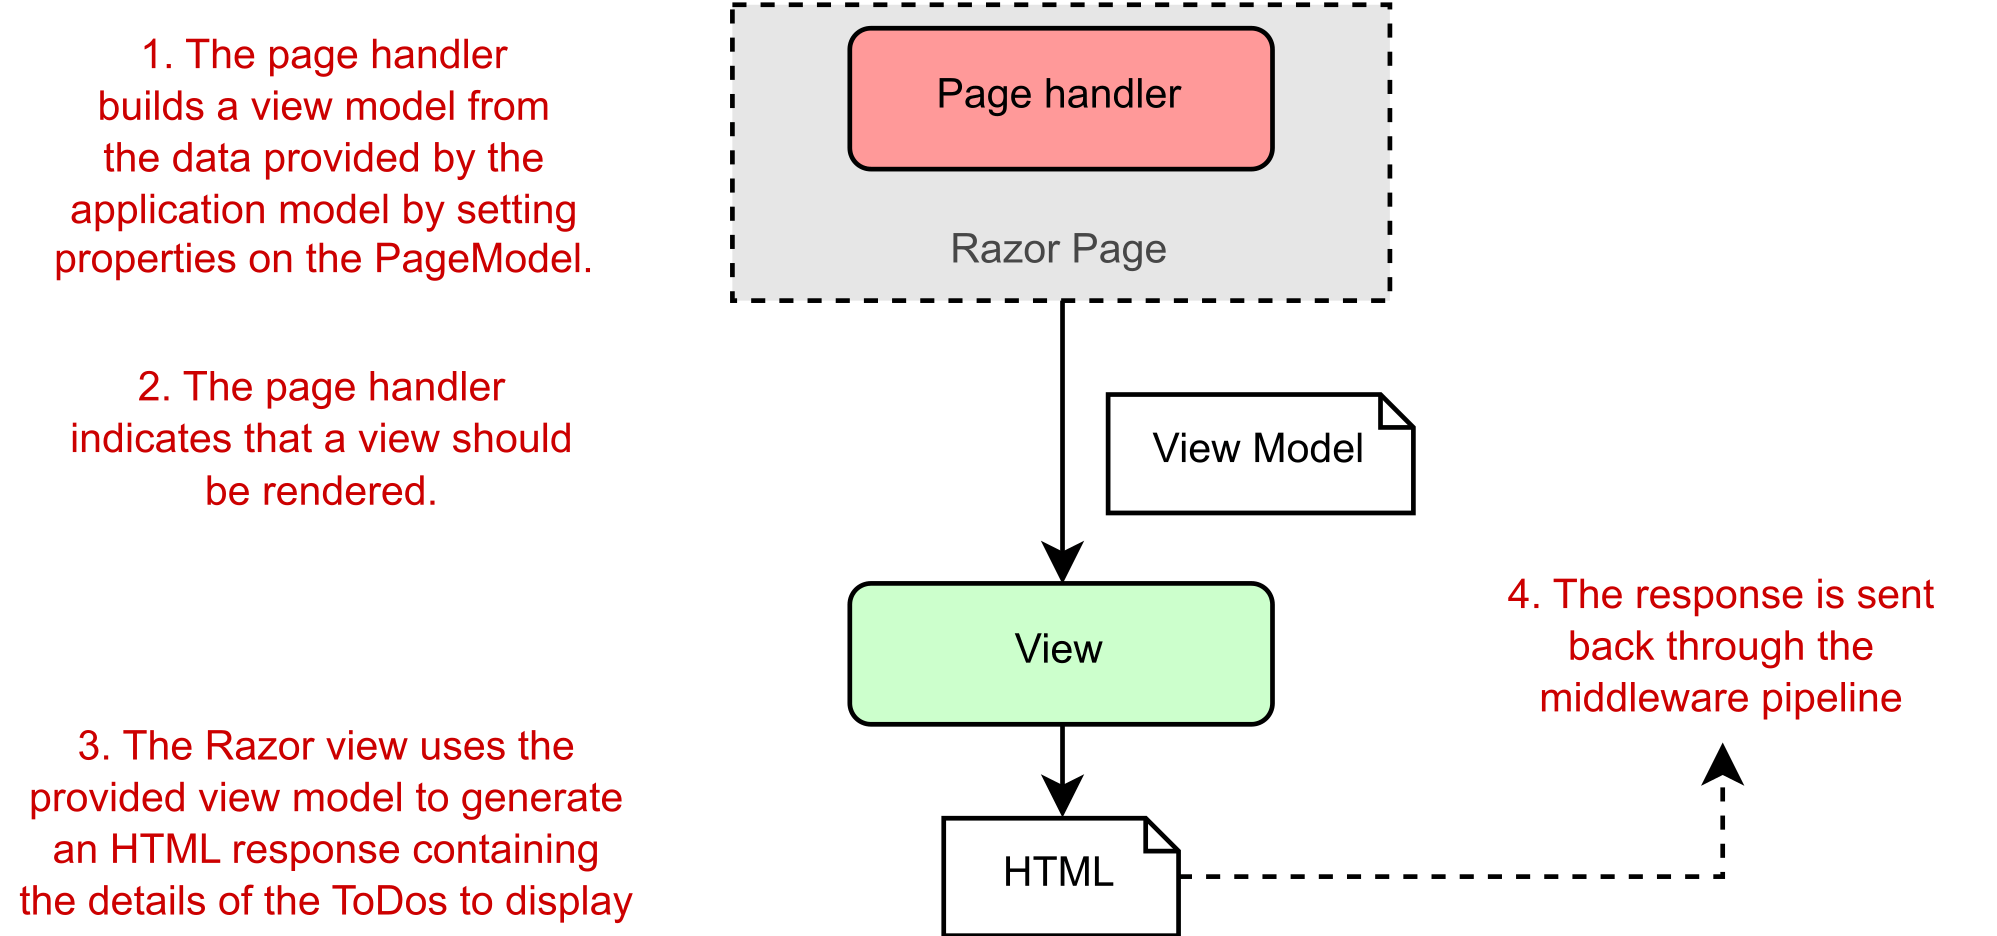
Figure 13.11 The page handler builds a view model by setting properties on the PageModel. It’s the view that generates the response.
图 13.11 页面处理程序通过在 PageModel 上设置属性来构建视图模型。这是生成响应。

It’s important to note that although the page handler selects whether to execute the view and the data to use, it doesn’t control what HTML is generated. The view itself decides what the content of the response will be.

请务必注意,尽管页面处理程序选择是否执行视图和要使用的数据,但它并不控制生成的 HTML。视图本身决定响应的内容。

13.4.4 Putting it all together: A complete Razor Page request

13.4.4 汇总:完整的 Razor Page 请求

Now that you’ve seen the steps that go into handling a request in ASP.NET Core using Razor Pages, let’s put them together from request to response. Figure 13.12 shows how the steps combine to handle the request to display the list of to-do items for the Simple category. The traditional MVC pattern is still visible in Razor Pages, made up of the page handler (controller), the view, and the application model.

现在,你已经了解了使用 Razor Pages 在 ASP.NET Core 中处理请求的步骤,让我们将它们从请求到响应放在一起。图 13.12 显示了如何组合这些步骤来处理显示 Simple 类别的待办事项列表的请求。传统的 MVC 模式在 Razor Pages 中仍然可见,它由页面处理程序(控制器)、视图和应用程序模型组成。

alt text

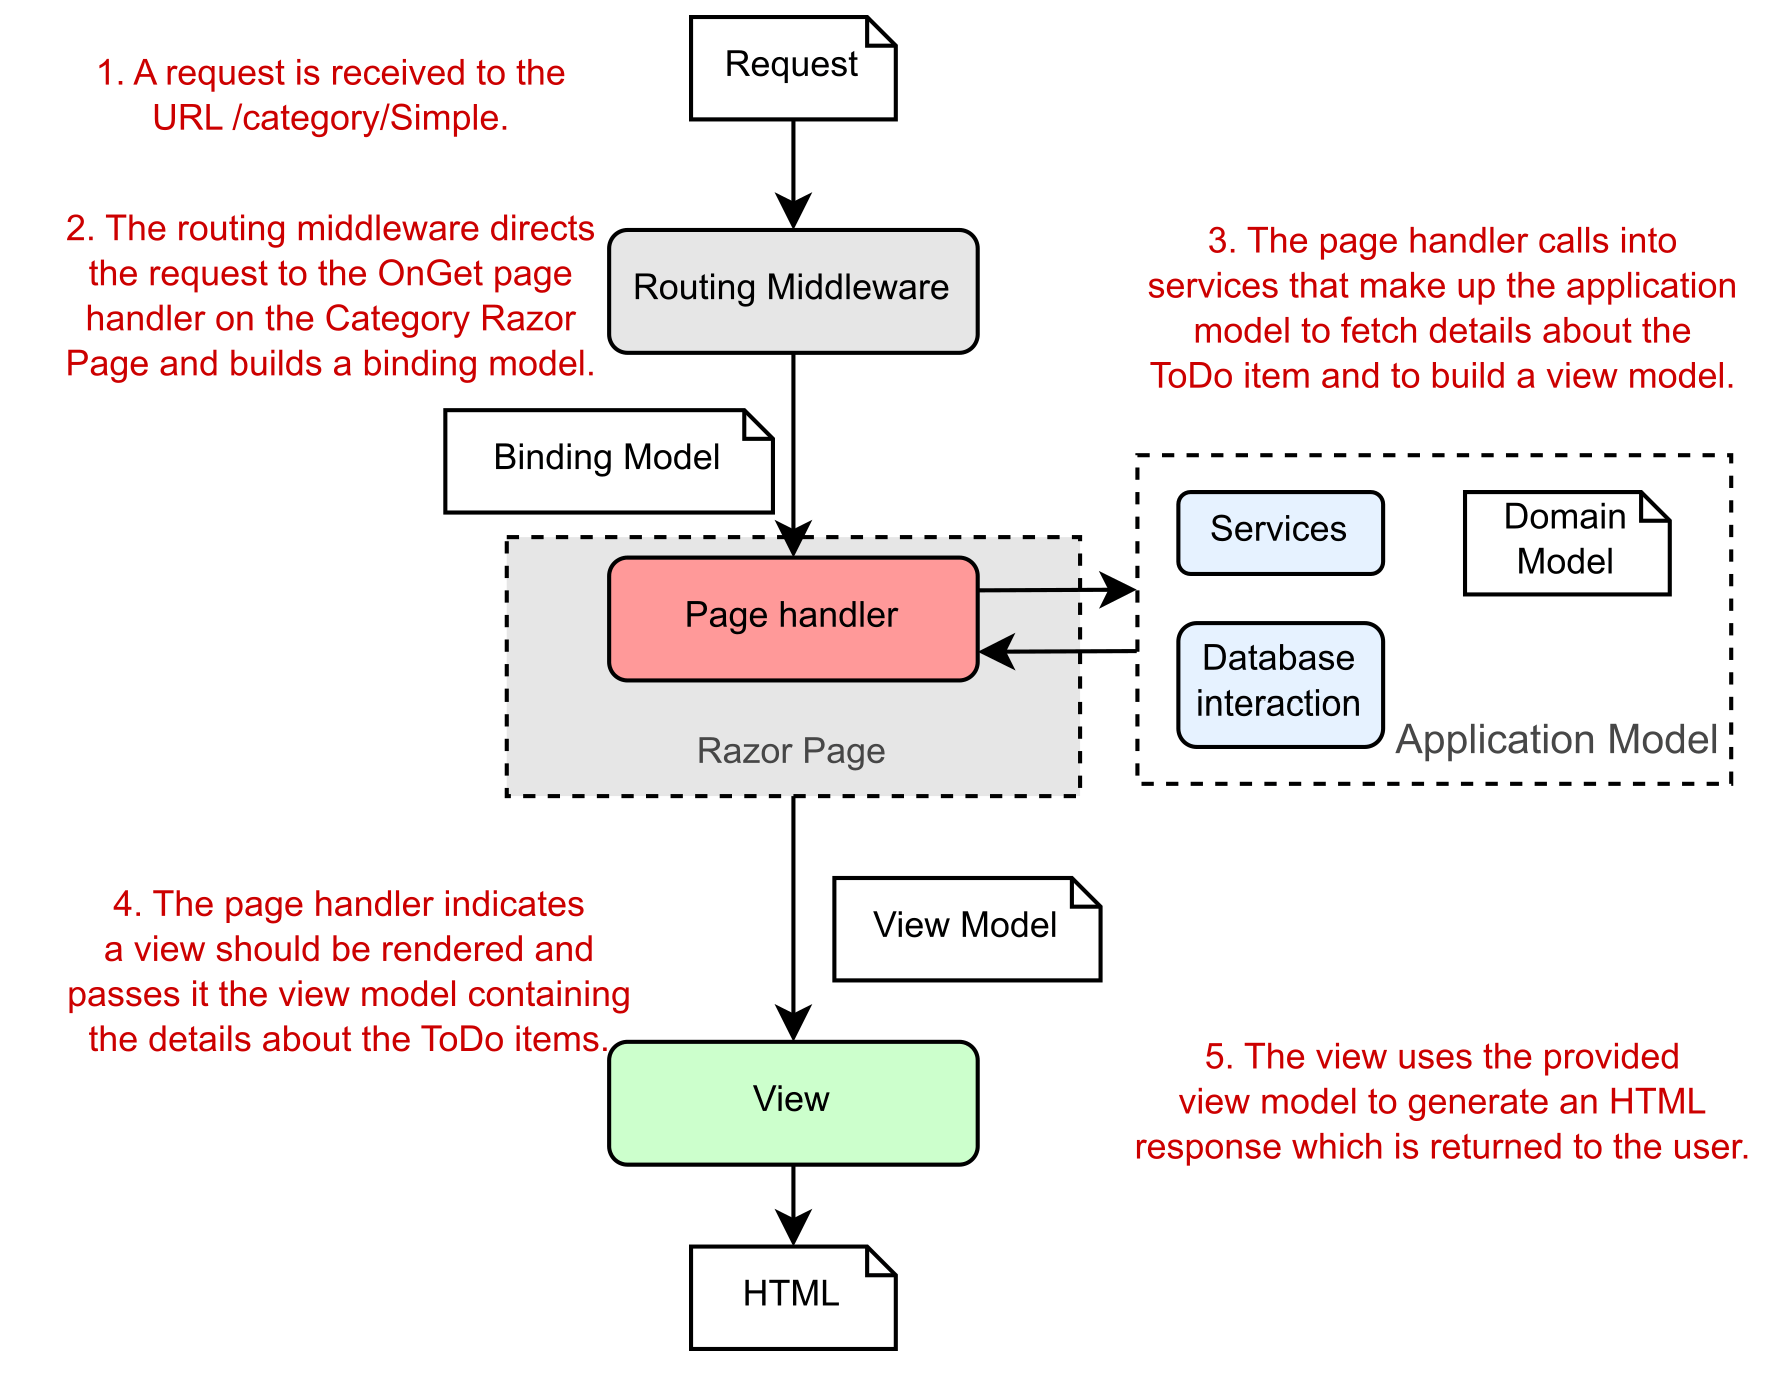
Figure 13.12 A complete Razor Pages request for the list of to-dos in the Simple category
图 13.12 对“简单”类别中待办事项列表的完整 Razor Pages 请求

By now, you may be thinking this whole process seems rather convoluted. So many steps to display some HTML! Why not allow the application model to create the view directly, rather than have to go on a dance back and forth with the page handler method? The key benefit throughout this process is the separation of concerns:

到现在为止,您可能会认为整个过程似乎相当复杂。显示一些 HTML 的步骤太多了!为什么不允许应用程序模型直接创建视图,而不必使用页面处理程序方法来回跳舞呢?整个过程中的主要好处是关注点分离:

  • The view is responsible only for taking some data and generating HTML.
    该视图只负责获取一些数据并生成 HTML。

  • The application model is responsible only for executing the required business logic.
    应用程序模型仅负责执行所需的业务逻辑。

  • The page handler (controller) is responsible only for validating the incoming request and selecting which response is required, based on the output of the application model.
    页面处理程序(控制器)仅负责验证传入请求并根据应用程序模型的输出选择所需的响应。

By having clearly defined boundaries, it’s easier to update and test each of the components without depending on any of the others. If your UI logic changes, you won’t necessarily have to modify any of your business logic classes, so you’re less likely to introduce errors in unexpected places.
通过明确定义的边界,可以更轻松地更新和测试每个组件,而无需依赖任何其他组件。如果您的 UI 逻辑发生变化,您不一定必须修改任何业务逻辑类,因此您不太可能在意想不到的地方引入错误。

The dangers of tight coupling
紧密耦合的危险
It’s generally a good idea to reduce coupling between logically separate parts of your application as much as possible. This makes it easier to update your application without causing adverse effects or requiring modifications in seemingly unrelated areas. Applying the MVC pattern is one way to help with this goal.
通常,最好尽可能减少应用程序逻辑上独立的部分之间的耦合。这样可以更轻松地更新您的应用程序,而不会造成不利影响或需要在看似不相关的区域中进行修改。应用 MVC 模式是帮助实现此目标的一种方法。

As an example of when coupling rears its head, I remember a case a few years ago when I was working on a small web app. In our haste, we hadn’t decoupled our business logic from our HTML generation code properly, but initially there were no obvious problems. The code worked, so we shipped it!

举个例子,我记得几年前我正在开发一个小型 Web 应用程序。由于匆忙,我们没有将业务逻辑与 HTML 生成代码正确解耦,但最初并没有明显的问题。代码有效,所以我们发布了它!

A few months later, someone new started working on the app and immediately “helped” by renaming an innocuous spelling error in a class in the business layer. Unfortunately, the names of those classes had been used to generate our HTML code, so renaming the class caused the whole website to break in users’ browsers! Suffice it to say that we made a concerted effort to apply the MVC pattern thereafter and ensure that we had a proper separation of concerns.

几个月后,有人开始开发该应用程序,并立即“帮助”重命名了业务层中一个无害的类中的一个无害的拼写错误。不幸的是,这些类的名称已被用于生成我们的 HTML 代码,因此重命名该类会导致整个网站在用户的浏览器中中断!可以说,我们在此后齐心协力地应用 MVC 模式,并确保我们适当地分离了关注点。

The examples shown in this chapter demonstrate the bulk of the Razor Pages functionality. It has additional features, such as the filter pipeline, which I cover in chapters 21 and 22, and I discuss binding models in greater depth in chapter 16, but the overall behavior of the system is the same.

本章中显示的示例演示了 Razor Pages 的大部分功能。它还有其他功能,例如过滤器管道,我在第 21 章和第 22 章中介绍了这一点,我在第 16 章中更深入地讨论了绑定模型,但系统的整体行为是相同的。

Similarly, in chapter 19 I look at MVC controllers and explain why I don’t recommend them over Razor Pages for server-rendered applications. By contrast, in chapter 20 I discuss how you can use the MVC design pattern when you’re generating machine-readable responses using Web API controllers. The process is for all intents and purposes identical to the MVC pattern you’ve already seen.

同样,在第 19 章中,我将介绍 MVC 控制器,并解释为什么对于服务器呈现的应用程序,我不建议使用 MVC 控制器而不是 Razor Pages。相比之下,在第 20 章中,我将讨论在使用 Web API 控制器生成机器可读响应时如何使用 MVC 设计模式。该过程的所有意图和目的都与您已经看到的 MVC 模式相同。

I hope that by this point, you’re sold on Razor Pages and their overall design using the MVC pattern. The page handler methods on a Razor Page are invoked in response to a request and select the type of response to generate by returning an IActionResult.

我希望到此时,您已经对使用 MVC 模式的 Razor Pages 及其整体设计感到满意。调用 Razor 页面上的页面处理程序方法以响应请求,并通过返回 IActionResult 选择要生成的响应类型。

An aspect I’ve touched on only vaguely is how the RoutingMiddleware decides which Razor Page and handler to invoke for a given request. You don’t want to have a Razor Page for every URL in an app. It would be difficult to have, for example, a different page per product in an e-shop; every product would need its own Razor Page! In chapter 14 you’ll see how to define routes for your Razor Pages, how to add constraints to your routes, and how they deconstruct URLs to match a single handler.

我只是模糊地谈到了一个方面,即 RoutingMiddleware 如何决定为给定请求调用哪个 Razor Page 和处理程序。您不希望应用程序中的每个 URL 都有一个 Razor 页面。例如,在电子商店中为每个产品设置不同的页面是很困难的;每个产品都需要自己的 Razor Page!在第 14 章中,你将了解如何为 Razor 页面定义路由,如何向路由添加约束,以及它们如何解构 URL 以匹配单个处理程序。

13.5 Summary

13.5 总结

Razor Pages are located in the Pages folder of a project and by default are named according to the URL path they handle. Privacy.cshtml, for example, handles the path /Privacy. This convention makes it easy to quickly add new pages.
Razor Pages 位于项目的 Pages 文件夹中,默认情况下根据它们处理的 URL 路径进行命名。例如,Privacy.cshtml 处理路径 /Privacy。此约定使快速添加新页面变得容易。

Razor Pages must contain the @page directive as the first line of the .cshtml file. Without this directive, ASP.NET Core won’t recognize it as a Razor Page, and it won’t appear as an endpoint in your app.
Razor Pages 必须包含 @page 指令作为 .cshtml 文件的第一行。如果没有此指令,ASP.NET Core 将无法将其识别为 Razor 页面,并且不会在应用中显示为终结点。

Page models derive from the PageModel base class and contain page handlers. Page handlers are methods named using conventions that indicate the HTTP verb they handle. OnGet, for example, handles the GET verb. Page handlers are equivalent to minimal API endpoint handlers; they run in response to a given request.
页面模型派生自 PageModel 基类,并包含页面处理程序。页面处理程序是使用约定命名的方法,这些约定指示它们处理的 HTTP 动词。例如,OnGet 处理 GET 动词。页面处理程序等同于最小 API 端点处理程序;它们运行以响应给定的请求。

Razor templates can contain standalone C#, standalone HTML, and dynamic HTML generated from C# values. By combining all three, you can build highly dynamic applications.
Razor 模板可以包含独立 C#、独立 HTML 和从 C# 值生成的动态 HTML。通过将这三者结合起来,您可以构建高度动态的应用程序。

The MVC design pattern allows for a separation of concerns between the business logic of your application, the data that’s passed around, and the display of data in a response. This reduces coupling between the different layers of your application.
MVC 设计模式允许在应用程序的业务逻辑、传递的数据和响应中的数据显示之间分离关注点。这减少了应用程序不同层之间的耦合。

Razor Pages should inherit from the PageModel base class and contain page handlers. The routing middleware selects a page handler based on the incoming request’s URL, the HTTP verb, and the request’s query string.
Razor Pages 应继承自 PageModel 基类并包含页面处理程序。路由中间件根据传入请求的 URL、HTTP 动词和请求的查询字符串选择页面处理程序。

Page handlers generally should delegate to services to handle the business logic required by a request instead of performing the changes themselves. This ensures a clean separation of concerns that aids testing and improves application structure.
页面处理程序通常应委托给服务来处理请求所需的业务逻辑,而不是自行执行更改。这确保了关注点的清晰分离,从而有助于测试并改进应用程序结构。

ASP.NET Core in Action 12 Saving data with Entity Framework Core

12 Saving data with Entity Framework Core
12 使用 Entity Framework Core 保存数据

This chapter covers

本章涵盖

  • Understanding what Entity Framework Core is and why you should use it
    了解什么是 Entity Framework Core 以及为什么应该使用它

  • Adding Entity Framework Core to an ASP.NET Core application
    将 Entity Framework Core 添加到 ASP.NET Core 应用程序

  • Building a data model and using it to create a database
    构建数据模型并使用它来创建数据库

  • Querying, creating, and updating data with Entity Framework Core
    使用 Entity Framework Core 查询、创建和更新数据

Most applications that you’ll build with ASP.NET Core require storing and loading some kind of data. Even the examples so far in this book have assumed that you have some sort of data store—storing exchange rates, user shopping carts, or the locations of physical stores. I’ve glossed over this topic for the most part, but typically you’ll store this data in a database.

您将使用 ASP.NET Core 构建的大多数应用程序都需要存储和加载某种类型的数据。即使是本书中到目前为止的示例也假定您有某种数据存储 — 存储汇率、用户购物车或实体商店的位置。我大部分时间都忽略了这个主题,但通常您会将此数据存储在数据库中。

Working with databases can be a rather cumbersome process. You have to manage connections to the database, translate data from your application to a format the database can understand, and handle a plethora of other subtle problems. You can manage this complexity in a variety of ways, but I’m going to focus on using a library built for modern .NET: Entity Framework Core (EF Core). EF Core is a library that lets you quickly and easily build database access code for your ASP.NET Core applications. It’s modeled on the popular Entity Framework 6.x library, but it has significant changes that make it stand alone in its own right as more than an upgrade.

使用数据库可能是一个相当繁琐的过程。您必须管理与数据库的连接,将应用程序中的数据转换为数据库可以理解的格式,并处理大量其他细微的问题。您可以通过多种方式管理这种复杂性,但我将重点介绍如何使用为现代 .NET 构建的库:Entity Framework Core (EF Core)。EF Core 是一个库,可让您快速轻松地为 ASP.NET Core 应用程序构建数据库访问代码。它以流行的 Entity Framework 6.x 库为模型,但它具有重大变化,使其本身不仅仅是升级。

The aim of this chapter is to provide a quick overview of EF Core and show how you can use it in your applications to query and save to a database quickly. You’ll learn enough to connect your app to a database and manage schema changes to the database, but I won’t be going into great depth on any topics.

本章旨在提供 EF Core 的快速概述,并演示如何在应用程序中使用它来快速查询和保存到数据库。您将学到足够的知识来将应用程序连接到数据库并管理数据库的架构更改,但我不会深入讨论任何主题。

Note For an in-depth look at EF Core, I recommend Entity Framework Core in Action, 2nd ed., by Jon P. Smith (Manning, 2021). Alternatively, you can read about EF Core on the Microsoft documentation website at https://docs.microsoft.com/ef/core.
注意 要深入了解 EF Core,我推荐 Jon P. Smith 的 Entity Framework Core in Action,第 2 版(Manning,2021 年)。或者,您可以在 https://docs.microsoft.com/ef/core Microsoft 文档网站上阅读有关 EF Core 的信息。

Section 12.1 introduces EF Core and explains why you may want to use it in your applications. You’ll learn how the design of EF Core helps you iterate quickly on your database structure and reduce the friction of interacting with a database.

第 12.1 节介绍了 EF Core,并解释了为什么你可能想要在应用程序中使用它。你将了解 EF Core 的设计如何帮助你快速迭代数据库结构并减少与数据库交互的摩擦。

In section 12.2 you’ll learn how to add EF Core to an ASP.NET Core app and configure it by using the ASP.NET Core configuration system. You’ll see how to build a model for your app that represents the data you’ll store in the database and how to hook it into the ASP.NET Core DI container.

在第 12.2 节中,你将了解如何将 EF Core 添加到 ASP.NET Core 应用,并使用 ASP.NET Core 配置系统对其进行配置。您将了解如何为应用程序构建一个模型,该模型表示您将存储在数据库中的数据,以及如何将其挂接到 ASP.NET Core DI 容器中。

Note For this chapter I use SQLite, a small, fast, cross-platform database engine, but none of the code shown in this chapter is specific to SQLite. The code sample for the book also includes a version using SQL Server Express’s LocalDB feature. This version is installed as part of Visual Studio 2022 (when you choose the ASP.NET and Web Development workload), and it provides a lightweight SQL Server engine. You can read more about LocalDB at http://mng.bz/5jEa.
注意 在本章中,我使用了 SQLite,这是一个小型、快速、跨平台的数据库引擎,但本章中展示的代码都不是特定于 SQLite 的。该书的代码示例还包括使用 SQL Server Express 的 LocalDB 功能的版本。此版本作为 Visual Studio 2022 的一部分安装(当您选择 ASP.NET 和 Web 开发工作负载时),它提供轻量级 SQL Server 引擎。您可以在 http://mng.bz/5jEa 上阅读有关 LocalDB 的更多信息。

No matter how carefully you design your original data model, the time will come when you need to change it. In section 12.3 I show how you can easily update your model and apply these changes to the database itself, using EF Core for all the heavy lifting.

无论您多么仔细地设计原始数据模型,都需要更改它。在部分12.3 我将展示如何轻松更新模型并将这些更改应用于数据库本身,从而使用 EF Core 完成所有繁重的工作。

When you have EF Core configured and a database created, section 12.4 shows how to use it in your application code. You’ll see how to create, read, update, and delete (CRUD) records, and you’ll learn about some of the patterns to use when designing your data access.

配置 EF Core 并创建数据库后,第 12.4 节介绍了如何在应用程序代码中使用它。您将了解如何创建、读取、更新和删除 (CRUD) 记录,并了解在设计数据访问时要使用的一些模式。

In section 12.5 I highlight a few of the problems you’ll want to take into consideration when using EF Core in a production app. A single chapter on EF Core can offer only a brief introduction to all the related concepts, so if you choose to use EF Core in your own applications—especially if you’re using such a data access library for the first time—I strongly recommend reading more after you have the basics from this chapter.

在第 12.5 节中,我重点介绍了在生产应用程序中使用 EF Core 时需要考虑的一些问题。EF Core 的一章只能简要介绍所有相关概念,因此,如果您选择在自己的应用程序中使用 EF Core(尤其是您是第一次使用此类数据访问库),我强烈建议您在了解本章的基础知识后再阅读更多内容。

Before we get into any code, let’s look at what EF Core is, what problems it solves, and when you may want to use it.

在开始任何代码之前,让我们看看 EF Core 是什么,它解决了什么问题,以及何时可能需要使用它。

12.1 Introducing Entity Framework Core

12.1 Entity Framework Core 简介

Database access code is ubiquitous across web applications. Whether you’re building an e-commerce app, a blog, or the Next Big Thing™, chances are that you’ll need to interact with a database.

数据库访问代码在 Web 应用程序中无处不在。无论您是构建电子商务应用程序、博客还是 Next Big Thing™,您都有可能需要与数据库进行交互。

Unfortunately, interacting with databases from app code is often a messy affair, and you can take many approaches. A task as simple as reading data from a database, for example, requires handling network connections, writing SQL statements, and handling variable result data. The .NET ecosystem has a whole array of libraries you can use for this task, ranging from the low-level ADO.NET libraries to higher-level abstractions such as EF Core.

遗憾的是,从应用程序代码与数据库交互通常是一件麻烦的事情,您可以采用多种方法。例如,像从数据库读取数据这样简单的任务需要处理网络连接、编写 SQL 语句和处理可变结果数据。.NET 生态系统具有可用于此任务的一整套库,从低级 ADO.NET 库到高级抽象(如 EF Core)。

In this section, I describe what EF Core is and the problem it’s designed to solve. I cover the motivation for using an abstraction such as EF Core and how it helps bridge the gap between your app code and your database. As part of that discussion, I present some of the tradeoffs you’ll make by using EF Core in your apps, which should help you decide whether it’s right for your purposes. Finally, we’ll take a look at an example EF Core mapping, from app code to database, to get a feel for EF Core’s main concepts.

在本节中,我将介绍什么是 EF Core 以及它旨在解决的问题。我将介绍使用 EF Core 等抽象的动机,以及它如何帮助弥合应用程序代码和数据库之间的差距。作为该讨论的一部分,我将介绍在应用程序中使用 EF Core 将做出的一些权衡,这应该有助于您确定它是否适合您的目的。最后,我们将查看从应用代码到数据库的 EF Core 映射示例,以了解 EF Core 的主要概念。

12.1.1 What is EF Core?

12.1.1 什么是 EF Core?

EF Core is a library that provides an object-oriented way to access databases. It acts as an object-relational mapper (ORM), communicating with the database for you and mapping database responses to .NET classes and objects, as shown in figure 12.1.

EF Core 是一个库,它提供了一种面向对象的方式来访问数据库。它充当对象关系映射器 (ORM),为您与数据库通信,并将数据库响应映射到 .NET 类和对象,如图 12.1 所示。

alt text

Figure 12.1 EF Core maps .NET classes and objects to database concepts such as tables and rows.
图 12.1 EF Core 将 .NET 类和对象映射到数据库概念,例如表和行。

Definition With an object-relational mapper (ORM), you can manipulate a database with object-oriented concepts such as classes and objects by mapping them to database concepts such as tables and columns.
定义 使用对象关系映射器 (ORM),您可以使用面向对象的概念来作数据库,例如类和对象,方法是将它们映射到表和列等数据库概念。

EF Core is based on but distinct from the existing Entity Framework libraries (currently up to version 6.x). It was built as part of the .NET Core push to work cross-platform, but with additional goals in mind. In particular, the EF Core team wanted to make a highly performant library that could be used with a wide range of databases.

EF Core 基于现有的实体框架库(当前最高版本 6.x),但不同于现有实体框架库。它是作为 .NET Core 跨平台推动工作的一部分构建的,但考虑了其他目标。具体而言,EF Core 团队希望制作一个可与各种数据库一起使用的高性能库。

There are many types of databases, but probably the most commonly used family is relational databases, accessed via Structured Query Language (SQL). This is the bread and butter of EF Core; it can map Microsoft SQL Server, SQLite, MySQL, Postgres, and many other relational databases. It even has a cool in-memory feature you can use when testing to create a temporary database. EF Core uses a provider model, so support for other relational databases can be plugged in later as they become available.

数据库有很多类型,但最常用的系列可能是关系数据库,通过结构化查询语言 (SQL) 访问。这是 EF Core 的生计;它可以映射 Microsoft SQL Server、SQLite、MySQL、Postgres 和许多其他关系数据库。它甚至还有一个很酷的内存功能,您可以在测试创建临时数据库时使用。EF Core 使用提供程序模型,因此可以在其他关系数据库可用时插入对它们的支持。

Note As of .NET Core 3.0, EF Core also works with nonrelational, NoSQL, or document databases like Cosmos DB too. I’m going to consider mapping only to relational databases in this book, however, as that’s the most common requirement in my experience. Historically, most data access, especially in the .NET ecosystem, has used relational databases, so it generally remains the most popular approach.
注意 从 .NET Core 3.0 开始,EF Core 也适用于非关系数据库、NoSQL 数据库或 Cosmos DB 等文档数据库。但是,在本书中,我将只考虑映射到关系数据库,因为这是我经验中最常见的要求。从历史上看,大多数数据访问(尤其是在 .NET 生态系统中)都使用关系数据库,因此它通常仍然是最流行的方法。

That discussion covers what EF Core is but doesn’t dig into why you’d want to use it. Why not access the database directly by using the traditional ADO.NET libraries? Most of the arguments for using EF Core can be applied to ORMs in general, so what are the advantages of an ORM?

该讨论涵盖了 EF Core 是什么,但并未深入探讨你为何要使用它。为什么不使用传统的 ADO.NET 库直接访问数据库呢?大部分使用 EF Core 的论点通常可以应用于 ORM,那么 ORM 有哪些优势呢?

12.1.2 Why use an object-relational mapper?

12.1.2 为什么使用对象关系映射器?

One of the biggest advantages of an ORM is the speed with which it allows you to develop an application. You can stay in the familiar territory of object-oriented .NET, often without needing to manipulate a database directly or write custom SQL.

ORM 的最大优势之一是它允许您开发应用程序的速度。您可以停留在熟悉的面向对象的 .NET 领域,通常不需要直接作数据库或编写自定义 SQL。

Suppose that you have an e-commerce site, and you want to load the details of a product from the database. Using low-level database access code, you’d have to open a connection to the database; write the necessary SQL with the correct table and column names; read the data over the connection; create a plain old CLR object (POCO) to hold the data; and set the properties on the object, converting the data to the correct format manually as you go. Sounds painful, right?

假设您有一个电子商务网站,并且您希望从数据库中加载产品的详细信息。使用低级数据库访问代码,您必须打开与数据库的连接;使用正确的表和列名称编写必要的 SQL;通过连接读取数据;创建一个普通的旧 CLR 对象 (POCO) 来保存数据;并设置对象的属性,并随时手动将数据转换为正确的格式。听起来很痛苦,对吧?

An ORM such as EF Core takes care of most of this work for you. It handles the connection to the database, generates the SQL, and maps data back to your POCO objects. All you need to provide is a LINQ query describing the data you want to retrieve.

EF Core 等 ORM 会为你处理大部分工作。它处理与数据库的连接,生成 SQL,并将数据映射回 POCO 对象。您只需提供一个 LINQ 查询,描述您要检索的数据。

ORMs serve as high-level abstractions over databases, so they can significantly reduce the amount of plumbing code you need to write to interact with a database. At the most basic level, they take care of mapping SQL statements to objects, and vice versa, but most ORMs take this process a step further and provide additional features.

ORM 充当数据库的高级抽象,因此它们可以显著减少与数据库交互所需编写的管道代码量。在最基本的层面上,它们负责将 SQL 语句映射到对象,反之亦然,但大多数 ORM 将此过程更进一步并提供了额外的功能。

ORMs like EF Core keep track of which properties have changed on any objects they retrieve from the database, which lets you load an object from the database by mapping it from a database table, modify it in .NET code, and then ask the ORM to update the associated record in the database. The ORM works out which properties have changed and issues update statements for the appropriate columns, saving you a bunch of work.

EF Core 等 ORM 会跟踪它们从数据库中检索的任何对象上的哪些属性已更改,这允许您通过从数据库表映射对象、在 .NET 代码中修改对象,然后要求 ORM 更新数据库中的关联记录来加载数据库对象。ORM 会找出哪些属性已更改,并为相应的列发出 update 语句,从而为您节省大量工作。

As is so often the case in software development, using an ORM has its drawbacks. One of the biggest advantages of ORMs is also their Achilles’ heel: they hide the database from you. Sometimes this high level of abstraction can lead to problematic database query patterns in your apps. A classic example is the N+1 problem, in which what should be a single database request turns into separate requests for every single row in a database table.

与软件开发中经常出现的情况一样,使用 ORM 也有其缺点。ORM 的最大优势之一也是它们的致命弱点:它们对您隐藏了数据库。有时,这种高级别的抽象可能会导致您的应用程序中出现有问题的数据库查询模式。一个典型的例子是 N+1 问题,在这个问题中,本应是单个数据库请求的内容变成了对数据库表中每一行的单独请求。

Another commonly cited drawback is performance. ORMs are abstractions over several concepts, so they inherently do more work than if you were to handcraft every piece of data access in your app. Most ORMs, EF Core included, trade some degree of performance for ease of development.

另一个经常被提及的缺点是性能。ORM 是多个概念的抽象,因此它们本质上比您手动创建应用程序中的每一条数据访问要多。大多数 ORM(包括 EF Core)都以某种程度的性能为代价来简化开发。

That said, if you’re aware of the pitfalls of ORMs, you can often drastically simplify the code required to interact with a database. As with anything, if the abstraction works for you, use it; otherwise, don’t. If you have only minimal database access requirements or need the best performance you can get, an ORM such as EF Core may not be the right fit.

也就是说,如果您意识到 ORM 的陷阱,您通常可以大大简化与数据库交互所需的代码。与任何事情一样,如果抽象对您有用,请使用它;否则,不要。如果您只有最小的数据库访问要求或需要您可以获得的最佳性能,则 EF Core 等 ORM 可能不适合。

An alternative is to get the best of both worlds: use an ORM for the quick development of the bulk of your application, and fall back to lower-level APIs such as ADO.NET for those few areas that prove to be bottlenecks. That way, you can get good-enough performance with EF Core, trading performance for development time, and optimize only those areas that need it.

另一种选择是两全其美:使用 ORM 快速开发大部分应用程序,并回退到较低级别的 API,例如 ADO.NET 用于那些被证明是瓶颈的少数领域。这样,您就可以使用 EF Core 获得足够好的性能,以牺牲开发时间来换取性能,并仅优化需要它的领域。

Note These days, the performance aspect is one of the weaker arguments against ORMs. EF Core uses many database tricks and crafts clean SQL queries, so unless you’re a database expert, you may find that it outperforms even your handcrafted ADO.NET queries!
注意 如今,性能方面是反对 ORM 的较弱的论点之一。EF Core 使用许多数据库技巧并制作干净的 SQL 查询,因此,除非你是数据库专家,否则你可能会发现它甚至优于你手工制作的 ADO.NET 查询!

Even if you decide to use an ORM in your app, many ORMs are available for .NET, of which EF Core is one. Whether EF Core is right for you depends on the features you need and the tradeoffs you’re willing to make to get them. Section 12.1.3 compares EF Core with Microsoft’s other offering, Entity Framework, but you could consider many other alternatives, such as Dapper and NHibernate, each of which has its own set of tradeoffs.

即使您决定在应用程序中使用 ORM,也有许多 ORM 可用于 .NET,EF Core 就是其中之一。EF Core 是否适合你取决于你需要的功能以及你愿意为获得这些功能而做出的权衡。12.1.3部分将 EF Core 与 Microsoft 的其他产品 Entity Framework 进行比较,但您可以考虑许多其他替代方案,例如 Dapper 和 NHibernate,每个替代方案都有自己的一组权衡。

12.1.3 When should you choose EF Core?

12.1.3 何时应选择 EF Core?

Microsoft designed EF Core as a reimagining of the mature Entity Framework 6.x (EF 6.x) ORM, which it released in 2008. With many years of development behind it, EF 6.x was a stable and feature-rich ORM, but it’s no longer under active development.

Microsoft 将 EF Core 设计为对成熟的 Entity Framework 6.x (EF 6.x) ORM 的重新构想,该 ORM 在2008. 经过多年的开发,EF 6.x 是一个稳定且功能丰富的 ORM,但它不再处于积极开发阶段。

EF Core, released in 2016, is a comparatively new project. The APIs of EF Core are designed to be close to those of EF 6.x—though they aren’t identical—but the core components have been completely rewritten. You should consider EF Core to be distinct from EF 6.x; upgrading directly from EF 6.x to EF Core is nontrivial.

EF Core 于 2016 年发布,是一个相对较新的项目。EF Core 的 API 设计为接近 EF 6.x 的 API(尽管它们并不相同),但核心组件已完全重写。您应该将 EF Core 与 EF 6.x 区分开来;直接从 EF 6.x 升级到 EF Core 并非易事。

Although Microsoft supports both EF Core and EF 6.x, EF 6.x isn’t recommended for new .NET applications. There’s little reason to start a new application with EF 6.x these days, but the exact tradeoffs will depend largely on your specific app. If you decide to choose EF 6.x instead of EF Core, make sure that you understand what you’re sacrificing. Also make sure that you keep an eye on the guidance and feature comparison from the EF team at http://mng.bz/GxgA.

尽管 Microsoft 同时支持 EF Core 和 EF 6.x,但不建议将 EF 6.x 用于新的 .NET 应用程序。如今,几乎没有理由使用 EF 6.x 启动新应用程序,但确切的权衡在很大程度上取决于您的特定应用程序。如果您决定选择 EF 6.x 而不是 EF Core,请确保您了解您正在牺牲什么。此外,请务必密切关注 http://mng.bz/GxgA 的 EF 团队提供的指南和功能比较。

If you decide to use an ORM for your app, EF Core is a great contender. It’s also supported out of the box by various other subsystems of ASP.NET Core. In chapter 23 you’ll see how to use EF Core with the ASP.NET Core Identity authentication system for managing users in your apps.

如果你决定为应用使用 ORM,EF Core 是一个很好的竞争者。ASP.NET Core 的各种其他子系统也支持开箱即用。在第 23 章中,你将了解如何将 EF Core 与 ASP.NET Core Identity 身份验证系统配合使用,以管理应用中的用户。

Before I get into the nitty-gritty of using EF Core in your app, I’ll describe the application we’re going to be using as the case study for this chapter. I’ll go over the application and database details and discuss how to use EF Core to communicate between the two.

在深入探讨在您的应用程序中使用 EF Core 的细节之前,我将介绍我们将用作本章案例研究的应用程序。我将介绍应用程序和数据库的详细信息,并讨论如何使用 EF Core 在两者之间进行通信。

12.1.4 Mapping a database to your application code

12.1.4 将数据库映射到应用程序代码

EF Core focuses on the communication between an application and a database, so to show it off, you need an application. This chapter uses the example of a simple cooking app API that lists recipes and lets you retrieve a recipe’s ingredients, as shown in figure 12.2. Users can list all recipes, add new ones, edit recipes, and delete old ones.

EF Core 侧重于应用程序和数据库之间的通信,因此要展示它,您需要一个应用程序。本章使用一个简单的烹饪应用程序 API 示例,该 API 列出了食谱并允许您检索食谱的成分,如图 12.2 所示。用户可以列出所有配方、添加新配方、编辑配方和删除旧配方。

alt text

Figure 12.2 The recipe app provides an API for managing recipes. You can view, update, and delete recipes, as well as create new ones.
图 12.2 配方应用程序提供用于管理配方的 API。您可以查看、更新和删除食谱,以及创建新的食谱。

This API is obviously a simple one, but it contains all the database interactions you need with its two entities: Recipe and Ingredient.

这个 API 显然很简单,但它包含了您需要的所有数据库交互,它与两个实体:Recipe 和 Ingredient。

Definition An entity is a .NET class that’s mapped by EF Core to the database. These are classes you define, typically as POCO classes, that can be saved and loaded by mapping to database tables using EF Core.
定义 实体是由 EF Core 映射到数据库的 .NET 类。这些是你定义的类,通常为 POCO 类,可以通过使用 EF Core 映射到数据库表来保存和加载这些类。

When you interact with EF Core, you’ll be using primarily POCO entities and a database context that inherits from the DbContext EF Core class. The entity classes are the object-oriented representations of the tables in your database; they represent the data you want to store in the database. You use the DbContext in your application both to configure EF Core and access the database at runtime.

与 EF Core 交互时,将主要使用 POCO 实体和从 DbContext EF Core 类继承的数据库上下文。实体类是数据库中表的面向对象的表示形式;它们表示要存储在数据库中的数据。您可以在应用程序中使用 DbContext 来配置 EF Core 并在运行时访问数据库。

Note You can potentially have multiple DbContexts in your application and even configure them to integrate with different databases.
注意 您的应用程序中可能有多个 DbContext,甚至可以将它们配置为与不同的数据库集成。

When your application first uses EF Core, EF Core creates an internal representation of the database based on the DbSet properties on your application’s DbContext and the entity classes themselves, as shown in figure 12.3.

当应用程序首次使用 EF Core 时,EF Core 会根据应用程序的 DbContext 和实体类本身的 DbSet 属性创建数据库的内部表示形式,如图 12.3 所示。

alt text

Figure 12.3 EF Core creates an internal model of your application’s data model by exploring the types in your code. It adds all the types referenced in the DbSet<> properties on your app’s DbContext and any linked types.
图 12.3 EF Core 通过浏览代码中的类型来创建应用程序数据模型的内部模型。它会添加DbSet<> 应用的 DbContext 属性和任何链接类型。

For the recipe app, EF Core builds a model of the Recipe class because it’s exposed on the AppDbContext as a DbSet. Furthermore, EF Core loops through all the properties of Recipe, looking for types it doesn’t know about, and adds them to its internal model. In the app, the Ingredients collection on Recipe exposes the Ingredient entity as an ICollection<Ingredient>, so EF Core models the entity appropriately.

对于配方应用,EF Core 会生成 Recipe 类的模型,因为它在 AppDbContext 上作为 DbSet 公开。此外,EF Core 会循环访问 Recipe 的所有属性,查找它不知道的类型,并将它们添加到其内部模型中。在应用程序中,Recipe 上的 Ingredients 集合将 Ingredient 实体公开为 ICollection<Ingredient>,因此 EF Core 会适当地对实体进行建模。

EF Core maps each entity to a table in the database, but it also maps the relationships between the entities. Each recipe can have many ingredients, but each ingredient (which has a name, quantity, and unit) belongs to one recipe, so this is a many-to-one relationship. EF Core uses that knowledge to correctly model the equivalent many-to-one database structure.

EF Core 将每个实体映射到数据库中的表,但它也会映射实体之间的关系。每个配方可以包含许多成分,但每个成分(具有名称、数量和单位)都属于一个配方,因此这是一种多对一关系。EF Core 使用该知识对等效的多对一数据库结构进行正确建模。

Note Two different recipes, such as fish pie and lemon chicken, may use an ingredient that has both the same name and quantity, such as the juice of one lemon, but they’re fundamentally two different instances. If you update the lemon chicken recipe to use two lemons, you wouldn’t want this change to automatically update the fish pie to use two lemons too!
注意 两种不同的食谱,例如鱼馅饼和柠檬鸡,可能使用名称和数量相同的成分,例如一个柠檬的汁液,但它们本质上是两个不同的实例。如果您将柠檬鸡食谱更新为使用两个柠檬,您肯定不希望此更改自动更新鱼馅饼食谱以使用两个柠檬!

EF Core uses the internal model it builds when interacting with the database to ensure that it builds the correct SQL to create, read, update, and delete entities.

EF Core 在与数据库交互时使用它生成的内部模型,以确保它生成正确的 SQL 来创建、读取、更新和删除实体。

Right—it’s about time for some code! In section 12.2, you’ll start building the recipe app. You’ll see how to add EF Core to an ASP.NET Core application, configure a database provider, and design your application’s data model.

好了 — 是时候编写一些代码了!在第 12.2 节中,您将开始构建配方应用程序。你将了解如何将 EF Core 添加到 ASP.NET Core 应用程序、配置数据库提供程序以及设计应用程序的数据模型。

12.2 Adding EF Core to an application

12.2 将 EF Core 添加到应用程序

In this section we focus on getting EF Core installed and configured in your ASP.NET Core recipe API app. You’ll learn how to install the required NuGet packages and build the data model for your application. As we’re talking about EF Core in this chapter, I’m not going to go into how to create the application in general. I created a simple minimal API app as the basis—nothing fancy.

在本部分中,我们重点介绍如何在 ASP.NET Core 配方 API 应用程序中安装和配置 EF Core。您将了解如何安装所需的 NuGet 包并为您的应用程序构建数据模型。由于我们在本章中讨论的是 EF Core,因此我不打算一般地介绍如何创建应用程序。我创建了一个简单、最小的 API 应用程序作为基础 — 没什么花哨的。

Tip The sample code for this chapter shows the state of the application at three points in this chapter: at the end of section 12.2, at the end of section 12.3, and at the end of the chapter. It also includes examples using both LocalDB and SQLite providers.
提示 本章的示例代码显示了本章中三个点的应用程序状态:第 12.2 节的末尾、第 12.3 节的末尾和本章的末尾。它还包括使用 LocalDB 和 SQLite 提供程序的示例。

Interaction with EF Core in the example app occurs in a service layer that encapsulates all the data access outside your minimal API endpoint handlers, as shown in figure 12.4. This design keeps your concerns separated and makes your services testable.

在示例应用程序中与 EF Core 的交互发生在服务层中,该服务层封装了最小 API 端点处理程序之外的所有数据访问,如图 12.4 所示。这种设计将您的关注点分开,并使您的服务可测试。

alt text

Figure 12.4 Handling a request by loading data from a database using EF Core. Interaction with EF Core is restricted to RecipeService; the endpoint doesn’t access EF Core directly.

图 12.4 通过使用 EF Core 从数据库加载数据来处理请求。与 EF Core 的交互仅限于 RecipeService;终端节点不直接访问 EF Core。

Adding EF Core to an application is a multistep process:
将 EF Core 添加到应用程序是一个多步骤过程:

  1. Choose a database provider, such as Postgres, SQLite, or MS SQL Server.
    选择数据库提供程序,例如 Postgres、SQLite 或 MS SQL Server。

  2. Install the EF Core NuGet packages.
    安装 EF Core NuGet 包。

  3. Design your app’s DbContext and entities that make up your data model.
    设计应用程序的 DbContext 和构成数据模型的实体。

  4. Register your app’s DbContext with the ASP.NET Core DI container.
    将应用的 DbContext 注册到 ASP.NET Core DI 容器。

  5. Use EF Core to generate a migration describing your data model.
    使用 EF Core 生成描述数据模型的迁移。

  6. Apply the migration to the database to update the database’s schema.
    将迁移应用于数据库以更新数据库的架构。

This process may seem a little daunting already, but I’ll walk through steps 1–4 in sections 12.2.1–12.2.3 and steps 5–6 in section 12.3, so it won’t take long. Given the space constraints of this chapter, I stick to the default conventions of EF Core in the code I show you. EF Core is far more customizable than it may initially appear to be, but I encourage you to stick to the defaults wherever possible, which will make your life easier in the long run.

这个过程可能看起来有点令人生畏,但我将介绍第 12.2.1-12.2.3 节中的第 1-4 步和第 12.3 节中的第 5-6 步,因此不会花费很长时间。鉴于本章的篇幅限制,我在向您展示的代码中坚持 EF Core 的默认约定。EF Core 的可定制性比最初看起来要高得多,但我鼓励您尽可能坚持使用默认值,从长远来看,这将使您的生活更轻松。

The first step in setting up EF Core is deciding which database you’d like to interact with. It’s likely that a client or your company’s policy will dictate this decision, but giving some thought to it is still worthwhile.

设置 EF Core 的第一步是确定要与之交互的数据库。客户或您公司的政策可能会决定这个决定,但考虑一下仍然是值得的。

12.2.1 Choosing a database provider and installing EF Core

12.2.1 选择数据库提供程序并安装 EF Core

EF Core supports a range of databases by using a provider model. The modular nature of EF Core means that you can use the same high-level API to program against different underlying databases; EF Core knows how to generate the necessary implementation-specific code and SQL statements.

EF Core 使用提供程序模型支持一系列数据库。EF Core 的模块化特性意味着您可以使用相同的高级 API 对不同的底层数据库进行编程;EF Core 知道如何生成必要的特定于实现的代码和 SQL 语句。

You’ll probably have a database in mind when you start your application, and you’ll be pleased to know that EF Core has most of the popular ones covered. Adding support for a given database involves adding the correct NuGet package to your .csproj file, such as the following:
在启动应用程序时,您可能会想到一个数据库,并且您会很高兴地知道 EF Core 涵盖了大多数常用数据库。添加对给定数据库的支持涉及将正确的 NuGet 包添加到.csproj 文件,如下所示:

  • PostgreSQL—Npgsql.EntityFrameworkCore.PostgreSQL

  • Microsoft SQL Server—Microsoft.EntityFrameworkCore.SqlServer

  • MySQL—MySql.Data.EntityFrameworkCore

  • SQLite—Microsoft.EntityFrameworkCore.SQLite

Some of the database provider packages are maintained by Microsoft, some are maintained by the open-source community, and some (such as the Oracle provider) require a paid license, so be sure to check your requirements. You can find a list of providers at https://docs.microsoft.com/ef/core/providers.

一些数据库提供程序包由 Microsoft 维护,一些由开源社区维护,还有一些(如 Oracle 提供程序)需要付费许可证,因此请务必检查您的要求。您可以在 https://docs.microsoft.com/ef/core/providers 上找到提供商列表。

You install a database provider in your application in the same way as any other library: by adding a NuGet package to your project’s .csproj file and running dotnet restore from the command line (or letting Visual Studio automatically restore for you).

在应用程序中安装数据库提供程序的方式与任何其他库相同:将 NuGet 包添加到项目的 .csproj 文件并运行 dotnet restore从命令行(或让 Visual Studio 自动为您还原)。

EF Core is inherently modular, so you’ll need to install multiple packages. I’m using the SQLite database provider, so I’ll be using the SQLite packages:

EF Core 本质上是模块化的,因此需要安装多个包。我正在使用 SQLite 数据库提供程序,因此我将使用 SQLite 包:

  • Microsoft.EntityFrameworkCore.SQLite—This package is the main database provider package for using EF Core at runtime. It also contains a reference to the main EF Core NuGet package.
    Microsoft.EntityFrameworkCore.SQLite – 此包是在运行时使用 EF Core 的主要数据库提供程序包。它还包含对主 EF Core NuGet 包的引用。

  • Microsoft.EntityFrameworkCore.Design—This package contains shared build-time components for EF Core, required for building the EF Core data model for your app.
    Microsoft.EntityFrameworkCore.Design – 此包包含 EF Core 的共享构建时组件,这些组件是为您的应用程序构建 EF Core 数据模型所必需的。

Tip You’ll also want to install tooling to help create and update your database. I show how to install these tools in section 12.3.1.
提示 您还需要安装工具来帮助创建和更新数据库。我在 Section 12.3.1 中演示了如何安装这些工具。

Listing 12.1 shows the recipe app’s .csproj file after adding the EF Core packages. Remember, you add NuGet packages as PackageReference elements.

列表 12.1 显示了添加 EF Core 包后配方应用程序的 .csproj 文件。请记住,将 NuGet 包添加为 PackageReference 元素。

Listing 12.1 Installing EF Core in an ASP.NET Core application
列表 12.1 在 ASP.NET Core 中安装 EF Core应用

<Project Sdk="Microsoft.NET.Sdk.Web">

  <PropertyGroup>
    <TargetFramework>net7.0</TargetFramework>   ❶
    <Nullable>enable</Nullable>
    <ImplicitUsings>enable</ImplicitUsings>
  </PropertyGroup>

  <ItemGroup>
    <PackageReference     ❷
      Include="Microsoft.EntityFrameworkCore.SQLite"    ❷
      Version="7.0.0" />    ❷
    <PackageReference     ❸
      Include="Microsoft.EntityFrameworkCore.Design"    ❸
      Version="7.0.0" >    ❸
        <IncludeAssets>runtime; build; native; contentfiles;  ❹
          Analyzers; buildtransitive</IncludeAssets>    ❹
        <PrivateAssets>all</PrivateAssets>    ❹
    </PackageReference>
  </ItemGroup>

❶ The app targets .NET 7.0.
该应用程序面向 .NET 7.0。
❷ Installs the appropriate NuGet package for your selected DB
为所选数据库安装适当的 NuGet 包
❸ Contains shared design-time components for EF Core
包含 EF Core 的共享设计时组件
❹ Added automatically by NuGet
由 NuGet 自动添加

With these packages installed and restored, you have everything you need to start building the data model for your application. In section 12.2.2 we’ll create the entity classes and the DbContext for your recipe app.

安装并还原这些包后,您就拥有了开始为应用程序构建数据模型所需的一切。在第 12.2.2 节中,我们将为您的配方应用程序创建实体类和 DbContext。

12.2.2 Building a data model

12.2.2 构建数据模型

In section 12.1.4 I showed an overview of how EF Core builds up its internal model of your database from the DbContext and entity models. Apart from this discovery mechanism, EF Core is flexible in letting you define your entities the way you want to, as POCO classes.

在第 12.1.4 节中,我概述了 EF Core 如何从 DbContext 和实体模型构建其数据库的内部模型。除了这种发现机制之外,EF Core 还可以灵活地让你以所需的方式将实体定义为 POCO 类。

Some ORMs require your entities to inherit from a specific base class or require you to decorate your models with attributes that describe how to map them. EF Core heavily favors a convention over configuration approach, as you can see in listing 12.2, which shows the Recipe and Ingredient entity classes for your app.

某些 ORM 要求实体从特定基类继承,或者要求您使用描述如何映射模型的属性来装饰模型。EF Core 非常倾向于使用约定而不是配置方法,因为你可以这样做参见 清单 12.2 中,它显示了 Recipe 和ngredient 实体类。

Tip The required keyword, used on several properties in listing 12.2, was introduced in C# 11. It’s used here to prevent warnings about uninitialized non-nullable values. You can read more about how EF Core interacts with non-nullable types in the documentation at http://mng.bz/Keoj.

提示 在清单 12.2 中的几个属性上使用的 required 关键字是在 C# 11 中引入的。它在此处用于防止有关未初始化的不可为 null 值的警告。您可以在 http://mng.bz/Keoj 文档中阅读有关 EF Core 如何与不可为 null 的类型交互的更多信息。

Listing 12.2 Defining the EF Core entity classes
列表 12.2 定义 EF Core 实体类

public class Recipe
{
    public int RecipeId { get; set; }
    public required string Name { get; set; }
    public TimeSpan TimeToCook { get; set; }
    public bool IsDeleted { get; set; }
    public required string Method { get; set; }
    public required ICollection<Ingredient> Ingredients { get; set; }  ❶
}
public class Ingredient
{
    public int IngredientId { get; set; }
    public int RecipeId { get; set; }
    public required string Name { get; set; }
    public decimal Quantity { get; set; }
    public required string Unit { get; set; }
}

❶ A Recipe can have many Ingredients, represented by ICollection.
一个配方可以有很多成分,用 ICollection 表示。

These classes conform to certain default conventions that EF Core uses to build up a picture of the database it’s mapping. The Recipe class, for example, has a RecipeId property, and the Ingredient class has an IngredientId property. EF Core identifies this pattern of an Id suffix as indicating the primary key of the table.

这些类符合 EF Core 用于构建其映射的数据库图片的某些默认约定。例如,Recipe 类具有 RecipeId 属性,而 Ingredient 类具有 IngredientId 属性。EF Core 将 Id 后缀的这种模式标识为指示表的主键。

Definition The primary key of a table is a value that uniquely identifies the row among all the others in the table. It’s often an int or a Guid.
定义 表的主键是一个值,用于在表中的所有其他行中唯一标识该行。它通常是 int 或 Guid。

Another convention visible here is the RecipeId property on the Ingredient class. EF Core interprets this property to be a foreign key pointing to the Recipe class. When considered with ICollection on the Recipe class, this property represents a many-to-one relationship, in which each recipe has many ingredients but each ingredient belongs to a single recipe (figure 12.5).

此处显示的另一个约定是 Ingredient 类的 RecipeId 属性。EF Core 将此属性解释为指向 Recipe 类的外键。当在 Recipe 类中使用 ICollection 时,此属性表示多对一关系,其中每个配方都有许多成分,但每个成分都属于一个配方(图 12.5)。

alt text

Figure 12.5 Many-to-one relationships in code are translated to foreign key relationships between tables.
图 12.5 代码中的多对一关系转换为表之间的外键关系。

Definition A foreign key on a table points to the primary key of a different table, forming a link between the two rows.
定义 表上的外键指向不同表的主键,从而在两行之间形成链接。

Many other conventions are at play here, such as the names EF Core will assume for the database tables and columns or the database column types it will use for each property, but I’m not going to discuss them here. The EF Core documentation contains details about all these conventions, as well as how to customize them for your application; see https://docs.microsoft.com/ef/core/modeling.

这里还有许多其他约定,例如 EF Core 将为数据库表和列采用的名称,或者它将用于每个属性的数据库列类型,但我不打算在这里讨论它们。EF Core 文档包含有关所有这些约定以及如何为应用程序自定义它们的详细信息;请参阅 https://docs.microsoft.com/ef/core/modeling

Tip You can also use DataAnnotations attributes to decorate your entity classes, controlling things like column naming and string length. EF Core will use these attributes to override the default conventions.
提示 您还可以使用 DataAnnotations 属性来装饰实体类,从而控制列命名和字符串长度等内容。EF Core 将使用这些属性来替代默认约定。

As well as defining the entities, you define the DbContext for your application. The DbContext is the heart of EF Core in your application, used for all your database calls. Create a custom DbContext, in this case called AppDbContext, and derive from the DbContext base class, as shown in listing 12.3. This class exposes the DbSet so that EF Core can discover and map the Recipe entity. You can expose multiple instances of DbSet<> in this way for each of the top-level entities in your application.

除了定义实体之外,您还可以为应用程序定义 DbContext。DbContext 是应用程序中 EF Core 的核心,用于所有数据库调用。创建自定义 DbContext(在本例中称为 AppDbContext),并从 DbContext 基类派生,如清单所示12.3. 此类公开 DbSet以便 EF Core 可以发现和映射 Recipe 实体。您可以通过这种方式为应用程序中的每个顶级实体公开 DbSet<> 的多个实例

Listing 12.3 Defining the application DbContext
清单 12.3 定义应用程序 DbContext

public class AppDbContext : DbContext
{
    public AppDbContext(DbContextOptions<AppDbContext> options)      ❶
        : base(options) { }                                          ❶
    public DbSet<Recipe> Recipes { get; set; }    ❷
}

❶ The constructor options object, containing details such as the connection string
构造函数选项对象,包含连接字符串等详细信息

❷ You’ll use the Recipes property to query the database.
您将使用 Recipes 属性来查询数据库。

The AppDbContext for your app is simple, containing a list of your root entities, but you can do a lot more with it in a more complex application. If you wanted to, you could customize how EF Core maps entities to the database, but for this app you’re going to use the defaults.

应用程序的 AppDbContext 很简单,包含根实体的列表,但您可以在更复杂的应用程序中使用它执行更多作。如果需要,可以自定义 EF Core 将实体映射到数据库的方式,但对于此应用程序,你将使用默认值。

Note You didn’t list Ingredient on AppDbContext, but EF Core models it correctly as it’s exposed on the Recipe. You can still access the Ingredient objects in the database, but you must navigate via the Recipe entity’s Ingredients property to do so, as you’ll see in section 12.4.
注意 您没有在 AppDbContext 上列出 Ingredient,但 EF Core 会正确建模,因为它在 Recipe 上公开。您仍然可以访问数据库中的 Ingredient 对象,但必须通过 Recipe 实体的 Ingredients 属性进行导航,如第 12.4 节所示。

For this simple example, your data model consists of these three classes: AppDbContext, Recipe, and Ingredient. The two entities are mapped to tables and their columns to properties, and you use the AppDbContext to access them.

对于这个简单的示例,您的数据模型由以下三个类组成:AppDbContext、Recipe 和 Ingredient。这两个实体映射到表,它们的列映射到属性,您可以使用 AppDbContext 访问它们。

Note This code-first approach is typical, but if you have an existing database, you can automatically generate the EF entities and DbContext instead. (You can find more information in Microsoft’s “reverse engineering” article at http://mng.bz/mgd4.)
注意 这种代码优先方法是典型的,但如果你有现有数据库,则可以自动生成 EF 实体和 DbContext。(您可以在 Microsoft 的“逆向工程”文章中找到更多信息,网址为 http://mng.bz/mgd4

The data model is complete, but you’re not quite ready to use it: your ASP.NET Core app doesn’t know how to create your AppDbContext, and your AppDbContext needs a connection string so that it can talk to the database. In section 12.2.3 we tackle both of these problems, and we finish setting up EF Core in your ASP.NET Core app.

数据模型已完成,但您还没有完全准备好使用它:您的 ASP.NET Core 应用程序不知道如何创建 AppDbContext,并且您的 AppDbContext 需要一个连接字符串,以便它可以与数据库通信。在第 12.2.3 节中,我们解决了这两个问题,并完成了 ASP.NET Core 应用中的 EF Core 设置。

12.2.3 Registering a data context

12.2.3 注册数据上下文

As with any other service in ASP.Net Core, you should register your AppDbContext with the dependency injection (DI) container. When registering your context, you also configure the database provider and set the connection string so that EF Core knows how to talk with the database.

与 ASP.Net Core 中的任何其他服务一样,您应该向依赖项注入 (DI) 容器注册 AppDbContext。注册上下文时,还要配置数据库提供程序并设置连接字符串,以便 EF Core 知道如何与数据库通信。

You register the AppDbContext with the WebApplicationBuilder in Program.cs. EF Core provides a generic AddDbContext extension method for this purpose; the method takes a configuration function for a DbContextOptionsBuilder instance. This builder can set a host of internal properties of EF Core and lets you replace all the internal services of EF Core if you want.

您可以在 Program.cs 中向 WebApplicationBuilder 注册 AppDbContext。EF Core 为此提供了通用的 AddDbContext 扩展方法;该方法采用 DbContextOptionsBuilder 实例的配置函数。此生成器可以设置 EF Core 的大量内部属性,并允许你根据需要替换 EF Core 的所有内部服务。

The configuration for your app is, again, nice and simple, as you can see in the following listing. You set the database provider with the UseSqlite extension method, made available by the Microsoft.EntityFrameworkCore.SQLite package, and pass it a connection string.

同样,您的应用程序的配置既漂亮又简单,如下面的清单所示。您可以使用 UseSqlite 扩展方法(由 Microsoft.EntityFrameworkCore.SQLite 包提供)设置数据库提供程序,并向其传递连接字符串。

Listing 12.4 Registering a DbContext with the DI container
清单 12.4 向 DI 注册 DbContext容器

using Microsoft.EntityFrameworkCore;
WebApplicationBuillder builder = WebApplication.CreateBuilder(args);
var connString = builder.Configuration                  ❶
        .GetConnectionString("DefaultConnection");      ❶

Builder.Services.AddDbContext<AppDbContext>(            ❷
        options => options.UseSqlite(connString));   ❸

WebApplication app = builder.Build();
app.Run();

❶ The connection string is taken from configuration, from the ConnectionStrings
section.
连接字符串取自配置的 ConnectionStrings 部分。
❷ Registers your app’s DbContext by using it as the generic parameter
通过将应用的 DbContext 用作泛型参数来注册该应用的 DbContext
❸ Specifies the database provider in the customization options for the
DbContext.
在 DbContext 的自定义选项中指定数据库提供程序。

Note If you’re using a different database provider, such as a provider for SQL Server, you need to call the appropriate Use method on the options object when registering your AppDbContext.
注意 如果您使用的是其他数据库提供程序(例如 SQL Server 的提供程序),则需要在注册 AppDbContext 时对 options 对象调用相应的 Use
方法。

The connection string is a typical secret, as I discussed in chapter 10, so loading it from configuration makes sense. At runtime the correct configuration string for your current environment is used, so you can use different databases when developing locally and in production.

正如我在第 10 章中讨论的那样,连接字符串是一个典型的密钥,因此从配置中加载它是有意义的。在运行时,将使用当前环境的正确配置字符串,因此在本地开发和生产时可以使用不同的数据库。

Tip You can configure your AppDbContext’s connection string in other ways, such as with the OnConfiguring method, but I recommend the method shown here for ASP.NET Core websites.
提示 您可以通过其他方式配置 AppDbContext 的连接字符串,例如使用 OnConfiguring 方法,但我建议对 ASP.NET Core 网站使用此处显示的方法。

Now you have a DbContext, named AppDbContext, registered as a scoped service with the DI container (typical for database-related services), and a data model corresponding to your database. Codewise, you’re ready to start using EF Core, but the one thing you don’t have is a database! In section 12.3 you’ll see how you can easily use the .NET CLI to ensure that your database stays up to date with your EF Core data model.

现在,您有一个名为 AppDbContext 的 DbContext,它注册为 DI 容器的作用域服务(通常用于数据库相关服务),以及与您的数据库对应的数据模型。在代码方面,你已准备好开始使用 EF Core,但你没有的一件事是数据库!在第 12.3 节中,你将了解如何轻松使用 .NET CLI 来确保数据库与 EF Core 数据模型保持同步。

12.3 Managing changes with migrations

12.3 通过迁移管理更改

In this section you’ll learn how to generate SQL statements to keep your database’s schema in sync with your application’s data model, using migrations. You’ll learn how to create an initial migration and use it to create the database. Then you’ll update your data model, create a second migration, and use it to update the database schema.

在本节中,您将学习如何使用迁移生成 SQL 语句,以使数据库的架构与应用程序的数据模型保持同步。您将了解如何创建初始迁移并使用它来创建数据库。然后,您将更新数据模型,创建第二个迁移,并使用它来更新数据库架构。

Managing schema changes for databases, such as when you need to add a new table or a new column, is notoriously difficult. Your application code is explicitly tied to a particular version of a database, and you need to make sure that the two are always in sync.

众所周知,管理数据库的架构更改(例如,当您需要添加新表或新列时)非常困难。您的应用程序代码明确绑定到数据库的特定版本,您需要确保两者始终同步。

Definition Schema refers to how the data is organized in a database, including the tables, columns, and relationships among them.
定义 架构是指数据在数据库中的组织方式,包括表、列以及它们之间的关系。

When you deploy an app, normally you can delete the old code/executable and replace it with the new code. Job done. If you need to roll back a change, delete that new code, and deploy an old version of the app.

部署应用程序时,通常可以删除旧代码/可执行文件并将其替换为新代码。工作完成。如果您需要回滚更改,请删除该新代码,然后部署旧版本的应用程序。

The difficulty with databases is that they contain data, so blowing it away and creating a new database with every deployment isn’t possible. A common best practice is to version a database’s schema explicitly along with your application’s code. You can do this in many ways, but typically you need to store the SQL script that takes the database from the previous schema to the new schema. Then you can use a library such as DbUp (https://github.com/DbUp/DbUp) or FluentMigrator (https://github.com/fluentmigrator/fluentmigrator) to keep track of which scripts have been applied and ensure that your database schema is up to date. Alternatively, you can use external tools to manage this task.

数据库的难点在于它们包含数据,因此不可能在每次部署时都将其吹走并创建一个新数据库。一种常见的最佳实践是将数据库的架构与应用程序代码一起显式进行版本控制。您可以通过多种方式执行此作,但通常需要存储将数据库从以前的架构转移到新架构的 SQL 脚本。然后,您可以使用 DbUp (https://github.com/DbUp/DbUp) 或 FluentMigrator (https://github.com/fluentmigrator/fluentmigrator) 等库来跟踪已应用的脚本,并确保您的数据库架构是最新的。或者,您也可以使用外部工具来管理此任务。

EF Core provides its own version of schema management called migrations. Migrations provide a way to manage changes to a database schema when your EF Core data model changes.

EF Core 提供自己的架构管理版本,称为迁移。 迁移提供了一种在 EF Core 数据模型更改时管理数据库架构更改的方法。

Definition A migration is a C# code file in your application that defines how the data model changed—which columns were added, new entities, and so on. Migrations provide a record over time of how your database schema evolved as part of your application, so the schema is always in sync with your app’s data model.
定义 迁移是应用程序中的 C# 代码文件,用于定义数据模型的更改方式 - 添加了哪些列、新实体等。迁移会记录数据库 Schema 作为应用程序的一部分如何随时间演变,因此 Schema 始终与应用的数据模型保持同步。

You can use command-line tools to create a new database from the migrations or to update an existing database by applying new migrations to it. You can even roll back a migration, which updates a database to a previous schema.

您可以使用命令行工具从迁移中创建新数据库,或者通过向现有数据库应用新的迁移来更新现有数据库。您甚至可以回滚迁移,这会将数据库更新到以前的架构。

Warning Applying migrations modifies the database, so you must always be aware of data loss. If you remove a table from the database using a migration and then roll back the migration, the table will be re-created, but the data it previously contained will be gone forever!
警告 应用迁移会修改数据库,因此您必须始终注意数据丢失。如果您使用迁移从数据库中删除表,然后回滚迁移,则会重新创建该表,但之前包含的数据将永远消失!

In this section, you’ll see how to create your first migration and use it to create a database. Then you’ll update your data model, create a second migration, and use it to update the database schema.

在本节中,您将了解如何创建您的第一个迁移并使用它来创建数据库。然后,您将更新数据模型,创建第二个迁移,并使用它来更新数据库架构。

12.3.1 Creating your first migration

12.3.1 创建您的第一个迁移

Before you can create migrations, you need to install the necessary tooling. You have two primary ways to do this:
在创建迁移之前,您需要安装必要的工具。有两种主要方法可以执行此作:

  • Package manager console—You can use PowerShell cmdlets inside Visual Studio’s Package Manager Console (PMC). You can install them directly from the PMC or by adding the Microsoft.EntityFrameworkCore.Tools package to your project.
    包管理器控制台 — 您可以在 Visual Studio 的包管理器控制台 (PMC) 中使用 PowerShell cmdlet。您可以直接从 PMC 安装它们,也可以通过将 Microsoft.EntityFrameworkCore.Tools 包添加到您的项目来安装它们。

  • .NET tool—You can use cross-platform, command-line tooling that extends the .NET software development kit (SDK). You can install the EF Core .NET tool globally for your machine by running dotnet tool install --global dotnet-ef.
    .NET 工具 — 您可以使用扩展 .NET SDK 的跨平台命令行工具。可以通过运行 dotnet tool install -- global dotnet-ef 为计算机全局安装 EF Core .NET 工具。

In this book I use the cross-platform .NET tools, but if you’re familiar with EF 6.x or prefer to use the Visual Studio PMC, there are equivalent commands for the steps you’re going to take (http://mng.bz/9DK7). You can check that the .NET tool installed correctly by running dotnet ef, which should produce a help screen like the one shown in figure 12.6.

在本书中,我使用了跨平台的 .NET 工具,但如果您熟悉 EF 6.x 或更喜欢使用 Visual Studio PMC,则对于您将要执行的步骤 (http://mng.bz/9DK7),有等效的命令。您可以通过运行 dotnet ef 来检查 .NET 工具是否正确安装,这应该会产生如图 12.6 所示的帮助屏幕。

alt text

Figure 12.6 Running the dotnet ef command to check that the .NET EF Core tools are installed correctly
图 12.6 运行 dotnet ef 命令以检查 .NET EF Core 工具是否已正确安装

Tip If you get the No executable found matching command ‘dotnet-ef’ message when running the preceding command, make sure that you installed the global tool by using dotnet tool install --global dotnet-ef. In general, you need to run the dotnet ef tools from the project folder in which you registered your AppDbContext—not from the solution-folder level.
提示 如果在运行上述命令时收到 No executable found matching command 'dotnet-ef' 消息,请确保使用 dotnet tool install --global 安装了全局工具dotnet-ef 的通常,您需要从注册 AppDbContext 的项目文件夹运行 dotnet ef 工具,而不是从解决方案文件夹级别运行。

With the tools installed and your database context configured, you can create your first migration by running the following command from inside your web project folder and providing a name for the migration (in this case, InitialSchema):
安装工具并配置数据库上下文后,您可以通过从 Web 项目文件夹内运行以下命令并提供迁移名称(在本例中为 InitialSchema)来创建第一个迁移:

dotnet ef migrations add InitialSchema

This command creates three files in the Migrations folder in your project:
此命令在项目的 Migrations 文件夹中创建三个文件:

  • Migration file—This file, with the Timestamp_MigrationName.cs format, describes the actions to take on the database, such as creating a table or adding a column. Note that the commands generated here are database-provider-specific, based on the database provider configured in your project.
    迁移文件 - 此文件采用 Timestamp_MigrationName.cs 格式,描述要对数据库执行的作,例如创建表或添加列。请注意,此处生成的命令是特定于数据库提供程序的,具体取决于项目中配置的数据库提供程序。

  • Migration designer.cs file—This file describes EF Core’s internal model of your data model at the point in time when the migration was generated.
    迁移designer.cs文件 – 此文件描述在生成迁移时数据模型的 EF Core 内部模型。

  • AppDbContextModelSnapshot.cs—This file describes EF Core’s current internal model. This file is updated when you add another migration, so it should always be the same as the current (latest) migration. EF Core can use AppDbContextModelSnapshot.cs to determine a database’s previous state when creating a new migration without interacting with the database directly.
    AppDbContextModelSnapshot.cs – 此文件描述 EF Core 的当前内部模型。当您添加另一个迁移时,此文件会更新,因此它应始终与当前(最新)迁移相同。EF Core 可以在创建新迁移时使用 AppDbContextModelSnapshot.cs 来确定数据库的先前状态,而无需直接与数据库交互。

These three files encapsulate the migration process, but adding a migration doesn’t update anything in the database itself. For that task, you must run a different command to apply the migration to the database.

这三个文件封装了迁移过程,但添加迁移不会更新数据库本身的任何内容。对于该任务,您必须运行其他命令才能将迁移应用于数据库。

Tip You can, and should, look inside the migration file EF Core generates to check what it will do to your database before running the following commands. Better safe than sorry!
提示 在运行以下命令之前,您可以而且应该查看 EF Core 生成的迁移文件,以检查它将对数据库执行什么作。安全总比后悔好!

You can apply migrations in any of four ways:
您可以通过以下四种方式中的任何一种应用迁移:

  • Using the .NET tool
    使用 .NET 工具
  • Using the Visual Studio PowerShell cmdlets
    使用 Visual Studio PowerShell cmdlets
  • In code, by obtaining an instance of your AppDbContext from the DI container and calling context.Database.Migrate()
    在代码中,通过获取AppDbContext 并从 DI 容器中调用上下文。Database.Migrate() 数据库
  • By generating a migration bundle application (see http://mng.bz/jPyr)
    通过生成迁移捆绑包应用程序(请参阅 http://mng.bz/jPyr

Which method is best for you depends on how you designed your application, how you’ll update your production database, and what your personal preference is. I’ll use the .NET tool for now, but I discuss some of these considerations in section 12.5. You can apply migrations to a database by running
哪种方法最适合您取决于您如何设计应用程序、如何更新生产数据库以及您的个人偏好。我将使用.NET 工具,但我会在第 12.5 节中讨论其中的一些注意事项。您可以通过运行

dotnet ef database update

from the project folder of your application. I won’t go into the details on how this command works, but it performs four steps:
从应用程序的 project 文件夹中。我不会详细介绍此命令的工作原理,但它执行四个步骤:

  1. Builds your application
    构建您的应用程序
  2. Loads the services configured in your app’s Program.cs, including AppDbContext
    加载在应用程序的 Program.cs 中配置的服务,包括 AppDbContext
  3. Checks whether the database in the AppDbContext connection string exists and if not, creates it
    检查 AppDbContext 连接字符串中的数据库是否存在,如果不存在,则创建该数据库
  4. Updates the database by applying any unapplied migrations
    通过应用任何未应用的迁移来更新数据库

If everything is configured correctly, as in section 12.2, running this command sets you up with a shiny new database like the one shown in figure 12.7.
如果一切都配置正确,如 Section 12.2 所示,运行此命令将为您设置一个闪亮的新数据库,如图 12.7 所示。

alt text

Figure 12.7 Applying migrations to a database creates the database if it doesn’t exist and updates the database to match EF Core’s internal data model. The list of applied migrations is stored in the EFMigrationsHistory table.
图 12.7 将迁移应用于数据库会创建数据库(如果数据库不存在),并更新数据库以匹配 EF Core 的内部数据模型。应用的迁移列表存储在
EFMigrationsHistory 表。

Note If you get an error message saying No project was found when running these commands, check that you’re running them in your application’s project folder, not the top-level solution folder.
注意 如果您在运行这些命令时收到一条错误消息,指出 No project was found,请检查您是否在应用程序的项目文件夹中运行它们,而不是在顶级解决方案文件夹中运行它们。

When you apply the migrations to the database, EF Core creates the necessary tables in the database and adds the appropriate columns and keys. You may have also noticed the __EFMigrationsHistory table, which EF Core uses to store the names of migrations that it’s applied to the database. Next time you run dotnet ef database update, EF Core can compare this table with the list of migrations in your app and apply only the new ones to your database.

将迁移应用于数据库时,EF Core 会在数据库中创建必要的表,并添加相应的列和键。你可能还注意到了 EFMigrationsHistory 表,EF Core 使用该表来存储它应用于数据库的迁移的名称。下次运行 dotnet ef database update 时,EF Core 可以将此表与应用中的迁移列表进行比较,并仅将新的迁移应用于数据库。

In section 12.3.2 we’ll look at how migrations make it easy to change your data model and update the database schema without having to re-create the database from scratch.

在 Section 12.3.2 中,我们将了解迁移如何使更改数据模型和更新数据库模式变得容易,而无需从头开始重新创建数据库。

12.3.2 Adding a second migration

12.3.2 添加第二个迁移

Most applications inevitably evolve due to increased scope or simple maintenance. Adding properties to your entities, adding new entities , and removing obsolete classes are all likely.

由于范围扩大或维护简单,大多数应用不可避免地会不断发展。向实体添加属性、添加新实体和删除过时的类都是可能的。

EF Core migrations make this evolution simple. Suppose that you decide to highlight vegetarian and vegan dishes in your recipe app by exposing IsVegetarian and IsVegan properties on the Recipe entity (listing 12.5). Change your entities to your desired state, generate a migration, and apply it to the database, as shown in figure 12.8.

EF Core 迁移使这种演变变得简单。假设您决定通过在 Recipe 实体(清单 12.5)上公开 IsVegetarian 和 IsVegan 属性,在食谱应用程序中突出显示素食和纯素食菜肴。将实体更改为所需状态,生成迁移并将其应用于数据库,如图 12.8 所示。

alt text

Figure 12.8 Creating a second migration and applying it to the database using the command-line tools.
图 12.8 使用命令行工具创建第二个迁移并将其应用于数据库

Listing 12.5 Adding properties to the Recipe entity
清单 12.5 向 Recipe 实体添加属性

public class Recipe
{
    public int RecipeId { get; set; }
    public required string Name { get; set; }
    public TimeSpan TimeToCook { get; set; }
    public bool IsDeleted { get; set; }
    public required string Method { get; set; }
    public bool IsVegetarian { get; set; }
    public bool IsVegan { get; set; }
    public required ICollection<Ingredient> Ingredients { get; set; }
}

As shown in figure 12.8, after changing your entities, you need to update EF Core’s internal representation of your data model. You perform this update exactly the same way that you did for the first migration, by calling dotnet ef migrations add and providing a name for the migration:
如图 12.8 所示,更改实体后,您需要更新 EF Core 的数据模型的内部表示形式。执行此更新的方式与第一次迁移完全相同,方法是调用 dotnet ef migrations add 并提供迁移的名称:

dotnet ef migrations add ExtraRecipeFields

This command creates a second migration in your project by adding the migration file and its .designer.cs snapshot file; it also updates AppDbContextModelSnapshot.cs (figure 12.9).
此命令通过添加迁移文件及其 .designer.cs 快照文件,在项目中创建第二个迁移;它还会更新 AppDbContextModelSnapshot.cs (图 12.9)。

alt text

Figure 12.9 Adding a second migration adds a new migration file and a migration Designer.cs file. It also updates AppDbContextModelSnapshot to match the new migration’s Designer.cs file.
图 12.9 添加第二个迁移会添加新的迁移文件和迁移Designer.cs文件。它还更新 AppDbContextModelSnapshot 以匹配新迁移的 Designer.cs 文件。

As before, this command creates the migration’s files but doesn’t modify the database. You can apply the migration and update the database by running

与以前一样,此命令会创建迁移的文件,但不会修改数据库。您可以通过运行

dotnet ef database update

This command compares the migrations in your application with the __EFMigrationsHistory table in your database to see which migrations are outstanding; then it runs them. EF Core runs the 20220825201452_ExtraRecipeFields migration, adding the IsVegetarian and IsVegan fields to the database, as shown in figure 12.10.

此命令将应用程序中的迁移与数据库中的 EFMigrationsHistory 表进行比较,以查看哪些迁移未完成;然后它运行它们。EF Core 运行 20220825201452_ExtraRecipeFields 迁移,将 IsVegetarian 和 IsVegan 字段添加到数据库中,如图 12.10 所示。

alt text

Figure 12.10 Applying the ExtraRecipeFields migration to the database adds the IsVegetarian and IsVegan fields to the Recipes table.
图 12.10 将 ExtraRecipeFields 迁移应用于数据库,将 IsVegetarian 和 IsVegan 字段添加到 Recipes 表中。

Using migrations is a great way to ensure that your database is versioned along with your app code in source control. You can easily check out your app’s source code for a historical point in time and re-create the database schema your application used at that point.

使用迁移是确保数据库与源代码管理中的应用程序代码一起进行版本控制的好方法。您可以轻松查看应用程序的历史时间点源代码,并重新创建应用程序在该时间点使用的数据库架构。

Migrations are easy to use when you’re working alone or deploying to a single web server, but even in these cases, you have important things to consider when deciding how to manage your databases. For apps with multiple web servers using a shared database or for containerized applications, you have even more things to think about.

当您单独工作或部署到单个 Web 服务器时,迁移很容易使用,但即使在这些情况下,在决定如何管理数据库时,您也需要考虑重要事项。对于具有多个 Web 服务器、使用共享数据库的应用程序或容器化应用程序,您需要考虑的事项更多。

This book is about ASP.NET Core, not EF Core, so I don’t want to dwell on database management much. But section 12.5 points out some of the things you need to bear in mind when using migrations in production.

这本书是关于 ASP.NET Core 的,而不是 EF Core,因此我不想过多地讨论数据库管理。但是 Section 12.5 指出了在 生产环境 中使用 migrations 时需要记住的一些事项。

In section 12.4 we’ll get back to the meaty stuff: defining our business logic and performing CRUD operations on the database.

在 Section 12.4 中,我们将回到内容丰富的东西:定义我们的业务逻辑并在数据库上执行 CRUD作。

12.4 Querying data from and saving data to the database

12.4 从数据库查询数据并将数据保存到数据库

Let’s review where you are in creating the recipe application:
让我们回顾一下您创建配方应用程序的位置:

  • You created a simple data model consisting of recipes and ingredients.
    您创建了一个由配方和成分组成的简单数据模型。

  • You generated migrations for the data model to update EF Core’s internal model of your entities.
    您为数据模型生成了迁移,以更新 EF Core 的实体内部模型。

  • You applied the migrations to the database so that its schema matches EF Core’s model.
    您已将迁移应用于数据库,使其架构与 EF Core 的模型匹配。

In this section you’ll build the business logic for your application by creating a RecipeService. This service handles querying the database for recipes, creating new recipes, and modifying existing ones. As this app has a simple domain, I’ll be using RecipeService to handle all the requirements, but in your own apps you may have multiple services that cooperate to provide the business logic.

本节中,您将通过创建 RecipeService 来构建应用程序的业务逻辑。此服务处理在数据库中查询配方、创建新配方和修改现有配方。由于此应用程序具有一个简单的域,因此我将使用 RecipeService 来处理所有需求,但在您自己的应用程序中,您可能有多个服务相互协作以提供业务逻辑。

Note For simple apps, you may be tempted to move this logic into your endpoint handlers or Razor Pages. This approach may be fine for tiny apps, but I encourage you to resist the urge generally; extracting your business logic to other services decouples the HTTP-centric nature of your handlers from the underlying business logic, whichoften makes your business logic easier to test and more reusable.
注意 对于简单的应用程序,您可能会想将此逻辑移动到端点处理程序或 Razor Pages 中。这种方法可能适用于小型应用程序,但我鼓励您通常抵制这种冲动;将业务逻辑提取到其他服务可以将处理程序以 HTTP 为中心的性质与底层业务逻辑分离,这通常使业务逻辑更易于测试和更可重用。

Our database doesn’t have any data in it yet, so we’d better start by creating a recipe.

我们的数据库中还没有任何数据,因此我们最好先创建一个配方。

12.4.1 Creating a record

12.4.1 创建记录

In this section you’re going to build functionality to let users create a recipe by using the API. Clients send all the details of the recipe in the body of a POST request to an endpoint in your app. The endpoint uses model binding and validation attributes to confirm that the request is valid, as you learned in chapter 7.

在本节中,您将构建功能,让用户使用 API 创建配方。客户端将 POST 请求正文中配方的所有详细信息发送到 应用程序中的终端节点。终端节点使用模型绑定和验证属性来确认请求有效,如您在第 7 章中学到的那样。

If the request is valid, the endpoint handler calls RecipeService to create the new Recipe object in the database. As EF Core is the topic of this chapter, I’m going to focus on this service alone, but you can always check out the source code for this book if you want to see how everything fits together in a minimal API application.

如果请求有效,则端点处理程序会调用RecipeService 在数据库。由于 EF Core 是本章的主题,因此我将单独关注此服务,但如果您想了解所有内容如何组合到最小 API 应用程序中,您始终可以查看本书的源代码。

The business logic for creating a recipe in this application is simple: there is no logic! Copy the properties from the command binding model provided in the endpoint handler to a Recipe entity and its Ingredients, add the Recipe object to AppDbContext, and save it in the database, as shown in figure 12.11.

在此应用程序中创建配方的业务逻辑很简单:没有逻辑!将端点处理程序中提供的命令绑定模型中的属性复制到 Recipe 实体及其 Ingredients,将 Recipe 对象添加到 AppDbContext,并将其保存在数据库中,如图 12.11 所示。

alt text

Figure 12.11 Calling the POST endpoint and creating a new entity. A Recipe is created from the CreateRecipeCommand model and is added to the DbContext. EF Core generates the SQL to add a new row to the Recipes table in the database.

图 12.11 调用 POST 端点并创建新实体。配方是从 CreateRecipeCommand 模型创建的,并添加到 DbContext 中。EF Core 生成 SQL 以向数据库的 Recipes 表添加新行。

Warning Many simple, equivalent sample applications using EF or EF Core allow you to bind directly to the Recipe entity as the model in your endpoint. Unfortunately, this approach exposes a security vulnerability known as overposting, which is bad practice. If you want to avoid the boilerplate mapping code in your applications, consider using a library such as AutoMapper (http://automapper.org). For more details on overposting, see my blog post on the subject at http://mng.bz/d48O.
警告 许多使用 EF 或 EF Core 的简单等效示例应用程序允许您直接绑定到 Recipe 实体作为终端节点中的模型。不幸的是,这个方法会暴露一个称为 overpost 的安全漏洞,这是一种不好的做法。如果要避免在应用程序中使用样板映射代码,请考虑使用 AutoMapper (http://automapper.org) 等库。有关过度发布的更多详细信息,请参阅我在 http://mng.bz/d48O 上关于该主题的博客文章。

Creating an entity in EF Core involves adding a new row to the mapped table. For your application, whenever you create a new Recipe, you also add the linked Ingredient entities. EF Core takes care of linking all these entities correctly by creating the correct RecipeId for each Ingredient in the database.

在 EF Core 中创建实体涉及向映射表添加新行。对于您的应用程序,每当您创建新配方时,您都会添加链接的 Ingredient 实体。EF Core 通过为数据库中的每个成分创建正确的 RecipeId 来正确链接所有这些实体。

All interactions with EF Core and the database start with an instance of AppDbContext, which typically is DI-injected via the constructor. Creating a new entity requires three steps:

与 EF Core 和数据库的所有交互都从 AppDbContext 实例开始,该实例通常通过构造函数进行 DI 注入。创建新实体需要三个步骤:

  1. Create the and Ingredient entities.
    创建 Recipe 和 Ingredient 实体。

  2. Add the entities to EF Core’s list of tracked entities using _context.Add(entity).
    使用 _context 将实体添加到 EF Core 的跟踪实体列表中。

  3. Execute the SQL INSERT statements against the database, adding the necessary rows to the Recipe and Ingredient tables, by calling _context.SaveChangesAsync().
    对数据库执行 SQL INSERT 语句,通过调用SaveChangesAsync() 上下文。

Tip There are sync and async versions of most of the EF Core commands that involve interacting with the database, such as SaveChanges() and SaveChangesAsync(). In general, the async versions will allow your app to handle more concurrent connections, so I tend to favor them whenever I can use them.
提示 大多数涉及与数据库交互的 EF Core 命令都有同步和异步版本,例如 SaveChanges() 和 SaveChangesAsync()。通常,异步版本将允许您的应用程序处理更多的并发连接,因此只要可以使用它们,我就会倾向于使用它们。

Listing 12.6 shows these three steps in practice. The bulk of the code in this example involves copying properties from CreateRecipeCommand to the Recipe entity. The interaction with the AppDbContext consists of only two methods: Add() and SaveChangesAsync().

清单 12.6 展示了这三个步骤的实际应用。此示例中的大部分代码涉及将属性从 CreateRecipeCommand 复制到 Recipe 实体。与 AppDbContext 的交互仅包含两个方法:Add() 和 SaveChangesAsync()。

Listing 12.6 Creating a Recipe entity in the database in RecipeService
清单 12.6 在数据库中创建一个 Recipe 实体

readonly AppDbContext _context;    ❶
public async Task<int> CreateRecipe(CreateRecipeCommand cmd)   ❷
{
    var recipe = new Recipe                             ❸
    {                                                   ❸
        Name = cmd.Name,                                ❸
        TimeToCook = new TimeSpan(                      ❸
            cmd.TimeToCookHrs, cmd.TimeToCookMins, 0),  ❸
        Method = cmd.Method,                            ❸
        IsVegetarian = cmd.IsVegetarian,                ❸
        IsVegan = cmd.IsVegan,                          ❸
        Ingredients = cmd.Ingredients.Select(i =>      ❸
        new Ingredient              ❹
        {                           ❹
            Name = i.Name,          ❹
            Quantity = i.Quantity,  ❹
            Unit = i.Unit,          ❹
        }).ToList()                 ❹
    };
    _context.Add(recipe);       ❺
    await _context.SaveChangesAsync();   ❻
    return recipe.RecipeId;    ❼
}

❶ An instance of the AppDbContext is injected in the class constructor using DI.
使用 DI 将 AppDbContext 的实例注入类构造函数中。
❷ CreateRecipeCommand is passed in from the endpoint handler.
CreateRecipeCommand 从端点处理程序传入。
❸ Creates a Recipe by mapping from the command object to the Recipe entity
通过从命令对象映射到 Recipe 实体来创建 Recipe
❹ Maps each CreateIngredientCommand onto an Ingredient entity
将每个 CreateIngredientCommand 映射到一个 Ingredient 实体
❺ Tells EF Core to track the new entities
告知 EF Core 跟踪新实体
❻ Tells EF Core to write the entities to the database; uses the async version of the command
告知 EF Core 将实体写入数据库;使用命令的异步版本
❼ EF Core populates the RecipeId field on your new Recipe when it’s saved.
保存新配方时,EF Core 会填充新配方上的 RecipeId 字段。

If a problem occurs when EF Core tries to interact with your database—you haven’t run the migrations to update the database schema, for example—this code throws an exception. I haven’t shown it here, but it’s important to handle these exceptions in your application so you don’t present an ugly error message to user when things go wrong.

如果在 EF Core 尝试与数据库交互时出现问题(例如,您尚未运行迁移来更新数据库架构),则此代码将引发异常。我没有在这里展示它,但在您的应用程序中处理这些异常很重要,这样您就不会在出现问题时向用户显示难看的错误消息。

Assuming that all goes well, EF Core updates all the autogenerated IDs of your entities (RecipeId on Recipe, and both RecipeId and IngredientId on Ingredient). Return the recipe ID to the endpoint handler so the handler can use it—to return the ID in the API response, for example.

假设一切顺利,EF Core 会更新实体的所有自动生成的 ID(Recipe 上的 RecipeId,以及 Ingredient 上的 RecipeId 和 IngredientId)。将配方 ID 返回给终端节点处理程序,以便处理程序可以使用它,例如,在 API 响应中返回 ID。

Tip The DbContext type is an implementation of both the unit-of-work and repository patterns, so you generally don’t need to implement these patterns manually in your apps. You can read more about these patterns at https://martinfowler.com/eaaCatalog.
提示 DbContext 类型是工作单元模式和存储库模式的实现,因此您通常不需要在应用程序中手动实现这些模式。您可以在 https://martinfowler.com/eaaCatalog 上阅读有关这些模式的更多信息。

And there you have it. You’ve created your first entity with EF Core. In section 12.4.2 we’ll look at loading these entities from the database so you can fetch them all in a list.

你有它。你已使用 EF Core 创建了第一个实体。在 Section 12.4.2 中,我们将介绍如何从数据库中加载这些实体,以便您可以在列表中获取它们。

12.4.2 Loading a list of records

12.4.2 加载记录列表

Now that you can create recipes, you need to write the code to view them. Luckily, loading data is simple in EF Core, relying heavily on LINQ methods to control the fields you need. For your app, you’ll create a method on RecipeService that returns a summary view of a recipe, consisting of RecipeId, Name, and TimeToCook as a RecipeSummaryViewModel, as shown in figure 12.12.

现在,您可以创建配方,您需要编写代码来查看它们。幸运的是,在 EF Core 中加载数据很简单,在很大程度上依赖于 LINQ 方法来控制所需的字段。对于您的应用程序,您将在 RecipeService 上创建一个方法,该方法返回配方的摘要视图,其中包含 RecipeId、Name 和 TimeToCook 作为 RecipeSummaryViewModel,如图 12.12 所示。

alt text

Figure 12.12 Calling the GET list endpoint and querying the database to retrieve a list of RecipeSummaryViewModels. EF Core generates the SQL to retrieve the necessary fields from the database and maps them to view model objects.
图 12.12 调用 GET 列表终端节点并查询数据库以检索 RecipeSummaryViewModels 列表。EF Core 生成 SQL 以从数据库中检索必要的字段,并将它们映射到视图模型对象。

Note Creating a view model is technically a UI concern rather than a business-logic concern. I’m returning a view model directly from RecipeService here mostly to hammer home the fact that you shouldn’t be using EF Core entities directly in your endpoint’s public API. Alternatively, you might return the Recipe entity directly from the RecipeService and then build and return the RecipeSummaryViewModel inside your endpoint handler code.
注意 从技术上讲,创建视图模型是一个 UI 问题,而不是业务逻辑问题。我在这里直接从 RecipeService 返回一个视图模型,主要是为了强调您不应该直接在终端节点的公共 API 中使用 EF Core 实体的事实。或者,您可以直接从 RecipeService 返回 Recipe 实体,然后在终端节点处理程序代码中构建并返回 RecipeSummaryViewModel。

The GetRecipes method in RecipeService is conceptually simple and follows a common pattern for querying an EF Core database, as shown in figure 12.13. EF Core uses a fluent chain of LINQ commands to define the query to return on the database. The DbSet property on AppDataContext is an IQueryable, so you can use all the usual Select() and Where() clauses that you would with other IQueryable providers. EF Core converts these LINQ methods into a SQL statement to query the database when you call an execute function such as ToListAsync(), ToArrayAsync(), or SingleAsync(), or their non-async brethren.

RecipeService 中的 GetRecipes 方法在概念上很简单,并遵循查询 EF Core 数据库的常见模式,如图 12.13 所示。EF Core 使用 Fluent LINQ 命令链来定义要在数据库上返回的查询。AppDataContext 上的 DbSet 属性是 IQueryable,因此您可以使用其他 IQueryable 提供程序的所有常用 Select() 和 Where() 子句。EF Core 将这些 LINQ 方法转换为 SQL 语句,以便在调用执行函数(如 ToListAsync()、ToArrayAsync() 或 SingleAsync())或其非异步兄弟时查询数据库。

You can also use the Select() extension method to map to objects other than your entities as part of the SQL query. You can use this technique to query the database efficiently by fetching only the columns you need.

您还可以使用 Select() 扩展方法映射到实体以外的对象,作为 SQL 查询的一部分。您可以使用此技术通过仅获取所需的列来高效地查询数据库。

alt text

Figure 12.13 The three parts of an EF Core database query
图 12.13 EF Core 数据库查询的三个部分

Listing 12.7 shows the code to fetch a list of RecipeSummaryViewModels, following the same basic pattern as figure 12.12. It uses a Where LINQ expression to filter out recipes marked as deleted and a Select clause to map to the view models. The ToListAsync() command instructs EF Core to generate the SQL query, execute it on the database, and build RecipeSummaryViewModels from the data returned.

清单 12.7 显示了获取 RecipeSummaryViewModel列表的代码,遵循与图 12.12 相同的基本模式。它使用 Where LINQ 表达式筛选出标记为已删除的配方,并使用 Select 子句映射到视图模型。ToListAsync() 命令指示 EF Core 生成 SQL 查询,在数据库上执行该查询,并根据返回的数据生成 RecipeSummaryViewModels。

Listing 12.7 Loading a list of items using EF Core in RecipeService
清单 12.7 在配方服务

public async Task<ICollection<RecipeSummaryViewModel>> GetRecipes()
{
    return await _context.Recipes    ❶
        .Where(r => !r.IsDeleted)
        .Select(r => new RecipeSummaryViewModel               ❷ 
        {                                                     ❷ 
            Id = r.RecipeId,                                  ❷ 
            Name = r.Name,                                    ❷ 
            TimeToCook = $"{r.TimeToCook.TotalMinutes}mins"   ❷ 
        })
        .ToListAsync();      ❸
}

❶ A query starts from a DbSet property.
查询从 DbSet 属性开始。
❷ EF Core queries only the Recipe columns it needs to map the view model
correctly.
EF Core 仅查询正确映射视图模型所需的 Recipe 列。
❸ Executes the SQL query and creates the final view models
执行 SQL 查询并创建最终视图模型

Notice that in the Select method you convert the TimeToCook property from a TimeSpan to a string by using string interpolation:

请注意,在 Select 方法中,通过使用字符串插值将 TimeToCook 属性从 TimeSpan 转换为字符串:

TimeToCook = $"{r.TimeToCook.TotalMinutes}mins"

I said before that EF Core converts the series of LINQ expressions to SQL, but that statement is a half-truth: EF Core can’t or doesn’t know how to convert some expressions to SQL. In those cases, such as this example, EF Core finds the fields from the DB that it needs to run the expression on the client side, selects them from the database, and then runs the expression in C#. This approach lets you combine the power and performance of database-side evaluation without compromising the functionality of C#.

我之前说过 EF Core 将一系列 LINQ 表达式转换为 SQL,但该说法是半真半假:EF Core 不能或不知道如何将某些表达式转换为 SQL。在这些情况下(例如本示例),EF Core 从数据库中找到在客户端运行表达式所需的字段,从数据库中选择这些字段,然后在 C# 中运行表达式。此方法允许您将数据库端评估的强大功能和性能相结合,而不会影响 C# 的功能。

Warning Client-side evaluation is both powerful and useful but has the potential to cause problems. In general, recent versions of EF Core throw an exception if a query requires dangerous client-side evaluation, ensuring (for example) that you can’t accidentally return all records to the client before filtering. For more examples, including ways to avoid these problems, see the documentation at http://mng.bz/zxP6.
警告 客户端评估功能强大且有用,但可能会导致问题。通常,如果查询需要危险的客户端评估,最新版本的 EF Core 会引发异常,例如,确保在筛选之前不会意外地将所有记录返回给客户端。有关更多示例,包括避免这些问题的方法,请参阅 http://mng.bz/zxP6 中的文档。

At this point, you have a list of records displaying a summary of the recipe’s data, so the obvious next step is loading the detail for a single record.

此时,您有一个记录列表,其中显示了配方数据的摘要,因此显而易见的下一步是加载单个记录的详细信息。

12.4.3 Loading a single record

12.4.3 加载单个记录

For most intents and purposes, loading a single record is the same as loading a list of records. Both approaches have the same common structure you saw in figure 12.13, but when you’re loading a single record, you typically use a Where clause that restricts the data to a single entity.

对于大多数 intent 和目的,加载单个记录与加载记录列表相同。这两种方法都具有您在图 12.13 中看到的相同的通用结构,但是当您加载单个记录时,您通常会使用 Where 子句将数据限制为单个实体。

Listing 12.8 shows the code to fetch a recipe by ID, following the same basic pattern as before (figure 12.12). It uses a Where() LINQ expression to restrict the query to a single recipe, where RecipeId == id, and a Select clause to map to RecipeDetailViewModel. The SingleOrDefaultAsync() clause causes EF Core to generate the SQL query, execute it on the database, and build the view model.

清单 12.8 显示了通过 ID 获取配方的代码,遵循与之前相同的基本模式(图 12.12)。它使用 Where() LINQ 表达式将查询限制为单个配方,其中 RecipeId == id,并使用 Select 子句映射到 RecipeDetailViewModel。SingleOrDefaultAsync() 子句使 EF Core 生成 SQL 查询,在数据库上执行该查询,并生成视图模型。

Note SingleOrDefaultAsync()throws an exception if the previous Where clause returns more than one record.
注意 SingleOrDefaultAsync() 如果前面的 Where 子句返回多条记录,则引发异常。

Listing 12.8 Loading a single item using EF Core in RecipeService
清单 12.8 在配方服务

public async Task<RecipeDetailViewModel> GetRecipeDetail(int id)     ❶
{
    return await _context.Recipes         ❷
        .Where(x => x.RecipeId == id)    ❸
        .Select(x => new RecipeDetailViewModel    ❹
        {                                         ❹
            Id = x.RecipeId,                      ❹
            Name = x.Name,                        ❹
            Method = x.Method,                    ❹
            Ingredients = x.Ingredients                       ❺
            .Select(item => new RecipeDetailViewModel.Item    ❺
            {                                                 ❺
                Name = item.Name,                             ❺
                Quantity = $"{item.Quantity} {item.Unit}"     ❺
            })                                                ❺
        })
        .SingleOrDefaultAsync();     ❻
}

❶ The id of the recipe to load is passed as a parameter.
要加载的配方的 id 作为参数传递。
❷ As before, a query starts from a DbSet property.
与以前一样,查询从 DbSet 属性开始。
❸ Limits the query to the recipe with the provided id
将查询限制为具有提供的 ID 的配方
❹ Maps the Recipe to a RecipeDetailViewModel
将配方映射到 RecipeDetailViewModel
❺ Loads and maps linked Ingredients as part of the same query
加载和映射链接的 Ingredients 作为同一查询的一部分
❻ Executes the query and maps the data to the view model
执行查询并将数据映射到视图模型

Notice that as well as mapping the Recipe to a RecipeDetailViewModel, you map the related Ingredients for a Recipe, as though you’re working with the objects directly in memory. One advantage of using an ORM is that you can easily map child objects and let EF Core decide how best to build the underlying queries to fetch the data.

请注意,除了将 Recipe 映射到 RecipeDetailViewModel 之外,您还可以映射 Recipe 的相关 Ingredient,就像您直接在内存中处理对象一样。使用 ORM 的一个优点是,您可以轻松映射子对象,并让 EF Core 决定如何最好地构建基础查询来提取数据。

Note EF Core logs all the SQL statements it runs as LogLevel.Information events by default, so you can easily see what queries are running against the database.
注意 默认情况下,EF Core 将其运行的所有 SQL 语句记录为 LogLevel.Information 事件,因此您可以轻松查看针对数据库运行的查询。

Your app is definitely shaping up. You can create new recipes, view them all in a list, and drill down to view individual recipes with their ingredients and method. Soon, though, someone’s going to introduce a typo and want to change their data, so you’ll have to implement the U in CRUD: update.

您的应用肯定正在成型。您可以创建新配方,在列表中查看所有配方,并向下钻取以查看单个配方食谱及其成分和方法。不过,很快,有人会引入一个拼写错误并想要更改他们的数据,因此您必须在 CRUD: update 中实现 U。

12.4.4 Updating a model with changes

12.4.4 使用更改更新模型

Updating entities when they’ve changed generally is the hardest part of CRUD operations, as there are so many variables. Figure 12.14 shows an overview of this process as it applies to your recipe app.

在实体发生更改时更新实体通常是 CRUD作中最困难的部分,因为变量太多了。图 12.14 显示了适用于您的配方应用程序的此过程的概述。

alt text

Figure 12.14 Updating an entity involves three steps: read the entity using EF Core, update the properties of the entity, and call SaveChangesAsync() on the DbContext to generate the SQL to update the correct rows in the database.

图 12.14 更新实体涉及三个步骤:使用 EF Core 读取实体,更新实体的属性,并在 DbContext 上调用 SaveChangesAsync() 以生成 SQL 以更新数据库中的正确行。

I’m not going to handle the relationship aspect in this book because that problem generally is complex, and how you tackle it depends on the specifics of your data model. Instead, I’ll focus on updating properties on the Recipe entity itself.

我不打算在本书中处理关系方面,因为这个问题通常很复杂,如何解决它取决于数据模型的具体情况。相反,我将重点介绍更新 Recipe 上的属性实体本身。

Note For a detailed discussion of handling relationship updates in EF Core, see Entity Framework Core in Action, 2nd ed., by Jon P. Smith (Manning, 2021; http://mng.bz/w9D2).
注意 有关在 EF Core 中处理关系更新的详细讨论,请参阅 Jon P. Smith 的 Entity Framework Core in Action,第 2 版(Manning,2021 年; http://mng.bz/w9D2)。

For web applications, when you update an entity you typically follow the steps outlined in figure 12.14:
对于 Web 应用程序,当您更新实体时,通常会按照图 12.14 中概述的步骤进行作:

  1. Read the entity from the database.
    从数据库中读取实体。
  2. Modify the entity’s properties.
    修改实体的属性。
    3.Save the changes to the database.
    保存对数据库的更改。

You’ll encapsulate these three steps in a method on RecipeService called UpdateRecipe. This method takes an UpdateRecipeCommand parameter and contains the code to change the Recipe entity.

您将把这三个步骤封装在 RecipeService 上名为 UpdateRecipe 的方法中。此方法采用 UpdateRecipeCommand 参数,并包含用于更改 Recipe 实体的代码。

Note As with the Create command, you don’t modify the entities directly in the minimal API endpoint handler, ensuring that you keep the UI/API concern separate from the business logic.
注意 与 Create 命令一样,您不会直接在最小 API 终端节点处理程序中修改实体,从而确保将 UI/API 关注点与业务逻辑分开。

Listing 12.9 shows the RecipeService.UpdateRecipe method, which updates the Recipe entity. It performs the three steps we defined previously to read, modify, and save the entity. I’ve extracted the code to update the recipe with the new values to a helper method for clarity.

清单 12.9 显示了 RecipeService.UpdateRecipe 方法,该方法更新了 Recipe 实体。它执行我们之前定义的三个步骤来读取、修改和保存实体。为清楚起见,我提取了代码,以使用新值将配方更新为帮助程序方法。

Listing 12.9 Updating an existing entity with EF Core in RecipeService
清单 12.9 使用 EF Core 更新现有实体在 RecipeService 中

public async Task UpdateRecipe(UpdateRecipeCommand cmd)
{
    var recipe = await _context.Recipes.FindAsync(cmd.Id);  ❶
    if(recipe is null) {                                    ❷
        throw new Exception("Unable to find the recipe");   ❷
    }                                                       ❷
    UpdateRecipe(recipe, cmd);             ❸
    await _context.SaveChangesAsync();    ❹
}

static void UpdateRecipe(Recipe recipe, UpdateRecipeCommand cmd)   ❺
{                                                                  ❺
    recipe.Name = cmd.Name;                                        ❺
    recipe.TimeToCook =                                            ❺
        new TimeSpan(cmd.TimeToCookHrs, cmd.TimeToCookMins, 0);    ❺
    recipe.Method = cmd.Method;                                    ❺
    recipe.IsVegetarian = cmd.IsVegetarian;                        ❺
    recipe.IsVegan = cmd.IsVegan;                                  ❺
}                                                                  ❺

❶ Find is exposed directly by Recipes and simplifies reading an entity by id.
Find 由 Recipes 直接公开,并简化了按 ID 读取实体的过程。
❷ If an invalid id is provided, recipe will be null.
如果提供的 ID 无效,则 recipe 将为 null。
❸ Sets the new values on the Recipe entity
在 Recipe 实体上设置新值
❹ Executes the SQL to save the changes to the database
执行 SQL 以保存对数据库的更改
❺ A helper method for setting the new properties on the Recipe entity
用于在 Recipe 实体上设置新属性的辅助方法

In this example I read the Recipe entity using the FindAsync(id) method exposed by DbSet. This simple helper method loads an entity by its ID—in this case, RecipeId. I could have written a similar query with LINQ:

在此示例中,我使用 DbSet 公开的 FindAsync(id) 方法读取 Recipe 实体。这个简单的帮助程序方法按实体的 ID 加载实体,在本例中为 RecipeId。我本可以使用 LINQ 编写类似的查询:

_context.Recipes.Where(r=>r.RecipeId == cmd.Id).FirstOrDefault();

Using FindAsync() or Find() is a little more declarative and concise, however.
但是,使用 FindAsync() 或 Find() 的声明性和简洁性更强一些。

Tip Find is a bit more complicated. Find first checks to see whether the entity is already being tracked in EF Core’s DbContext. If so (because the entity was previously loaded in this request), the entity is returned immediately without calling the database. Using Find can obviously be faster if the entity is tracked, but it can be slower if you know that the entity isn’t being tracked yet.
提示 Find 稍微复杂一些。“查找优先”检查是否已在 EF Core 的 DbContext 中跟踪实体。如果是这样(因为之前在此请求中加载了实体),则立即返回该实体,而不调用数据库。如果跟踪实体,则使用 Find 显然会更快,但如果您知道尚未跟踪实体,则使用 Find 可能会更慢。

You may wonder how EF Core knows which columns to update when you call SaveChangesAsync(). The simplest approach would be to update every column. If the field hasn’t changed, it doesn’t matter if you write the same value again. But EF Core is cleverer than that.

你可能想知道 EF Core 在调用 SaveChangesAsync() 时如何知道要更新哪些列。最简单的方法是更新每一列。如果字段未更改,则再次写入相同的值并不重要。但 EF Core 比这更聪明。

EF Core internally tracks the state of any entities it loads from the database and creates a snapshot of all the entity’s property values so that it can track which ones have changed. When you call SaveChanges(), EF Core compares the state of any tracked entities (in this case, the Recipe entity) with the tracking snapshot. Any properties that have been changed are included in the UPDATE statement sent to the database, and unchanged properties are ignored.

EF Core 在内部跟踪它从数据库加载的任何实体的状态,并创建所有实体属性值的快照,以便它可以跟踪哪些实体已更改。调用 SaveChanges() 时,EF Core 会将任何跟踪实体(在本例中为 Recipe 实体)的状态与跟踪快照进行比较。任何已更改的属性都包含在发送到数据库的 UPDATE 语句中,而未更改的属性将被忽略。

Note EF Core provides other mechanisms to track changes, as well as options to disable change tracking. See the documentation or chapter 3 of Jon P. Smith’s Entity Framework Core in Action, 2nd ed., (Manning, 2021; http://mng.bz/q9PJ) for details. You can view which details the DbContext is tracking by accessing DbContext.ChangeTracer.DebugView, as described in the documentation at http://mng.bz/8rlz.
注意 EF Core 提供了其他机制来跟踪更改,以及用于禁用更改跟踪的选项。请参阅 Jon P. Smith 的 Entity Framework Core in Action, 2nd ed.(Manning,2021 年;http://mng.bz/q9PJ)了解详情。您可以通过访问 DbContext.ChangeTracer.DebugView 来查看 DbContext 正在跟踪的详细信息,如 http://mng.bz/8rlz 中的文档中所述。

With the ability to update recipes, you’re almost done with your recipe app. “But wait!” I hear you cry. “we haven’t handled the D in CRUD: delete!” That’s true, but in reality, I’ve found only a few occasions to delete data. Let’s consider the requirements for deleting a recipe from the application:

借助更新食谱的功能,您几乎完成了食谱应用程序。“但是等等!”我听到你哭泣。“我们还没有处理 CRUD 中的 D:删除!”这是真的,但实际上,我只发现了少数删除数据的机会。让我们考虑一下从应用程序中删除配方的要求:

  • You need to provide an API that deletes a recipe.
    您需要提供用于删除配方的 API。

  • After a recipe is deleted, it must not appear in the recipe list and can’t be retrieved.
    删除配方后,它不得显示在配方列表中,也无法检索。

You could achieve these requirements by deleting the recipe from the database, but the problem with data is that when it’s gone, it’s gone! What if a user accidentally deletes a record? Also, deleting a row from a relational database typically has implications on other entities. You can’t delete a row from the Recipe table in your application, for example, without also deleting all the Ingredient rows that reference it, thanks to the foreign-key constraint on Ingredient.RecipeId.

您可以通过从数据库中删除配方来实现这些要求,但数据的问题在于,当它消失时,它就消失了!如果用户不小心删除了记录怎么办?此外,从关系数据库中删除行通常会对其他实体产生影响。例如,由于对 Ingredient.RecipeId 的外键约束,您无法从应用程序的 Recipe 表中删除一行,而无需删除引用该行的所有 Ingredient 行。

EF Core can easily handle these true deletion scenarios for you with the DbContext .Remove(entity) command, but often what you mean when you find a need to delete data is to archive it or hide it from the UI. A common approach to handling this scenario is to include some sort of “Is this entity deleted?” flag on your entity, such as the IsDeleted flag I included on the Recipe entity:

EF Core 可以使用 DbContext 轻松处理这些真正的删除方案。Remove(entity) 命令,但当您发现需要删除数据时,您的意思是将其存档或从 UI 中隐藏数据。处理这种情况的常见方法是包括某种“Is this entity deleted?” 标志,例如IsDeleted 标志:

public bool IsDeleted { get; set; }

If you take this approach, deleting data suddenly becomes simpler, as it’s nothing more than an update to the entity—no more problems of lost data and no more referential-integrity problems.

如果您采用这种方法,删除数据会突然变得更加简单,因为它只不过是对实体的更新——不再有数据丢失的问题,也不再有引用完整性问题。

Note The main exception I’ve found to this pattern is when you’re storing your users’ personally identifying information. In these cases, you may be duty-bound (and potentially legally bound) to scrub their information from your database on request.
注意 我发现这种模式的主要例外是当您存储用户的个人身份信息时。在这些情况下,您可能有义务(并且可能受法律约束)根据要求从您的数据库中删除他们的信息。

With this approach, you can create a delete method on RecipeService that updates the IsDeleted flag, as shown in listing 12.10. In addition, make sure that you have Where() clauses in all the other methods in your RecipeService to ensure you can’t return a deleted Recipe, as you saw in listing 12.9 for the GetRecipes() method.

使用这种方法,你可以在 RecipeService 上创建一个 delete 方法来 更新 IsDeleted 标志,如清单 12.10 所示。此外,请确保在 RecipeService 的所有其他方法中都有 Where() 子句,以确保无法返回已删除的 Recipe,如清单 12.9 中的 GetRecipes() 方法所示。

Listing 12.10 Marking entities as deleted in EF Core
列表 12.10 在 EF Core 中将实体标记为已删除

public async Task DeleteRecipe(int recipeId)
{
    var recipe = await _context.Recipes.FindAsync(recipeId);     ❶
    if(recipe is null) {                                    ❷
        throw new Exception("Unable to find the recipe");   ❷
    }                                                       ❷
    recipe.IsDeleted = true;   ❸
    await _context.SaveChangesAsync();   ❹
}

❶ Fetches the Recipe entity by id
按 id 获取 Recipe 实体
❷ If an invalid id is provided, recipe will be null.
如果提供的 ID 无效,则 recipe 将为 null。
❸ Marks the Recipe as deleted
将配方标记为已删除
❹ Executes the SQL to save the changes to the database
行 SQL 以保存对数据库的更改

This approach satisfies the requirements—it removes the recipe from exposure by the API—but it simplifies several things. This soft-delete approach won’t work for all scenarios, but I’ve found it to be a common pattern in projects I’ve worked on.

这种方法满足了要求,它消除了 API 公开的配方,但它简化了几件事。这种软删除方法并不适用于所有情况,但我发现它是我参与过的项目中的常见模式。

Tip EF Core has a handy feature called global query filters. These filters allow\ you to specify a Where clause at the model level. You could ensure, for example, that EF Core never loads Recipes for which IsDeleted is true. This feature is also useful for segregating data in a multitenant environment. See the documentation for details: http://mng.bz/EQxd.
提示 EF Core 有一个称为全局查询筛选器的便捷功能。这些筛选条件允许您在模型级别指定 Where 子句。例如,您可以确保 EF Core 永远不会加载 IsDeleted 为 true 的配方。此功能对于在多租户环境中隔离数据也很有用。有关详细信息,请参阅文档:http://mng.bz/EQxd

We’re almost at the end of this chapter on EF Core. We’ve covered the basics of adding EF Core to your project and using it to simplify data access, but you’ll likely need to learn more about EF Core as your apps become more complex. In the final section of this chapter, I’d like to pinpoint a few things you need to take into consideration before using EF Core in your own applications so that you’ll be familiar with some of the problems you’ll face as your apps grow.

关于 EF Core 的本章即将结束。我们已经介绍了将 EF Core 添加到项目并使用它来简化数据访问的基础知识,但随着应用变得越来越复杂,你可能需要了解有关 EF Core 的更多信息。在本章的最后一部分中,我想指出在您自己的应用程序中使用 EF Core 之前需要考虑的一些事项,以便您熟悉随着应用程序的增长而面临的一些问题。

12.5 Using EF Core in production applications

12.5 在生产应用程序中使用 EF Core

This book is about ASP.NET Core, not EF Core, so I didn’t want to spend too much time exploring EF Core. This chapter should’ve given you enough information to get up and running, but you definitely need to learn more before you even think about putting EF Core into production. As I’ve said several times, I recommend reading Entity Framework Core in Action, 2nd ed., by Jon P. Smith (Manning, 2021), or exploring the EF Core documentation site at https://docs.microsoft.com/ef/core.

这本书是关于 ASP.NET Core 的,而不是 EF Core,因此我不想花太多时间探索 EF Core。本章应该已经为你提供了足够的信息来启动和运行,但你肯定需要在考虑将 EF Core 投入生产之前了解更多信息。正如我多次说过的,我建议阅读 Jon P. Smith 的 Entity Framework Core in Action,第 2 版(Manning,2021 年),或浏览 https://docs.microsoft.com/ef/core 的 EF Core 文档站点。

The following topics aren’t essential for getting started with EF Core, but you’ll quickly run up against them if you build a production-ready app. This section isn’t a prescriptive guide to tackling each of these items, but more a set of things to consider before you dive into production:

以下主题对于开始使用 EF Core 不是必需的,但如果您构建生产就绪型应用程序,您将很快遇到这些主题。本节不是处理这些项目的规范性指南,而是在深入研究生产之前需要考虑的一组事项:

  • Scaffolding of columns—EF Core uses conservative values for things like string columns by allowing strings of large or unlimited length. In practice, you may want to restrict these and other data types to sensible values.
    列的基架 – EF Core 通过允许较大或无限长度的字符串,对字符串列等内容使用保守值。在实践中,您可能希望将这些数据类型和其他数据类型限制为合理的值。

  • Validation—You can decorate your entities with DataAnnotations validation attributes, but EF Core won’t validate the values automatically before saving to the database. This behavior differs from EF 6.x behavior, in which validation was automatic.
    验证 – 您可以使用 DataAnnotations 验证属性修饰实体,但 EF Core 不会在保存到数据库之前自动验证值。此行为不同于 EF 6.x 行为,在 EF 6.x 中,验证是自动的。

  • Handling concurrency—EF Core provides a few ways to handle concurrency, which occurs when multiple users attempt to update an entity at the same time. One partial solution is to use Timestamp columns on your entities.
    处理并发 – EF Core 提供了几种处理并发的方法,当多个用户尝试同时更新实体时,会发生并发。一种部分解决方案是在实体上使用 Timestamp 列。

  • Handling errors—Databases and networks are inherently flaky, so you’ll always have to account for transient errors. EF Core includes various features to maintain connection resiliency by retrying on network failures.
    处理错误 - 数据库和网络本质上是不稳定的,因此您始终必须考虑暂时性错误。EF Core 包含各种功能,可通过在网络故障时重试来保持连接复原能力。

  • Synchronous vs. asynchronous—EF Core provides both synchronous and asynchronous commands for interacting with the database. Often, async is better for web apps, but this argument has nuances that make it impossible to recommend one approach over the other in all situations.
    同步与异步 – EF Core 提供用于与数据库交互的同步和异步命令。通常,async 更适合 Web 应用程序,但此参数具有细微差别,因此不可能在所有情况下都推荐一种方法而不是另一种方法。

EF Core is a great tool for being productive in writing data-access code, but some aspects of working with a database are unavoidably awkward. Database management is one of the thorniest problems to tackle. Most web applications use some sort of database, so the following problems are likely to affect ASP.NET Core developers at some point:

EF Core 是高效编写数据访问代码的绝佳工具,但使用数据库的某些方面不可避免地会遇到困难。数据库管理是需要解决的最棘手的问题之一。大多数 Web 应用程序都使用某种类型的数据库,因此以下问题可能会在某个时候影响 ASP.NET Core 开发人员:

  • Automatic migrations—If you deploy your app to production automatically as part of some sort of DevOps pipeline, you’ll inevitably need some way to apply migrations to a database automatically. You can tackle this situation in several ways, such as scripting the .NET tool, applying migrations in your app’s startup code, using EF Core bundles, or using a custom tool. Each approach has its pros and cons.
    自动迁移 — 如果您将应用程序作为某种 DevOps 管道的一部分自动部署到生产环境,那么您不可避免地需要某种方法来自动将迁移应用于数据库。您可以通过多种方式解决这种情况,例如为 .NET 工具编写脚本、在应用程序的启动代码中应用迁移、使用 EF Core 捆绑包或使用自定义工具。每种方法都有其优点和缺点。

  • Multiple web hosts—One specific consideration is whether you have multiple web servers hosting your app, all pointing to the same database. If so, applying migrations in your app’s startup code becomes harder, as you must ensure that only one app can migrate the database at a time.
    多个 Web 主机 - 一个特别的考虑因素是您是否有多个 Web 服务器托管您的应用程序,所有服务器都指向同一个数据库。如果是这样,在应用程序的启动代码中应用迁移会变得更加困难,因为您必须确保一次只有一个应用程序可以迁移数据库。

  • Making backward-compatible schema changes—A corollary of the multiple-web-host approach is that you’ll often be in a situation in which your app accesses a database that has a newer schema than the app thinks. Normally, you should endeavor to make schema changes backward-compatible wherever possible.
    进行向后兼容的架构更改 – 多 Web 主机方法的一个必然结果是,您经常会遇到这样的情况:您的应用程序访问的数据库具有比应用程序认为的架构更新的架构。通常,您应该尽可能努力使架构更改向后兼容。

  • Storing migrations in a different assembly—In this chapter I included all my logic in a single project, but in larger apps, data access is often in a different project from the web app. For apps with this structure, you must use slightly different commands when using .NET CLI or PowerShell cmdlets.
    将迁移存储在不同的程序集中 – 在本章中,我将所有逻辑包含在一个项目中,但在较大的应用程序中,数据访问通常与 Web 应用程序位于不同的项目中。对于具有此结构的应用程序,在使用 .NET CLI 或 PowerShell cmdlet 时,必须使用略有不同的命令。

  • Seeding data—When you first create a database, you often want it to have some initial seed data, such as a default user. EF 6.x had a mechanism for seeding data built in, whereas EF Core requires you to seed your database explicitly yourself.
    种子设定数据 – 首次创建数据库时,您通常希望它具有一些初始种子数据,例如默认用户。EF 6.x 内置了用于设定数据种子的机制,而 EF Core 要求您自己显式设定数据库种子。

How you choose to handle each of these problems depends on the infrastructure and the deployment approach you take with your app. None is particularly fun to tackle, but all are unfortunate necessities. Take heart, though; all these problems can be solved one way or another!

您选择如何处理这些问题取决于您对应用程序采用的基础设施和部署方法。没有一个是特别有趣的,但都是不幸的必需品。不过,请放心;所有这些问题都可以以某种方式解决!

That brings us to the end of this chapter on EF Core and part 2 of the book. In part 3 we move away from minimal APIs to look at building server-rendered page-based applications with Razor Pages.

这样,我们就结束了本章的 EF Core 和本书的第 2 部分。在第 3 部分中,我们将从最小的 API 转向使用 Razor Pages 构建服务器呈现的基于页面的应用程序。

12.6 Summary

12.6 总结

EF Core is an ORM that lets you interact with a database by manipulating standard POCO classes called entities in your application, reducing the amount of SQL and database knowledge you need to be productive.
EF Core 是一种 ORM,允许您通过作应用程序中称为实体的标准 POCO 类来与数据库交互,从而减少提高工作效率所需的 SQL 和数据库知识量。

EF Core maps entity classes to tables, properties on the entity to columns in the tables, and instances of entity objects to rows in these tables. Even if you use EF Core to avoid working with a database directly, you need to keep this mapping in mind.
EF Core 将实体类映射到表,将实体的属性映射到表中的列,并将实体对象的实例映射到这些表中的行。即使使用 EF Core 来避免直接使用数据库,也需要牢记此映射。

EF Core uses a database-provider model that lets you change the underlying database without changing any of your object manipulation code. EF Core has database providers for Microsoft SQL Server, SQLite, PostgreSQL, MySQL, and many others.
EF Core 使用数据库提供程序模型,该模型允许您在不更改任何对象作代码的情况下更改基础数据库。EF Core 具有适用于 Microsoft SQL Server、SQLite、PostgreSQL、MySQL 等的数据库提供程序。

EF Core is cross-platform and has good performance for an ORM, but it has a different feature set from EF 6.x. Nevertheless, EF Core is recommended for all new applications after EF 6.x.
EF Core 是跨平台的,对于 ORM 具有良好的性能,但它的功能集与 EF 6.x 不同。不过,建议将 EF Core 用于 EF 6.x 之后的所有新应用程序。

EF Core stores an internal representation of the entities in your application and how they map to the database, based on the DbSet properties on your application’s DbContext. EF Core builds a model based on the entity classes themselves and any other entities they reference.
EF Core 根据应用程序的 DbContext 上的 DbSet 属性存储应用程序中实体的内部表示形式以及它们如何映射到数据库。EF Core 基于实体类本身及其引用的任何其他实体构建模型。

You add EF Core to your app by adding a NuGet database provider package. You should also install the design packages for EF Core, which works in conjunction with the .NET tools to generate and apply migrations to a database.
通过添加 NuGet 数据库提供程序包,将 EF Core 添加到应用。您还应该安装 EF Core 的设计包,它与 .NET 工具结合使用,以生成迁移并将其应用于数据库。

EF Core includes many conventions for how entities are defined, such as primary keys and foreign keys. You can customize how entities are defined declaratively, by using DataAnnotations, or by using a fluent API.
EF Core 包括许多关于如何定义实体的约定,例如主键和外键。您可以使用 DataAnnotations 或使用 Fluent API 自定义以声明方式定义实体的方式。

Your application uses a DbContext to interact with EF Core and the database. You register it with a DI container using AddDbContext, defining the database provider and providing a connection string. This approach makes your DbContext available in the DI container throughout your app.
应用程序使用 DbContext 与 EF Core 和数据库交互。使用 AddDbContext 将其注册到 DI 容器,定义数据库提供程序并提供连接字符串。此方法使您的 DbContext 在整个应用程序中的 DI 容器中可用。

EF Core uses migrations to track changes to your entity definitions. They’re used to ensure that your entity definitions, EF Core’s internal model, and the database schema match.
EF Core 使用迁移来跟踪对实体定义的更改。它们用于确保实体定义、EF Core 的内部模型和数据库架构匹配。

After changing an entity, you can create a migration using either the .NET tool or Visual Studio PowerShell cmdlets. To create a new migration with the .NET command-line interface, run dotnet ef migrations add NAME in your project folder, where NAME is the name you want to give the migration. This command compares your current DbContext snapshot with the previous version and generates the necessary SQL statements to update your database.
更改实体后,您可以使用 .NET 工具或 Visual Studio PowerShell cmdlet 创建迁移。要使用 .NET 命令行界面创建新的迁移,请在项目文件夹中运行 dotnet ef migrations add NAME,其中 NAME 是要为迁移提供的名称。此命令将当前 DbContext 快照与以前的版本进行比较,并生成必要的 SQL 语句来更新数据库。

You can apply the migration to the database by using dotnet ef database update. This command creates the database if it doesn’t already exist and applies any outstanding migrations.
可以使用 dotnet ef database update 将迁移应用于数据库。此命令将创建数据库(如果尚不存在)并应用任何未完成的迁移。

EF Core doesn’t interact with the database when it creates migrations—only when you update the database explicitly—so you can still create migrations when you’re offline.
EF Core 在创建迁移时不与数据库交互,仅在显式更新数据库时交互,因此在脱机时仍可以创建迁移。

You can add entities to an EF Core database by creating a new entity, e, calling _context.Add(e) on an instance of your application’s data context, _context, and calling _context.SaveChangesAsync(). This technique generates the necessary SQL INSERT statements to add the new rows to the database.
可以通过创建新实体 e 并将实体添加到 EF Core 数据库,调用_上下文。Add(e) 在应用程序的数据上下文的实例上,_context,然后调用_SaveChangesAsync()上下文生成必要的 SQL INSERT 语句以将新行添加到数据库中。

You can load records from a database by using the DbSet properties on your app’s DbContext. These properties expose the IQueryable interface so you can use LINQ statements to filter and transform the data in the database before it’s returned.
您可以通过在应用程序的 DbContext 上使用 DbSet 属性从数据库加载记录。这些属性公开 IQueryable 接口,以便您可以在返回数据库中的数据之前使用 LINQ 语句对其进行筛选和转换。

Updating an entity consists of three steps: reading the entity from the database, modifying the entity, and saving the changes to the database. EF Core keeps track of which properties have changed so that it can optimize the SQL it generates.
更新实体包括三个步骤:从数据库中读取实体、修改实体以及保存对数据库的更改。EF Core 会跟踪哪些属性已更改,以便可以优化它生成的 SQL。

You can delete entities in EF Core by using the Remove method, but you should consider carefully whether you need this function. Often. a soft delete using an IsDeleted flag on entities is safer and easier to implement.
可以使用 Remove 方法删除 EF Core 中的实体,但应仔细考虑是否需要此函数。通常,在实体上使用 IsDeleted 标志的软删除更安全且更易于实现。

This chapter covers only a subset of the problems you must consider when using EF Core in your applications. Before using it in a production app, you should consider (among other things) the data types generated for fields, validation, handling concurrency, the seeding of initial data, handling migrations on a running application, and handling migrations in a web-farm scenario.
本章仅介绍在应用程序中使用 EF Core 时必须考虑的问题的子集。在生产应用程序中使用它之前,您应该考虑(除其他事项外)为字段生成的数据类型、验证、处理并发、初始数据的种子设定、在正在运行的应用程序上处理迁移以及在 Web 场方案中处理迁移。

ASP.NET Core in Action 11 Documenting APIs with OpenAPI

11 Documenting APIs with OpenAPI
11 使用 OpenAPI 记录 API

This chapter covers

本章涵盖

  • Understanding OpenAPI and seeing why it’s useful
    了解 OpenAPI 并了解它为何有用
  • Adding an OpenAPI description to your app
    将 OpenAPI 描述添加到您的应用程序
  • Improving your OpenAPI descriptions by adding metadata to endpoints
    通过向终端节点添加元数据来改进 OpenAPI 描述
  • Generating a C# client from your OpenAPI description
    从 OpenAPI 描述生成 C# 客户端

In this chapter I introduce the OpenAPI specification for describing RESTful APIs, demonstrate how to use OpenAPI to describe a minimal API application, and discuss some of the reasons you might want to do so.

在本章中,我将介绍用于描述 RESTful API 的 OpenAPI 规范,演示如何使用 OpenAPI 来描述最小的 API 应用程序,并讨论您可能希望这样做的一些原因。

In section 11.1 you’ll learn about the OpenAPI specification itself and where it fits in to an ASP.NET Core application. You’ll learn about the libraries you can use to enable OpenAPI documentation generation in your app and how to expose the document using middleware.

在第 11.1 节中,您将了解 OpenAPI 规范本身以及它在 ASP.NET Core 应用程序中的位置。您将了解可用于在应用程序中启用 OpenAPI 文档生成的库,以及如何使用中间件公开文档。

Once you have an OpenAPI document, you’ll see how to do something useful with it in section 11.2, where we add Swagger UI to your app. Swagger UI uses your app’s OpenAPI document to generate a UI for testing and inspecting the endpoints in your app, which can be especially useful for local testing.

拥有 OpenAPI 文档后,您将在第 11.2 节中看到如何使用它执行一些有用的作,我们将在其中将 Swagger UI 添加到您的应用程序。Swagger UI 使用应用程序的 OpenAPI 文档生成用于测试和检查应用程序中的端点的 UI,这对于本地测试特别有用。

After seeing your app described in Swagger UI, it’s time to head back to the code in section 11.3. OpenAPI and Swagger UI need rich metadata about your endpoints to provide the best functionality, so we look at some of the basic metadata you can add to your endpoints.

在 Swagger UI 中看到您的应用程序描述后,是时候返回第 11.3 节中的代码了。OpenAPI 和 Swagger UI 需要有关终端节点的丰富元数据才能提供最佳功能,因此我们来看看您可以添加到终端节点的一些基本元数据。

In section 11.4 you’ll learn about one of the best tooling features that comes from creating an OpenAPI description of your app: automatically generated clients. Using a third-party library called NSwag, you’ll learn how to automatically generate C# code and classes for interacting with your API based on the OpenAPI description you added in the previous sections. You’ll learn how to generate your client, customize the generated code, and rebuild the client when your app’s OpenAPI description changes.

在 Section 11.4 中,您将了解创建应用程序的 OpenAPI 描述所带来的最佳工具功能之一:自动生成的客户端。使用名为 NSwag 的第三方库,您将学习如何根据您在前面部分中添加的 OpenAPI 描述自动生成用于与 API 交互的 C# 代码和类。您将学习如何生成客户端、自定义生成的代码,以及在应用程序的 OpenAPI 描述发生更改时重新构建客户端。

Finally, in section 11.5, you’ll learn more ways to add metadata to your endpoints to give the best experience for your generated clients. You’ll learn how to add summaries and descriptions to your endpoints by using method calls and attributes and by extracting the XML documentation comments from your C# code.

最后,在第 11.5 节中,您将了解将元数据添加到终端节点的更多方法,以便为生成的客户端提供最佳体验。您将学习如何使用方法调用和属性以及从 C# 代码中提取 XML 文档注释,从而向终端节点添加摘要和说明。

Before we consider those advanced scenarios, we’ll look at the OpenAPI specification, what it is, and how you can add an OpenAPI document to your app.

在考虑这些高级方案之前,我们将了解 OpenAPI 规范、它是什么以及如何将 OpenAPI 文档添加到您的应用程序。

11.1 Adding an OpenAPI description to your app

11.1 将 OpenAPI 描述添加到您的应用程序

OpenAPI (previously called Swagger) is a language-agnostic specification for describing RESTful APIs. At its core, OpenAPI describes the schema of a JavaScript Object Notation (JSON) document which in turn describes the URLs available in your application, how to invoke them, and the data types they return. In this section you’ll learn how to generate an OpenAPI document for your minimal API application.

OpenAPI(以前称为 Swagger)是一种与语言无关的规范,用于描述 RESTful API。OpenAPI 的核心是描述 JavaScript 对象表示法 (JSON) 文档的架构,而 JSON 文档又描述了应用程序中可用的 URL、如何调用它们以及它们返回的数据类型。在本节中,您将学习如何为最小 API 应用程序生成 OpenAPI 文档。

Providing an OpenAPI document for your application makes it possible to add various types of automation for your app. You can do the following things, for example:

为您的应用程序提供 OpenAPI 文档可以为您的应用程序添加各种类型的自动化。例如,您可以执行以下作:

  • Explore your app using Swagger UI (section 11.2).
    使用 Swagger UI 浏览您的应用程序(第 11.2 节)。

  • Generate strongly-typed clients for interacting with your app (section 11.4).
    生成用于与您的应用程序交互的强类型客户端(第 11.4 节)。

  • Automatically integrate into third-party services such as Azure API Management
    自动集成到第三方服务中,例如 Azure API 管理。

Note If you’re familiar with SOAP from the old ASP.NET days, you can think of OpenAPI as being the HTTP/REST equivalent of Web Service Description Language (WSDL). Just as a .wsdl file described your XML SOAP services, so the OpenAPI document describes your REST API.
注意 如果您熟悉 ASP.NET 年代的 SOAP,则可以将 OpenAPI 视为 Web 服务描述语言 (WSDL) 的 HTTP/REST 等效项。正如 .wsdl 文件描述 XML SOAP 服务一样,OpenAPI 文档也描述了 REST API。

ASP.NET Core includes some support for OpenAPI documents out of the box, but to take advantage of them you’ll need to use a third-party library. The two best-known libraries to use are called NSwag and Swashbuckle. In this chapter I use Swashbuckle to add an OpenAPI document to an ASP.NET Core app. You can read how to use NSwag instead at http://mng.bz/6Dmy.

ASP.NET Core 包含一些开箱即用的 OpenAPI 文档支持,但要利用它们,您需要使用第三方库。两个最著名的库称为 NSwag 和 Swashbuckle。在本章中,我将使用 Swashbuckle 将 OpenAPI 文档添加到 ASP.NET Core 应用程序。您可以在 http://mng.bz/6Dmy 阅读如何使用 NSwag。

Note NSwag and Swashbuckle provide similar functionality for generating OpenAPI documents, though you’ll find slight differences in how to use them and in the features they support. NSwag also supports client generation, as you’ll see in section 11.4.
注意 NSwag 和 Swashbuckle 为生成 OpenAPI 文档提供了类似的功能,但您会发现它们的使用方式和它们支持的功能略有不同。NSwag 还支持客户端生成,您将在 11.4 节中看到。

Add the Swashbuckle.AspNetCore NuGet package to your project by using the NuGet Package Manager in Visual Studio, or use the .NET CLI by running
使用 Visual Studio 中的 NuGet 包管理器将 Swashbuckle.AspNetCore NuGet 包添加到项目中,或使用.NET CLI 通过运行

dotnet add package Swashbuckle.AspNetCore

from your project’s folder. Swashbuckle uses ASP.NET Core metadata services to retrieve information about all the endpoints in your application and to generate an OpenAPI document. Then this document is served by middleware provided by Swashbuckle, as shown in figure 11.1. Swashbuckle also includes middleware for visualizing your OpenAPI document, as you’ll see in section 11.2.

从项目的文件夹中。Swashbuckle 使用 ASP.NET Core 元数据服务来检索有关应用程序中所有终端节点的信息并生成 OpenAPI 文档。然后这个文档由 Swashbuckle 提供的中间件提供,如图 11.1 所示。Swashbuckle 还包括用于可视化 OpenAPI 文档的中间件,您将在 11.2 节中看到。

alt text

Figure 11.1 Swashbuckle uses ASP.NET Core metadata services to retrieve information about the endpoints in your application and builds an OpenAPI document. The OpenAPI middleware serves this document when requested. Swashbuckle also includes optional middleware for visualizing the OpenAPI document using Swagger UI.
图 11.1 Swashbuckle 使用 ASP.NET Core 元数据服务检索有关应用程序中终端节点的信息并构建 OpenAPI 文档。OpenAPI 中间件在请求时提供此文档。Swashbuckle 还包括用于使用 Swagger UI 可视化 OpenAPI 文档的可选中间件。

After installing Swashbuckle, configure your application to generate an OpenAPI document as shown in listing 11.1. This listing shows a reduced version of the fruit API from chapter 5, with only the GET and POST methods included for simplicity. The OpenAPI-related additions are in bold.

安装 Swashbuckle 后,配置您的应用程序以生成一个 OpenAPI 文档,如清单 11.1 所示。此清单显示了第 5 章中 fruit API 的简化版本,为简单起见,仅包含 GET 和 POST 方法。与 OpenAPI 相关的添加内容以粗体显示。

Note Swashbuckle uses the old Swagger nomenclature rather than OpenAPI in its method names. You should think of OpenAPI as the name of the specification and Swagger as the name of the tooling related to OpenAPI, as described in this post: http://mng.bz/o18M.
注意 Swashbuckle 在其方法名称中使用旧的 Swagger 命名法,而不是 OpenAPI。您应该将 OpenAPI 视为规范的名称,将 Swagger 视为与 OpenAPI 相关的工具的名称,如本文所述:http://mng.bz/o18M

Listing 11.1 Adding OpenAPI support to a minimal API app using Swashbuckle
清单 11.1 使用 Swashbuckle 向最小 API 应用程序添加 OpenAPI 支持

using System.Collections.Concurrent;

WebApplicationBuilder builder = WebApplication.CreateBuilder(args);

builder.Services.AddEndpointsApiExplorer(); ❶
builder.Services.AddSwaggerGen(); ❷

WebApplication app = builder.Build();

var _fruit = new ConcurrentDictionary<string, Fruit>();

app.UseSwagger(); ❸
app.UseSwaggerUI(); ❹

app.MapGet("/fruit/{id}", (string id) =>
    _fruit.TryGetValue(id, out var fruit)
        ? TypedResults.Ok(fruit)
        : Results.Problem(statusCode: 404));

app.MapPost("/fruit/{id}", (string id, Fruit fruit) =>
    _fruit.TryAdd(id, fruit)
        ? TypedResults.Created($"/fruit/{id}", fruit)
        : Results.ValidationProblem(new Dictionary<string, string[]>
            {
             { "id", new[] { "A fruit with this id already exists" } }
        }));

app.Run();

record Fruit(string Name, int Stock);

❶ Adds the endpoint-discovery features of ASP.NET Core that Swashbuckle requires
添加了 Swashbuckle 所需的 ASP.NET Core 的端点发现功能
❷ Adds the Swashbuckle services required for creating OpenApi Documents
添加了创建 OpenApi 文档所需的 Swashbuckle 服务
❸ Adds middleware to expose the OpenAPI document for your app
添加中间件以公开应用程序的 OpenAPI 文档
❹ Adds middleware that serves the Swagger UI
添加为 Swagger UI 提供服务的中间件

With the changes in this listing, your application exposes an OpenAPI description of its endpoints. If you run the app and navigate to /swagger/v1/swagger.json, you’ll find a large JSON file, similar to the one shown in figure 11.2. This file is the OpenAPI Document description of your application.

通过此清单中的更改,您的应用程序将公开其终端节点的 OpenAPI 描述。如果您运行应用程序并导航到 /swagger/v1/swagger.json,您将找到一个大型 JSON 文件,类似于图 11.2 中所示的文件。此文件是应用程序的 OpenAPI 文档描述。

alt text

Figure 11.2 The OpenAPI Document for the app described in listing 11.1, generated with NSwag.
图 11.2 清单 11.1 中描述的应用程序的 OpenAPI 文档,使用 NSwag 生成

The OpenAPI document includes a general description of your app, such as a title and version, as well as specific details about each of the endpoints. In figure 11.2, for example, the /fruit/{id} endpoint describes the fact that it needs a GET verb and takes an id parameter in the path.

OpenAPI 文档包括应用程序的一般描述,例如标题和版本,以及有关每个终端节点的具体详细信息。例如,在图 11.2 中,/fruit/{id} 端点描述它需要一个 GETverb 并在 path 中采用 id 参数。

You can change some of the document values, such as the title, by adding configuration to the AddSwaggerGen() method. You can set the title of the app to "Fruitify" and add a description for the document:

您可以通过向 AddSwaggerGen() 方法添加配置来更改某些文档值,例如标题。您可以将应用程序的标题设置为 “Fruitify” 并为文档添加描述:

builder.Services.AddSwaggerGen(x =>
    x.SwaggerDoc("v1", new OpenApiInfo()
    {
        Title = "Fruitify",
        Description = "An API for interacting with fruit stock",
        Version = "1.0"
    }));

You can also change settings such as the path used to expose the document and various minutia about how Swashbuckle generates the final JSON. See the documentation for details: http://mng.bz/OxQR.

您还可以更改设置,例如用于公开文档的路径以及有关 Swashbuckle 如何生成最终 JSON 的各种细节。有关详细信息,请参阅文档:http://mng.bz/OxQR

All that is clever, but if you’re shrugging and asking “So what?”, where OpenAPI really shines is the hooks it provides for other tooling. And you’ve already added one such piece of tooling to your app: Swagger UI.

所有这些都很聪明,但如果你耸耸肩问“那又怎样”,OpenAPI 真正闪耀的地方是它为其他工具提供的钩子。您已经向应用程序添加了这样一个工具:Swagger UI。

11.2 Testing your APIs with Swagger UI

11.2 使用 Swagger UI 测试 API

In this section you’ll learn about Swagger UI (https://swagger.io/tools/swagger-ui), an open-source web UI that makes it easy to visualize and test your OpenAPI apps. In some ways you can think of Swagger UI as being a light version of Postman, which I used in previous chapters to interact with minimal API applications. Swagger UI provides an easy way to view all the endpoints in your application and send requests to them. Postman provides many extra features, such as creating collections and sharing them with your team, but if all you’re trying to do is test your application locally, Swagger UI is a great option.

在本节中,您将了解 Swagger UI (https://swagger.io/tools/swagger-ui),这是一种开源 Web UI,可让您轻松可视化和测试 OpenAPI 应用程序。在某些方面,您可以将 Swagger UI 视为 Postman 的轻量级版本,我在前面的章节中使用它来与之交互最少的 API 应用程序。Swagger UI 提供了一种简单的方法来查看应用程序中的所有终端节点并向它们发送请求。Postman 提供了许多额外的功能,例如创建集合并与您的团队共享它们,但如果您只想在本地测试您的应用程序,那么 Swagger UI 是一个不错的选择。

You can add Swagger UI to your ASP.NET Core application using Swashbuckle by calling
您可以通过调用 Swashbuckle 将 Swagger UI 添加到您的 ASP.NET Core 应用程序中

app.UseSwaggerUI()

to add the Swagger UI middleware, as you saw in listing 11.1. The Swagger UI middleware automatically integrates with the OpenAPI document middleware and exposes the Swagger UI web UI in your app at the path /swagger by default. Navigate to /swagger in your app, and you see a page like the one in figure 11.3.

添加 Swagger UI 中间件,如清单 11.1 所示。默认情况下,Swagger UI 中间件会自动与 OpenAPI 文档中间件集成,并在应用程序中的路径 /swagger 中公开 Swagger UI Web UI。导航到/swagger 添加到您的应用程序中,您会看到一个类似于图 11.3 中的页面。

alt text

Figure 11.3 The Swagger UI endpoint for the app. With this UI you can view all the endpoints in your app, the schema of objects that are sent and returned, and even test the APIs by providing parameters and sending requests.
图 11.3 应用程序的 Swagger UI 端点。使用此 UI,您可以查看应用程序中的所有端点、已发送和返回的对象的 schema,甚至通过提供参数和发送请求来测试 API。

Swagger UI lists all the endpoints described in the OpenAPI document, the schema of objects that are sent to and received from each API, and all the possible responses that each endpoint can return. You can even test an API from the UI by choosing Try it out, entering a value for the parameter, and choosing Execute. Swagger UI shows the command executed, the response headers, and the response body (figure 11.4).

Swagger UI 列出了 OpenAPI 文档中描述的所有端点、发送到每个 API 和从每个 API 接收的对象架构,以及每个端点可以返回的所有可能响应。您甚至可以从 UI 中测试 API,方法是选择 Try it out (试用),输入参数值,然后选择 Execute (执行)。Swagger UI 显示执行的命令、响应标头和响应正文(图 11.4)。

alt text

Figure 11.4 You can send requests using the Swagger UI by choosing an API, entering the required parameters, and choosing Execute. Swagger UI shows the response received.
图 11.4 您可以通过选择 API、输入所需参数并选择 Execute (执行) 来使用 Swagger UI 发送请求。Swagger UI 显示收到的响应。

Swagger UI is a useful tool for exploring your APIs and can replace a tool like Postman in some cases. But the examples we’ve shown so far reveal a problem with our API: the responses described for the GET endpoint in figure 11.3 mentioned a 200 response, but our execution in figure 11.4 reveals that it can also return a 404. To solve that documentation issue, we need to add extra metadata to our APIs.

Swagger UI 是探索 API 的有用工具,在某些情况下可以取代 Postman 等工具。但是,到目前为止我们展示的示例揭示了 API 的一个问题:图 11.3 中为 GET 端点描述的响应提到了 200 响应,但我们在图 11.4 中的执行表明它也可以返回 404。为了解决该文档问题,我们需要向 API 添加额外的元数据。

11.3 Adding metadata to your minimal APIs

11.3 将元数据添加到最小 API

Metadata is information about an API that doesn’t change the execution of the API itself. You used metadata in chapter 5 when you added names to your endpoints, using WithName(), so that you could reference them by using LinkGenerator. The name doesn’t change anything about how the endpoint executes, but it provides information for other features to hook into.

元数据是有关 API 的信息,它不会更改 API 本身的执行。在第 5 章中,当您使用 WithName() 向终端节点添加名称时,您使用了元数据,以便您可以使用 LinkGenerator 引用它们。该名称不会更改终端节点的执行方式,但它为要挂接的其他功能提供了信息。

Currently, you can add three broad categories of metadata to minimal API endpoints:

目前,您可以将三大类元数据添加到最小 API 终端节点:

  • Routing metadata—As you’ve already seen, the WithName() methods adds a globally unique name to an endpoint that’s used for URL generation.
    路由元数据 – 如您所见,WithName() 方法将全局唯一名称添加到用于 URL 生成的终端节点。

  • Metadata for other middleware—Several pieces of middleware can be customized on a per-request basis by adding metadata to an endpoint. When the middleware runs, it checks the selected endpoint’s metadata and acts accordingly. Examples include authorization, hostname filtering, and output caching.
    其他中间件的元数据 — 通过向终端节点添加元数据,可以按请求自定义多个中间件。当中间件运行时,它会检查所选终端节点的元数据并采取相应的行动。示例包括授权、主机名筛选和输出缓存。

  • OpenAPI metadata—OpenAPI document generation is driven by the metadata exposed by endpoints, which in turn controls the UI exposed by Swagger UI.
    OpenAPI 元数据 - OpenAPI 文档生成由终端节点公开的元数据驱动,而终端节点又控制 Swagger UI 公开的 UI。

We look at how to add authorization metadata to your endpoints in chapter 25, so for now we’ll focus on improving the OpenAPI description of your app using metadata. You can provide a lot of details to document your APIs, some of which Swashbuckle uses during OpenAPI generation and some of which it doesn’t. The following listing shows how to add a tag for each API and how to explicitly describe the responses that are returned, using Produces().

我们将在第 25 章中介绍如何将授权元数据添加到您的终端节点,因此现在我们将专注于使用元数据改进应用程序的 OpenAPI 描述。您可以提供大量详细信息来记录您的 API,其中一些 Swashbuckle 在 OpenAPI 生成期间使用,而另一些则不使用。下面的清单显示了如何为每个 API 添加一个标签,以及如何使用 Produces() 显式描述返回的响应。

Listing 11.2 Adding OpenAPI metadata to improve endpoint documentation
清单 11.2 添加 OpenAPI 元数据以改进端点文档

using System.Collections.Concurrent;

WebApplicationBuilder builder = WebApplication.CreateBuilder(args);

builder.Services.AddEndpointsApiExplorer();
builder.Services.AddSwaggerGen();

WebApplication app = builder.Build();

var _fruit = new ConcurrentDictionary<string, Fruit>();

app.UseSwagger();
app.UseSwaggerUI();

app.MapGet("/fruit/{id}", (string id) =>
    _fruit.TryGetValue(id, out var fruit)
        ? TypedResults.Ok(fruit)
        : Results.Problem(statusCode: 404))
    .WithTags("fruit") ❶
    .Produces<Fruit>() ❷
    .ProducesProblem(404); ❸

app.MapPost("/fruit/{id}", (string id, Fruit fruit) =>
    _fruit.TryAdd(id, fruit)
        ? TypedResults.Created($"/fruit/{id}", fruit)
        : Results.ValidationProblem(new Dictionary<string, string[]>
            {
            { "id", new[] { "A fruit with this id already exists" } }
            }))
    .WithTags("fruit") ❹
    .Produces<Fruit>(201) ❺
    .ProducesValidationProblem(); ❻

app.Run();
record Fruit(string Name, int stock);

❶ Adding a tag groups the endpoints in Swagger UI. Each endpoint can have multiple
tags.
添加标签对 Swagger UI 中的端点进行分组。每个终端节点可以有多个标签。
❷ The endpoint can return a Fruit object. When not specified, a 200 response is
assumed.
端点可以返回 Fruit 对象。如果未指定,则假定响应为 200。
❸ If the id isn’t found, the endpoint returns a 404 Problem Details response.
如果未找到 ID,则终端节点将返回 404 Problem Details 响应。
❹ Adding a tag groups the endpoints in Swagger UI. Each endpoint can have multiple
tags.
在 Swagger UI 中添加标签对端点进行分组。每个终端节点可以有多个标签。
❺ This endpoint also returns a Fruit object but uses a 201 response instead of 200.
此端点还返回一个 Fruit 对象,但使用 201 响应而不是 200。
❻ If the ID already exists, it returns a 400 Problem Details response with validation
errors.
如果 ID 已存在,则返回 400 Problem Details 响应,其中包含验证错误。

With these changes, Swagger UI shows the correct responses for each endpoint, as shown in figure 11.5. It also groups the endpoints under the tag "fruit" instead of the default tag inferred from the project name when no tags are provided.

通过这些更改,Swagger UI 会为每个端点显示正确的响应,如图 11.5 所示。它还将终端节点分组在标签 “fruit” 下,而不是在未提供标签时从项目名称推断的默认标签下。

alt text

Figure 11.5 Swagger UI groups the endpoints in your application based on the Tag metadata attached to them. The UI uses the metadata added by calling Produces() to document the expected return types and status codes for each endpoint.
图 11.5 Swagger UI 根据附加到终端节点的 Tag 元数据对应用程序中的终端节点进行分组。UI 使用通过调用 Produces() 添加的元数据来记录每个端点的预期返回类型和状态代码。

If adding all this extra metadata feels like a bit of a chore, don’t worry. Adding the extra OpenAPI metadata is optional, necessary only if you plan to expose your OpenAPI document for others to consume. If all you want is an easy way to test your minimal APIs, you can go a long way without many of these extra method calls.

如果添加所有这些额外的元数据感觉有点麻烦,请不要担心。添加额外的 OpenAPI 元数据是可选的,只有当您计划公开 OpenAPI 文档供其他人使用时,才需要添加元数据。如果你想要的只是一种简单的方法来测试你的最小API,您可以在没有许多额外方法调用的情况下走很长的路。

Tip Remember that you can also use route groups (described in chapter 5) to apply metadata to multiple APIs at the same time.
提示 请记住,您还可以使用路由组(如第 5 章所述)同时将元数据应用于多个 API。

One of the strongest arguments for making your OpenAPI descriptions as rich as possible is that it makes the tooling around your API easier to use. Swagger UI is one example. But an arguably even more useful tool lets you automatically generate C# clients for interacting with your APIs.

使 OpenAPI 描述尽可能丰富的最有力的论据之一是,它使围绕 API 的工具更易于使用。Swagger UI 就是一个例子。但是,一个可以说更有用的工具允许您自动生成用于与 API 交互的 C# 客户端。

11.4 Generating strongly typed clients with NSwag

11.4 使用 NSwag 生成强类型客户端

In this section you’ll learn how to use your OpenAPI description to automatically generate a client class that you can use to call your API from another C# project. You’ll create a console application, use a .NET tool to generate a C# client for interacting with your API, and finally customize the generated types. The generated code includes automatic serialization and deserialization of request types, and makes interacting with your API from another C# project much easier than the alternative method of crafting HTTP requests manually.

在本节中,您将学习如何使用 OpenAPI 描述自动生成可用于从另一个 C# 项目调用 API 的客户端类。您将创建一个控制台应用程序,使用 .NET 工具生成用于与 API 交互的 C# 客户端,最后自定义生成的类型。生成的代码包括请求类型的自动序列化和反序列化,并且与手动创建 HTTP 请求的替代方法相比,从另一个 C# 项目与 API 交互要容易得多。

Note Generating a strongly typed client is optional. It makes it easier to consume your APIs from C#, but if you don’t need this functionality, you can still test your APIs by using Postman or another HTTP client.
注意 生成强类型客户端是可选的。它使从 C# 使用 API 变得更加容易,但如果您不需要此功能,您仍然可以使用 Postman 或其他 HTTP 客户端来测试 API。

You could use any of several tools to automatically generate a C# client from an OpenAPI description, such as OpenAPI Generator (http://mng.bz/Y1wB), but in this chapter I use NSwag. You may remember from section 11.1 that NSwag can be used instead of Swashbuckle to generate an OpenAPI description for your API. But unlike Swashbuckle, NSwag also contains a client generator. NSwag is also the default library used by both Visual Studio and the Microsoft .NET OpenAPI global tool to generate C# client code.

您可以使用多种工具中的任何一种从 OpenAPI 描述自动生成 C# 客户端,例如 OpenAPIGenerator (http://mng.bz/Y1wB),但在本章中我使用 NSwag。你可能还记得 11.1 节 中,可以使用 NSwag 代替 Swashbuckle 来为你的 API 生成 OpenAPI 描述。但与 Swashbuckle 不同的是,NSwag 还包含一个客户端生成器。NSwag 也是 Visual Studio 和 Microsoft .NET OpenAPI 全局工具用来生成 C# 客户端代码的默认库。

Code generation based on an OpenAPI description works via the process shown in figure 11.6. First, Visual Studio or the .NET tool downloads the OpenAPI description JSON file so that it’s available locally. The code generation tool reads the OpenAPI description, identifies all the endpoints and schemas described by the document, and generates a C# client class that you can use to call the API described in the document. The code generation tool hooks into the build process so that any time the local OpenAPI description file changes, the code generator runs to regenerate the client.

基于 OpenAPI 描述的代码生成工作过程如图 11.6 所示。首先,Visual Studio 或 .NET 工具下载 OpenAPI 描述 JSON 文件,以便它在本地可用。代码生成工具读取 OpenAPI 描述,识别文档描述的所有端点和架构,并生成一个 C# 客户端类,您可以使用该类来调用文档中描述的 API。代码生成工具挂接到构建过程中,因此,每当本地 OpenAPI 描述文件发生更改时,代码生成器都会运行以重新生成客户端。

alt text

Figure 11.6 Visual Studio or a .NET tool downloads the OpenAPI description locally and installs the code-generation tool from NuGet. When your project builds, the generation tool reads the OpenAPI description and generates a C# class for interacting with the API.
图 11.6 Visual Studio 或 .NET 工具在本地下载 OpenAPI 描述,并从 NuGet 安装代码生成工具。生成项目时,生成工具会读取 OpenAPI 描述并生成用于与 API 交互的 C# 类。

You can generate clients by using Visual Studio, as shown in section 11.4.1, or a .NET tool, as shown in section 11.4.2. Both approaches produce the same result, so your choice is a matter of personal preference.

您可以使用 Visual Studio(如第 11.4.1 节所示)或 .NET 工具(如第 11.4.2 节所示)生成客户端。这两种方法都会产生相同的结果,因此您的选择取决于个人喜好。

11.4.1 Generating a client using Visual Studio

11.4.1 使用 Visual Studio 生成客户端

In this section I show how to generate a client by using Visual Studio’s built-in support. For this section I assume that you have a simple .NET 7 console app that needs to interact with your minimal API app.

在本节中,我将介绍如何使用 Visual Studio 的内置支持生成客户端。在本部分中,我假设你有一个简单的 .NET 7 控制台应用程序,它需要与最小 API 应用程序交互。

Note In the sample code for this chapter, both applications are in the same solution for simplicity, but they don’t need to be. You don’t even need the source code for the API; as long as you have the OpenAPI description of an API, you can generate a client for it.
注意 在本章的示例代码中,为简单起见,这两个应用程序位于同一解决方案中,但并非必须如此。您甚至不需要 API 的源代码;只要您具有 API 的 OpenAPI 描述,就可以为其生成客户端。

To generate the client, follow these steps:
要生成客户端,请执行以下步骤:

  1. Ensure that the API application is running and that the OpenAPI description JSON file is accessible. Note the URL at which the JSON file is exposed. If you’re following along with the source code for the book, run the OpenApiExample project.
    确保 API 应用程序正在运行,并且 OpenAPI 描述 JSON 文件可访问。记下公开 JSON 文件的 URL。如果您按照本书的源代码进行作,请运行 OpenApiExample 项目。

  2. In the client project, right-click the project file and then choose from the contextual menu, as shown in figure 11.7. This command opens the Add Service Reference dialog box.
    在客户端项目中,右键单击项目文件,然后从上下文菜单中选择 Add > Service Reference,如图 11.7 所示。此命令将打开 Add Service Reference 对话框。

alt text

Figure 11.7 Adding a service reference using Visual Studio. Right-click the project that will call the API, and choose Add > Service Reference.
图 11.7 使用 Visual Studio 添加服务引用。右键单击将调用 API 的项目,然后选择 Add > Service Reference。

  1. In the Add Service Reference dialog box, select OpenAPI and then choose Next. On the Add New OpenAPI Service Reference page, enter the URL where the OpenAPI document is located. Enter a namespace for the generated code and a name for the generated client class, as shown in figure 11.8, and then choose Finish.
    在 Add Service Reference (添加服务引用) 对话框中,选择 OpenAPI (OpenAPI),然后选择 Next (下一步)。在 Add New OpenAPI Service Reference 页面上,输入 OpenAPI 文档所在的 URL。输入生成的代码的命名空间和生成的客户端类的名称,如图 11.8 所示,然后选择 Finish。

alt text

Figure 11.8 Adding an OpenAPI service reference using Visual Studio. Add the link to the OpenAPI document, the code generation parameters, and click Finish. Visual Studio downloads the OpenAPI document and saves it to the project to use for code generation.
图 11.8 使用 Visual Studio 添加 OpenAPI 服务引用。将链接添加到 OpenAPI document,代码生成参数,然后单击 Finish。Visual Studio 下载 OpenAPI 文档并将其保存到项目中以用于代码生成。

The Service Reference Configuration Progress screen shows the changes Visual Studio makes to your application, such as installing various NuGet packages and downloading the OpenAPI document.
Service Reference Configuration Progress 屏幕显示 Visual Studio 对应用程序所做的更改,例如安装各种 NuGet 包和下载 OpenAPI 文档。

Tip If you’re running the sample code with Visual Studio, you can find the OpenAPI document at https://localhost:7186/swagger/v1/swagger.json. This location is also displayed in the Swagger UI.
提示 如果使用 Visual Studio 运行示例代码,则可以在 https://localhost:7186/swagger/v1/swagger.json 中找到 OpenAPI 文档。此位置也显示在 Swagger UI 中。

After performing these steps, look at the csproj file of your console app. You’ll see that several NuGet package references were added, as well as a new element, as shown in listing 11.3.

执行这些步骤后,请查看控制台应用的 csproj 文件。您将看到添加了多个 NuGet 包引用,以及一个新的 元素,如清单 11.3 所示。

Listing 11.3 Adding a service reference for OpenAPI client generation with Visual Studio
清单 11.3 为使用 Visual Studio 生成 OpenAPI 客户端添加服务引用

<Project Sdk="Microsoft.NET.Sdk">
    <PropertyGroup>
        <OutputType>Exe</OutputType>
        <TargetFramework>net7.0</TargetFramework>
        <ImplicitUsings>enable</ImplicitUsings>
        <Nullable>enable</Nullable>
    </PropertyGroup>

    <ItemGroup>
        <OpenApiReference ❶
            Include="OpenAPIs\swagger.json"
            CodeGenerator="NSwagCSharp"
            Namespace="Fruit"
            ClassName="FruitClient">
        <SourceUri>https://localhost:7186/swagger/v1/swagger.json</SourceUri>
        </OpenApiReference>
    </ItemGroup>

    <ItemGroup>
        <PackageReference ❷
            Include="Microsoft.Extensions.ApiDescription.Client"
            Version="3.0.0">
            <PrivateAssets>all</PrivateAssets>
            <IncludeAssets>runtime; build; native; contentfiles; analyzers;
                buildtransitive</IncludeAssets>
        </PackageReference>

        <PackageReference Include="Newtonsoft.Json" Version="13.0.1" />

        <PackageReference Include="NSwag.ApiDescription.Client"
            Version="13.0.5">
                <PrivateAssets>all</PrivateAssets>
                <IncludeAssets>runtime; build; native; contentfiles; analyzers;
                    buildtransitive</IncludeAssets>
        </PackageReference>
    </ItemGroup>
</Project>

❶ Defines where the OpenAPI description was loaded from and code generation settings
定义 OpenAPI 描述的加载位置和代码生成设置
❷ Extra NuGet packages are required by the code generator.
代码生成器需要额外的 NuGet 包。

Theoretically, this code should be everything you need to generate the client. Unfortunately, Visual Studio adds some out-of-date packages that you’ll need to update before your project will build, as follows:
从理论上讲,此代码应该是生成客户端所需的一切。遗憾的是,Visual Studio 添加了一些过时的包,您需要在构建项目之前更新这些包,如下所示:

  1. Update NSwag.ApiDescription.Client to the latest version (currently, 13.18.2). This package does the code generation based on the OpenAPI description.
    将 NSwag.ApiDescription.Client 更新到最新版本(当前为 13.18.2)。此包根据 OpenAPI 描述执行代码生成。

  2. Update Microsoft.Extensions.ApiDescription.Client to the latest version (7.0.0 at the time of the .NET 7 release). This package is referenced transitively by NSwag.ApiDescription.Client anyway, so you don’t have to reference it directly, but doing so ensures that you have the latest version of the package.
    将 Microsoft.Extensions.ApiDescription.Client 更新到最新版本(.NET 7 版本发布时为 7.0.0)。无论如何,此包都由 NSwag.ApiDescription.Client 以传递方式引用,因此您不必直接引用它,但这样做可以确保您拥有最新版本的包。

NOTE By default, the generated client uses Newtonsoft.Json to serializes the requests and responses. In section 11.4.4 you’ll see how to replace it with the built-in System.Text.Json.
注意 默认情况下,生成的客户端使用 Newtonsoft.Json 来序列化请求和响应。在第 11.4.4 节中,你将了解如何将其替换为内置的 System.Text.Json。

After you make these changes, your project should look similar to the following listing.
进行这些更改后,您的项目应类似于下面的清单。

Listing 11.4 Updating package versions for OpenAPI generation
清单 11.4 更新包版本以生成 OpenAPI

<Project Sdk="Microsoft.NET.Sdk">

  <PropertyGroup>
    <OutputType>Exe</OutputType>
    <TargetFramework>net7.0</TargetFramework>
    <ImplicitUsings>enable</ImplicitUsings>
    <Nullable>enable</Nullable>
  </PropertyGroup>
  <ItemGroup>
    <OpenApiReference
        Include="OpenAPIs\swagger.json"
        CodeGenerator="NSwagCSharp"
        Namespace="Fruit"
        ClassName="FruitClient">
      <SourceUri>https://localhost:7186/swagger/v1/swagger.json</SourceUri>
    </OpenApiReference>
  </ItemGroup>

  <ItemGroup>
    <PackageReference
      Include="Microsoft.Extensions.ApiDescription.Client"
      Version="7.0.0">  ❶
        <PrivateAssets>all</PrivateAssets>
        <IncludeAssets>runtime; build; native; contentfiles; analyzers;
          buildtransitive</IncludeAssets>
    </PackageReference>
    <PackageReference Include="Newtonsoft.Json" Version="13.0.1" />
    <PackageReference Include="NSwag.ApiDescription.Client"
      Version="13.18.2">  ❶
        <PrivateAssets>all</PrivateAssets>
        <IncludeAssets>runtime; build; native; contentfiles; analyzers;
          buildtransitive</IncludeAssets>
    </PackageReference>
  </ItemGroup>

</Project>

❶ Updates to the latest version
更新到最新版本

With the packages updated, you can build your project and generate the FruitClient. In section 11.4.3 you’ll see how to use this client to call your API, but first we’ll look at how to generate the client with a .NET global tool if you’re not using Visual Studio.

更新包后,您可以构建项目并生成 FruitClient。在 11.4.3 节中,您将看到如何使用此客户端来调用您的 API,但首先我们将了解如何如果您使用 Visual Studio,请使用 .NET 全局工具生成客户端。

11.4.2 Generating a client using the .NET Global tool

11.4.2 使用.NET 全局工具

In this section you’ll learn how to generate a client from an OpenAPI definition by using a .NET global tool instead of Visual Studio. The result is essentially the same, so if you’ve followed the steps in section 11.4.1 in Visual Studio, you can skip this section.

在本部分中,你将了解如何使用 .NET 全局工具而不是 Visual Studio 从 OpenAPI 定义生成客户端。结果基本相同,因此,如果您已按照 Visual Studio 中 11.4.1 节中的步骤作,则可以跳过此部分。

Note You don’t have to use Visual Studio or a .NET tool. Ultimately ,you need a csproj file that looks like listing 11.4 and an OpenAPI definition JSON file in your project, so if you’re happy editing the project file and downloading the definition manually, you can take that approach. Visual Studio and the .NET tool simplify and automate some of these steps.
注意 您不必使用 Visual Studio 或 .NET 工具。最后,您需要一个类似于清单 11.4 的 csproj 文件和一个项目中的 OpenAPI 定义 JSON 文件,因此,如果您愿意编辑项目文件并手动下载定义,则可以采用这种方法。Visual Studio 和 .NET 工具简化并自动执行其中一些步骤。

As in section 11.4.1, the instructions in 11.4.2 assume that you have a console app that needs to call your API, that the API is accessible, and that it has an OpenAPI description. To generate a client by using NSwag, follow these steps:

与第 11.4.1 节一样,11.4.2 中的说明假定您有一个需要调用 API 的控制台应用程序,该 API 是可访问的,并且它具有 OpenAPI 描述。要使用 NSwag 生成客户端,请执行以下步骤:

  1. Ensure that the API application is running and that the OpenAPI description JSON file is accessible. Note the URL at which the JSON file is exposed. In the source code associated with the book, run the OpenApiExample project.
    确保 API 应用程序正在运行,并且 OpenAPI 描述 JSON 文件可访问。记下公开 JSON 文件的 URL。在与本书关联的源代码中,运行 OpenApiExample 项目。

  2. Install the .NET OpenAPI tool (http://mng.bz/GyOv) globally by running
    通过运行 .NET OpenAPI 工具 (http://mng.bz/GyOv) 全局安装

dotnet tool install -g Microsoft.dotnet-openapi
  1. From the project folder of your console app, add an OpenAPI reference by using the following command, substituting the path to the OpenAPI document and the location to download the JSON file to:
    在控制台应用程序的项目文件夹中,使用以下命令添加 OpenAPI 引用,将 OpenAPI 文档的路径和将 JSON 文件下载到的位置替换为:

    dotnet openapi add url http://localhost:5062/swagger/v1/swagger.json --output-file OpenAPIs\fruit.json

Tip If you’re running the sample code by using dotnet run, you can find the OpenAPI document at the preceding URL. This location is also displayed in the Swagger UI.
提示 如果使用 dotnet run 运行示例代码,则可以在前面的 URL 中找到 OpenAPI 文档。此位置也显示在 Swagger UI 中。

  1. Update the packages added to your project by running the following commands from the project folder:
    通过从项目文件夹运行以下命令来更新添加到项目中的包:
dotnet add package NSwag.ApiDescription.Client
dotnet add package Microsoft.Extensions.ApiDescription.Client
dotnet add package Newtonsoft.Json

After you run all these steps, your OpenAPI description file should have been downloaded to OpenAPIs\fruit.json, and your project file should look similar to the following listing (elements added by the tool highlighted in bold).

运行所有这些步骤后,您的 OpenAPI 描述文件应已下载到 OpenAPIs\fruit.json,并且您的项目文件应类似于以下清单(由该工具添加的元素以粗体突出显示)。

Listing 11.5 Adding an OpenAPI reference using the .NET OpenAPI tool
清单 11.5 使用 .NET OpenAPI 工具添加 OpenAPI 引用

<Project Sdk="Microsoft.NET.Sdk">

  <PropertyGroup>
    <OutputType>Exe</OutputType>
    <TargetFramework>net7.0</TargetFramework>
    <ImplicitUsings>enable</ImplicitUsings>
    <Nullable>enable</Nullable>
  </PropertyGroup>

  <ItemGroup>
    <PackageReference
      Include="Microsoft.Extensions.ApiDescription.Client"
      Version="7.0.0">
        <IncludeAssets>runtime; build; native; contentfiles; analyzers;
          buildtransitive</IncludeAssets>
      <PrivateAssets>all</PrivateAssets>
    </PackageReference>
    <PackageReference Include="Newtonsoft.Json" Version="13.0.1" />
    <PackageReference Include="NSwag.ApiDescription.Client"
      Version="13.18.2">
        <IncludeAssets>runtime; build; native; contentfiles; analyzers;
          buildtransitive</IncludeAssets>
      <PrivateAssets>all</PrivateAssets>
    </PackageReference>
  </ItemGroup>

  <ItemGroup>
    <OpenApiReference Include="OpenAPIs\fruit.json"
      SourceUrl="http://localhost:5062/swagger/v1/swagger.json" />
  </ItemGroup>
</Project>

Other than minor ordering differences, the main difference between the Visual Studio approach and the .NET tool approach is that Visual Studio lets you specify the class name and namespace for your new client, whereas the .NET Tool uses the default values. For consistency, add the ClassName and Namespace attributes to the <OpenApiReference> element added by the tool:

除了细微的排序差异外,Visual Studio 方法和 .NET 工具方法之间的主要区别在于,Visual Studio 允许您为新客户端指定类名和命名空间,而 .NET 工具使用默认值。为了保持一致性,请将 ClassName 和 Namespace 属性添加到工具添加的 <OpenApiReference> 元素中:

<OpenApiReference Include="OpenAPIs\fruit.json"
  SourceUrl="http://localhost:5062/swagger/v1/swagger.json"
  Namespace="Fruit"
  ClassName="FruitClient" />

In section 11.4.4 you’ll learn how to customize the generated code further, but before we get to that topic, let’s look at the generated FruitClient and how to use it.

在 Section 11.4.4 中,您将学习如何进一步自定义生成的代码,但在我们进入该主题之前,让我们看看生成的 FruitClient 以及如何使用它。

11.4.3 Using a generated client to call your API

11.4.3 使用生成的客户端调用 API

So far, you’ve been taking my word for it that a client is magically generated for your application, so in this section you get to try it out. The NSwag.ApiDescription.Client package added to your project works with the Microsoft.Extensions.ApiDescription.Client package to read the OpenAPI description file in your project. From this description it can work out what APIs you have and what types you need to serialize to and from. Finally, it outputs a C# class with the class name and namespace you specified in the OpenApiReference element.

到目前为止,您一直相信我的话,即 Client 是为您的应用程序神奇生成的,因此在本节中,您将快来试试吧。添加到项目的 NSwag.ApiDescription.Client 包与 Microsoft.Extensions.ApiDescription.Client 包配合使用,以读取项目中的 OpenAPI 描述文件。从此描述中,它可以计算出您拥有哪些 API 以及需要序列化到哪些类型或从中序列化。最后,它输出一个 C# 类,其中包含您在 OpenApiReference 元素中指定的类名和命名空间。

Note The generated file is typically saved to your project’s obj folder. After building your project, you can find the fruitClient.cs file in this folder. Alternatively, use Visual Studio’s Go To Definition (F12) functionality on an instance of FruitClient to navigate to the code in your integrated development environment (IDE).
注意 生成的文件通常保存到项目的 obj 文件夹中。构建项目后,您可以在此文件夹中找到 fruitClient.cs 文件。或者,在 FruitClient 实例上使用 Visual Studio 的转到定义 (F12) 功能导航到集成开发环境 (IDE) 中的代码。

To use the FruitClient to call your API, you must create an instance of it, passing in the base address of your API and an HttpClient instance. Then you can send HTTP requests to the discovered endpoints. A client generated from the OpenAPI description of the simple minimal API in listing 11.2, for example, would have methods called FruitPOSTAsync() and FruitGETASync(), corresponding to the two exposed methods, as shown in listing 11.6.

要使用 FruitClient 调用 API,您必须创建一个 API 实例,并传入 API 的基址和 HttpClient 实例。然后,您可以向发现的终端节点发送 HTTP 请求。例如,从清单 11.2 中简单最小 API 的 OpenAPI 描述生成的客户端将具有名为 FruitPOSTAsync() 和 FruitGETASync() 的方法,对应于两个公开的方法,如下面的清单所示。

Listing 11.6 Calling the API from listing 11.2 using a generated client
清单 11.6 使用生成的客户端调用 清单 11.2 中的 API

using Fruit; ❶

var client = new FruitClient( ❷
    "https://localhost:7186", ❸
    new HttpClient()); ❹

Fruit.Fruit created = await client.FruitPOSTAsync("123", ❺
    new Fruit.Fruit { Name = "Banana", Stock = 100 }); ❻
Console.WriteLine($"Created {created.Name}");

Fruit.Fruit fetched = await client.FruitGETAsync("123"); ❼
Console.WriteLine($"Fetched {fetched.Name}");

❶ The code is generated in the Fruit namespace.
代码在 Fruit 命名空间中生成。
❷ Uses the generated FruitClient
使用生成的 FruitClient
❸ Specifies the base address of the API
指定 API 的基址
❹ The provided HttpClient is used to call the API.
提供的 HttpClient 用于调用 API。
❺ Calls the MapPost endpoint of the API
调用 API 的 MapPost 端点
❻ The Fruit type is generated automatically by NSwag.
Fruit 类型由 NSwag 自动生成。
❼ Calls the MapGet endpoint of the API
调用 API 的 MapGet 端点

This code is simultaneously impressive and somewhat horrible:

这段代码既令人印象深刻,又有些可怕:

  • It’s impressive that you’re able to generate all the boilerplate code for interacting with the API. You don’t have to do any string interpolation to calculate the path. You don’t have to serialize the request body or deserialize the response. You don’t have to check for error status codes. The generated code takes care of all those tasks.
    令人印象深刻的是,您能够生成用于与 API 交互的所有样板代码。您不必执行任何字符串插值来计算路径。您不必序列化请求正文或反序列化响应。您不必检查错误状态代码。生成的代码会处理所有这些任务。

  • Those FruitPOSTAsync and FruitGETAsync methods have really ugly names!
    那些 FruitPOSTAsync 和 FruitGETAsync 方法的名字真的很丑陋!

Luckily, you can fix the ugly method names: improve your API’s OpenAPI definition by adding WithName() to every API. The name you provide for your endpoint is used as the OperationID in the OpenAPI description; then NSwag uses it to generate the client methods. This scenario is a prime example of adding more metadata to your OpenAPI, making the tooling better for your consumers.

幸运的是,您可以修复丑陋的方法名称:通过向每个 API 添加 WithName() 来改进 API 的 OpenAPI 定义。您为终端节点提供的名称将用作 OpenAPI 描述中的 OperationID;然后 NSwag 使用它来生成客户端方法。此方案是向 OpenAPI 添加更多元数据的一个典型示例,使工具更适合您的使用者。

As well as improve your OpenAPI description, you can customize the code generation directly, as you’ll see in the next section.

除了改进 OpenAPI 描述外,您还可以直接自定义代码生成,如下一节所示。

11.4.4 Customizing the generated code

11.4.4 自定义生成的代码

In this section you’ll learn about some of the customization options available with the NSwag generator and why you might want to use them. I look at three customization options in this section:

在本节中,您将了解 NSwag 生成器提供的一些自定义选项以及您可能希望使用它们的原因。在本节中,我将查看三个自定义选项:

  • Using System.Text.Json instead of Newtonsoft.Json for JSON serialization
    使用 System.Text.Json 而不是 Newtonsoft.Json 进行 JSON 序列化

  • Generating an interface for the generated client implementation
    为生成的客户端实现生成接口

  • Not requiring an explicit BaseAddress parameter in the constructor
    在构造函数中不需要显式 BaseAddress 参数

By default, NSwag uses Newtonsoft.Json to serialize requests and deserialize responses. Newtonsoft.Json is a popular, battle-hardened JSON library, but .NET 7 has a built-in JSON library, System.Text.Json, that ASP.NET Core uses by default for JSON serialization. Instead of using two JSON libraries, you may want to replace the serialization used in your client to use System.Text.Json.

默认情况下,NSwag 使用 Newtonsoft.Json 来序列化请求和反序列化响应。Newtonsoft.Json 是一个常用的、久经考验的 JSON 库,但 .NET 7 有一个内置的 JSON 库 System.Text.Json,ASP.NET Core 默认使用该库进行 JSON 序列化。您可能希望将客户端中使用的序列化替换为 System.Text.Json,而不是使用两个 JSON 库。

When NSwag generates a client, it marks the class as partial, which means that you can define your own partial class FruitClient (for example) and add any methods that you think are useful to the client. The generated client also provides partial methods that act as hooks just before a request is sent or received.

当 NSwag 生成客户端时,它会将类标记为 partial,这意味着您可以定义自己的部分类 FruitClient(例如)并添加您认为对客户端有用的任何方法。生成的 Client 端还提供了部分方法,这些方法在发送或接收请求之前充当 hook。

Definition Partial methods in C# (http://mng.bz/zXEB) are void-returning methods that don’t have an implementation. You can define the implementation of the method in a separate partial class file. If you don’t define the implementation, the method is removed at compile time, so you use partial methods as highly performant event handlers.
定义 C# (http://mng.bz/zXEB) 中的分部方法是没有实现的返回 void 的方法。您可以在单独的Partial 类文件。如果未定义实现,则会在编译时删除该方法,因此将分部方法用作高性能事件处理程序。

Extending your generated clients is useful, but during testing it’s common to also want to substitute your generated client by using interfaces. Interfaces let you substitute fake or mock versions of a service so that your tests aren’t calling the API for real, as you learned in chapter 8. NSwag can help with this process by automatically generating an IFruitClient interface that the FruitClient implements.

扩展生成的 Client 端很有用,但在测试期间,通常还希望使用 interfaces 替换生成的 Client 端。接口允许你替换服务的 fake 或 mock 版本,这样你的测试就不会真正调用 API,正如你在第 8 章中学到的那样。NSwag 可以通过自动生成 FruitClient 实现的 IFruitClient 接口来帮助完成此过程。

Finally, providing a base address where the API is hosted makes sense on the face of it. But as we discussed in chapter 9, primitive constructor arguments such as string and int don’t play well with dependency injection. Given that HttpClient contains a BaseAddress property, you can configure NSwag to not require that the base address be passed as a constructor argument and instead set it on the HttpClient type directly. This approach helps in dependency injection (DI) scenarios, as you’ll when we discuss IHttpClientFactory in chapter 33.

最后,提供托管 API 的基址从表面上看是有意义的。但是正如我们在第 9 章中讨论的那样,像 string 和 int 这样的原始构造函数参数不能很好地与依赖注入配合。鉴于 HttpClient 包含 BaseAddress 属性,您可以将 NSwag 配置为不要求将基址作为构造函数参数传递,而是直接在 HttpClient 类型上设置它。‌这种方法在依赖关系注入 (DI) 场景中有所帮助,正如我们在第 33 章讨论 IHttpClientFactory 时所看到的那样。

These three seemingly unrelated options are all configured in NSwag in the same way: by adding an Options element to the <OpenApiReference> element in your project file. The options are provided as command-line switches and must be provided on one line, without line breaks. The switches for the three settings described are

这三个看似无关的选项在 NSwag 中都以相同的方式配置:通过在<OpenApiReference> 元素。这些选项以命令行开关的形式提供,并且必须在一行中提供,没有换行符。用于描述的三种设置的开关是

  • /UseBaseUrl:false—When false, NSwag removes the baseUrl parameter from the generated client’s constructor and instead relies on HttpClient to have the correct base address. It defaults to true.
    /UseBaseUrl:false — 当 false 时,NSwag 从生成的客户端的构造函数中删除 baseUrl 参数,而是依赖 HttpClient 具有正确的基址。它默认为 true。

  • /GenerateClientInterfaces:true—When true, NSwag generates an interface for the client, containing all the endpoints. The generated client implements this interface. It defaults to false.
    /GenerateClientInterfaces:true — 如果为 true,则 NSwag 会为客户端生成一个接口,其中包含所有端点。生成的 Client 端实现此接口。它默认为 false。

  • /JsonLibrary:SystemTextJson—This switch specifies the JSON serialization library to use. It defaults to using Newtonsoft.Json.
    /JsonLibrary:SystemTextJson - 此开关指定要使用的 JSON 序列化库。它默认使用 Newtonsoft.Json。

Tip A vast number of configuration options is available for NSwag. I find that the best documentation is available in the NSwag .NET tool. You can install the tool by using dotnet tool install -g NSwag.ConsoleCore, and you can view the available options by running nswag help openapi2csclient.
提示 NSwag 有大量的配置选项可用。我发现 NSwag .NET 工具中提供了最好的文档。可以使用 dotnet tool install -g NSwag.ConsoleCore 安装该工具,并且可以通过运行 nswag help openapi2csclient 来查看可用选项。

You can set all three of these options by adding an <Options> element to the <OpenApiReference> element, as shown in the following listing. Make sure that you open and close both elements correctly so the XML stays valid; it’s an easy mistake to make when editing by hand!

您可以通过向 <<OpenApiReference> 元素添加 <Options> 元素来设置所有这三个选项,如下面的清单所示。确保正确打开和关闭这两个元素,以便 XML 保持有效;手动编辑时很容易犯错误!‌

Listing 11.7 Customizing NSwag generator options
清单 11.7 自定义 NSwag 生成器选项

<OpenApiReference Include="OpenAPIs\fruit.json"
  SourceUrl="http://localhost:5062/swagger/v1/swagger.json"
  Namespace="Fruit"
  ClassName="FruitClient" >
    <Options>/UseBaseUrl:false /GenerateClientInterfaces:true 
[CA]/JsonLibrary:SystemTextJson</Options>  ❶
</OpenApiReference>  ❷

❶ Customizes the options NSwag uses for code generation
自定义 NSwag 用于代码生成的选项
❷ Make sure to close the outer XML element to keep the XML valid.
确保关闭外部 XML 元素以保持 XML 有效。

You’d be forgiven for thinking that after making these changes, NSwag would update the generated code next time you build. Unfortunately, it’s not necessarily that simple. NSwag watches for changes to the OpenAPI description JSON file saved in your project and will regenerate the code any time the file changes, but it won’t necessarily update when you change options in your csproj file. Even worse, doing a clean or rebuild similarly has no effect. If you find yourself in this situation, it’s best to delete the obj folder for your project to ensure that everything regenerates correctly.

如果你认为在进行这些更改后,NSwag 会在你下次构建时更新生成的代码,这是可以理解的。不幸的是,事情不一定那么简单。NSwag 会监视项目中保存的 OpenAPI 描述 JSON 文件的更改,并在文件更改时重新生成代码,但当您更改 csproj 文件中的选项时,它不一定会更新。更糟糕的是,以类似的方式进行清理或重建也没有效果。如果您发现自己处于这种情况,最好删除项目的 obj 文件夹,以确保所有内容都能正确重新生成。

Tip Another option is to make a tiny change in the OpenAPI document so that NSwag updates the generated code when you build your project. Then you can revert the OpenAPI document change.
提示 另一种选择是对 OpenAPI 文档进行微小的更改,以便 NSwag 在您构建项目时更新生成的代码。然后,您可以还原 OpenAPI 文档更改。

After you’ve persuaded NSwag to regenerate the client, you should update your code to use the new features. You can remove the Newtonsoft.Json reference from your csproj file and update your Program.cs as shown in the following listing.

在你说服 NSwag 重新生成客户端之后,你应该更新你的代码以使用新功能。您可以从 csproj 文件中删除 Newtonsoft.Json 引用并更新Program.cs,如下面的清单所示。

Listing 11.8 Using the updated NSwag client
清单 11.8 使用更新的 NSwag 客户端

using Fruit;

IFruitClient client = new FruitClient(    ❶
    new HttpClient() { BaseAddress =     ❷
        new Uri("https://localhost:7186") });    ❷

Fruit.Fruit created = await client.FruitPOSTAsync("123",
    new Fruit.Fruit { Name = "Banana", Stock = 100 });
Console.WriteLine($"Created {created.Name}");

Fruit.Fruit fetched = await client.FruitGETAsync("123");
Console.WriteLine($"Fetched {fetched.Name}");

❶ FruitClient now implements IFruitClient.
FruitClient 现在实现 IFruitClient。
❷ Sets the base address on HttpClient instead of passing as a constructor argument
在 HttpClient 上设置基址,而不是作为构造函数参数传递

If you updated the operation IDs for your API endpoints using WithName(), you may be a little surprised to see that you still have the ugly FruitPOSTAsync and FruitGETAsync methods, even though you regenerated the client. That’s because the OpenAPI description saved to your project is downloaded only once, when you initially add it. Let’s look at how to update the local OpenAPI document to reflect the changes to your remote API.

如果您使用 WithName() 更新了 API 终端节点的作 ID,您可能会有点惊讶地发现,即使您重新生成了客户端,您仍然拥有丑陋的 FruitPOSTAsync 和 FruitGETAsync 方法。这是因为保存到项目的 OpenAPI 描述在您最初添加时仅下载一次。让我们看看如何更新本地 OpenAPI 文档以反映对远程 API 的更改。

11.4.5 Refreshing the OpenAPI description

11.4.5 刷新 OpenAPI 描述

In this section you’ll learn how to update the OpenAPI description document saved to your project that’s used for generation. This document doesn’t update automatically, so the client generated by NSwag may not reflect the latest OpenAPI description for your API.

在本节中,您将了解如何更新保存到项目中用于生成的 OpenAPI 描述文档。本文档不会自动更新,因此 NSwag 生成的客户端可能无法反映您的 API 的最新 OpenAPI 描述。

Whether you used Visual Studio (as in section 11.4.1) or the .NET OpenAPI tool (as in section 11.4.2), the OpenAPI description saved as a JSON file to your project is a point-in-time snapshot of the API. If you add more metadata to your API, you need to download the OpenAPI description to your project again.

无论您使用的是 Visual Studio(如第 11.4.1 节所示)还是 .NET OpenAPI 工具(如第 11.4.2 节所示),以 JSON 文件形式保存到项目中的 OpenAPI 描述都是 API 的时间点快照。如果您向 API 添加更多元数据,则需要再次将 OpenAPI 描述下载到您的项目中。

Tip My preferred approach is low-tech: I simply navigate to the OpenAPI description in the browser, copy the JSON contents, and paste it into the JSON file in my project.
提示 我的首选方法是低技术含量的方法:我只需在浏览器中导航到 OpenAPI 描述,复制 JSON 内容,然后将其粘贴到我项目的 JSON 文件中。

If you don’t want to update the OpenAPI description manually, you can use Visual Studio or the .NET OpenAPI tool to refresh the saved document for you.

如果不想手动更新 OpenAPI 说明,可以使用 Visual Studio 或 .NET OpenAPI 工具刷新为您保存文档。

Warning If you originally used Visual Studio, you can’t refresh the document by using the OpenAPI tool and vice versa. The reason is that Visual Studio uses the SourceUri attribute on the OpenApiReference element and the .NET tool uses the SourceUrl attribute. And yes, that situation is arbitrary and annoying!
警告 如果您最初使用的是 Visual Studio,则无法使用 OpenAPI 工具刷新文档,反之亦然。原因是 Visual Studio 使用 OpenApiReference 元素上的 SourceUri 属性,而 .NET 工具使用 SourceUrl 属性。是的,这种情况是武断和烦人的!

To update your OpenAPI description by using Visual Studio, follow these steps:
要使用 Visual Studio 更新 OpenAPI 描述,请执行以下步骤:

  1. Ensure that your API is running and that the OpenAPI description document is available.
    确保您的 API 正在运行,并且 OpenAPI 描述文档可用。

  2. Navigate to the connected services page for your project by choosing Project > Connected Services > Manage Connected Services.
    通过选择 Project > Connected Services 导航到项目的 Connected Services 页面> 管理连接的服务。

3.Select the overflow button next to your OpenAPI reference and choose Refresh, as shown in figure 11.9. Then choose Yes in the dialog box to update your OpenAPI document.
选择 OpenAPI 引用旁边的溢出按钮,然后选择 Refresh,如图11.9所示. 然后在对话框中选择 Yes 以更新您的 OpenAPI 文档。

alt text

Figure 11.9 Updating the OpenAPI description for an API. Choose Refresh to download the OpenAPI description again and save it to your project. Then NSwag will generate an updated client on the next build.
图 11.9 更新 API 的 OpenAPI 描述。选择 Refresh (刷新) 以再次下载 OpenAPI 描述并将其保存到您的项目中。然后 NSwag 将在下一个构建中生成更新的客户端。

To update your OpenAPI description by using the .NET OpenAPI tool, follow these steps:
若要使用 .NET OpenAPI 工具更新 OpenAPI 说明,请执行以下步骤:

  1. Ensure that your API is running and that the OpenAPI description document is available.
    确保您的 API 正在运行,并且 OpenAPI 描述文档可用。

  2. From your project folder, run the following command, using the same URL you used to add the OpenAPI description originally:
    在项目文件夹中,使用最初用于添加 OpenAPI 描述的相同 URL 运行以下命令:

dotnet openapi refresh http://localhost:5062/swagger/v1/swagger.json

After updating your OpenAPI description by using either Visual Studio or the .NET tool, build your application to trigger NSwag to regenerate your client. Any changes you made to your OpenAPI description (such as adding operation IDs) will be reflected in the generated code.

使用 Visual Studio 或 .NET 工具更新 OpenAPI 描述后,构建应用程序以触发 NSwag 重新生成客户端。您对 OpenAPI 描述所做的任何更改(例如添加作 ID)都将反映在生成的代码中。

I think that client generation is the killer app for OpenAPI descriptions, but it works best when you use metadata to add extensive documentation to your APIs. In section 11.5 you’ll learn how to go one step further by adding summaries and descriptions to your endpoints.

我认为客户端生成是 OpenAPI 描述的杀手级应用程序,但当您使用元数据向 API 添加大量文档时,它的效果最佳。在 Section 11.5 中,您将学习如何通过向终端节点添加摘要和描述来更进一步。

11.5 Adding descriptions and summaries to your endpoints

11.5 向终端节点 添加描述和摘要

In this section you’ll learn how to add extra descriptions and summaries to your OpenAPI description document. Tools such as Swagger UI and NSwag use these extra descriptions and summaries to provide a better developer experience working with your API. You’ll also learn about alternative ways to add metadata to your minimal API endpoints.

在本节中,您将学习如何向 OpenAPI 描述文档添加额外的描述和摘要。Swagger UI 和 NSwag 等工具使用这些额外的描述和摘要来提供更好的开发人员使用 API 的体验。您还将了解将元数据添加到最小 API 终端节点的替代方法。

11.5.1 Using fluent methods to add descriptions

11.5.1 使用 Fluent 方法添加描述

Whilst working with your minimal API endpoints and calling methods such as WithName() and WithTags(), you may have noticed the methods WithSummary() and WithDescription(). These methods add metadata to your endpoint in exactly the same way as the other With* methods, but unfortunately, they don’t update your OpenAPI description without some extra changes.

在使用最小 API 端点并调用 WithName() 和 WithTags() 等方法时,您可能已经注意到了 WithSummary() 和 WithDescription() 方法。这些方法以与其他 With* 方法完全相同的方式将元数据添加到您的终端节点,但遗憾的是,如果不进行一些额外更改,它们不会更新您的 OpenAPI 描述。

To make use of the summary and description metadata, you must add an extra NuGet package, Microsoft.AspNetCore.OpenApi, and call WithOpenApi() on your endpoint. This method ensures that the summary and description metadata are added correctly to the OpenAPI description when Swashbuckle generates the document. Add this package via the NuGet package manager or the .NET CLI by calling

若要使用摘要和说明元数据,必须添加额外的 NuGet 包 Microsoft.AspNetCore.OpenApi,并在终结点上调用 WithOpenApi()。此方法可确保在 Swashbuckle 生成文档时将摘要和描述元数据正确添加到 OpenAPI 描述中。通过 NuGet 包管理器或 .NET CLI 添加此包

dotnet add package Microsoft.AspNetCore.OpenApi

from the project folder. Then update your endpoints to add summaries and/or descriptions, making sure to call WithOpenApi(), as shown in the following listing.

从项目文件夹中。然后更新您的终端节点以添加摘要和/或描述,确保调用 WithOpenApi(),如下面的清单所示。

Listing 11.9 Adding summaries and descriptions to endpoints using WithOpenApi()
列表 11.9 使用 WithOpenApi() 向端点添加摘要和描述

using System.Collections.Concurrent;

WebApplicationBuilder builder = WebApplication.CreateBuilder(args);

builder.Services.AddEndpointsApiExplorer();
builder.Services.AddSwaggerGen();

WebApplication app = builder.Build();

app.UseSwagger();
app.UseSwaggerUI();

var _fruit = new ConcurrentDictionary<string, Fruit>();

app.MapGet("/fruit/{id}", (string id) =>
    _fruit.TryGetValue(id, out var fruit)
        ? TypedResults.Ok(fruit)
        : Results.Problem(statusCode: 404))
    .WithName("GetFruit")
    .WithTags("fruit")
    .Produces<Fruit>()
    .ProducesProblem(404)
    .WithSummary("Fetches a fruit")    ❶
    .WithDescription("Fetches a fruit by id, or returns 404" +    ❷
      " if no fruit with the ID exists")    ❷
    .WithOpenApi();    ❸

app.Run();
record Fruit(string Name, int Stock);

❶ Adds a summary to the endpoint
向端点添加摘要
❷ Adds a description to the endpoint
向端点添加描述
❸ Exposes the metadata added by summary and description to the OpenAPI description
将 summary 和 description 添加的元数据公开到 OpenAPI 描述

With these changes, Swagger UI reflects the extra metadata, as shown in figure 11.10. NSwag also uses the summary as a documentation comment when it generates the endpoints on the client. You can see in figure 11.10, however, that one piece of documentation is missing: a description of the parameter id.
通过这些更改,Swagger UI 会反映额外的元数据,如图 11.10 所示。NSwag 在客户端上生成端点时,还会将摘要用作文档注释。但是,您可以在图 11.10 中看到缺少一条文档:参数 id 的描述。

alt text

Figure 11.10 The summary and description metadata displayed in the Swagger UI. Note that no description is displayed for the id parameter.
图 11.10 Swagger UI 中显示的摘要和描述元数据。请注意,不显示 id 参数的描述。

Unfortunately, you don’t have a particularly elegant way to add documentation for your parameters. The suggested approach is to use an overload of the WithOpenApi() method, which takes a lambda method where you can add a description for the parameter:
遗憾的是,您没有一种特别优雅的方法来为您的参数添加文档。建议的方法是使用 WithOpenApi() 方法的重载,该方法采用 lambda 方法,您可以在其中添加参数的描述:

.WithOpenApi(o =>
{
    o.Parameters[0].Description = "The id of the fruit to fetch";
    o.Summary = "Fetches a fruit";
    return o;
});

This example shows that you can use the WithOpenApi() method to set any of the OpenAPI metadata for the endpoint, so you can use this single method to set (for example) the summary and tags instead of using the dedicated WithSummary() or WithTags() method.

此示例显示,您可以使用 WithOpenApi() 方法为终端节点设置任何 OpenAPI 元数据,因此您可以使用此单一方法来设置(例如)摘要和标签,而不是使用专用的 WithSummary() 或 WithTags() 方法。

Adding all this metadata undoubtedly documents your API in more detail and makes your generated code easier to understand. But if you’re anything like me, the sheer number of methods you have to call makes it hard to see where your endpoint ends and the metadata begins! In section 11.5.2 we’ll look at an alternative approach that involves using attributes.

添加所有这些元数据无疑可以更详细地记录您的 API,并使您生成的代码更易于理解。但是,如果您和我一样,您必须调用的方法数量之多使得很难看到您的终端节点从何处结束,元数据从何处开始!在 Section 11.5.2 中,我们将介绍一种涉及使用 attributes 的替代方法。

11.5.2 Using attributes to add metadata

11.5.2 使用属性添加元数据

I’m a fan of fluent interfaces in many cases, as I feel that they make code easier to understand. But the endpoint metadata extensions, such as those shown in listing 11.9, go to extremes. It’s hard to understand what the endpoint is doing with all the noise from the metadata methods! Ever since version 1.0, C# has had a canonical way to add metadata to code—attributes—and you can replace your endpoint extension methods with dedicated attributes if you prefer.

在许多情况下,我是 Fluent 接口的粉丝,因为我觉得它们使代码更容易理解。但是端点元数据扩展(如清单 11.9 中所示的扩展)走向了极端。很难理解终端节点对元数据方法的所有干扰做了什么!从 1.0 版开始,C# 就有一种将元数据添加到代码中的规范方法 — 属性 — 如果您愿意,可以将端点扩展方法替换为专用属性。

Almost all the extension methods that you add to your endpoint have an equivalent attribute you can use instead. These attributes should be applied directly to the handler method (the lambda function, if that’s what you’re using). Listing 11.10 shows the equivalent of listing 11.9, using attributes instead of fluent methods where possible. The WithOpenApi() method is the only call that can’t be replaced; it must be included so that Swashbuckle reads the OpenAPI metadata correctly.

您添加到终端节点的几乎所有扩展方法都具有您可以改用的等效属性。这些属性应直接应用于处理程序方法(lambda 函数,如果您使用的是 lambda 函数)。清单 11.10 显示了与清单 11.9 等效的清单,尽可能使用属性而不是连贯方法。WithOpenApi() 方法是唯一无法替换的调用;必须包含它,以便 Swashbuckle 正确读取 OpenAPI 元数据。

Listing 11.10 Using attributes to describe your API
清单 11.10 使用属性来描述 API

using System.Collections.Concurrent;

WebApplicationBuilder builder = WebApplication.CreateBuilder(args);

builder.Services.AddEndpointsApiExplorer();
builder.Services.AddSwaggerGen();

WebApplication app = builder.Build();

app.UseSwagger();
app.UseSwaggerUI();

var _fruit = new ConcurrentDictionary<string, Fruit>();

app.MapGet("/fruit/{id}",
    [EndpointName("GetFruit")]  ❶
    [EndpointSummary("Fetches a fruit")]  ❶
    [EndpointDescription("Fetches a fruit by id, or returns 404" + ❶
        " if no fruit with the ID exists")]  ❶
    [ProducesResponseType(typeof(Fruit), 200)]  ❶
    [ProducesResponseType(typeof(HttpValidationProblemDetails), 404, ❶
        "application/problem+json")]  ❶
    [Tags("fruit")]  ❶
    (string id) =>
        _fruit.TryGetValue(id, out var fruit)
            ? TypedResults.Ok(fruit)
            : Results.Problem(statusCode: 404))
    .WithOpenApi(o =>
    {
        o.Parameters[0].Description = "The id of the fruit to fetch";
        return o;
    });

app.Run();
record Fruit(string Name, int Stock);

❶ You can use attributes instead of fluent method calls.
您可以使用属性而不是 Fluent 方法调用。

Whether you think listing 11.10 is better than listing 11.9 is largely a matter of taste, but the reality is that neither is particularly elegant. In both cases the metadata significantly obscures the intent of the API, so it’s important to consider which metadata is worth adding and which is unnecessary noise. That balance may shift depending on who your audience is (internal or external customers), how mature your API is, and how much you can extract to helper functions.

你是否认为列出 11.10 比列出 11.9 更好,这在很大程度上是一个品味问题,但现实是两者都不是特别优雅。在这两种情况下,元数据都会严重掩盖 API 的意图,因此重要的是要考虑哪些元数据值得添加,哪些是不必要的干扰。这种平衡可能会根据您的受众群体(内部或外部客户)、API 的成熟度以及可以提取到帮助程序函数的数量。

11.5.3 Using XML documentation comments to add metadata

11.5.3 使用 XML 文档注释添加元数据

One understandable complaint about both the attribute and method approaches for attaching OpenAPI metadata is that the summary and parameter descriptions are divorced from the endpoint handler to which they apply. In this section you’ll see how an alternative approach that uses Extensible Markup Language (XML) documentation comments.

关于附加 OpenAPI 元数据的属性和方法方法的一个可以理解的抱怨是,摘要和参数描述与它们所应用的端点处理程序分离。在本节中,您将了解如何使用可扩展标记语言 (XML) 文档注释的替代方法。

Every C# developer user will be used to the handy descriptions about methods and parameters you get in your IDE from IntelliSense. You can add these descriptions to your own methods by using XML documentation comments, for example:

每个 C# 开发人员用户都将习惯于从 IntelliSense 获得的有关 IDE 中的方法和参数的便捷说明。您可以使用 XML 文档注释将这些描述添加到您自己的方法中,例如:

/// <summary>
/// Adds one to the provided value and returns it
/// </summary>
/// <param name="value">The value to increment</param>
public int Increment(int value) => value + 1;

In your IDE—whether that’s Visual Studio, JetBrains Rider, or Visual Studio Code—this description appears when you try to invoke the method. Wouldn’t it be nice to use the same syntax to define the summary and parameter descriptions for our OpenAPI endpoints? Well, the good news is that we can!

在您的 IDE 中(无论是 Visual Studio、JetBrains Rider 还是 Visual Studio Code),当您尝试调用该方法时,会显示此描述。使用相同的语法来定义 OpenAPI 端点的摘要和参数描述不是很好吗?好吧,好消息是我们可以!

Warning The use of XML documentation comments is only partially supported in .NET 7. These comments work only when you have static or instance method endpoint handlers, not lambda methods or local functions. You can find the issue tracking full support for XML comments at https://github.com/dotnet/aspnetcore/issues/39927.
警告 .NET 7 仅部分支持使用 XML 文档注释。这些注释仅在您具有静态或实例方法终端节点处理程序,而不是 lambda 方法或本地函数时有效。您可以找到问题在 https://github.com/dotnet/aspnetcore/issues/39927 跟踪对 XML 注释的完全支持。

Swashbuckle can use the XML comments you add to your endpoint handlers as the descriptions for your OpenAPI description. When enabled, the .NET software development kit (SDK) generates an XML file containing all your documentation comments. Swashbuckle can read this file on startup and use it to generate the OpenAPI descriptions, as shown in figure 11.11.

Swashbuckle 可以使用您添加到终端节点处理程序的 XML 注释作为 OpenAPI 描述的描述。启用后,.NET SDK 会生成一个包含所有文档注释的 XML 文件。Swashbuckle 可以在启动时读取此文件并使用它来生成 OpenAPI 描述,如图 11.11 所示。

alt text

Figure 11.11 You can configure a .NET application to export documentation comments to a dedicated XML file when it builds. Swashbuckle reads this documentation file at runtime, combining it with the attribute and fluent method metadata for an endpoint to generate the final OpenAPI description.
图 11.11 您可以配置 .NET 应用程序以将文档注释导出到专用 XML 文件当它构建时。Swashbuckle 在运行时读取此文档文件,将其与终端节点的属性和 Fluent 方法元数据相结合,以生成最终的 OpenAPI 描述。

To enable XML documentation comment extraction for your OpenAPI description document you must do three things:
要为您的 OpenAPI 描述文档启用 XML 文档注释提取,您必须执行以下三项作:

  1. Enable documentation generation for your project. Add the <GenerateDocumentationFile> inside a <PropertyGroup> in your csproj file, and set it to true:
    为您的项目启用文档生成。在 <GenerateDocumentationFile> 中添加<PropertyGroup>,并将其设置为

true:

<PropertyGroup>
  <GenerateDocumentationFile>true</GenerateDocumentationFile>
</PropertyGroup>
  1. Configure Swashbuckle to read the generated XML document in SwaggerGen():
    配置 Swashbuckle 以读取 SwaggerGen() 中生成的 XML 文档:
builder.Services.AddSwaggerGen(opts =>
{
    var file = $"{Assembly.GetExecutingAssembly().GetName().Name}.xml";
    opts.IncludeXmlComments(Path.Combine(AppContext.BaseDirectory, file));
});

3.Use a static or instance method handler and add the XML comments, as shown in the following listing.
使用静态或实例方法处理程序并添加 XML 注释,如下面的清单所示。

Listing 11.11 Adding documentation comments to an endpoint handler
Listing 11.11 向端点处理程序添加文档注释

using Microsoft.AspNetCore.Mvc;
using System.Collections.Concurrent;
using System.Reflection;

WebApplicationBuilder builder = WebApplication.CreateBuilder(args);

builder.Services.AddEndpointsApiExplorer();
builder.Services.AddSwaggerGen(opts =>  ❶
{
    var file = $"{Assembly.GetExecutingAssembly().GetName().Name}.xml";
    opts.IncludeXmlComments(Path.Combine(AppContext.BaseDirectory, file));
});

WebApplication app = builder.Build();

app.UseSwagger();
app.UseSwaggerUI();

var _fruit = new ConcurrentDictionary<string, Fruit>();

var handler = new FruitHandler(fruit);  ❷
app.MapGet("/fruit/{id}", handler.GetFruit)  ❷
    .WithName("GetFruit");  ❸

app.Run();
record Fruit(string Name, int Stock);

internal class FruitHandler
{
    private readonly ConcurrentDictionary<string, Fruit> _fruit;
    public FruitHandler(ConcurrentDictionary<string, Fruit> fruit)
    {
        _fruit = fruit;
    }

    /// <summary>    ❹
    /// Fetches a fruit by id, or returns 404 if it does not exist   ❹
    /// </summary>    ❹
    /// <param name="id" >The ID of the fruit to fetch</param>    ❹
    /// <response code="200">Returns the fruit if it exists</response>  ❹
    /// <response code="404">If the fruit doesn't exist</response>   ❹
    [ProducesResponseType(typeof(Fruit), 200)]    ❺
    [ProducesResponseType(typeof(HttpValidationProblemDetails),   ❺
        404, "application/problem+json")]    ❺
    [Tags("fruit")]    ❺
    public IResult GetFruit(string id)
        => _fruit.TryGetValue(id, out var fruit)
            ? TypedResults.Ok(fruit)
            : Results.Problem(statusCode: 404);
}

❶ Enables XML comments for your OpenAPI descriptions
为您的 OpenAPI 描述启用 XML 注释
❷ You must use static or instance handlers, not lambda methods.
您必须使用静态或实例处理程序,而不是 lambda 方法。
❸ You can add extra metadata by using methods.
您可以使用 methods 添加额外的元数据。
❹ The XML comments are used in the OpenAPI description.
XML 注释用于 OpenAPI 描述。
❺ You can also add extra metadata by using attributes on the handler method.
您还可以通过在 handler 方法上使用 attributes 来添加额外的元数据。

I like the XML comment approach, as it feels much more natural for C# and the comments are often deemphasized in IDEs, reducing visual clutter. You’ll still need to use attributes and/or fluent methods to fully describe your endpoints for OpenAPI, but every little bit helps!

我喜欢 XML 注释方法,因为它对 C# 来说感觉更自然,而且注释在 IDE 中经常被淡化,从而减少了视觉混乱。您仍然需要使用属性和/或 Fluent 方法来完整描述 OpenAPI 的端点,但每一点都有帮助!

As I’ve mentioned several times, how far you go with your OpenAPI description is up to you and how much value you get from it. If you want to use OpenAPI only for local testing with Swagger UI, it doesn’t make sense to clutter your code with lots of extra metadata. In fact, in those cases it would be best to add the swagger services and middleware conditionally only when you’re in development, as in this example:

正如我多次提到的,您对 OpenAPI 描述的了解程度取决于您,以及您从中获得多少价值。如果您只想将 OpenAPI 用于 Swagger UI 的本地测试,那么用大量额外的元数据来杂乱无章的代码是没有意义的。事实上,在这些情况下,最好仅在开发过程中有条件地添加 swagger 服务和中间件,如下例所示:

WebApplicationBuilder builder = WebApplication.CreateBuilder(args);

if(builder.Environment.IsDevelopment())
{
    builder.Services.AddEndpointsApiExplorer();
    builder.Services.AddSwaggerGen();
}

WebApplication app = builder.Build();
if(app.Environment.IsDevelopment())
{
    app.UseSwagger();
    app.UseSwaggerUI();
}

app.Run();

On the other hand, if you’re generating C# clients for calling your API or exposing your API for public consumption, the more metadata you add, the better! It’s also worth noting that you can add OpenAPI descriptions for all the endpoints in your application, not only your minimal API endpoints. When you create web API controllers in chapter 20, you can include them = too.

另一方面,如果要生成 C# 客户端来调用 API 或公开 API 以供公众使用,则添加的元数据越多越好!还值得注意的是,您可以为应用程序中的所有终端节点添加 OpenAPI 描述,而不仅仅是您的最小 API 终端节点。在第 20 章中创建 Web API 控制器时,也可以包含它们。

11.6 Knowing the limitations of OpenAPI

11.6 了解 OpenAPI 的局限性

In this chapter I’ve described the benefits of OpenAPI, both for simple testing with Swagger UI and for code generation. But like most things in software, it’s not all sweetness and light. OpenAPI and Swagger have limitations that you may run into, particularly as your APIs increase in complexity. In this section I describe some of the challenges to watch out for.

在本章中,我介绍了 OpenAPI 的好处,无论是使用 Swagger UI 进行简单测试还是代码生成。但就像软件中的大多数东西一样,它并不全是甜蜜和轻松。OpenAPI 和 Swagger 存在您可能会遇到的限制,尤其是在 API 复杂性增加时。在本节中,我将介绍一些需要注意的挑战。

11.6.1 Not all APIs can be described by OpenAPI

11.6.1 并非所有 API 都可以由 OpenAPI 描述

The OpenAPI specification is meant to describe your API so that any client knows how to call it. Unfortunately, OpenAPI can’t describe all APIs, which isn’t an accident. The OpenAPI specification says “Not all services can be described by OpenAPI—this specification is not intended to cover every possible style of REST APIs.” So,= the important question is which APIs can’t it describe?

OpenAPI 规范旨在描述您的 API,以便任何客户端都知道如何调用它。不幸的是,OpenAPI 无法描述所有 API,这并非偶然。OpenAPI 规范指出“并非所有服务都可以由 OpenAPI 描述— 此规范并不打算涵盖所有可能的 REST API 样式。那么,重要的问题是哪些 API 不能描述?

One classic example is an API that follows the REST design known as Hypertext As the Engine of Application State (HATEOAS). In this design, each request to an API endpoint includes a list of links describing the actions you can take and the paths to use for each action, enabling clients to discover which actions are available for a given resource. The server can add or remove links dynamically, depending on the state of the resource and which user is making the request.

一个典型的示例是遵循 REST 设计的 API,称为超文本作为应用程序状态引擎 (HATEOAS)。在此设计中,对 API 终端节点的每个请求都包含一个链接列表,这些链接描述了您可以执行的作以及用于每个作的路径,使客户端能够发现哪些作可用于给定资源。服务器可以动态添加或删除链接,具体取决于资源的状态和发出请求的用户。

Tip Martin Fowler has a great description of the REST maturity models, in which HATEOAS is the highest level of maturity, at http://mng.bz/0K1N.
提示 Martin Fowler 对 REST 成熟度模型进行了很好的描述,其中 HATEOAS 是最高级别的成熟度,达到 http://mng.bz/0K1N

HATEOAS generally introduces more complexity than is worthwhile for small projects, but it’s a great way to decouple your client-side applications from your server APIs so that they can evolve separately. This approach can be invaluable when you have large or independent teams. The problem for OpenAPI is that it wasn’t designed for these kinds of dynamic APIs. OpenAPI wants to know up front what the responses are for each of your endpoints, which isn’t information that you can give it if you’re following HATEOAS.

HATEOAS 通常会带来比小型项目所值得的更多的复杂性,但这是将客户端应用程序与服务器 API 分离的好方法,以便它们可以单独发展。当您拥有大型或独立团队时,这种方法可能非常宝贵。OpenAPI 的问题在于它不是为这些类型的动态 API 设计的。OpenAPI 希望提前知道每个终端节点的响应是什么,如果您遵循 HATEOAS,则无法提供这些信息。

In a different scenario, you may have multiple backend APIs, each with its own OpenAPI specification. You expose a single, unified API gateway app, with which all your clients interact. Unfortunately, even though each backend API has an OpenAPI specification, there’s no easy way to combine the APIs into a single unified document that you can expose in your API gateway and which clients can use for testing and code generation.

在不同的情况下,您可能有多个后端 API,每个 API 都有自己的 OpenAPI 规范。您公开一个统一的 API Gateway 应用程序,所有客户端都与该应用程序进行交互。遗憾的是,即使每个后端 API 都有一个 OpenAPI 规范,也没有简单的方法可以将这些 API 组合成一个统一的文档,您可以在 API 网关中公开该文档,客户端可以使用该文档进行测试和代码生成。

Another common problem centers on securing your APIs with authentication and authorization. The OpenAPI specification contains a section about describing your authentication requirements, and Swagger UI supports them. Where things fall down is if you’re using any extensions to the common authentication protocols or advanced features. Although some of these workflows are possible, in some cases Swagger UI simply may not support your workflow, rendering Swagger UI unusable.

另一个常见问题集中在使用身份验证和授权保护您的 API 上。OpenAPI 规范包含有关描述身份验证的部分要求,并且 Swagger UI 支持它们。出现问题的地方是如果您使用了常见身份验证协议或高级功能的任何扩展。尽管其中一些工作流程是可能的,但在某些情况下,Swagger UI 可能根本不支持您的工作流程,从而导致 Swagger UI 不可用。

11.6.2 Generated code is opinionated

11.6.2 生成的代码是固执己见的

At the end of section 11.4 I said that code generation is the killer feature for Open API documents, and in many cases it is. That statement, however, assumes that you like the generated code. If the tooling you use—whether that’s NSwag or some other code generator—doesn’t generate the code you want, you may find yourself spending a lot of effort customizing and tweaking the output. At some point and for some APIs, it may be simpler and easier to write your own client!

在 11.4 节的结尾,我说过代码生成是 Open API 文档的杀手级功能,在许多情况下确实如此。但是,该语句假定您喜欢生成的代码。如果您使用的工具(无论是 NSwag 还是其他代码生成器)没有生成您想要的代码,您可能会发现自己花费了大量精力来自定义和调整输出。在某些时候,对于某些 API,编写自己的客户端可能会更简单、更容易!

Note A classic complaint (with which I sympathize) is the use of exceptions for process flow whenever an error or unexpected status code is returned. Not all errors are exceptional, throwing exceptions is relatively expensive computationally, and it often means that every call made with a client needs custom exception handling. This design sometimes makes code generation seem more like a burden than a benefit.
注意 一个典型的抱怨(我对此表示同情)是每当返回错误或意外状态代码时,都会对流程使用异常。并非所有错误都是异常的,引发异常的计算成本相对较高,这通常意味着使用客户端进行的每个调用都需要自定义异常处理。这种设计有时使代码生成看起来更像是一种负担,而不是一种好处。

Another, subtler issue arises when you use code generation with two separate but related OpenAPI documents, such as a products API and a cart API. If you use the techniques in this chapter to generate the clients and then try to follow this simple sequence, you’ll run into trouble:

当您将代码生成与两个独立但相关的 OpenAPI 文档(例如产品 API 和购物车 API)一起使用时,会出现另一个更微妙的问题。如果使用本章中的技术生成客户端,然后尝试遵循以下简单顺序,则会遇到麻烦:

  1. Retrieve a Product instance from the products API by using ProductsClient.Get()
    使用 ProductsClient.Get() 从 products API 检索 Product 实例。

  2. Send the retrieved Product to the cart API by using CartClient.Add(Product)
    使用 将检索到的 Product 发送到购物车 API CartClient.Add(Product) 的

Unfortunately, the generated Product type retrieved from the products API is a different type from the generated Product type that the CartClient requires, so this code won’t compile. Even if the type has the same properties and is serialized to the same JSON when it’s sent to the client, C# considers the objects to be different types and won’t let them swap places. You must copy the values manually from the first Product instance to a new instance. These complaints are mostly small niggles and paper cuts, but they can add up when you run into them often.

遗憾的是,从 products API 检索到的生成的 Product 类型与 CartClient 需要的生成的 Product 类型不同,因此此代码无法编译。即使类型具有相同的属性,并且在发送到客户端时序列化为相同的 JSON,C# 也会将对象视为不同的类型,并且不允许它们交换位置。您必须手动将值从第一个 Product 实例复制到新实例。这些抱怨大多是小问题和剪纸,但当您经常遇到它们时,它们会累积起来。

11.6.3 Tooling often lags the specification

11.6.3 工具经常滞后于规格

Another factor to consider is the many groups that are involved in generating an OpenAPI document and generating a client:

另一个需要考虑的因素是生成 OpenAPI 文档和生成客户端所涉及的许多组:

  • The Open API specification is a community-driven project written by the OpenAPI Initiative group.
    Open API 规范是由 OpenAPI Initiative 小组编写的社区驱动型项目。

  • Microsoft provides the tooling built into ASP.NET Core for supplying the metadata about your API endpoints.
    Microsoft 提供了 ASP.NET Core 中内置的工具,用于提供有关 API 终端节点的元数据。

  • Swashbuckle is an open-source project that uses the ASP.NET Core metadata to generate an OpenAPI-compatible document.
    Swashbuckle 是一个开源项目,它使用 ASP.NET Core 元数据生成与 OpenAPI 兼容的文档。

  • NSwag is an open-source project that takes an OpenAPI-compatible document and generates clients (and has many other features!).
    NSwag 是一个开源项目,它采用与 OpenAPI 兼容的文档并生成客户端(并且具有许多其他功能!)

  • Swagger UI is an open-source project for interacting with APIs based on the OpenAPI document.
    Swagger UI 是一个开源项目,用于与基于 OpenAPI 文档的 API 交互。

Some of these projects have direct dependencies on others (everything depends on the OpenAPI specification, for example), but they may evolve at difference paces. If Swashbuckle doesn’t support some new feature of the OpenAPI specification, it won’t appear in your documents, and NSwag won’t be able to use it.

其中一些项目直接依赖于其他项目(例如,一切都取决于 OpenAPI 规范),但它们的发展速度可能不同。如果 Swashbuckle 不支持 OpenAPI 规范的某些新功能,它不会出现在你的文档中,NSwag 也无法使用它。

Most of the tools provide ways to override the behavior to work around these rough edges, but the reality is that if you’re using newer or less popular features, you may have more difficulty persuading all the tools in your tool chain to play together nicely.

大多数工具都提供了覆盖行为的方法,以解决这些粗糙的边缘,但现实情况是,如果您使用的是较新或不太流行的功能,则说服工具链中的所有工具很好地协同工作可能会更加困难。

Overall, the important thing to remember is that OpenAPI documents may work well if you have simple requirements or want to use Swagger UI only for testing. In these cases, there’s little investment required to add OpenAPI support, and it can improve your workflow, so you might find it worthwhile to try.

总的来说,要记住的重要一点是,如果您有简单的要求或只想使用 Swagger UI 进行测试,OpenAPI 文档可能会很好地工作。在这些情况下,添加 OpenAPI 支持只需要很少的投资,而且它可以改善您的工作流程,因此您可能会发现值得尝试。

If you have more complex requirements, are creating an API that OpenAPI can’t easily describe or aren’t a fan of the code generation, it may not be worth your time to invest heavily in OpenAPI for your documents.

如果您有更复杂的要求,正在创建 OpenAPI 无法轻松描述的 API,或者不喜欢代码生成,那么可能不值得您花时间为您的文档投入大量 OpenAPI。

Tip If you’re a fan of code generation but prefer more of a remote procedure call (RPC) style of programming, it’s worthwhile to look at gRPC. Code generation for gRPC is robust, supported across multiple languages, and has great support in .NET. You can read more in the documentation at https://learn.microsoft.com/aspnet/core/grpc.
提示 如果您喜欢代码生成,但更喜欢远程过程调用 (RPC) 风格的编程,那么值得考虑一下 gRPC。gRPC 的代码生成非常健壮,支持多种语言,并您可以在 https://learn.microsoft.com/aspnet/core/grpc 上的文档中阅读更多内容。

In chapter 12 we’ll take a brief look at the new object-relational mapper that fits well with ASP.NET Core: Entity Framework Core. You’ll get only a taste of it in this book, but you’ll learn how to load and save data, build a database from your code, and migrate the database as your code evolves.

在第 12 章中,我们将简要介绍非常适合 ASP.NET Core 的新对象关系映射器:Entity Framework Core。在本书中,您只会对它有所了解,但您将学习如何加载和保存数据、从代码构建数据库,以及随着代码的发展迁移数据库。

11.7 Summary

11.7 总结

OpenAPI is a specification for describing HTTP APIs in a machine-readable format, as a JSON document. You can use this document to drive other tooling, such as code generators or API testers.
OpenAPI 是一种规范,用于以机器可读格式(如 JSON 文档)描述 HTTP API。您可以使用本文档来驱动其他工具,例如代码生成器或 API 测试器。

You can add OpenAPI document generation to an ASP.NET Core app by using the NSwag or Swashbuckle NuGet package. These packages work with ASP.NET Core services to read metadata about all the endpoints in your application to build an OpenAPI document.
您可以使用 NSwag 或 Swashbuckle NuGet 包将 OpenAPI 文档生成添加到 ASP.NET Core 应用程序。这些软件包与 ASP.NET Core 服务配合使用,以读取有关应用程序中所有终端节点的元数据,以构建 OpenAPI 文档。

The Swashbuckle Swagger middleware exposes the OpenAPI Document for your application at the path /swagger/v1/swagger.json by default. Exposing the document in this way makes it easy for other tools to understand the endpoints in your application.
Swashbuckle Swagger 中间件在路径中公开应用程序的 OpenAPI 文档/swagger/v1/swagger.json 中。暴露该文档使其他工具能够轻松理解应用程序中的端点。

You can explore and test your API by using Swagger UI. The Swashbuckle Swagger UI middleware exposes the UI at the path /swagger by default. You can use Swagger UI to explore your API, send test requests to your endpoints, and check how well your API is documented.
您可以使用 Swagger UI 探索和测试您的 API。默认情况下,Swashbuckle Swagger UI 中间件在路径 /swagger 处公开 UI。您可以使用 Swagger UI 来浏览 API,向终端节点发送测试请求,并检查 API 的文档记录情况。

You can customize the OpenAPI description of your endpoints by adding metadata. You can provide tags, for example, by calling WithTags() on an endpoint and specify that an endpoint returns a type T with a 201 status code using Produces<T>(201). Adding metadata improves your API OpenAPI description, which in turn improves tooling such as Swagger UI.
您可以通过添加元数据来自定义终端节点的 OpenAPI 描述。例如,您可以通过在终端节点上调用 WithTags() 来提供标签,并使用 Produces<T>(201) 指定终端节点返回状态代码为 201 的类型 T。添加元数据可以改进 API 的 OpenAPI 描述,从而改进 Swagger UI 等工具。

You can use NSwag to generate a C# client from an OpenAPI description. This approach takes care of using the correct paths to call the API, substituting parameters in the path, and serializing and deserializing requests to the API, removing much of the boilerplate associated with interacting with an API.
您可以使用 NSwag 从 OpenAPI 描述生成 C# 客户端。此方法负责使用正确的路径调用 API、替换路径中的参数以及序列化和反序列化对 API 的请求,从而删除与与 API 交互相关的大部分样板。

You can add code generation to your project by using Visual Studio or the .NET API tool or by making manual changes to your project. Visual Studio and the .NET tool automate downloading the OpenAPI description to your local project and adding the necessary NuGet packages. You should update the NuGet packages to the latest versions to ensure that you have the latest bug or security fixes.
您可以使用 Visual Studio 或 .NET API 工具,或者通过手动更改项目来向项目添加代码生成。Visual Studio 和 .NET 工具会自动将 OpenAPI 描述下载到本地项目,并添加必要的 NuGet 包。应将 NuGet 包更新到最新版本,以确保您拥有最新的 bug 或安全修复。

NSwag automatically generates a C# method name on the main client class for each endpoint in the OpenAPI description. If the endpoint’s OperationID is missing, NSwag generates a name, which may not be optimal. You can specify the OperationID to use for an endpoint in your OpenAPI description by calling WithName() on the endpoint.
NSwag 在 OpenAPI 描述中的每个端点的主客户端类上自动生成一个 C# 方法名称。如果缺少终结点的 OperationID,NSwag 会生成一个名称,这可能不是最佳名称。您可以通过在终端节点上调用 WithName() 来指定 OpenAPI 描述中要用于终端节点的 OperationID。

You can customize the client NSwag generates by adding an <Options> element inside the <OpenApiReference> in your .csproj file. These options are specified as command-line switches such as /JsonLibrary:SystemTextJson. You can change many things about the generated code with these switches, such as the serialization library to use and whether to generate an interface for the client.
您可以通过在<OpenApiReference> 在 .csproj 文件中。这些选项指定为命令行开关,例如 /JsonLibrary:SystemTextJson。您可以使用这些开关更改有关生成代码的许多内容,例如要使用的序列化库以及是否为 Client 端生成接口。

If the OpenAPI description for a remote API changes, you need to download the document to your project again for the generated client to reflect these changes. If you originally added the OpenAPI reference by using Visual Studio, you should use Visual Studio to refresh the document, and the same applies to the .NET API tool. NSwag automatically updates the generated code when the downloaded OpenAPI document changes.
如果远程 API 的 OpenAPI 描述发生更改,您需要再次将文档下载到您的项目中,以便生成的客户端反映这些更改。如果最初使用 Visual Studio 添加了 OpenAPI 引用,则应使用 Visual Studio 刷新文档,这同样适用于 .NET API 工具。当下载的 OpenAPI 文档发生更改时,NSwag 会自动更新生成的代码。

You can add an OpenAPI summary and description to an endpoint by installing the Microsoft.AspNetCore.OpenApi package, calling WithOpenApi() on the endpoint, and adding calls to WithSummary() or WithDescription(). This metadata is shown in Swagger UI, and NSwag uses the summary to generate documentation comments in the C# client.
您可以通过安装 Microsoft.AspNetCore.OpenApi 包,在端点上调用 WithOpenApi(),然后添加对 WithSummary() 或 WithDescription() 的调用,将 OpenAPI 摘要和说明添加到端点。此元数据显示在 Swagger UI 中,NSwag 使用摘要在 C# 客户端中生成文档注释。

You can use attributes instead of fluent methods to add OpenAPI metadata if you prefer. This approach sometimes helps improve readability of your endpoints. You must still call WithOpenApi() on the endpoint to read the metadata attributes.
如果需要,可以使用属性而不是 Fluent 方法来添加 OpenAPI 元数据。此方法有时有助于提高终端节点的可读性。您仍必须在终端节点上调用 WithOpenApi() 才能读取元数据属性。

You can use XML documentation comments to document your OpenAPIs to reduce the clutter of extra method calls and attributes. To use this approach, you must enable documentation generation for the project, configure Swashbuckle to read the XML documentation file on startup, and use static or instance handler methods instead of lambda methods.
您可以使用 XML 文档注释来记录 OpenAPI,以减少额外方法调用和属性的混乱。要使用此方法,您必须为项目启用文档生成,将 Swashbuckle 配置为在启动时读取 XML 文档文件,并使用静态或实例处理程序方法而不是 lambda 方法。

Not all APIs can be described by the OpenAPI specification. Some styles, such as HATEOAS, are naturally dynamic and don’t lend themselves to the static design of OpenAPI. You may also have difficulty with complex authentication requirements, as well as combining OpenAPI documents. In these cases, you may find that OpenAPI brings little value to your application.
并非所有 API 都可以用 OpenAPI 规范来描述。某些样式(如 HATEOAS)自然是动态的,并不适合 OpenAPI 的静态设计。您可能还难以满足复杂的身份验证要求以及组合 OpenAPI 文档。在这些情况下,您可能会发现 OpenAPI 为您的应用程序带来什么价值。

ASP.NET Core in Action 10 Configuring an ASP.NET Core application

10 Configuring an ASP.NET Core application
10 配置 ASP.NET Core 应用程序

This chapter covers

本章涵盖

  • Loading settings from multiple configuration providers
    从多个配置提供程序加载设置

  • Storing sensitive settings safely
    安全地存储敏感设置

  • Using strongly typed settings objects
    使用强类型设置对象

  • Using different settings in different hosting environments
    在不同的托管环境中使用不同的设置

In part 1 of this book, you learned the basics of getting an ASP.NET Core app up and running, and how to use minimal API endpoints to create an HTTP API. When you start building real applications, you’ll quickly find that you want to tweak various settings at deploy time without necessarily having to recompile your application. This chapter looks at how you can achieve this task in ASP.NET Core by using configuration.

在本书的第 1 部分中,您学习了启动和运行 ASP.NET Core 应用程序的基础知识,以及如何使用最少的 API 端点来创建 HTTP API。当您开始构建真正的应用程序时,您很快就会发现您希望在部署时调整各种设置,而不必重新编译您的应用程序。本章介绍如何使用 configuration 在 ASP.NET Core 中完成此任务。

I know. Configuration sounds boring, right? But I have to confess that the configuration model is one of my favorite parts of ASP.NET Core; it’s so easy to use and so much more elegant than some approaches in old versions of .NET Framework. In section 10.2 you’ll learn how to load values from a plethora of sources—JavaScript Object Notation (JSON) files, environment variables, and command-line arguments—and combine them into a unified configuration object.

我知道。配置听起来很无聊,对吧?但我不得不承认,配置模型是 ASP.NET Core 中我最喜欢的部分之一;它非常易于使用,并且比旧版本的 .NET Framework 中的某些方法要优雅得多。在第 10.2 节中,您将学习如何从大量来源(JavaScript 对象表示法 (JSON) 文件、环境变量和命令行参数)加载值,并将它们组合到一个统一的配置对象中。

On top of that, ASP.NET Core makes it easy to bind this configuration to strongly typed options objects—simple plain old CLR object (POCO) classes that are populated from the configuration object, which you can inject into your services, as you’ll see in section 10.3. Binding to strongly typed options objects lets you nicely encapsulate settings for different features in your app.

最重要的是,ASP.NET Core 可以轻松地将此配置绑定到强类型选项对象 — 从配置对象填充的简单普通旧 CLR 对象 (POCO) 类,您可以将其注入到您的服务中,如第 10.3 节所示。绑定到强类型选项对象可以让您很好地封装应用程序中不同功能的设置。

In the final section of this chapter, you’ll learn about the ASP.NET Core hosting environments. You often want your app to run differently in different situations, such as running it on your developer machine compared with deploying it to a production server. These situations are known as environments. When the app knows the environment in which it’s running, it can load a different configuration and vary its behavior accordingly.

在本章的最后一节中,您将了解 ASP.NET Core 托管环境。您通常希望您的应用程序在不同情况下以不同的方式运行,例如在开发人员计算机上运行它与将其部署到生产服务器。这些情况称为环境。当应用程序知道它运行的环境时,它可以加载不同的配置并相应地改变其行为。

Before we get to that topic, let’s cover the basics. What is configuration, why do we need it, and how does ASP.NET Core handle these requirements?

在我们进入该主题之前,让我们先了解一下基础知识。什么是配置,我们为什么需要它,以及 ASP.NET Core 如何处理这些要求?

10.1 Introducing the ASP.NET Core configuration model

10.1 ASP.NET Core 配置模型简介

In this section I provide a brief description of configuration and what you can use it for in ASP.NET Core applications. Configuration is the set of external parameters provided to an application that controls the application’s behavior in some way. It typically consists of a mixture of settings and secrets that the application loads at runtime.

在本节中,我将简要介绍配置以及您可以在 ASP.NET Core 应用程序中使用它的用途。Configuration 是提供给应用程序的一组外部参数,它以某种方式控制应用程序的行为。它通常由应用程序在运行时加载的设置和密钥的混合组成。

Definition A setting is any value that changes the behavior of your application. A secret is a special type of setting that contains sensitive data, such as a password, an API key for a third-party service, or a connection string.
定义 设置是更改应用程序行为的任何值。密钥是一种特殊类型的设置,其中包含敏感数据,例如密码、第三方服务的 API 密钥或连接字符串。

The obvious things to consider before we get started are why we need app configuration and what sort of things we need to configure. Normally, you move anything that you can consider to be a setting or a secret out of your application code. That way, you can change these values at deploy time easily without having to recompile your application.

在开始之前,要考虑的明显事项是为什么需要应用程序配置以及需要配置哪些类型的内容。通常,您将任何可以视为设置或密钥的内容从应用程序代码中移出。这样,您就可以在部署时轻松更改这些值,而无需重新编译应用程序。

You might have an application that shows the locations of your bricks-and-mortar stores. You could have a setting for the connection string to the database in which you store the details on the stores, but also settings such as the default location to display on a map, the default zoom level to use, and the API key for accessing the Google Maps API (figure 10.1). Storing these settings and secrets outside your compiled code is good practice, as it makes it easy to tweak them without having to recompile your code.

您可能有一个显示实体店位置的应用程序。你可以设置存储商店详细信息的数据库的连接字符串,也可以设置地图上显示的默认位置、要使用的默认缩放级别以及用于访问 Google Maps API 的 API 密钥等设置(图 10.1)。将这些设置和密钥存储在已编译代码之外是一种很好的做法,因为它可以轻松调整它们,而无需重新编译代码。

alt text

Figure 10.1 You can store the default map location, zoom level, and mapping API Key in configuration and load them at runtime. It’s important to keep secrets such as API keys in configuration out of your code.
图 10.1 您可以在配置中存储默认地图位置、缩放级别和地图 API Key,并在运行时加载它们。请务必将 configuration 中的 API 密钥等机密信息保留在代码之外。

There’s also a security aspect: you don’t want to hardcode secret values such as API keys or passwords into your code, where they could be committed to source control and made publicly available. Even values embedded in your compiled application can be extracted, so it’s best to externalize them whenever possible.

还有一个安全方面:您不希望将 API 密钥或密码等秘密值硬编码到代码中,因为这些值可以提交到源代码管理中并公开可用。甚至可以提取嵌入在已编译应用程序中的值,因此最好尽可能将它们外部化。

Virtually every web framework provides a mechanism for loading configuration, and the old .NET Framework version of ASP.NET was no different. It used the element in a web.config file to store key-value configuration pairs. At runtime you’d use the static (wince) ConfigurationManager to load the value for a given key from the file. You could do more advanced things using custom configuration sections, but doing more advanced things using custom configuration sections was painful and so was rarely used, in my experience.

实际上,每个 Web 框架都提供了加载配置的机制,旧版 ASP.NET 也不例外。它使用 web.config 文件中的 元素来存储键值配置对。在运行时,您将使用静态 (wince) ConfigurationManager 从文件中加载给定键的值。您可以使用自定义配置部分执行更高级的作,但根据我的经验,这样做很痛苦,因此很少使用。

ASP.NET Core gives you a totally revamped experience. At the most basic level, you’re still specifying key-value pairs as strings, but instead of getting those values from a single file, now you can load them from multiple sources. You can load values from files, but now they can be in any format you like: JSON, XML, YAML, and so on. Further, you can load values from environment variables, from command-line arguments, from a database, or from a remote service. Or you can create your own custom configuration provider.

ASP.NET Core 为您提供全新的体验。在最基本的层面上,您仍然将键值对指定为字符串,但现在您可以从多个源加载它们,而不是从单个文件中获取这些值。您可以从文件中加载值,但现在它们可以采用您喜欢的任何格式:JSON、XML、YAML 等。此外,还可以从环境变量、命令行参数、数据库或远程服务加载值。或者,您可以创建自己的自定义配置提供程序。

Definition ASP.NET Core uses configuration providers to load key-value pairs from a variety of sources. Applications can use multiple configuration providers.
定义 ASP.NET Core 使用配置提供程序从各种来源加载键值对。应用程序可以使用多个配置提供程序。ASP.NET Core 配置模型还具有覆盖设置的概念。每个配置提供程序都可以定义自己的设置,也可以覆盖先前提供程序的设置。您将在 10.2 节中看到这个非常有用的功能。

The ASP.NET Core configuration model also has the concept of overriding settings. Each configuration provider can define its own settings, or it can overwrite settings from a previous provider. You’ll see this incredibly useful feature in action in section 10.2.

ASP.NET Core 为您提供全新的体验。在最基本的层面上,您仍然将键值对指定为字符串,但现在您可以从多个源加载它们,而不是从单个文件中获取这些值。您可以从文件中加载值,但现在它们可以采用您喜欢的任何格式:JSON、XML、YAML 等。此外,还可以从环境变量、命令行参数、数据库或远程服务加载值。或者,您可以创建自己的自定义配置提供程序。

ASP.NET Core makes it simple to bind these key-value pairs, which are defined as strings, to POCO-setting classes that you define in your code. This model of strongly typed configuration, described in section 10.3, makes it easy to group settings logically around a given feature and lends itself well to unit testing.

ASP.NET Core 使将这些定义为字符串的键值对绑定到您在代码中定义的 POCO 设置类变得简单。这种强类型配置模型(在 Section 10.3 中描述)可以很容易地围绕给定功能对设置进行逻辑分组,并且非常适合 unit testing。

Before we get to strongly typed settings, we’ll look at how you load the settings and secrets for your app, whether they’re stored in JSON files, environment variables, or command-line arguments.

在开始强类型设置之前,我们将了解如何加载应用程序的设置和 Secret,无论它们是存储在 JSON 文件、环境变量还是命令行参数中。

10.2 Building a configuration object for your app

10.2 为您的应用程序构建配置对象

In this section we’ll get into the meat of the configuration system. You’ll learn how to load settings from multiple sources, how they’re stored internally in ASP.NET Core, and how settings can override other values to produce layers of configuration. You’ll also learn how to store secrets securely while ensuring that they’re still available when you run your app.

在本节中,我们将深入介绍配置系统的核心内容。您将学习如何从多个来源加载设置,如何将它们内部存储在 ASP.NET Core 中,以及设置如何覆盖其他值以生成配置层。您还将学习如何安全地存储密钥,同时确保在运行应用程序时它们仍然可用。

ASP.NET Core’s configuration model has been essentially the same since .NET Core 1.0, but in .NET 6, ASP.NET Core introduced the ConfigurationManager class. ConfigurationManager simplifies common patterns for working with configuration by implementing both of the two main configuration-related interfaces: IConfigurationBuilder and IConfigurationRoot.

自 .NET Core 1.0 以来,ASP.NET Core 的配置模型基本相同,但在 .NET 6 中,ASP.NET Core 引入了 ConfigurationManager 类。ConfigurationManager 简化了通过实现两个主要的与配置相关的接口来处理配置:IConfigurationBuilder 和IConfigurationRoot。

Note IConfigurationBuilder describes how to construct the final configuration representation for your app, and IConfigurationRoot holds the configuration values themselves.
注意 IConfigurationBuilder 描述了如何为您的应用程序构建最终的配置表示形式,而 IConfigurationRoot 本身保存了配置值。

You describe your configuration by adding IConfigurationProviders to the ConfigurationManager. Configuration providers describe how to load the key-value pairs from a particular source, such as a JSON file or environment variables (figure 10.2). When you add a provider, the ConfigurationManager queries it and adds all the values returned to the IConfigurationRoot implementation.

您可以通过将 IConfigurationProvider添加到 ConfigurationManager 来描述您的配置。配置提供程序描述了如何从特定源(例如 JSON 文件或环境变量)加载键值对(图 10.2)。当您添加提供程序时,ConfigurationManager 会查询它,并将返回给 IConfigurationRoot 实现的所有值添加。

alt text

Figure 10.2 Using ConfigurationManager to populate IConfiguration. Configuration providers are added to the ConfigurationManager with extension methods. The manager queries the provider and adds all the returned values to the IConfigurationRoot, which implements IConfiguration.
图 10.2 使用 ConfigurationManager 填充 IConfiguration。配置提供程序使用扩展方法添加到 ConfigurationManager。经理查询提供程序,并将所有返回的值添加到实现 IConfiguration 的 IConfigurationRoot。

Note Adding a provider to the ConfigurationManager adds the configuration values to the IConfigurationRoot instance, which implements IConfiguration. You’ll generally work with the IConfiguration interface in your code.
注意 将提供程序添加到 ConfigurationManager 会将配置值添加到实现 IConfiguration 的 IConfigurationRoot 实例。您通常会在代码中使用IConfiguration 接口。

ASP.NET Core ships with configuration providers for loading data from common locations:
ASP.NET Core 附带了用于从常见位置加载数据的配置提供程序:

  • JSON files
    JSON 文件

  • Extensible Markup Language (XML) files
    可扩展标记语言 (XML) 文件

  • Environment variables
    环境变量

  • Command-line arguments
    命令行参数

  • Initialization (INI) files
    初始化 (INI) 文件

If these providers don’t fit your requirements, you can find a host of alternatives on GitHub and NuGet, and it’s not difficult to create your own custom provider. You could use the official Microsoft Azure Key Vault provider NuGet package or the YAML file provider I wrote.

如果这些提供程序不符合您的要求,您可以在 GitHub 和 NuGet 上找到许多替代方案,并且创建自己的自定义提供程序并不难。您可以使用官方的 Microsoft Azure Key Vault 提供程序 NuGet 包或我编写的 YAML 文件提供程序。

Note The Azure Key Vault provider is available on NuGet at http://mng.bz/0KrN, and you can find my YAML provider on GitHub at http://mng.bz/Yqdj.
注意: Azure Key Vault 提供程序在 NuGet 上以 http://mng.bz/ 0KrN 提供,您可以在 GitHub 上找到我的 YAML 提供程序,网址为 http://mng.bz/Yqdj

In many cases, the default providers are sufficient. In particular, most templates start with an appsettings.json file, which contains a variety of settings depending on the template you choose. The following listing shows the default file generated by the ASP.NET Core 7.0 Empty template without authentication.

在许多情况下,默认提供程序就足够了。特别是,大多数模板都以 appsettings.json 文件开头,该文件包含各种设置,具体取决于您选择的模板。以下清单显示了 ASP.NET Core 7.0 Empty 模板生成的默认文件,无需身份验证。

Listing 10.1 Default appsettings.json file created by an ASP.NET Core
清单 10.1 由 ASP.NET Core Empty 模板创建的默认 appsettings.json 文件

{
  "Logging": {
    "LogLevel": {
      "Default": "Information",
      "Microsoft.AspNetCore": "Warning"
    }
  },
  "AllowedHosts": "*"
}

As you can see, this file contains mostly settings to control logging, but you can add extra configuration for your app here too.

如您所见,此文件主要包含用于控制日志记录的设置,但您也可以在此处为您的应用程序添加额外的配置。

Warning Don’t store sensitive values—such as passwords, API keys, and connection strings—in this file. You’ll see how to store these values securely in section 10.2.3.
警告 不要在此文件中存储敏感值,例如密码、API 密钥和连接字符串。您将在 Section 10.2.3 中看到如何安全地存储这些值。

Adding your own configuration values involves adding a key-value pair to the JSON. It’s a good idea to namespace your settings by creating a base object for related settings, as in the MapSettings object shown in the following listing.

添加您自己的配置值涉及向 JSON 添加键值对。通过为相关设置创建基本对象来命名设置是一个好主意,如下面的清单所示的 MapSettings 对象。

Listing 10.2 Adding configuration values to an appsettings.json file
示例 10.2 向 appsettings.json 文件添加配置值

{
    "Logging": {
        "LogLevel": {
            "Default": "Information",
            "Microsoft": "Warning",
            "Microsoft.Hosting.Lifetime": "Information"
        }
    },
    "AllowedHosts": "*",
    "MapSettings": { ❶
        "DefaultZoomLevel": 9, ❷
        "DefaultLocation": { ❸
        "latitude": 50.500, ❸
        "longitude": -4.000 ❸
        }
    }
}

❶ Nest all the configuration under the MapSettings key.
将所有配置嵌套在 MapSettings 键下。

❷ Values can be numbers in the JSON file, but they’ll be converted to strings when they’re read.
值可以是 JSON 文件中的数字,但在读取时它们会转换为字符串。

❸ You can create deeply nested structures to organize your configuration values better.
您可以创建深度嵌套的结构来更好地组织您的配置值。

I’ve nested the new configuration inside the MapSettings parent key to create a section that will be useful later for binding values to a POCO object. I also nested the latitude and longitude keys under the DefaultLocation key. You can create any structure of values you like; the configuration provider will read them fine. Also, you can store the values as any data type—numbers, in this case—but be aware that the provider will read and store them internally as strings.

我已将新配置嵌套在 MapSettings 父键中,以创建一个部分,该部分稍后将用于将值绑定到 POCO 对象。我还将纬度和经度键嵌套在 DefaultLocation 键下。您可以创建任何您喜欢的值结构;配置提供程序将读取它们。此外,您可以将值存储为任何数据类型(在本例中为数字),但请注意,提供程序将在内部将它们读取并存储为字符串。

Tip The configuration keys are not case-sensitive in your app, so bear that fact in mind when loading from providers in which the keys are case-sensitive. If you have a YAML file with keys name and NAME, for example, only one will appear in the final IConfiguration.
提示 配置键在您的应用程序中不区分大小写,因此在从键区分大小写的提供程序加载时,请记住这一事实。例如,如果您有一个具有键 name 和 NAME 的 YAML 文件,则最终的 IConfiguration 中只会显示一个。

Now that you have a configuration file, it’s time for your app to load it into the ConfigurationManager.

现在你有了一个配置文件,是时候让你的应用程序将其加载到 ConfigurationManager 中了。

10.2.1 Adding a configuration provider in Program.cs

10.2.1 在 Program.cs 中添加配置提供程序

As you’ve seen throughout this book, ASP.NET Core (from .NET 6 onward) uses the WebApplicationBuilder class to bootstrap your application. As part of the bootstrap process, WebApplicationBuilder creates a ConfigurationManager instance and exposes it as the property Configuration.

正如您在本书中所看到的,ASP.NET Core(从 .NET 6 开始)使用WebApplicationBuilder 类来引导您的应用程序。作为引导过程的一部分,WebApplicationBuilder 创建一个 ConfigurationManager 实例,并将其公开为属性 Configuration。

Tip You can access the ConfigurationManager directly on WebApplicationBuilder.Configuration and WebApplication.Configuration. Both properties reference the same ConfigurationManager instance.
提示 您可以直接在 WebApplicationBuilder 上访问 ConfigurationManager。Configuration 和 WebApplication.Configuration 的 Configuration。这两个属性引用同一个 ConfigurationManager 实例。

WebApplicationBuilder adds several default configuration providers to the ConfigurationManager, which we’ll look at in more detail throughout this chapter:

WebApplicationBuilder 向 ConfigurationManager 添加了几个默认配置提供程序,我们将在本章中更详细地介绍它们:

  • JSON file provider—Loads settings from an optional JSON file called appsettings.json. It also loads settings from an optional environment-specific JSON file called appsettings.ENVIRONMENT.json. I show how to use environment-specific files in section 10.4.
    JSON 文件提供程序 - 从名为 appsettings.json 的可选 JSON 文件加载设置。它还从名为 appsettings 的可选特定于环境的 JSON 文件加载设置。ENVIRONMENT.json 的。我在 Section 10.4 中展示了如何使用特定于环境的文件。

  • User Secrets—Loads secrets that are stored safely during development.
    User Secrets (用户密钥) - 加载在开发过程中安全存储的密钥。

  • Environment variables—Loads environment variables as configuration variables, which are great for storing secrets in production.
    环境变量 — 将环境变量加载为配置变量,这非常适合在生产中存储密钥。

  • Command-line arguments—Uses values passed as arguments when you run your app.
    命令行参数 - 使用在运行应用程序时作为参数传递的值。

The ConfigurationManager is configured with all these sources automatically, but you can easily add more providers. You can also start from scratch and clear the default providers as shown in the following listing, which completely customizes where configuration is loaded from.

ConfigurationManager 会自动配置所有这些源,但您可以轻松添加更多提供程序。您还可以从头开始并清除默认提供程序,如下面的清单所示,它完全自定义了加载配置的位置。

Listing 10.3 Loading appsettings.json by clearing the configuration sources

WebApplicationBuilder builder = WebApplication.CreateBuilder(args);

builder.Configuration.Sources.Clear(); ❶
builder.Configuration.AddJsonFile("appsettings.json", optional: true); ❷

WebApplication app = builder.Build();

app.MapGet("/", () => app.Configuration.AsEnumerable()); ❸

app.Run();

❶ Clears the providers configured by default in WebApplicationBuilder
清除 WebApplicationBuilder 中默认配置的提供程序

❷ Adds a JSON configuration provider, providing the name of the configuration file
添加 JSON 配置提供程序,提供配置文件的名称

❸ Returns all the configuration key-value pairs for display purposes
返回所有配置键值对以供显示

This example added a single JSON configuration provider by calling the AddJsonFile() extension method and providing a filename. It also set the value of optional to true, telling the configuration provider to skip files that it can’t find at runtime instead of throwing FileNotFoundException. When the provider is added, the ConfigurationManager requests all the available values from the provider and adds them to the IConfiguration implementation.

此示例通过调用 AddJsonFile() 扩展方法并提供文件名来添加单个 JSON 配置提供程序。它还将 optional 的值设置为 true,告知配置提供程序跳过在运行时找不到的文件,而不是引发 FileNotFoundException。添加提供程序后, ConfigurationManager 从提供程序请求所有可用值,并将它们添加到 IConfiguration 实现中。

ConfigurationBuilder vs. ConfigurationManager
ConfigurationBuilder 与 ConfigurationManager
Before .NET 6 and the introduction of ConfigurationManager, configuration in ASP.NET Core was implemented with ConfigurationBuilder. You’d add configuration providers to the builder type the same way you do with ConfigurationManager, but the configuration values weren’t loaded until you called Build(), which created the final IConfigurationRoot object.
在 .NET 6 和 ConfigurationManager 引入之前,ASP.NET Core 中的配置是使用 ConfigurationBuilder 实现的。您可以像使用 ConfigurationManager 一样将配置提供程序添加到生成器类型中,但在调用 Build() 之前不会加载配置值,这将创建最终的 IConfigurationRoot 对象。
By contrast, in .NET 6 and .NET 7 ConfigurationManager acts as both the builder and the final IConfigurationRoot. When you add a new configuration provider, the configuration values are added to the IConfigurationRoot immediately, without the need to call Build() first.
相比之下,在 .NET 6 和 .NET 7 中,ConfigurationManager 既充当生成器,又充当最终的 IConfigurationRoot。添加新的配置提供程序时,配置值会立即添加到 IConfigurationRoot,而无需先调用 Build()。
The ConfigurationBuilder approach using the builder pattern is cleaner in some ways, as it has a clearer separation of concerns, but the common use patterns for configuration mean that the new ConfigurationManager approach is often easier to use.
使用 builder 模式的 ConfigurationBuilder 方法在某些方面更简洁,因为它具有更清晰的关注点分离,但配置的常见使用模式意味着新的 ConfigurationManager 方法通常更易于使用。
If you prefer, you can still use the builder pattern by accessing WebApplicationBuilder.Host.ConfigureAppConfiguration. You can read about some of these patterns and the differences between the two approaches on my blog at http://mng.bz/Ke4j.
如果您愿意,您仍然可以通过访问 WebApplicationBuilder.Host.ConfigureAppConfiguration 来使用构建器模式。您可以在我的博客 http://mng.bz/Ke4j 上阅读其中一些模式以及两种方法之间的差异。

You can access the IConfiguration object directly in Program.cs, as in listing 10.3, but the ConfigurationManager is also registered as IConfiguration in the dependency injection (DI) container, so you can inject it into your classes and endpoint handlers. You could rewrite the endpoint handler in listing 10.3 as the following, and the IConfiguration object would be injected into the handler using DI:

你可以直接在 Program.cs 中访问 IConfiguration 对象,如清单 10.3 所示,但 ConfigurationManager 也在依赖注入 (DI) 容器中注册为 IConfiguration,因此你可以将其注入到你的类和端点处理程序中。您可以将清单 10.3 中的端点处理程序重写为以下内容,并且 IConfiguration 对象将使用 DI 注入到处理程序中:

app.MapGet("/", (IConfiguration config) => config.AsEnumerable());

Note The ConfigurationManager implements IConfigurationRoot, which also implements IConfiguration. The ConfigurationManager is registered in the DI container as an IConfiguration, not an IConfigurationRoot.
注意 ConfigurationManager 实现 IConfigurationRoot,后者也实现 IConfiguration。ConfigurationManager 在 DI 容器中注册为 IConfiguration,而不是 IConfigurationRoot。

You’ve seen how to add values to the ConfigurationManager by using providers such as the JSON file provider. and listing 10.3 showed an example of iterating over every configuration value, but normally you want to retrieve a specific configuration value.

您已经了解了如何使用诸如 JSON 文件提供程序之类的提供程序向 ConfigurationManager 添加值,清单 10.3 显示了一个迭代每个配置值的示例,但通常您希望检索特定的配置值。

IConfiguration stores configuration as a set of key-value string pairs. You can access any value by its key, using standard dictionary syntax. You could use

IConfiguration 将配置存储为一组键值字符串对。您可以使用标准字典语法通过其键访问任何值。您可以使用

var zoomLevel = builder.Configuration["MapSettings:DefaultZoomLevel"];

to retrieve the configured zoom level for your application (using the settings shown in listing 10.2). Note that I used a colon (:) to designate a separate section. Similarly, to retrieve the latitude key, you could use

检索为应用程序配置的缩放级别(使用清单 10.2 中所示的设置)。请注意,我使用冒号 (:) 来指定一个单独的部分。同样,要检索纬度键,您可以使用

var lat = builder.Configuration["MapSettings:DefaultLocation:Latitude"];

Note If the requested configuration key doesn’t exist, you get a null value.
注意 如果请求的配置键不存在,您将获得一个null 值。

You can also grab a whole section of the configuration by using the GetSection(section) method, which returns an IConfigurationSection, which also implements IConfiguration. This method grabs a chunk of the configuration and resets the namespace. Another way to get the latitude key is

您还可以使用 GetSection (section) 方法获取配置的整个部分,该方法返回 IConfigurationSection,该方法还实现 IConfiguration。此方法获取配置块并重置命名空间。获取纬度键的另一种方法是

var lat = builder.Configuration
    .GetSection("MapSettings")["DefaultLocation:Latitude"];

Accessing setting values this way is useful in Program.cs when you’re defining your application. When you’re setting up your application to connect to a database, for example, you’ll often load a connection string from the IConfiguration object. You’ll see a concrete example in chapter 12, which looks at Entity Framework Core.

以这种方式访问设置值在 Program.cs 定义应用程序时非常有用。例如,在设置应用程序以连接到数据库时,通常会从 IConfiguration 对象加载连接字符串。您将在第 12 章中看到一个具体示例,该示例介绍了 Entity Framework Core。

If you need to access the configuration object in places other than Program.cs, you can use DI to inject it as a dependency into your service’s constructor. But accessing configuration by using string keys this way isn’t particularly convenient; you should try to use strongly typed configuration instead, as you’ll see in section 10.3.

如果您需要在 Program.cs 以外的位置访问配置对象,则可以使用 DI 将其作为依赖项注入到服务的构造函数中。但是以这种方式使用字符串键访问配置并不是特别方便;你应该尝试使用强类型配置,正如你将在 Section 10.3 中看到的那样。

So far, this process probably feels a bit too convoluted and run-of-the-mill to load settings from a JSON file, and I’ll grant you that it is. Where the ASP.NET Core configuration system shines is when you have multiple providers.

到目前为止,从 JSON 文件加载设置,这个过程可能感觉有点太复杂和普通了,我承认确实如此。ASP.NET Core 配置系统的亮点是当您拥有多个提供商时。

10.2.2 Using multiple providers to override configuration values

10.2.2 使用多个提供程序覆盖配置值

You’ve seen how to add a configuration provider to the ConfigurationManager and retrieve the configuration values, but so far, you’ve configured only a single provider. When you add providers, it’s important to consider the order in which you add them, as that defines the order in which the configuration values will be added to the underlying dictionary. Configuration values from later providers overwrite values with the same key from earlier providers.

您已经了解了如何将配置提供程序添加到 ConfigurationManager 并检索配置值,但到目前为止,您只配置了一个提供程序。添加提供程序时,请务必考虑添加它们的顺序,因为这定义了将配置值添加到底层字典的顺序。来自更高提供程序的配置值会使用来自早期提供程序的相同键覆盖值。

Note This sentence bears repeating: the order in which you add configuration providers to ConfigurationManager is important. Later configuration providers can overwrite the values of earlier providers.
注意 这句话值得重复:将配置提供程序添加到 ConfigurationManager 的顺序很重要。更高版本的配置提供程序可以覆盖早期提供程序的值。

Think of the configuration providers as adding layers of configuration values to a stack, where each layer may overlap some or all of the layers below, as shown in figure 10.3. If the new provider contains any keys that are already known to the ConfigurationManager, they overwrite the old values to create the final set of configuration values stored in IConfiguration.

将配置提供程序视为向堆栈中添加配置值层,其中每个层可能与下面的部分或全部层重叠,如图 10.3 所示。如果新提供程序包含任何ConfigurationManager 中,它们会覆盖旧值以创建存储在 IConfiguration 中的最终配置值集。

Tip Instead of thinking in layers, you can think of the ConfigurationManager as a simple dictionary. When you add a provider, you’re setting some key-value pairs. When you add a second provider, the provider can add new keys or overwrite the value of existing keys.
提示 您可以将 ConfigurationManager 视为一个简单的字典,而不是分层思考。添加提供程序时,您将设置一些键值对。当您添加第二个提供程序时,该提供程序可以添加新键或覆盖现有键的值。

alt text

Figure 10.3 Each configuration provider adds a layer of values to ConfigurationBuilder. Calling Build() collapses that configuration. Later providers overwrite configuration values with the same keys from earlier providers.
图 10.3 每个配置提供程序都会向 ConfigurationBuilder 添加一层值。调用 Build() 会折叠该配置。后面的 provider 会用早期 providers的相同键覆盖配置值。

Update your code to load configuration from three different configuration providers—two JSON providers and an environment variable provider—by adding them to ConfigurationManager as shown in the following listing.

更新您的代码以从三个不同的配置提供程序(两个 JSON 提供程序和一个环境)加载配置变量提供程序 - 通过将它们添加到 ConfigurationManager如下面的清单所示。

Listing 10.4 Loading from multiple providers in Program.cs
清单 10.4 在 Program.cs 中从多个提供商加载

WebApplicationBuilder builder = WebApplication.CreateBuilder(args);

builder.Configuration.Sources.Clear();
builder.Configuration ❶
    .AddJsonFile("sharedSettings.json", optional: true); ❶
builder.Configuration.AddJsonFile("appsettings.json", optional: true);
builder.Configuration.AddEnvironmentVariables(); ❷

WebApplication app = builder.Build();

app.MapGet("/", () => app.Configuration.AsEnumerable());

app.Run();

❶ Loads configuration from a different JSON configuration file before the
appsettings.json file
在 appsettings.json 文件之前从不同的 JSON 配置文件加载配置

❷ Adds the machine’s environment variables as a configuration provider
将计算机的环境变量添加为配置提供程序

This layered design can be useful for several things. Fundamentally, it allows you to aggregate configuration values from multiple sources into a single, cohesive object. To cement this design in place, consider the configuration values in figure 10.4.
这种分层设计可用于多种用途。从根本上说,它允许您将来自多个源的配置值聚合到一个内聚对象中。为了巩固此设计,请考虑图 10.4 中的配置值。

alt text

Figure 10.4 The final IConfiguration includes the values from each of the providers. Both appsettings.json and the environment variables include the MyAppConnString key. As the environment variables are added later, that configuration value is used.

图 10.4 最终的 IConfiguration 包括来自每个提供程序的值。appsettings.json 和环境变量都包含 MyAppConnString 键。由于稍后添加环境变量,因此将使用该配置值。

Most of the settings in each provider are unique and are added to the final IConfiguration. But the "MyAppConnString" key appears both in appsettings.json and as an environment variable. Because the environment variable provider is added after the JSON providers, the environment variable configuration value is used in IConfiguration.

每个提供程序中的大多数设置都是唯一的,并添加到最终的 IConfiguration 中。但是 “MyAppConnString” key 既显示在 appsettings.json 中,也显示为环境变量。由于环境变量提供程序是在 JSON 提供程序之后添加的,因此在 IConfiguration 中使用环境变量配置值。

The ability to collate configuration from multiple providers is handy on its own, but this design is especially useful for handling sensitive configuration values, such as connection strings and passwords. Section 10.2.3 shows how to deal with this problem, both locally on your development machine and on production servers.

整理来自多个提供商的配置的能力本身很方便,但这种设计对于处理敏感的配置值(例如连接字符串和密码)特别有用。Section 10.2.3 展示了如何在开发计算机和 生产服务器上本地处理此问题。

10.2.3 Storing configuration secrets safely

10.2.3 安全地存储配置密钥

As soon as you build a nontrivial app, you’ll find that you need to store some sort of sensitive data as a setting somewhere. This data could be a password, a connection string, or an API key for a remote service, for example.

一旦你构建了一个重要的应用程序,你就会发现你需要在某个地方存储某种敏感数据作为设置。例如,此数据可以是密码、连接字符串或远程服务的 API 密钥。

Storing these values in appsettings.json is generally a bad idea, as you should never commit secrets to source control; the number of secret API keys people have committed to GitHub is scary! Instead, it’s much better to store these values outside your project folder, where they won’t get committed accidentally.

将这些值存储在 appsettings.json 中通常是一个坏主意,因为您永远不应该将 secret 提交到源代码管理;人们提交到 GitHub 的秘密 API 密钥的数量是可怕的!相反,最好将这些值存储在项目文件夹之外,这样它们就不会意外提交。

You can do this in a few ways, but the easiest and most common approaches are to use environment variables for secrets on your production server and User Secrets locally. Neither approach is truly secure, in that neither stores values in an encrypted format. If your machine is compromised, attackers will be able to read the stored values because they’re stored in plain text. These approaches are intended mainly to help you avoid committing secrets to source control.

您可以通过多种方式执行此作,但最简单和最常见的方法是将环境变量用于生产服务器上的密钥和本地的 User Secrets。这两种方法都不是真正安全的,因为两者都不会以加密格式存储值。如果您的计算机遭到入侵,攻击者将能够读取存储的值,因为它们以纯文本形式存储。这些方法主要是为了帮助您避免将密钥提交到源代码管理。

Tip Azure Key Vault is a secure alternative, in that it stores the values encrypted in Azure, but you still need to use User Secrets and environment variables to store the Azure Key Vault connection details. See the documentation for instructions on using Azure Key Vault in your apps http://mng.bz/BR7v. Another popular option is Vault by Hashicorp (www.vaultproject.io), which can be run on-premises or in the cloud.
提示 Azure Key Vault 是一种安全的替代方案,因为它将加密的值存储在 Azure 中,但您仍然需要使用用户密钥和环境变量来存储 Azure Key Vault 连接详细信息。有关在应用 http://mng.bz/BR7v 中使用 Azure Key Vault 的说明,请参阅文档。另一个流行的选项是 Hashicorp 的 Vault (www.vaultproject.io),它可以在本地或云中运行。

Whichever approach you use to store your application secrets, make sure that you aren’t storing them in source control. Even private repositories may not stay private forever, so it’s best to err on the side of caution.

无论您使用哪种方法来存储应用程序密钥,请确保您没有将它们存储在源代码管理中。即使是私有存储库也可能不会永远保持私有,因此最好谨慎行事。

Storing secrets in environment variables in production

在生产环境中的环境变量中执行 SECRET
You can add the environment variable configuration provider by using the AddEnvironmentVariables extension method, as you saw in listing 10.4. This method adds all the environment variables on your machine as key-value pairs to ConfigurationManager.
您可以使用 AddEnvironmentVariables 扩展方法添加环境变量配置提供程序,如清单 10.4 所示。此方法将计算机上的所有环境变量作为键值对添加到 ConfigurationManager。

Note The WebApplicationBuilder adds the environment variable provider to the ConfigurationManager by default.
注意 默认情况下,WebApplicationBuilder 将环境变量提供程序添加到 ConfigurationManager。

You can create the same hierarchical sections in environment variables that you typically see in JSON files by using a colon (:) or a double underscore () to demarcate a section, as in MapSettings:MaxNumberOfPoints or MapSettingsMaxNumberOfPoints.
您可以使用冒号 (:) 或双下划线 ( ) 来划分部分,从而在环境变量中创建通常在 JSON 文件中看到的相同分层部分,如下所示MapSettings:MaxNumberOfPoints 或MapSettings MaxNumberOfPoints 的 MapSettings MaxNumberOfPoints 的 Points。

Tip Some environments, such as Linux, don’t allow the colon in environment variables. You must use the double-underscore approach in these environments instead. A double underscore in an environment variable is converted to a colon when it’s imported into the IConfiguration object. You should always use the colon when retrieving values from an IConfiguration in your app.
提示 某些环境(如 Linux)不允许在环境变量中使用冒号。您必须在这些环境中改用双下划线方法。环境变量中的双下划线在导入 IConfiguration 对象时将转换为冒号。从应用程序中的 IConfiguration 检索值时,应始终使用冒号。

The environment-variable approach is particularly useful when you’re publishing your app to a self-contained environment, such as a dedicated server, Azure, or a Docker container. You can set environment variables on your production machine or on your Docker container, and the provider reads them at runtime, overriding the defaults specified in your appsettings.json files.

将应用发布到独立环境(如专用服务器、Azure 或 Docker 容器)时,环境变量方法特别有用。您可以在生产计算机或 Docker 容器上设置环境变量,提供程序会在运行时读取这些变量,从而覆盖 appsettings.json 文件中指定的默认值。

Tip For instructions on setting environment variables for your operating system, see Microsoft’s “Use multiple environments in ASP.NET Core” documentation at http://mng.bz/d4OD.
提示 有关为作系统设置环境变量的说明,请参阅 http://mng.bz/d4OD Microsoft的“在 ASP.NET Core 中使用多个环境”文档。

For a development machine, environment variables are less useful, as all your apps would use the same values. If you set the ConnectionStrings__ DefaultConnection environment variable, for example, that variable would be added to every app you run locally, which sounds like more of a hassle than a benefit!

对于开发计算机,环境变量不太有用,因为您的所有应用程序都将使用相同的值。例如,如果您设置 ConnectionStrings DefaultConnection 环境变量,则该变量将被添加到您在本地运行的每个应用程序中,这听起来更麻烦而不是好处!

Tip To avoid collisions, you can add only environment variables that have a given prefix, such as AddEnvironmentVariables("SomePrefix"). The prefix is removed from the key before it’s added to the ConfigurationManager, so the variable SomePrefix_MyValue is added to configuration as MyValue.
提示 为避免冲突,您可以仅添加具有给定前缀的环境变量,例如 AddEnvironmentVariables(“SomePrefix”)。在将前缀添加到ConfigurationManager 中,因此变量SomePrefix_MyValue 将作为 MyValue 添加到配置中。

For development scenarios, you can use the User Secrets Manager, which effectively adds per-app environment variables, so you can have different settings for each app but store them in a different location from the app itself.

对于开发场景,您可以使用 User Secrets Manager,它可以有效地添加每个应用程序的环境变量,因此您可以为每个应用程序设置不同的设置,但将它们存储在与应用程序本身不同的位置。

Storing secrets with the User Secrets Manager in development

STORING SECRETS 与 US系列 S ECRETS MANAGER 在开发中
The idea behind User Secrets is to simplify storing per-app secrets outside your app’s project tree. This approach is similar to environment variables, but you use a unique key for each app to keep the secrets segregated.
User Secrets 背后的理念是简化在应用程序项目树之外存储每个应用程序 Secret 的过程。此方法类似于环境变量,但您可以为每个应用程序使用唯一的键来保持密钥隔离。

Warning The secrets aren’t encrypted, so don’t consider them to be secure. Nevertheless, it’s an improvement on storing them in your project folder.
警告 密钥未加密,因此不要认为它们是安全的。不过,与将它们存储在项目文件夹中相比,这是一个改进。

Setting up User Secrets takes a bit more effort than using environment variables, as you need to configure a tool to read and write them, add the User Secrets configuration provider, and define a unique key for your application. To add User Secrets to your app, follow these steps:

设置用户密钥比使用环境变量需要更多的工作,因为您需要配置一个工具来读取和写入它们,添加用户密钥配置提供程序,并为您的应用程序定义唯一密钥。要将 User Secrets 添加到您的应用程序,请执行以下步骤:

  1. WebApplicationBuilder adds the User Secrets provider by default. The .NET SDK includes a global tool for working with secrets from the command line.
    默认情况下,WebApplicationBuilder 会添加 User Secrets 提供程序。.NET SDK 包括一个全局工具,用于从命令行处理机密。

  2. If you’re using Visual Studio, right-click your project and choose Manage User Secrets from the contextual menu. This command opens an editor for a secrets.json file in which you can store your key-value pairs as though it were an appsettings.json file, as shown in figure 10.5.
    如果您使用的是 Visual Studio,请右键单击您的项目,然后从上下文菜单中选择 Manage User Secrets (管理用户密钥)。此命令将打开一个 secrets.json 文件的编辑器,您可以在其中存储键值对,就像它是一个 appsettings.json 文件一样,如图 10.5 所示。

alt text
Figure 10.5 Choose Manage User Secrets to open an editor for the User Secrets app. You can use this file to store secrets when developing your app locally. These secrets are stored outside your project folder, so they won’t be committed to source control accidentally.
图 10.5 选择 Manage User Secrets(管理用户密钥)以打开 User Secrets 应用程序的编辑器。在本地开发应用程序时,您可以使用此文件来存储密钥。这些密钥存储在您的项目文件夹之外,因此它们不会意外提交到源代码管理。

  1. Add a unique identifier to your .csproj file. Visual Studio does this automatically when you choose Manage User Secrets, but if you’re using the command line, you’ll need to add it yourself. Typically, you’d use a unique ID, such as a globally unique identifier (GUID):
    向 .csproj 文件添加唯一标识符。当您选择 Manage User Secrets (管理用户密码) 时,Visual Studio 会自动执行此作,但如果您使用的是命令行,则需要自己添加它。通常,您会使用唯一 ID,例如全局唯一标识符 (GUID):

    <PropertyGroup>
    <UserSecretsId>96eb2a39-1ef9-4d8e-8b20-8e8bd14038aa</UserSecretsId>
    </PropertyGroup>

You can also generate the UserSecretsId property with a random value using the .NET command-line interface (CLI) by running the following command from your project folder:
您还可以使用 .NET 命令行界面 (CLI) 生成具有随机值的 UserSecretsId 属性,方法是从项目文件夹运行以下命令:

dotnet user-secrets init
  1. Add User Secrets by using the command line
    使用命令行添加用户密钥

    dotnet user-secrets set "MapSettings:GoogleMapsApiKey" F5RJT9GFHKR7

or edit the secret.json file directly by using your favorite editor. The exact location of this file depends on your operating system and may vary. Check the documentation for details at http://mng.bz/ryAg.
或者使用您最喜欢的编辑器直接编辑 secret.json 文件。此文件的确切位置取决于您的作系统,并且可能会有所不同。有关详细信息,请查看 http://mng.bz/ryAg 中的文档。

Note The Secret Manager tool is included in the .NET CLI, but you can also use the CLI to install additional .NET tools. You can find more about .NET tools in general in Microsoft’s “How to manage .NET tools” documentation: http://mng.bz/VdmX.
注意 Secret Manager 工具包含在 .NET CLI 中,但您也可以使用 CLI 安装其他 .NET 工具。您可以在 Microsoft 的“如何管理 .NET 工具”文档中找到有关 .NET 工具的更多信息:http://mng.bz/VdmX

Phew! That’s a lot of setup, and if you’re adding providers to ConfigurationManager manually, you’re not done yet! You need to update your app to load the User Secrets at runtime by using the AddUserSecrets extension method:

唷!这需要大量的设置,如果您手动将提供程序添加到 ConfigurationManager,那么您还没有完成!您需要使用 AddUserSecrets 扩展方法更新应用程序以在运行时加载用户密钥:

if (builder.Environment.IsDevelopment())
{
    builder.Configuration.AddUserSecrets<Program>();
}

Note You should use the User Secrets provider only in development, not in production, so in the preceding snippet you add the provider conditionally to ConfigurationManager. In production you should use environment variables or Azure Key Vault, as discussed earlier. All this is configured correctly by default when you use the default WebApplicationBuilder.

注意 您应该仅在开发中使用 User Secrets 提供程序,而不应在生产中使用,因此在前面的代码段中,您将有条件地将提供程序添加到 ConfigurationManager。如前所述,在生产环境中,应使用环境变量或 Azure Key Vault。默认情况下,当您使用默认的 WebApplicationBuilder 时,所有这些都是正确配置的。

The AddUserSecrets method has several overloads, but the simplest is a generic method that you can call by passing your application’s Program class as a generic argument, as shown in the preceding example. The User Secrets provider needs to read the UserSecretsId property that you (or Visual Studio) added to the .csproj file. The Program class acts as a simple marker to indicate which assembly contains this property.

AddUserSecrets 方法具有多个重载,但最简单的是泛型方法,您可以通过将应用程序的 Program 类作为泛型参数传递来调用该方法,如前面的示例所示。用户机密提供程序需要读取你(或 Visual Studio)添加到 .csproj 文件的 UserSecretsId 属性。Program 类充当一个简单的标记,用于指示哪个程序集包含此属性。

Note If you’re interested, the .NET software development kit (SDK) uses the UserSecretsId property in your .csproj file to generate an assembly-level UserSecretsIdAttribute. Then the provider reads this attribute at runtime to determine the UserSecretsId of the app and generates the path to the secrets.json file.
注意 如果您感兴趣,.NET SDK 使用 .csproj 文件中的 UserSecretsId 属性生成程序集级 UserSecretsIdAttribute。然后,提供程序在运行时读取此属性以确定应用的 UserSecretsId 并生成secrets.json文件的路径。

And there you have it—safe storage of your secrets outside your project folder during development. This cautious approach may seem like overkill, but if you have anything you consider to be remotely sensitive that you need to load into configuration, I strongly urge you to use environment variables or User Secrets.

这就是 — 在开发过程中将密钥安全地存储在项目文件夹之外。这种谨慎的方法可能会似乎有点矫枉过正,但如果您有任何您认为远程敏感的东西需要加载到配置中,我强烈建议您使用环境变量或用户密钥。

It’s almost time to leave configuration providers behind, but before we do, I’d like to show you the ASP.NET Core configuration system’s party trick: reloading files on the fly.

现在差不多该抛弃配置提供程序了,但在此之前,我想向您展示 ASP.NET Core 配置系统的派对技巧:动态重新加载文件。

10.2.4 Reloading configuration values when they change

10.2.4 在配置值更改时重新加载配置值

Besides security, not having to recompile your application every time you want to tweak a value is one of the advantages of using configuration and settings. In the previous version of ASP.NET, changing a setting by editing web.config would cause your app to restart. This feature beat having to recompile, but waiting for the app to start up before it could serve requests was a bit of a drag.
除了安全性之外,不必在每次要调整值时都重新编译应用程序是使用 configuration 和 settings 的优势之一。在早期版本的 ASP.NET 中,通过编辑 web.config 来更改设置将导致应用程序重启。此功能比必须重新编译要好,但等待应用程序启动后才能处理请求有点麻烦。

In ASP.NET Core, you finally get the ability to edit a file and have the configuration of your application update automatically, without your having to recompile or restart. An often-cited scenario in which you might find this ability useful is when you’re trying to debug an app you have in production. You typically configure logging to one of several levels:

在 ASP.NET Core 中,您最终能够编辑文件并自动更新应用程序的配置,而无需重新编译或重新启动。您可能会发现此功能非常有用的一个经常被引用的场景是,当您尝试调试生产环境中的应用程序时。通常将日志记录配置为以下几个级别之一:

  • Error
    错误
  • Warning
    警告
  • Information
    信息
  • Debug
    调试

Each of these settings is more verbose than the last, but it also provides more context. By default, you might configure your app to log only warning and error-level logs in production so that you don’t generate too many superfluous log entries. Conversely, if you’re trying to debug a problem, you want as much information as possible, so you may want to use the debug log level.

这些设置中的每一个都比上一个设置更详细,但它也提供了更多的上下文。默认情况下,您可以将应用程序配置为在生产环境中仅记录警告和错误级别的日志,这样就不会生成太多多余的日志条目。相反,如果您尝试调试问题,则需要尽可能多的信息,因此可能需要使用 debug log 级别。

Being able to change configuration at runtime means that you can easily switch on extra logs when you encounter a problem and switch them back afterward by editing your appsettings.json file.

能够在运行时更改配置意味着您可以在遇到问题时轻松打开额外的日志,并在之后通过编辑 appsettings.json 文件将它们切换回来。

Note Reloading is generally available only for file-based configuration providers, such as the JSON provider, as opposed to the environment variable provider, for example.
注意 重新加载通常仅适用于基于文件的配置提供程序,例如 JSON 提供程序,而不是环境变量提供程序。

You can enable the reloading of configuration files when you add any of the file-based providers to your ConfigurationManager. The Add*File extension methods include an overload with a reloadOnChange parameter. If this parameter is set to true, the app monitors the filesystem for changes to the file and triggers a complete rebuild of the IConfiguration, if needs be. The following listing shows how to add configuration reloading to the appsettings.json file added manually to the ConfigurationManager.

当您将任何基于文件的提供程序添加到 ConfigurationManager 时,您可以启用配置文件的重新加载。Add*File 扩展名方法包括带有 reloadOnChange 参数的重载。如果此参数设置为 true,则应用程序会监视文件系统中对文件的更改,并在需要时触发 IConfiguration 的完全重建。下面的清单显示了如何将配置重新加载添加到手动添加到 ConfigurationManager 的 appsettings.json 文件中。

Listing 10.5 Reloading appsettings.json when the file changes
示例 10.5 当文件更改时重新加载 appsettings.json

WebApplicationBuilder builder = WebApplication.CreateBuilder(args);

builder.Configuration.Sources.Clear();
builder.Configuration
    .AddJsonFile(
        "appsettings.json",
        optional: true,
        reloadOnChange: true); ❶

WebApplication app = builder.Build();

app.MapGet("/", () => app.Configuration.AsEnumerable());

app.Run();

❶ IConfiguration will be rebuilt if the appsettings.json file changes.
如果 IConfiguration 文件发生更改,appsettings.json 将重建。

Throughout section 10.2, you’ve seen how to customize the ConfigurationManager providers by clearing the default sources and adding your own, but in most cases, that won’t be necessary. As described in section 10.2.1, the default providers added by WebApplicationBuilder are normally good enough unless you want to add a new provider, such as Azure Key Vault. As a bonus, WebApplicationBuilder configures the appsettings.json with reloadOnChange:true by default. It’s worth sticking with the defaults initially and clear the sources and start again only if you really need to.

在整个 10.2 节中,您已经了解了如何通过清除默认源并添加您自己的源来自定义 ConfigurationManager 提供程序,但在大多数情况下,这不是必需的。如第 10.2.1 节所述,WebApplicationBuilder 添加的默认提供程序通常足够好,除非您要添加新的提供程序,例如 Azure Key Vault。作为奖励,WebApplicationBuilder 默认使用 reloadOnChange:true 配置appsettings.json。最初坚持使用默认值并清除源并仅在您确实需要时才重新开始是值得的。

Warning Adding a file configuration source using reloadOnChange:true isn’t entirely free, as ASP.NET Core sets up a file watcher in the background. Normally, this situation isn’t problematic, but if you set up a configuration watching thousands of files, you could run into difficulties!
警告 使用 reloadOnChange:true 添加文件配置源并非完全免费,因为 ASP.NET Core 在后台设置了文件侦听器。通常,这种情况没有问题,但如果您设置一个监视数千个文件的配置,您可能会遇到困难!

In listing 10.5, any changes you make to the file will be mirrored in the IConfiguration. But as I said at the start of this chapter, IConfiguration isn’t the preferred way to pass settings around in your application. Instead, as you’ll see in section 10.3, you should favor strongly typed objects.

在清单 10.5 中,您对文件所做的任何更改都将镜像到 IConfiguration 中。但正如我在本章开头所说,IConfiguration 并不是在应用程序中传递设置的首选方法。相反,正如您将在 10.3 节中看到的那样,您应该首选强类型对象。

10.3 Using strongly typed settings with the options pattern

10.3 将强类型设置与 options 模式一起使用

In this section you’ll learn about strongly typed configuration and the options pattern, the preferred way of accessing configuration in ASP.NET Core. By using strongly typed configuration, you can avoid problems with typos when accessing configuration. It also makes classes easier to test, as you can use simple POCO objects for configuration instead of relying on the IConfiguration abstraction.

在本节中,您将了解强类型配置和选项模式,这是在 ASP.NET Core 中访问配置的首选方式。通过使用强类型配置,您可以避免在访问配置时出现拼写错误问题。它还使类更易于测试,因为您可以使用简单的 POCO 对象进行配置,而不是依赖 IConfiguration 抽象。

Most of the examples I’ve shown so far have been about how to get values into IConfiguration, as opposed to how to use them. You’ve seen that you can access a key by using the builder.Configuration["key"] dictionary syntax, but using string keys this way feels messy and prone to typos, and the value retrieved is always a string, so you often need to convert it to another type. Instead, ASP.NET Core promotes the use of strongly typed settings—POCO objects that you define and create and that represent a small collection of settings, scoped to a single feature in your app.

到目前为止,我展示的大多数示例都是关于如何将值导入 IConfiguration,而不是如何使用它们。 您已经看到,您可以使用生成器访问密钥。Configuration[“key”] 字典语法,但以这种方式使用字符串键感觉很混乱,容易出现拼写错误,而且检索到的值总是字符串,所以你经常需要把它转换成另一种类型。相反,ASP.NET Core 促进了强类型设置的使用,即您定义和创建的 POCO 对象,这些对象表示一小部分设置,范围限定为应用程序中的单个功能。

The following listing shows both the settings for your store locator component and display settings to customize the home page of the app. They’re separated into two different objects with "MapSettings" and "AppDisplaySettings" keys, corresponding to the different areas of the app that they affect.

以下清单显示了 store locator 组件的地图设置和显示设置,以自定义应用程序的主页。它们被分成两个不同的对象,分别具有“MapSettings”和“AppDisplaySettings”键,对应于它们影响的应用的不同区域。

Listing 10.6 Separating settings into different objects in appsettings.json
清单 10.6 在 appsettings.json 中将设置分离到不同的对象中

{
    "MapSettings": { ❶
        "DefaultZoomLevel": 6, ❶
        "DefaultLocation": { ❶
            "latitude": 50.500, ❶
            "longitude": -4.000 ❶
    }
},
    "AppDisplaySettings": { ❷
        "Title": "Acme Store Locator", ❷
        "ShowCopyright": true ❷
    }
}

❶ Settings related to the store locator section of the app
与应用程序的商店定位器部分相关的设置

❷ General settings related to displaying the app
与显示应用程序相关的常规设置

The simplest approach to exposing the home-page settings in an endpoint handler is to inject IConfiguration into the endpoint handler and access the values by using the dictionary syntax:

在终结点处理程序中公开主页设置的最简单方法是将 IConfiguration 注入到终结点处理程序中,并使用字典语法访问值:

app.MapGet("/display-settings", (Iconfiguration config) =>
{
    string title = config["AppDisplaySettings:Title"];
    bool showCopyright = bool.Parse(
            config["AppDisplaySettings:ShowCopyright"]);

    return new { title, showCopyright };
});

But you don’t want to do this; there are too many strings for my liking! And that bool.Parse? Yuck! Instead, you can use custom strongly typed objects, with all the type safety and IntelliSense goodness that brings, as shown in the following listing.

但你不想这样做;琴弦太多了,我不喜欢!还有那个 bool。解析?呸!相反,您可以使用自定义的强类型对象,这些对象具有带来的所有类型安全性和 IntelliSense 优点,如下面的清单所示。

Listing 10.7 Injecting strongly typed options into a handler using IOptions
清单 10.7 使用 IOptions 将强类型选项注入处理程序

app.MapGet("/display-settings",
    (IOptions<AppDisplaySettings> options) => ❶
{
    AppDisplaySettings settings = options.Value; ❷
    string title = settings.Title; ❸

    bool showCopyright = settings.ShowCopyright; ❹

    return new { title, showCopyright };
});

❶ You can inject a strongly typed options class using the IOptions<> wrapper interface.
您可以使用 IOptions<> 包装器接口注入强类型选项类。

❷ The Value property exposes the POCO settings object.
Value 属性公开 POCO 设置对象。

❸ The settings object contains properties that are bound to configuration values at runtime.
settings 对象包含在运行时绑定到配置值的属性。

❹ The binder can also convert string values directly to built-in types.
Binder 还可以将字符串值直接转换为内置类型。

The ASP.NET Core configuration system includes a binder, which can take a collection of configuration values and bind them to a strongly typed object, called an options class. This binding is similar to the concept of JSON deserialization for creating types from chapter 6 and the model binding used by Model-View-Controller (MVC) and Razor Pages, which you’ll learn about in part 3.

ASP.NET Core 配置系统包括一个 Binder,它可以获取配置值的集合并将它们绑定到一个强类型对象,称为 options 类。此绑定类似于第 6 章中用于创建类型的 JSON 反序列化概念,以及模型-视图-控制器 (MVC) 和 Razor Pages 使用的模型绑定,您将在第 3 部分中了解。

Section 10.3.1 shows how to set up the binding of configuration values to a POCO options class, and section 10.3.2 shows how to make sure that it reloads when the underlying configuration values change. We’ll look at the different sorts of objects you can bind in section 10.3.3.

Section 10.3.1 显示了如何设置配置值到 POCO options 类的绑定,而Section 10.3.2 显示了如何确保在底层配置值更改时重新加载它。我们将在 10.3.3 节中看看你可以绑定的不同种类的对象。

10.3.1 Introducing the IOptions interface

10.3.1 IOptions 接口简介

ASP.NET Core introduced strongly typed settings as a way of letting configuration code adhere to the single-responsibility principle (SRP) and to allow the injection of configuration classes as explicit dependencies. Such settings also make testing easier; instead of having to create an instance of IConfiguration to test a service, you can create an instance of the POCO options class.

ASP.NET Core 引入了强类型设置,以此方式让配置代码遵循单一职责原则 (SRP),并允许将配置类作为显式依赖项注入。此类设置还使测试更容易;您不必创建 IConfiguration 的实例来测试服务,而是可以创建 POCO 选项类的实例。

The AppDisplaySettings class shown in the previous example could be simple, exposing only the values related to the home page:

上例所示的 AppDisplaySettings 类可能很简单,只公开与主页相关的值:

public class AppDisplaySettings
{
    public string Title { get; set; }
    public bool ShowCopyright { get; set; }
}

Your options classes need to be nonabstract and have a public parameterless constructor to be eligible for binding. The binder sets any public properties that match configuration values, as you’ll see in section 10.3.3.

你的 options 类必须是非抽象的,并且有一个公共的无参数构造函数才有资格进行绑定。Binders 设置与 configuration 值匹配的任何公共属性,如 Section 10.3.3 所示。

Tip You’re not restricted to built-in types such as string and bool; you can use nested complex types too. The options system binds sections to complex properties. See the associated source code for examples.
提示 您不仅限于 string 和 bool 等内置类型;您也可以使用嵌套的复杂类型。options 系统将 sections 绑定到 complex 属性。有关示例,请参阅关联的源代码。

To help facilitate the binding of configuration values to your custom POCO options classes, ASP.NET Core introduces the IOptions interface, a simple interface with a single property, Value, that contains your configured POCO options class at runtime. Options classes are configured as services in Program.cs , as shown in the following listing.

为了帮助将配置值绑定到自定义 POCO 选项类,ASP.NET Core 引入了 IOptions 接口,这是一个简单的接口,具有单个属性 Value,其中包含您在运行时配置的 POCO 选项类。选项类在 Program.cs 中配置为 services,如以下清单所示。

Listing 10.8 Configuring the options classes using Configure in Startup.cs
清单 10.8 在 Startup.cs 中使用Configure

WebApplicationBuilder builder = WebApplication.CreateBuilder(args);

builder.Services.Configure<MapSettings>(
    builder.Configuration.GetSection("MapSettings")); ❶
builder.Services.Configure<AppDisplaySettings>(
    builder.Configuration.GetSection("AppDisplaySettings")); ❷

❶ Binds the MapSettings section to the POCO options class MapSettings
将 MapSettings 部分绑定到 POCO 选项类 MapSettings

❷ Binds the AppDisplaySettings section to the POCO options class AppDisplaySettings
将 AppDisplaySettings 部分绑定到 POCO 选项类 AppDisplaySettings

Tip You don’t have to use the same name for both the section and class, as I do in listing 10.8; it’s simply a convention I like to follow. With this convention, you can also use the nameof() operator to further reduce the chance of typos, such as by calling GetSection(nameof(MapSettings)).
提示 您不必像在清单 10.8 中那样对 section 和 class 使用相同的名称;这只是我喜欢遵循的惯例。通过此约定,您还可以使用 nameof() 运算符来进一步减少拼写错误的可能性,例如通过调用 GetSection(nameof(MapSettings))。

Each call to Configure sets up the following series of actions internally:
每次调用 Configure 都会在内部设置以下一系列作:

  1. Creates an instance of ConfigureOptions, which indicates that IOptions should be configured based on configuration.
    创建 ConfigureOptions 的实例,这表示应根据配置配置 IOptions
    If Configure is called multiple times, multiple ConfigureOptions objects will be used, all of which can be applied to create the final object in much the same way that IConfiguration is built from multiple layers.
    如果多次调用 Configure,则将使用多个 ConfigureOptions 对象,所有这些对象都可以应用于创建最终对象,其方式与从多个层构建 IConfiguration 的方式大致相同。

  2. Each ConfigureOptions instance binds a section of IConfiguration to an instance of the T POCO class, setting any public properties on the options class based on the keys in the provided ConfigurationSection.
    每个 ConfigureOptions 实例将 IConfiguration 的一个部分绑定到 T POCO 类的实例,根据提供的 ConfigurationSection 中的键设置选项类上的任何公共属性。

Remember that the section name ("MapSettings" in listing 10.8) can have any value; it doesn’t have to match the name of your options class.
请记住,部分名称(清单 10.8 中的 “MapSettings”)可以有任何值;它不必与 Options 类的名称匹配。

  1. The IOptions interface is registered in the DI container as a singleton, with the final bound POCO object in the Value property.
    IOptions 接口在 DI 容器中注册为单一实例,最终绑定的 POCO 对象位于 Value 属性中。

This last step lets you inject your options classes into handlers and services by injecting IOptions, as you saw in listing 10.7, giving you encapsulated, strongly typed access to your configuration values. No more magic strings. Woo-hoo!

最后一步允许你通过注入 IOptions 将选项类注入到处理程序和服务中,就像你在清单 10.7 中看到的那样,为你提供了对配置值的封装、强类型访问。不再有神奇的字符串。呜呼!

Warning If you forget to call Configure and inject IOptions into your services, you won’t see any errors, but the T options class won’t be bound to anything and will have only default values in its properties.
警告 如果您忘记调用 Configure 并将 IOptions 注入到您的服务中,您将不会看到任何错误,但 T options 类不会绑定到任何内容,并且其属性中只有默认值。

The binding of the T options class to ConfigurationSection happens when you first request IOptions. The object is registered in the DI container as a singleton, so it’s bound only once.

T options 类与 ConfigurationSection 的绑定发生在您首次请求 IOptions 时。 该对象在 DI 容器中注册为单一实例,因此它只绑定一次。

This setup has one catch: you can’t use the reloadOnChange parameter I described in section 10.2.4 to reload your strongly typed options classes when using IOptions. IConfiguration will still be reloaded if you edit your appsettings.json files, but it won’t propagate to your options class.

此设置有一个问题:在使用 IOptions 时,您不能使用我在 Section 10.2.4 中描述的 reloadOnChange 参数来重新加载强类型选项类。如果编辑 IConfiguration 文件,appsettings.json 仍会重新加载,但它不会传播到选项类。

If that fact seems like a step backward or even a deal-breaker, don’t worry. IOptions has a cousin, IOptionsSnapshot, for such an occasion.

如果这个事实似乎是倒退,甚至是破坏交易,请不要担心。 IOptions 有一个表亲 IOptionsSnapshot 用于此类场合。

10.3.2 Reloading strongly typed options with IOptionsSnapshot

10.3.2 使用 IOptionsSnapshot 重新加载强类型选项

In section 10.3.1, you used IOptions to provide strongly typed access to configuration. Using IOptions to provide strongly typed access to configuration provided a nice encapsulation of the settings for a particular service, but with a specific drawback: the options class never changes, even if you modify the underlying configuration file from which it was loaded, such as appsettings.json.

在第 10.3.1 节中,您使用了 IOptions 提供对配置的强类型访问。使用 IOptions 提供对配置的强类型访问,为特定服务提供了很好的设置封装,但有一个特定的缺点:选项类永远不会更改,即使您修改了从中加载它的基础配置文件,例如 appsettings.json。

This situation isn’t always a problem (you generally shouldn’t be modifying files on live production servers anyway), but if you need this functionality, you can use the IOptionsSnapshot interface. Conceptually, IOptionsSnaphot is identical to IOptions in that it’s a strongly typed representation of a section of configuration. The difference is when and how often the POCO options objects are created when they’re used:

这种情况并不总是问题(通常无论如何都不应该在实时生产服务器上修改文件),但如果您需要此功能,则可以使用 IOptionsSnapshot 接口。从概念上讲,IOptionsSnaphot 与 IOptions 相同,因为它是配置部分的强类型表示形式。区别在于使用 POCO 选项对象的创建时间和频率:

  • IOptions—The instance is created once, when first needed. It always contains the configuration from when the object instance was first created.
    IOptions – 首次需要时,将创建一次实例。它始终包含首次创建对象实例时的配置。

  • IOptionsSnapshot—A new instance is created, when needed, if the underlying configuration has changed since the last instance was created.
    IOptionsSnapshot – 如果自创建上一个实例以来底层配置已更改,则在需要时创建新实例。

Warning IOptionsSnapshot is registered as a scoped service, so you can’t inject it into singleton services; if you do, you’ll have a captive dependency, as discussed in chapter 9. If you need a singleton version of IOptionsSnapshot, you can use a similar interface, IOptionsMonitor. See this blog post for details: http://mng.bz/9Da7.
警告 IOptionsSnapshot 注册为范围服务,因此您不能将其注入到单一实例服务中;如果这样做,您将拥有一个捕获依赖项,如第 9 章所述。如果需要 IOptionsSnapshot 的单一实例版本,可以使用类似的接口 IOptionsMonitor。有关详细信息,请参阅此博客文章:http://mng.bz/9Da7

IOptionsSnaphot is set up for your options classes automatically at the same time as IOptions, so you can use it in your services in exactly the same way. The following listing shows how you could update your display-settings API so that you always get the latest configuration values in your strongly typed AppDisplaySettings options class.

IOptionsSnaphot 与 IOptions 同时自动为您的选项类设置,因此您可以以完全相同的方式在服务中使用它。以下清单显示了如何更新 display-settings API,以便始终在强类型 AppDisplaySettings 选项类中获取最新的配置值。

Listing 10.9 Injecting reloadable options using IOptionsSnapshot
清单 10.9 使用IOptionsSnapshot

app.MapGet("/display-settings",
    (IOptionsSnapshot<AppDisplaySettings> options) => ❶
{
    AppDisplaySettings settings = options.Value; ❷

    return new
    {
        title = settings.Title, ❸
        showCopyright = settings.ShowCopyright, ❸
    };
});

IOptionsSnapshot<T> updates automatically if the underlying configuration values
change.
如果底层配置值发生更改,IOptionsSnapshot<T> 会自动更新。

❷ The Value property exposes the POCO settings object, the same as for IOptions<T>.
Value 属性公开 POCO 设置对象,与 IOptions<T> 相同。

❸ The settings match the configuration values at that point in time instead of at first
run.
这些设置与该时间点的配置值匹配,而不是在首次运行时匹配。

As IOptionsSnapshot<AppDisplaySettings> is registered as a scoped service, it’s re-created at every request. If you edit the settings file and cause IConfiguration to reload, IOptionsSnapshot<AppDisplaySettings> shows the new values on the next request. A new AppDisplaySettings object is created with the new configuration values and is used for all future DI—until you edit the file again, of course!

由于 IOptionsSnapshot<AppDisplaySettings> 注册为作用域服务,因此会在每次请求时重新创建它。如果编辑设置文件并导致 IConfiguration 重新加载,则 IOptionsSnapshot<AppDisplaySettings> 将在下一个请求中显示新值。使用新的配置值创建一个新的 AppDisplaySettings 对象,并将其用于所有未来的 DI — 当然,直到您再次编辑该文件为止!

Reloading your settings automatically is as simple as that: update your code to use IOptionsSnapshot<T> instead of IOptions<T> wherever you need it. But be aware that this change isn’t free. You’re rebinding and reconfiguring your options object with every request, which may have performance implications. In practice, reloading settings isn’t common in production, so you may decide that the developer convenience isn’t worth the performance impact.

自动重新加载设置非常简单:更新代码以使用 IOptionsSnapshot<T>而不是IOptions<T>,无论您需要什么地方。但请注意,此更改不是免费的。您正在使用每个请求重新绑定和重新配置 options 对象,这可能会对性能产生影响。在实践中,重新加载设置在生产中并不常见,因此您可能会认为开发人员的便利性不值得对性能造成影响。

An important consideration in using the options pattern is the design of your POCO options classes themselves. These classes typically are simple collections of properties, but there are a few things to bear in mind so that you don’t get stuck debugging why the binding seemingly hasn’t worked.

使用选项模式的一个重要考虑因素是 POCO 选项类本身的设计。这些类通常是简单的属性集合,但需要记住一些事项,这样您就不会陷入调试绑定似乎不起作用的原因。

10.3.3 Designing your options classes for automatic binding

10.3.3 为自动绑定设计 options 类

I’ve already touched on some of the requirements for POCO classes to work with the IOptions<T> binder, but there are a few rules to remember. The first key point is that the binder creates instances of your options classes by using reflection, so your POCO options classes need to

我已经谈到了 POCO 类与 IOptions<T> Binder 一起使用的一些要求,但有一些规则需要记住。第一个关键点是 Binder 使用反射创建选项类的实例,因此您的 POCO 选项类需要

  • Be nonabstract
    非抽象

  • Have a default (public parameterless) constructor
    具有默认 (public parameterless) 构造函数

If your classes satisfy these two points, the binder will loop through all the properties on your class and bind any that it can. In the broadest sense, the binder can bind any property that

如果您的类满足这两点,则 Binder 将遍历类上的所有属性,并绑定它可以绑定的任何属性。从最广泛的意义上讲,Binder 可以绑定

  • Is public
    是公开的

  • Has a getter (the binder won’t write set-only properties)
    具有 getter(Binder 不会写入仅 set-only 属性)

  • Has a setter or, for complex types, a non-null value
    具有 setter,或者对于复杂类型,具有非 null 值

  • Isn’t an indexer
    不是索引器

Listing 10.10 shows two extensive options class with a host of different types of properties. All the properties on BindableOptions are valid to bind, and all the properties on UnbindableOptions are not.

清单 10.10 展示了两个扩展的选项类,它们具有许多不同类型的属性。BindableOptions 上的所有属性都对 bind 有效,而 UnbindableOptions 上的所有属性都不是。

Listing 10.10 An options class containing binding and nonbinding properties
清单 10.10 包含 binding 和 nonbinding 属性的 options 类

public class BindableOptions
{
    public string String { get; set; } ❶
    public int Integer { get; set; } ❶
    public SubClass Object { get; set; } ❶
    public SubClass ReadOnly { get; } = new SubClass(); ❶
    public Dictionary<string, SubClass> Dictionary { get; set; } ❷
    public List<SubClass> List { get; set; } ❷
    public IDictionary<string, SubClass> IDictionary { get; set; } ❷
    public IEnumerable<SubClass> IEnumerable { get; set; } ❷
    public ICollection<SubClass> ReadOnlyCollection { get; } ❷
        = new List<SubClass>(); ❷

    public class SubClass
    {
    public string Value { get; set; }
    }
}

public class UnbindableOptions
{
    internal string NotPublic { get; set; } ❸
    public SubClass SetOnly { set => _setOnly = value; } ❸
    public SubClass NullReadOnly { get; } = null; ❸
    public SubClass NullPrivateSetter { get; private set; } = null; ❸
    public SubClass this[int i] { ❸
        get => _indexerList[i]; ❸
        set => _indexerList[i] = value; ❸
    }
    public List<SubClass> NullList { get; } ❹
    public Dictionary<int, SubClass> IntegerKeys { get; set; } ❹
    public IEnumerable<SubClass> ReadOnlyEnumerable { get; } ❹
        = new List<SubClass>(); ❹

    public SubClass _setOnly = null; ❺
    private readonly List<SubClass> _indexerList ❺
        = new List<SubClass>(); ❺

    public class SubClass
    {
        public string Value { get; set; }
    }
}

❶ The binder can bind simple and complex object types, and read-only properties with
a default.
Binder 可以将简单和复杂的对象类型以及只读属性与默认值绑定。

❷ The binder will also bind collections, including interfaces.
Binder 还将绑定集合,包括接口。

❸ The binder can’t bind nonpublic, set-only, null-read-only, or indexer properties.
Binder 无法绑定 non-public、set-only、null-read-only 或 indexer 属性。

❹ These collection properties can’t be bound.
这些集合属性无法绑定。

❺ The backing fields for implementing SetOnly and Indexer properties—not bound
directly
用于实现 SetOnly 和 Indexer 属性的支持字段 - 不直接绑定

As shown in the listing, the binder generally supports collections—both implementations and interfaces. If the collection property is already initialized, the binder uses the initialized value; otherwise, the binder may be able to create the collection instance automatically. If your property implements any of the following interfaces, the binder creates a List<> of the appropriate type as the backing object:

如清单所示,Binder 通常支持集合— 包括实现和接口。如果 collection 属性已初始化,则 Binder 将使用初始化的值;否则,Binder 可能能够自动创建 collection 实例。如果您的属性实现以下任何接口,则 Binder 会创建一个 List<> 作为后备对象:

  • IReadOnlyList<>
  • IReadOnlyCollection<>
  • ICollection<>
  • IEnumerable<>

Warning You can’t bind to an IEnumerable<> property that has already been initialized, as this interface doesn’t expose an Add function, and the binder won’t replace the backing value. You can bind to an IEnumerable<> if you leave its initial value null.
警告 您不能绑定到已初始化的 IEnumerable<> 属性,因为此接口不会公开 Add 函数,并且 Binder 不会替换后备值。如果保留 IEnumerable 的初始值<>则可以绑定到 IEnumerable null 的.

Similarly, the binder creates a Dictionary<,> as the backing field for properties with dictionary interfaces as long as they use string keys:
同样,Binder 会创建一个 Dictionary<,> 作为具有字典接口的属性的后备字段,只要它们使用 string、enum 或 integer(int、short、byte 等)键:

  • IDictionary<string,>
  • IReadOnlyDictionary<string,>

Warning You can’t bind dictionaries with non-string keys, such as int. For examples of binding collection types, see the associated source code for this book.
警告 您不能绑定使用非字符串或非整数键的字典,例如 custom classes 或 double。有关绑定集合类型的示例,请参阅本书的相关源代码。

Clearly, there are quite a few nuances here, but if you stick to the simple cases from the preceding example, you’ll be fine. Be sure to check for typos in your JSON files! You could also consider using explicit options validation, as described in this post: http://mng.bz/jPjr.

显然,这里有很多细微差别,但如果你坚持使用前面示例中的简单情况,你会没事的。请务必检查 JSON 文件中是否有拼写错误!你也可以考虑使用显式选项验证,如本文所述:http://mng.bz/jPjr

Tip The options pattern is most commonly used to bind POCO classes to configuration, but you can also configure your strongly typed settings classes in code by providing a lambda to the Configure function;, as in services.Configure(opt => opt.Value = true).
提示 选项模式最常用于将 POCO 类绑定到配置,但您也可以通过向 Configure 函数提供 lambda 来在代码中配置强类型设置类,就像在服务中一样.Configure(opt => opt.值 = true)。

The Options pattern is used throughout ASP.NET Core, but not everyone is a fan. In section 10.3.4 you’ll see how to use strongly typed settings and the configuration binder without the Options pattern.
Options 模式在整个 ASP.NET Core 中使用,但并非每个人都是粉丝。在 Section 10.3.4 中,您将看到如何使用强类型设置和没有 Options 模式的配置 Binder。

10.3.4 Binding strongly typed settings without the IOptions interface

10.3.4 在没有 IOptions 接口的情况下绑定强类型设置

The IOptions interface is canonical in ASP.NET Core; it’s used by the core ASP.NET Core libraries and has various convenience functions for binding strongly typed settings, as you’ve already seen. In many cases, however, the IOptions interface doesn’t give many benefits for consumers of the strongly typed settings objects. Services must take a dependency on the IOptions interface but then immediately extract the real object by calling IOptions<T>.Value. This situation can be especially annoying if you’re building a reusable library that isn’t inherently tied to ASP.NET Core, as you must expose the IOptions<T> interface in all your public APIs.

IOptions 接口在 ASP.NET Core 中是规范的;正如您已经看到的,它由 Core ASP.NET Core 库使用,并且具有用于绑定强类型设置的各种便捷函数。但是,在许多情况下,IOptions 接口并没有为强类型设置对象的使用者带来很多好处。服务必须依赖于 IOptions 接口,但随后通过调用 IOptions<T> 立即提取真实对象。值。如果您正在构建一个本质上不绑定到 ASP.NET Core 的可重用库,则这种情况可能尤其令人烦恼,因为您必须在所有公共 API 中公开 IOptions<T> 接口。

Luckily, the configuration binder that maps IConfiguration objects to strongly typed settings objects isn’t inherently tied to IOptions. Listing 10.11 shows how you can bind a strongly typed settings object to a configuration section manually, register it with the DI container, and inject the MapSettings object directly into a handler or service without the additional ceremony required to use IOptions.

幸运的是,将 IConfiguration 对象映射到强类型设置对象的配置绑定器本身并不与 IOptions 相关联。清单 10.11 展示了如何手动将强类型设置对象绑定到配置部分,将其注册到 DI 容器中,并将 MapSettings 对象直接注入处理程序或服务中,而无需使用 IOptions<MapSettings> 所需的额外仪式。

Listing 10.11 Configuring strongly typed settings without IOptions in Program.cs
清单 10.11 配置没有Program.cs 中的 IOptions

WebApplicationBuilder builder = WebApplication.CreateBuilder(args);

var settings = new MapSettings (); ❶
builder.Configuration.GetSection("MapSettings").Bind(settings); ❷
builder.Services.AddSingleton(settings); ❸

WebApplication app = builder.Build();

app.MapGet("/", (MapSettings mapSettings) => mapSettings); ❹

app.Run();

❶ Creates a new instance of the MapSettings object
创建 MapSettings 对象的新实例
❷ Binds the MapSettings section in IConfiguration to the settings object
将 IConfiguration 中的 MapSettings 部分绑定到设置对象
❸ Registers the settings object as a singleton
将 settings 对象注册为单例
❹ Injects the MapSettings object directly using DI
使用 DI 直接注入 MapSettings 对象

Alternatively, you can register the IOptions type in the DI container but then use a lambda to additionally register MapSettings as a singleton so it can be directly injected, as shown in listing 10.12.

或者,你可以在 DI 容器中注册 IOptions 类型,然后使用 lambda 另外将 MapSettings 注册为单例,以便可以直接注入,如清单 10.12 所示。

Listing 10.12 Configuring strongly typed settings for direct injection
示例 10.12 为直接注入配置强类型设置

WebApplicationBuilder builder = WebApplication.CreateBuilder(args);

builder.Services.Configure<MapSettings>( ❶
    builder.Configuration.GetSection("MapSettings")); ❶
builder.Services.AddSingleton(provider => ❷
    provider.GetRequiredService<IOptions<MapSettings>>().Value); ❷

WebApplication app = builder.Build();

app.MapGet("/", (MapSettings mapSettings) => mapSettings); ❸

app.Run();

❶ Configures the IOptions as normal
正常配置 IOptions
❷ Registers the MapSettings object in DI by delegating to the IOptions registration
通过委托 IOptions 注册,在 DI 中注册 MapSettings 对象
❸ Injects the MapSettings object directly DI
直接注入 MapSettings 对象 DI

If you use either of these approaches, you won’t benefit from the ability to reload strongly typed settings without further work or from some of the more advanced uses of IOptions, but in most cases, that’s not a big problem. I’m a fan of these approaches generally, but as always, consider what you’re losing before adopting them wholeheartedly.

如果使用这两种方法中的任何一种,则不会从无需进一步工作即可重新加载强类型设置的能力中受益,也不会受益于 IOptions 的一些更高级的用法,但在大多数情况下,这不是一个大问题。我通常是这些方法的粉丝,但与往常一样,在全心全意采用它们之前,请考虑一下你失去了什么。

Tip In chapter 31 I show one such advanced scenario in which you configure an IOptions object using services in your DI container. For other scenarios, see Microsoft’s “Options pattern in ASP.NET Core” documentation at http://mng.bz/DR7y, or see the various IOptions posts on my blog, such as this one: http://mng.bz/l1Aj.
提示 在第 31 章中,我将展示一个这样的高级场景,在该场景中,您可以使用 DI 容器中的服务配置 IOptions 对象。对于其他方案,请参阅 http://mng.bz/DR7y 上 Microsoft 的“ASP.NET Core 中的选项模式”文档,或查看我博客上的各种 IOptions 帖子,例如:http://mng.bz/l1Aj

That brings us to the end of this section on strongly typed settings. In section 10.4 we’ll look at how you can change your settings dynamically at runtime, based on the environment in which your app is running.

这将我们带到本节关于强类型设置的结尾。在 Section 10.4 中,我们将了解如何根据应用程序的运行环境在运行时动态更改设置。

10.4 Configuring an application for multiple environments

10.4 为多个环境配置应用程序

In this section you’ll learn about hosting environments in ASP.NET Core. You’ll learn how to set and determine which environment an application is running in and how to change which configuration values are used, based on the environment. Using environments lets you switch easily among different sets of configuration values in production compared with development, for example.

在本节中,您将了解如何在 ASP.NET Core 中托管环境。您将学习如何设置和确定应用程序在哪个环境中运行,以及如何根据环境更改使用的配置值。例如,与开发相比,使用环境可以让您在生产中的不同配置值集之间轻松切换。

Any application that makes it to production will likely have to run in multiple environments. If you’re building an application with database access, for example, you’ll probably have a small database running on your machine that you use for development. In production, you’ll have a completely different database running on a server somewhere else.

任何进入生产环境的应用程序都可能必须在多个环境中运行。例如,如果您正在构建具有数据库访问权限的应用程序,则您的计算机上可能会运行一个用于开发的小型数据库。在生产环境中,您将在其他位置的服务器上运行一个完全不同的数据库。

Another common requirement is to have different amounts of logging depending on where your app is running. In development, it’s great to generate lots of logs, which help with debugging, but when you get to production, too many logs can be overwhelming. You’ll want to log warnings, errors, and maybe information-level logs, but definitely not debug-level logs!

另一个常见要求是,根据应用程序的运行位置,具有不同的日志记录量。在开发中,生成大量日志非常有用,这有助于调试,但是当您进入生产环境时,过多的日志可能会让人不知所措。您需要记录警告、错误,也许还需要信息级日志,但绝对不是调试级日志!

To handle these requirements, you need to make sure that your app loads different configuration values depending on the environment it’s running in: load the production database connection string when in production, and so on. You need to consider three aspects:

要满足这些要求,您需要确保您的应用程序根据其运行环境加载不同的配置值:在生产环境中加载生产数据库连接字符串,依此类推。您需要考虑三个方面:

  • How your app identifies the environment it’s running in
    您的应用如何识别它正在运行的环境

  • How you load different configuration values based on the current environment
    如何根据当前环境加载不同的配置值

  • How to change the environment for a particular machine
    如何更改特定计算机的环境

This section tackles these aspects in turn so that you can easily tell your development machine apart from your production servers and act accordingly.

本节依次处理这些方面,以便您可以轻松地将开发计算机与生产服务器区分开来,并采取相应的措施。

10.4.1 Identifying the hosting environment

10.4.1 确定托管环境

When you create a WebApplicationBuilder instance in Program.cs, it automatically sets up the hosting environment for your application. By default, WebApplicationBuilder uses, perhaps unsurprisingly, an environment variable to identify the current environment. The WebApplicationBuilder looks for a magic environment variable called ASPNETCORE_ENVIRONMENT, uses it to create an IHostEnvironment object, and exposes it as WebApplicationBuilder.Environment.

当您在 Program.cs 中创建 WebApplicationBuilder 实例时,它会自动为您的应用程序设置托管环境。默认情况下,WebApplicationBuilder 使用环境变量来标识当前环境,这也许不足为奇。WebApplicationBuilder 查找一个名为 ASPNETCORE_ENVIRONMENT 的神奇环境变量,使用它来创建一个IHostEnvironment 对象,并将其公开为WebApplicationBuilder.Environment 的 Web 应用程序。

Note You can use either the DOTNET_ENVIRONMENT or ASPNETCOREENVIRONMENT environment variable. The ASPNETCORE value overrides the DOTNET value if both are set. I use the ASPNETCORE version throughout this book.
注意 您可以使用 DOTNET_ENVIRONMENT 或 ASPNETCOREENVIRONMENT 环境变量。如果同时设置了两者,则 ASPNETCORE 值将覆盖 DOTNET_ 值。我在本书中都使用ASPNETCORE_版本。

The IHostEnvironment interface exposes several useful properties about the running context of your app. The ContentRootPath property, for example, tells the application in which directory it can find any configuration files, such as appsettings.json. This folder is typically the one in which the application is running.

IHostEnvironment 接口公开了有关应用程序运行上下文的几个有用属性。例如,ContentRootPath 属性告诉应用程序它可以在哪个目录中找到任何配置文件,比如 appsettings.json。此文件夹通常是运行应用程序的文件夹。

TIP  ContentRootPath is not where you store static files that the browser can access directly; that’s the WebRootPath, typically wwwroot. WebRootPath is also exposed on the Environment property via the IWebHostEnvironment interface.
提示 ContentRootPath 不是存储浏览器可以直接访问的静态文件的位置;即 WebRootPath,通常为 wwwroot。WebRootPath 还通过 IWebHostEnvironment 接口在 Environment 属性上公开。

The IHostEnvironment.EnvironmentName property is what interests us in this section. It’s set to the value of the ASPNETCORE_ENVIRONMENT environment variable, so it can be any value, but you should stick to three commonly used values in most cases:

IHostEnvironment.EnvironmentName 属性是本节中我们感兴趣的内容。它设置为 ASPNETCORE_ENVIRONMENT 环境变量的值,因此它可以是任何值,但在大多数情况下,您应该坚持使用三个常用的值:

  • "Development" 开发
  • "Staging" 暂存
  • "Production" 生产

ASP.NET Core includes several helper methods for working with these three values, so you’ll have an easier time if you stick to them. In particular, whenever you’re testing whether your app is running in a particular environment, you should use one of the following extension methods:

ASP.NET Core 包含多个用于处理这三个值的帮助程序方法,因此,如果坚持使用它们,您将会更轻松。具体而言,每当测试应用程序是否在特定环境中运行时,都应使用以下扩展方法之一:

  • IHostEnvironment.IsDevelopment()
  • IHostEnvironment.IsStaging()
  • IHostEnvironment.IsProduction()
  • IHostEnvironment.IsEnvironment(string environmentName)

All these methods make sure that they do case-insensitive checks of the environment variable, so you won’t get any wonky errors at runtime if you don’t capitalize the environment variable value.

所有这些方法都确保它们对环境变量执行不区分大小写的检查,因此如果不将环境变量值大写,在运行时不会收到任何不稳定的错误。

Tip Where possible, use the IHostEnvironment extension methods instead of direct string comparison with EnvironmentName, as the methods provide case-insensitive matching.
提示 如果可能,请使用 IHostEnvironment 扩展方法,而不是直接与 EnvironmentName 进行字符串比较,因为这些方法提供不区分大小写的匹配。

IHostEnvironment doesn’t do anything other than expose the details of your current environment, but you can use it in various ways. In chapter 4 you saw that WebApplication adds the DeveloperExceptionMiddleware to your middleware pipeline only in the development environment. Now you know where WebApplication was getting its information about the environment: IHostEnvironment.

IHostEnvironment 除了公开当前环境的详细信息外,不执行任何其他作,但您可以通过多种方式使用它。在第 4 章中,您看到 WebApplication 仅在开发环境中将 DeveloperExceptionMiddleware 添加到您的中间件管道中。现在,您知道 WebApplication 从何处获取有关环境的信息:IHostEnvironment。

You can use a similar approach to customize which configuration values you load at runtime by loading different files when running in development versus production. This approach is common; it’s included out of the box in most ASP.NET Core templates and by default when you use the default ConfigurationManager included with WebApplicationBuilder.

您可以使用类似的方法来自定义在运行时加载的配置值,方法是在在开发环境中运行与生产环境。这种方法很常见;它在大多数 ASP.NET Core 模板中都是开箱即用的,并且在您使用 WebApplicationBuilder 中包含的默认 ConfigurationManager 时默认包含。

10.4.2 Loading environment-specific configuration files

10.4.2 加载特定于环境的配置文件

The EnvironmentName value is determined early in the process of bootstrapping your application, before the default ConfigurationManager is fully populated by WebApplicationBuilder. As a result, you can dynamically change which configuration providers are added to the builder and, hence, which configuration values are loaded when the IConfiguration is built.

EnvironmentName 值是在引导应用程序的早期确定的,在默认 ConfigurationManager 由 WebApplicationBuilder 完全填充之前。因此,您可以动态更改将哪些配置提供程序添加到生成器中,从而在构建 IConfiguration 时加载哪些配置值。

A common pattern is to have an optional, environment-specific appsettings .ENVIRONMENT.json file that’s loaded after the default appsettings.json file. The following listing shows how you could achieve this task if you’re customizing the ConfigurationMaanger in Program.cs, but it’s also effectively what WebApplicationBuilder does by default.

一种常见模式是具有可选的、特定于环境的 appsettings 。ENVIRONMENT.json 在默认 appsettings.json 文件之后加载的文件。下面的清单显示了如果您在 Program.cs 中自定义 ConfigurationManager,如何完成此任务,但这也是 WebApplication-Builder 默认所做的。

Listing 10.13 Adding environment-specific appsettings.json files

WebApplicationBuilder builder = WebApplication.CreateBuilder(args);

IHostEnvironment env = builder.Environment; ❶

builder.Configuration.Sources.Clear();
builder.Configuration
    .AddJsonFile(
        "appsettings.json",
        optional: false) ❷
    .AddJsonFile( ❸
        $”appsettings.{env.EnvironmentName}.json”, ❸
        Optional: true); ❸

WebApplication app = builder.Build();

app.MapGet("/", () =>"Hello world!");

app.Run();

❶ The current IHostEnvironment is available on WebApplicationBuilder.
当前的 IHostEnvironment 在 WebApplicationBuilder 上可用。
❷ It’s common to make the base appsettings.json compulsory.
将 base appsettings.json 设为必修是很常见的。
❸ Adds an optional environment-specific JSON file where the filename varies with the
environment
添加一个可选的特定于环境的 JSON 文件,其中文件名随环境而变化

With this pattern, a global appsettings.json file contains settings applicable to most environments. Additional optional JSON files called appsettings.Development.json, appsettings.Staging.json, and appsettings.Production.json are subsequently added to ConfigurationManager, depending on the current EnvironmentName.

使用此模式时,全局appsettings.json文件包含适用于大多数环境的设置。名为 appsettings 的其他可选 JSON 文件。Development.json,appsettings。Staging.json 和 appsettings 中。Production.json随后会添加到 ConfigurationManager,具体取决于当前的 EnvironmentName。

Any settings in these files will overwrite values from the global appsettings.json if they have the same key, as you’ve seen previously. Using environment-specific settings files lets you do things like set the logging to be verbose only in the development environment and switch to more selective logs in production.

这些文件中的任何设置都将覆盖全局appsettings.json的值,如果它们具有相同的键,就像您之前看到的那样。使用特定于环境的设置文件,您可以执行一些作,例如在开发环境中将日志记录设置为仅详细,并在生产环境中切换到更具选择性的日志。

Another common pattern is to add or remove configuration providers depending on the environment. You might use the User Secrets provider when developing locally, for example, but Azure Key Vault in production. Listing 10.14 shows how you can use IHostEnvironment to include the User Secrets provider conditionally only in development. Again, WebApplicationBuilder uses this pattern by default.

另一种常见模式是根据环境添加或删除配置提供程序。例如,在本地开发时使用用户机密提供程序,但在生产环境中使用 Azure Key Vault。清单 10.14 展示了如何使用 IHostEnvironment 仅在开发中有条件地包含 User Secrets 提供程序。同样,WebApplicationBuilder 默认使用此模式。

Listing 10.14 Conditionally including the User Secrets configuration provider
清单 10.14 有条件地包含 User Secrets 配置提供程序

WebApplicationBuilder builder = WebApplication.CreateBuilder(args);

IHostEnvironment env = builder.Environment;

builder.Configuration.Sources.Clear();
builder.Configuration
    .AddJsonFile(
        "appsettings.json",
        optional: false)
    .AddJsonFile(
        $"appsettings.{env}.json",
        Optional: true);

if(env.IsDevelopment()) ❶
{
    builder.Configuration.AddUserSecrets(); ❷
}

WebApplication app = builder.Build();

app.MapGet("/", () =>"Hello world!");

app.Run();

❶ Extension methods make checking the environment simple and explicit.
将问题详情服务添加到 DI 容器中,供 ExceptionHandlerMiddleware 使用
❷ In Staging and Production, the User Secrets provider won’t be used.
当不在开发中时,管道使用 ExceptionHandlerMiddleware。

As already mentioned, it’s also common to customize your application’s middleware pipeline based on the environment. In chapter 4 you learned that WebApplication adds the DeveloperExceptionPageMiddleware conditionally when developing locally. The following listing shows how you can use IHostEnvironment to control your pipeline in this way so that when you’re in staging or production, your app uses ExceptionHandlerMiddleware instead.

如前所述,根据环境自定义应用程序的中间件管道也很常见。在第 4 章中,您了解了 WebApplication 在本地开发时有条件地添加 DeveloperExceptionPageMiddleware。下面的清单显示了如何以这种方式使用 IHostEnvironment 来控制管道,以便在暂存或生产环境中,应用程序改用 ExceptionHandlerMiddleware。

Listing 10.15 Using the hosting environment to customize your middleware pipeline
清单 10.15 使用托管环境自定义中间件管道

WebApplicationBuilder builder = WebApplication.CreateBuilder(args);

builder.AddProblemDetails(); ❶

WebApplication app = builder.Build();

if (!builder.Environment.IsDevelopment()) ❷
{ ❷
    app.UseExceptionHandler(); ❷
} ❷

app.MapGet("/", () =>"Hello world!");

app.Run();

❶ Adds the problem details service to the DI container for use by the ExceptionHandlerMiddleware
将问题详情服务添加到 DI 容器中,供 ExceptionHandlerMiddleware 使用
❷ When not in development, the pipeline uses ExceptionHandlerMiddleware.
当不在开发中时,管道使用 ExceptionHandlerMiddleware。

Note In listing 10.15 you added the Problem Details services to the DI container so that the ExceptionHandlerMiddleware can generate a Problem Details response automatically. As you’re adding the extra middleware only in Staging and Production, you could add the services conditionally to the DI container too instead of always adding them as we did here.
注意 在示例 10.15 中,你向 DI 容器添加了 Problem Details 服务,以便 ExceptionHandlerMiddleware 可以自动生成 Problem Details 响应。由于您仅在 Staging 和 Production 中添加额外的中间件,因此您也可以有条件地将服务添加到 DI 容器中,而不是像我们在这里所做的那样总是添加它们。

You can inject IHostEnvironment anywhere in your app, but I advise against using it in your own services outside Program.cs. It’s far better to use the configuration providers to customize strongly typed settings based on the current hosting environment and inject these settings into your application instead.

您可以在应用程序中的任何位置注入 IHostEnvironment,但我建议不要在 Program.cs 之外的您自己的服务中使用它。最好使用配置提供程序根据当前托管环境自定义强类型设置,并将这些设置注入到应用程序中。

As useful as it is, setting IHostEnvironment with an environment variable can be a little cumbersome if you want to switch back and forth among different environments during testing. Personally, I’m always forgetting how to set environment variables on the various operating systems I use. The final skill I’d like to teach you is how to set the hosting environment when you’re developing locally.

尽管它很有用,但如果您想在测试期间在不同环境之间来回切换,则使用环境变量设置 IHostEnvironment 可能会有点麻烦。就我个人而言,我总是忘记如何在我使用的各种作系统上设置环境变量。最终技能我想教你在本地开发时如何设置托管环境。

10.4.3 Setting the hosting environment

10.4.3 设置托管环境

In this section I show you a couple of ways to set the hosting environment when you’re developing. These techniques make it easy to test a specific app’s behavior in different environments without having to change the environment for all the apps on your machine.

在本节中,我将向您展示在开发时设置托管环境的几种方法。通过这些技术,可以轻松测试特定应用程序在不同环境中的行为,而无需更改计算机上所有应用程序的环境。

If your ASP.NET Core application can’t find an ASPNETCORE_ENVIRONMENT environment variable when it starts up, it defaults to a production environment, as shown in figure 10.6. So when you deploy to production, you’ll be using the correct environment by default.

如果您的 ASP.NET Core 应用程序在启动时找不到 ASPNETCORE_ENVIRONMENT 环境变量,则默认使用生产环境,如图 10.6 所示。因此,当您部署到生产环境时,默认情况下将使用正确的环境。

alt text

Figure 10.6 By default, ASP.NET Core applications run in the production hosting environment. You can override this default by setting the ASPNETCORE_ENVIRONMENT variable.

图 10.6 默认情况下,ASP.NET Core 应用程序在生产托管环境中运行。您可以覆盖此默认值通过设置 ASPNETCORE_ENVIRONMENT 变量。

Tip By default, the current hosting environment is logged to the console at startup, which can be useful for checking that the environment variable has been picked up correctly.
提示 默认情况下,当前托管环境在启动时记录到控制台中,这对于检查是否已正确选取环境变量非常有用。

Another option is to use a launchSettings.json file to control the environment. All the default ASP.NET Core applications include this file in the Properties folder. LaunchSettings.json defines profiles for running your application.

另一种选择是使用 launchSettings.json 文件来控制环境。所有默认的 ASP.NET Core 应用程序都将此文件包含在 Properties 文件夹中。LaunchSettings.json 定义用于运行应用程序的配置文件。

Tip You can use profiles to run your application with different environment variables. You can also use profiles to emulate running on Windows behind Internet Information Services (IIS) by using the IIS Express profile. I rarely use this profile, even in Windows, and always choose the http or https profile.
提示 您可以使用配置文件来运行具有不同环境变量的应用程序。您还可以使用配置文件来模拟使用 IIS Express 配置文件在 Internet Information Services (IIS) 后面的 Windows 上运行。我很少使用此配置文件,即使在 Windows 中也是如此,并且总是选择 http 或 https 配置文件。

Listing 10.16 shows a typical launchSettings.json file that defines three profiles: http, https, and IIS Express. The first two profiles are equivalent to using dotnet run to run the project. The http profile listens only for http:// requests, whereas https listens for both http:// and https://. The IIS Express profile can be used only in Windows and uses IIS Express to run your application.

清单 10.16 显示了一个典型的 launchSettings.json 文件,它定义了三个配置文件:http、https 和 IIS Express。前两个配置文件等效于使用 dotnet run 运行项目。http 配置文件仅侦听 http:// 请求,而 https 同时侦听 http:// 和 https://。IIS Express 配置文件只能在 Windows 中使用,并使用 IIS Express 运行应用程序。

Listing 10.16 A typical launchSettings.json file defining three profiles
清单 10.16 定义三个配置文件的典型 launchSettings.json 文件

{
    "iisSettings": { ❶
        "windowsAuthentication": false, ❶
        "anonymousAuthentication": true, ❶
        "iisExpress": { ❶
            "applicationUrl": "http://localhost:53846", ❶
            "sslPort": 44399 ❶
            }
            },
            "profiles": {
            "http": { ❷
                "commandName": "Project", ❸
                "dotnetRunMessages": true, ❹
                "launchBrowser": true, ❺
                "applicationUrl": "http://localhost:5063", ❻
                "environmentVariables": { ❼
                "ASPNETCORE_ENVIRONMENT": "Development" ❼
            } ❼
            },
            "https": { ❽
                "commandName": "Project",
                "dotnetRunMessages": true,
                "launchBrowser": true,
                "applicationUrl": "https://localhost:7202;http://localhost:5063", ❾
                "environmentVariables": {
                "ASPNETCORE_ENVIRONMENT": "Development"
            }
            },
                "IIS Express": { ❿
                "commandName": "IISExpress",
                "launchBrowser": true,
                "environmentVariables": { ⓫
                "ASPNETCORE_ENVIRONMENT": "Development" ⓫
            } ⓫
        }
    }
}

❶ Defines settings for running behind IIS or using the IIS Express profile
定义在 IIS 后面运行或使用 IIS Express 配置文件的设置
❷ The “http” profile is used by default in macOS.
macOS 中默认使用 “http” 配置文件。
❸ The “project” command is equivalent to calling dotnet run on the project.
“project” 命令等效于在项目上调用 dotnet run。
❹ If true, gives feedback when dotnet run is executing a build or restore
如果为 true,则在 dotnet run 执行生成或还原时提供反馈
❺ If true, launches the browser when you run the application
如果为 true,则在运行应用程序时启动浏览器
❻ Defines the URLs the application will listen on in this profile
定义应用程序将在此配置文件中侦听的 URL
❼ Defines custom environment variables for the profile and sets the environment to
Development
为配置文件定义自定义环境变量,并将环境设置为 Development
❽ The https profile is used by default in Visual Studio in Windows.
默认情况下,https 配置文件在 Windows 的 Visual Studio 中使用。
❾ The https profile listens on both http:// and https:// URLs.
https 配置文件同时侦听 http:// 和 https:// URL。
❿ Runs the application behind IIS Express (Windows only)
在 IIS Express 后面运行应用程序(仅限 Windows)
⓫ Each profile can have different environment variables.
每个配置文件可以具有不同的环境变量。

The advantage of using the launchSettings.json file locally is that it allows you to set local environment variables for a project. In listing 10.16 the environment is set to the development environment, for example. Setting environment variables with launchSettings.json means you can use different environment variables for each project and even for each profile, and store them in source control.

在本地使用 launchSettings.json 文件的优点是,它允许为项目设置本地环境变量。例如,在列表 10.16 中,环境被设置为开发环境。使用 launchSettings.json 设置环境变量意味着您可以为每个项目甚至每个配置文件使用不同的环境变量,并将它们存储在源代码控制中。

You can choose a profile to use in Visual Studio by choosing it from the drop-down menu next to the Debug button on the toolbar, as shown in figure 10.7. You can choose a profile to run from the command line by using `dotnet run --launch-profile <Profile Name>`. If you don’t specify a profile, the first profile listed in launchSettings.json is used. If you don’t want to use any profile, you must explicitly ignore the launchSettings.json file by using dotnet run --no-launch-profile.

您可以从工具栏上 Debug (调试) 按钮旁边的下拉菜单中选择要在 Visual Studio 中使用的配置文件,如图 10.7 所示。您可以使用 `dotnet run --launch- profile <Profile Name>`从命令行选择要运行的配置文件。如果未指定配置文件,则使用 launchSettings .json中列出的第一个配置文件。如果不想使用任何配置文件,则必须使用 dotnet run --no-launch- profile 显式忽略 launchSettings.json 文件。

alt text

Figure 10.7 You can select the profile to use from Visual Studio by choosing it from the Debug drop-down menu. Visual Studio defaults to using the https profile.
图 10.7 您可以从 Debug 下拉菜单中选择要使用的配置文件,从 Visual Studio 中选择它。Visual Studio 默认使用 https 配置文件。

If you’re using Visual Studio, you can edit the launchSettings.json file visually: double-click the Properties node, choose the Debug tab, and choose Open debug launch profiles UI. You can see in figure 10.8 that the ASPNETCORE_ENVIRONMENT is set to Development; any changes made on this tab are mirrored in launchSettings.json.

如果您使用的是 Visual Studio,则可以直观地编辑 launchSettings.json 文件:双击 Properties (属性) 节点,选择 Debug (调试) 选项卡,然后选择 Open debug launch profiles UI (打开调试启动配置文件 UI)。在图 10.8 中可以看到,ASPNETCORE_ENVIRONMENT 设置为 Development;在此选项卡上所做的任何更改都会镜像到 launchSettings.json 中。

alt text

Figure 10.8 You can use Visual Studio to edit the launchSettings.json file, if you prefer. Changes will be mirrored between the launchSettings.json file and the Properties dialog box.
图 10.8 如果您愿意,可以使用 Visual Studio 编辑 launchSettings.json 文件。更改将在 launchSettings.json 文件和 Properties (属性) 对话框之间镜像。

The launchSettings.json file is intended for local development only; by default, the file isn’t deployed to production servers. Although you can deploy and use the file in production, doing so generally isn’t worth the hassle. Environment variables are a better fit.
launchSettings.json 文件仅用于本地开发;默认情况下,文件不会部署到生产服务器。尽管您可以在生产环境中部署和使用该文件,但这样做通常不值得。环境变量更合适。

One final trick I’ve used to set the environment in production is to use command-line arguments. You could set the environment to staging like this:

我在生产环境中设置环境时使用的最后一个技巧是使用命令行参数。您可以将环境设置为 stage,如下所示:

dotnet run --no-launch-profile --environment Staging

Note that you also have to pass --no-launch-profile if there’s a launchSettings.json file; otherwise, the values in the file take precedence.
注意 如果有 launchSettings.json 文件,您还必须传递 --no-launch-profile;否则,文件中的值优先。

That brings us to the end of this chapter on configuration. Configuration isn’t glamorous, but it’s an essential part of all apps. The ASP.NET Core configuration provider model handles a wide range of scenarios, letting you store settings and secrets in a variety of locations.

这让我们结束了本章关于配置的章节。配置并不迷人,但它是所有应用程序的重要组成部分。ASP.NET Core 配置提供程序模型可处理各种方案,让您能够在各种位置存储设置和机密。

Simple settings can be stored in appsettings.json, where they’re easy to tweak and modify during development, and they can be overwritten by using environment-specific JSON files. Meanwhile, your secrets and sensitive settings can be stored outside the project file in the User Secrets manager or as environment variables. This approach gives you both flexibility and safety—as long as you don’t go writing your secrets to appsettings.json!

简单的设置可以存储在 appsettings.json 中,在开发过程中很容易调整和修改,并且可以使用特定于环境的 JSON 文件覆盖它们。同时,您的 Secret 和敏感设置可以存储在 User Secrets Manager 中的项目文件外部或作为环境变量存储。这种方法为您提供了灵活性和安全性 - 只要您不将您的秘密写给 appsettings.json!

In chapter 11 we take a look at the OpenAPI specification and how you can use it for documenting your APIs, testing your endpoints, and generating strongly typed clients.

在第 11 章中,我们将了解 OpenAPI 规范,以及如何使用它来记录 API、测试端点和生成强类型客户端。

10.5 Summary

10.5 总结

Anything that could be considered to be a setting or a secret is normally stored as a configuration value. Externalizing these values means that you can change them without recompiling your app.
任何可被视为设置或密钥的内容通常存储为配置值。外部化这些值意味着您无需重新编译应用程序即可更改它们。

ASP.NET Core uses configuration providers to load key-value pairs from a variety of sources. Applications can use many configuration providers.
ASP.NET Core 使用配置提供程序从各种来源加载键值对。应用程序可以使用许多配置提供程序。

You can add configuration providers to an instance of ConfigurationManager by using extension methods such as AddJsonFile().
您可以使用扩展方法(如 AddJsonFile())将配置提供程序添加到 ConfigurationManager 实例。

The order in which you add providers to ConfigurationManager is important; subsequent providers replace the values of the same settings defined in earlier providers while preserving unique settings.
向 ConfigurationManager 添加提供程序的顺序很重要;后续提供程序将替换早期提供程序中定义的相同设置的值,同时保留唯一设置。

ASP.NET Core includes built-in providers for JSON files, XML files, environment files, and command-line arguments, among others. NuGet packages exist for many other providers, such as YAML files and Azure Key Vault.
ASP.NET Core 包括用于 JSON 文件、XML 文件、环境文件和命令行参数等的内置提供程序。NuGet 包适用于许多其他提供程序,例如 YAML 文件和 Azure Key Vault。

ConfigurationManager implements IConfiguration as well as IConfigurationBuilder, so you can retrieve configuration values from it directly.
ConfigurationManager 实现 IConfiguration 和 IConfigurationBuilder,因此您可以直接从中检索配置值。

Configuration keys aren’t case-sensitive, so you must take care not to lose values when loading settings from case-sensitive sources such as YAML.
配置键不区分大小写,因此在从区分大小写的源(如 YAML)加载设置时,必须注意不要丢失值。

You can retrieve settings from IConfiguration directly by using the indexer syntax, such as Configuration["MySettings:Value"]. This technique is often useful for accessing configuration values in Program.cs.
可以使用索引器语法(如 Configuration[“MySettings:Value”])直接从 IConfiguration 检索设置。此方法通常用于访问 Program.cs 中的配置值。

WebApplicationBuilder automatically configures a ConfigurationManager with JSON, environment variables, command-line arguments, and User Secret providers. This combination provides in-repository storage in JSON files, secret storage in both development and production, and the ability to override settings easily at runtime.
WebApplicationBuilder 使用 JSON、环境变量、命令行参数和用户密钥提供程序自动配置 ConfigurationManager。这种组合在 JSON 文件中提供存储库内存储、开发和生产中的秘密存储,以及在运行时轻松覆盖设置的能力。

In production, store secrets in environment variables to reduce the chance of incorrectly exposing the secrets in your code repository. These secrets can be loaded after your file-based settings in the configuration builder.
在生产环境中,将密钥存储在环境变量中,以减少在代码存储库中错误地暴露密钥的可能性。这些密钥可以在配置生成器中基于文件的设置之后加载。

On development machines, the User Secrets Manager is a more convenient tool than using environment variables. It stores secrets in your operating system’s user profile, outside the project folder, reducing the risk of accidentally exposing secrets in your code repository.
在开发计算机上,User Secrets Manager 是比使用环境变量更方便的工具。它将密钥存储在作系统的用户配置文件中,位于项目文件夹之外,从而降低了在代码存储库中意外暴露密钥的风险。

Be aware that neither environment variables nor the User Secrets Manager tool encrypts secrets. They merely store them in locations that are less likely to be made public, as they’re outside your project folder.
请注意,环境变量和 User Secrets Manager 工具都不会加密密钥。它们仅将它们存储在不太可能公开的位置,因为它们位于工程文件夹之外。

File-based providers such as the JSON provider can reload configuration values automatically when the file changes, allowing you to update configuration values in real time without restarting your app.
基于文件的提供程序(如 JSON 提供程序)可以在文件更改时自动重新加载配置值,从而允许您实时更新配置值,而无需重新启动应用程序。

Use strongly typed POCO options classes to access configuration in your app. Using strongly typed options reduces coupling in your app and ensures that classes are dependent only on the configuration values they use.
使用强类型 POCO 选项类访问应用程序中的配置。使用强类型选项可以减少应用程序中的耦合,并确保类仅依赖于它们使用的配置值。

Use the Configure<T>() extension method in ConfigureServices to bind your POCO options objects to ConfigurationSection. Alternatively, you can configure IOptions<T> objects in code instead of using configuration values by passing a lambda to the Configure() method.
使用 ConfigureServices 中的 Configure<T>() 扩展方法将 POCO 选项对象绑定到 ConfigurationSection。或者,您也可以在代码中配置 IOptions<T> 对象,而不是通过将 lambda 传递给 Configure() 方法来使用配置值。

You can inject the IOptions<T> interface into your services by using DI. You can access the strongly typed options object on the Value property. IOptions<T> values are registered in DI as singletons, so they remain the same even if the underlying configuration changes.
您可以通过 DI 将 IOptions<T> 接口注入到您的服务中。您可以在 Value 属性上访问强类型 options 对象。IOptions<T> 值在 DI 中注册为单一实例,因此即使底层配置发生更改,它们也保持不变。

If you want to reload your POCO options objects when your configuration changes, use the IOptionsSnapshot<T> interface instead. These instances are registered in DI with a scoped lifetime, so they’re re-created for every request. Using the IOptionsSnapshot<T> interface has performance implications due to binding to the options object repeatedly, so use it only when that effect is acceptable.
如果要在配置更改时重新加载 POCO 选项对象,请改用 IOptionsSnapshot<T> 接口。这些实例在 DI 中注册,具有作用域生命周期,因此会为每个请求重新创建它们。由于重复绑定到 options 对象,因此使用 IOptionsSnapshot<T> 接口会影响性能,因此请仅在该成本可接受时使用它。

Applications running in different environments, such as development versus production , often require different configuration values. ASP.NET Core determines the current hosting environment by using the ASPNETCORE_ENVIRONMENT environment variable. If this variable isn’t set, the environment is assumed to be production.
在不同环境(例如开发环境与生产环境)中运行的应用程序通常需要不同的配置值。ASP.NET Core 使用 ASPNETCORE_ENVIRONMENT 环境变量确定当前托管环境。如果未设置此变量,则假定环境为 production。

You can set the hosting environment locally by using the launchSettings.json file, which allows you to scope environment variables to a specific project.
您可以使用 launchSettings.json 文件在本地设置托管环境,该文件允许您将环境变量的范围限定为特定项目。

The current hosting environment is exposed as an IHostEnvironment interface. You can check for specific environments by using IsDevelopment(), IsStaging(), and IsProduction(). Then you can use the IHostEnvironment object to load files specific to the current environment, such as appsettings.Production.json.
当前托管环境作为 IHostEnvironment 接口公开。您可以使用 IsDevelopment()、IsStaging() 和 IsProduction() 检查特定环境。然后,您可以使用 IHostEnvironment 对象加载特定于当前环境的文件,例如 appsettings。Production.json。

ASP.NET Core in Action 9 Registering services with dependency injection

9 Registering services with dependency injection
9 使用依赖注入注册服务

This chapter covers

本章涵盖

  • Configuring your services to work with dependency injection
    配置服务以使用依赖关系注入

  • Choosing the correct lifetime for your services
    为您的服务选择正确的生命周期

In chapter 8 you learned about dependency injection (DI) in general, why it’s useful as a pattern for developing loosely coupled code, and its central place in ASP.NET Core. In this chapter you’ll build on that knowledge to apply DI to your own classes.

在第 8 章中,您了解了依赖项注入 (DI) 的一般知识,为什么它作为开发松散耦合代码的模式很有用,以及它在 ASP.NET Core 中的核心位置。在本章中,您将基于这些知识将 DI 应用于您自己的类。

You’ll start by learning how to configure your app so that the ASP.NET Core framework can create your classes for you, removing the pain of having to create new objects manually in your code. We look at the various patterns you can use to register your services and some of the limitations of the built-in DI container.

首先,您将学习如何配置您的应用程序,以便 ASP.NET Core 框架可以为您创建类,从而消除必须在代码中手动创建新对象的痛苦。我们来看看你可以用来注册服务的各种模式,以及内置 DI 容器的一些限制。

Next, you’ll learn how to handle multiple implementations of a service. You’ll learn how to inject multiple versions of a service, how to override a default service registration, and how to register a service conditionally if you don’t know whether it’s already registered.

接下来,您将学习如何处理服务的多个实现。您将学习如何注入服务的多个版本,如何覆盖默认服务注册,以及如何在不知道服务是否已注册时有条件地注册服务。

In section 9.4 we look at how you can control how long your objects are used—that is, their lifetime. We explore the differences among the three lifetime options and some of the pitfalls to be aware of when you come to write your own applications. Finally, in section 9.5 you’ll learn why lifetimes are important when resolving services outside the context of an HTTP request.

在 9.4 中,我们将了解如何控制对象的使用时间 — 即它们的生命周期。我们探讨了三种生命周期选项之间的差异,以及编写自己的应用程序时需要注意的一些陷阱。最后,在 9.5 节中,您将了解为什么在 HTTP 请求上下文之外解析服务时生命周期很重要。

We’ll start by revisiting the EmailSender service from chapter 8 to see how you could register the dependency graph in your DI container.

首先,我们将重新审视第 8 章中的 EmailSender 服务,了解如何在 DI 容器中注册依赖关系图。

9.1 Registering custom services with the DI container

9.1 向 DI 容器注册自定义服务

In this section you’ll learn how to register your own services with the DI container. We’ll explore the difference between a service and an implementation, and learn how to register the EmailSender hierarchy introduced in chapter 8.

在本节中,您将学习如何向 DI 容器注册自己的服务。我们将探讨服务和实现之间的区别,并学习如何注册第 8 章中介绍的 EmailSender 层次结构。

In chapter 8 I described a system for sending emails when a new user registers in your application. Initially, the minimal API endpoint handler RegisterUser created an instance of EmailSender manually, using code similar to the following listing (which you saw in chapter 8).

在第 8 章中,我描述了一个当新用户在您的应用程序中注册时发送电子邮件的系统。最初,最小 API 端点处理程序 RegisterUser 使用类似于以下清单的代码手动创建了一个 EmailSender 实例(您在第 8 章中看到)。

Listing 9.1 Creating an EmailSender instance without dependency injection
示例 9.1 创建无依赖注入的实例EmailSender

WebApplicationBuilder builder = WebApplication.CreateBuilder(args);
WebApplication app = builder.Build();

app.MapGet("/register/{username}", RegisterUser); ❶

app.Run();

string RegisterUser(string username)
{
    IEmailSender emailSender = new EmailSender( ❷
        new MessageFactory(), ❸
        new NetworkClient( ❹
            new EmailServerSettings ❺
                ( ❺
                    Host: "smtp.server.com", ❺
                    Port: 25 ❺
                )) ❺
            );
    emailSender.SendEmail(username); ❻
    return $"Email sent to {username}!";
}

❶ The endpoint is called when a new user is created.
创建新用户时调用 endpoint。

❷ To create EmailSender, you must create all its dependencies.
要创建 EmailSender,您必须创建其所有依赖项。

❸ You need a new MessageFactory.

您需要一个新的 MessageFactory。

❹ The NetworkClient also has dependencies.
NetworkClient 也有依赖项。

❺ You’re already two layers deep, but there could feasibly be more.
您已经有两层了,但可能还有更多。

❻ Finally, you can send the email.
最后,您可以发送电子邮件。

We subsequently refactored this code to inject an instance of IEmailSender into the handler instead, as shown in listing 9.2. The IEmailSender interface decouples the endpoint handler from the EmailSender implementation, making it easier to change the implementation of EmailSender (or replace it) without having to rewrite RegisterUser.

我们随后重构了这段代码,以注入一个IEmailSender 添加到处理程序中,如清单所示
9.2. IEmailSender 接口将端点处理程序与 EmailSender 实现解耦,从而更容易更改 mailSender 的实现(或替换它),而无需重写 RegisterUser。

Listing 9.2 Using IEmailSender with dependency injection in an endpoint handler
清单 9.2 使用带有依赖注入的 IEmailSender在端点处理程序中

WebApplicationBuilder builder = WebApplication.CreateBuilder(args);
WebApplication app = builder.Build();

app.MapGet("/register/{username}", RegisterUser); ❶

app.Run();

string RegisterUser(string username, IEmailSender emailSender) ❷
{
    emailSender.SendEmail(username); ❸
    return $"Email sent to {username}!";
}

❶ The endpoint is called when a new user is created.
创建新用户时调用 endpoint。

❷ The IEmailSender is injected into the handler using DI.
IEmailSender 使用 DI 注入处理程序。

❸ The handler uses the IEmailSender instance.
处理程序使用 IEmailSender 实例。

The final step in making the refactoring work is configuring your services with the DI container. This configuration lets the DI container know what to use when it needs to fulfill the IEmailSender dependency. If you don’t register your services, you’ll get an exception at runtime, like the one in figure 9.1. This exception describes a model-binding problem; the minimal API infrastructure tries to bind the emailSender parameter to the request body because IEmailSender isn’t a known service in the DI container.

进行重构的最后一步是使用 DI 容器配置您的服务。此配置使 DI 容器知道在需要满足 IEmailSender 依赖项时要使用什么。如果您不注册您的服务,您将在运行时收到异常,如图 9.1 中所示。此异常描述了模型绑定问题;最小 API 基础结构尝试将 emailSender 参数绑定到请求正文,因为 IEmailSender 不是 DI 容器中的已知服务。

alt text

Figure 9.1 If you don’t register all your required dependencies with the DI container, you’ll get an exception at runtime, telling you which service wasn’t registered.
图 9.1 如果你没有向 DI 容器注册所有需要的依赖项,你会在运行时收到一个异常,告诉你哪个服务没有注册。

To configure the application completely, you need to register an IEmailSender implementation and all its dependencies with the DI container, as shown in figure 9.2.

要完全配置应用程序,您需要向 DI 容器注册一个 IEmailSender 实现及其所有依赖项,如图 9.2 所示。

alt text

Figure 9.2 Configuring the DI container in your application involves telling it what type to use when a given service is requested, such as “Use EmailSender when IEmailSender is required.”
图 9.2 在应用程序中配置 DI 容器包括告诉它在请求给定服务时使用什么类型,例如“当需要 IEmailSender 时使用 EmailSender”。

Configuring DI consists of making a series of statements about the services in your app, such as the following:

配置 DI 包括对应用程序中的服务进行一系列声明,例如:

  • When a service requires IEmailSender, use an instance of EmailSender.
    当服务需要 IEmailSender 时,请使用 EmailSender 的实例。

  • When a service requires NetworkClient, use an instance of NetworkClient.
    当服务需要 NetworkClient 时,请使用 NetworkClient 的实例。

  • When a service requires MessageFactory, use an instance of MessageFactory.
    当服务需要 MessageFactory 时,请使用 MessageFactory 的实例。

Note You’ll also need to register the EmailServerSettings object with the DI container. We’ll do that slightly differently in section 9.2.
注意 您还需要向 DI 容器注册 EmailServerSettings 对象。我们将在 9.2 节中略微不同地执行此作。

These statements are made by calling various Add methods on the IServiceCollection exposed as the WebApplicationBuilder.Services property. Each Add method provides three pieces of information to the DI container:

这些语句是通过对作为 WebApplicationBuilder.Services 属性公开的 IServiceCollection 调用各种 Add 方法来进行的。每个 Add 方法都向 DI 容器提供三条信息:

  • Service type—TService. This class or interface will be requested as a dependency. It’s often an interface, such as IEmailSender, but sometimes a concrete type, such as NetworkClient or MessageFactory.
    服务类型 — TService。此类或接口将作为依赖项请求。它通常是一个接口,如 IEmailSender,但有时是一个具体类型,如 NetworkClient 或 MessageFactory。

  • Implementation type—TService or TImplementation. The container should create this class to fulfill the dependency. It must be a concrete type, such as EmailSender. It may be the same as the service type, as for NetworkClient and MessageFactory.
    实现类型 - TService 或 TImplementation。容器应创建此类以满足依赖项。它必须是具体类型,例如 EmailSender。它可能与 NetworkClient 和 MessageFactory 的服务类型相同。

  • Lifetime—transient, singleton, or scoped. The lifetime defines how long an instance of the service should be used by the DI container. I discuss lifetimes in detail in section 9.4.
    Definition
    生存期 - 瞬态、单例或范围。生存期定义 DI 容器应使用服务实例的时间。我在 9.4 节中详细讨论了寿命。

DEFINITION A concrete type is a type that can be created, such as a standard class or struct. It contrasts with a type such as an interface or an abstract class, which can’t be created directly.
定义 具体类型是可以创建的类型,例如标准类或结构。它与 interface 或抽象类等类型形成对比,后者无法直接创建。

Listing 9.3 shows how you can configure EmailSender and its dependencies in your application by using three methods: AddScoped<TService>, AddSingleton<TService>, and AddScoped<TService, TImplementation>. This code tells the DI container how to create each of the TService instances when they’re required and which lifetime to use.

清单 9.3 展示了如何使用三种方法在应用程序中配置 EmailSender 及其依赖项:AddScoped<TService>AddSingleton<TService>AddScoped<TService、TImplementation>。此代码告诉 DI 容器如何在需要时创建每个 TService 实例以及要使用的生命周期。

Listing 9.3 Registering services with the DI container
清单 9.3 使用 DI 容器注册服务

WebApplicationBuilder builder = WebApplication.CreateBuilder(args);
builder.Services.AddScoped<IEmailSender, EmailSender>(); ❶
builder.Services.AddScoped<NetworkClient>(); ❷
builder.Services.AddSingleton<MessageFactory>(); ❸

WebApplication app = builder.Build();

app.MapGet("/register/{username}", RegisterUser);

app.Run();

string RegisterUser(string username, IEmailSender emailSender)
{
    emailSender.SendEmail(username);
    return $"Email sent to {username}!";
}

❶ Whenever you require an IEmailSender, use EmailSender.
每当需要 IEmailSender 时,请使用 EmailSender。

❷ Whenever you require a NetworkClient, use NetworkClient.
每当您需要 NetworkClient 时,请使用 NetworkClient。

❸ Whenever you require a MessageFactory, use MessageFactory.
每当你需要 MessageFactory 时,请使用 MessageFactory。

That’s all there is to DI! It may seem a little bit like magic, but you’re simply giving the container instructions for making all the parts. You give it a recipe for cooking the chili, shred the lettuce, and grate the cheese, so when you ask for a burrito, it can put all the parts together and hand you your meal!

这就是 DI 的全部内容!这可能看起来有点像魔术,但您只是在给容器提供制作所有部件的说明。你给它一个烹饪辣椒、切碎生菜和磨碎奶酪的食谱,这样当你要墨西哥卷饼时,它可以把所有部分放在一起,然后把你的饭菜递给你!

Note Under the hood, the built-in ASP.NET Core DI container uses optimized reflection to create dependencies, but different DI containers may use other approaches. The Add APIs are the only way to register dependencies with the built-in container; there’s no support for using external configuration files to configure the container, for example.
注意 在后台,内置的 ASP.NET Core DI 容器使用优化的反射来创建依赖项,但不同的 DI 容器可能会使用其他方法。Add
API 是向内置容器注册依赖项的唯一方法;例如,不支持使用外部配置文件来配置容器。

The service type and implementation type are the same for NetworkClient and MessageFactory, so there’s no need to specify the same type twice in the AddScoped method—hence, the slightly simpler signature.

NetworkClient 和 MessageFactory 的服务类型和实现类型相同,因此无需在 AddScoped 方法中两次指定相同的类型,因此签名稍微简单一些。

Note The EmailSender instance is registered only as an IEmailSender, so you can’t resolve it by requesting the specific EmailSender implementation; you must use the IEmailSender interface.
注意 EmailSender 实例仅注册为 IEmailSender,因此您无法通过请求特定的 EmailSender 实现来解析它;您必须使用 IEmailSender 接口。

These generic methods aren’t the only ways to register services with the container. You can also provide objects directly or by using lambdas, as you’ll see in section 9.2.

这些泛型方法并不是向容器注册服务的唯一方法。您也可以直接或使用 lambda 提供对象,如第 9.2 节所示。

9.2 Registering services using objects and lambdas

9.2 使用对象和 lambda 注册服务

As I mentioned in section 9.1, I didn’t quite register all the services required by EmailSender. In the previous examples, NetworkClient depends on EmailServerSettings, which you’ll also need to register with the DI container for your project to run without exceptions.

正如我在 9.1 节中提到的,我没有完全注册 EmailSender 所需的所有服务。在前面的示例中,NetworkClient 依赖于 EmailServerSettings,您还需要向 DI 容器注册它,以便您的项目能够无异常地运行。

I avoided registering this object in the preceding example because you have to take a slightly different approach. The preceding Add* methods use generics to specify the Type of the class to register, but they don’t give any indication of how to construct an instance of that type. Instead, the container makes several assumptions that you have to adhere to:

在前面的示例中,我避免注册此对象,因为您必须采用略有不同的方法。前面的 Add* 方法使用泛型指定要注册的类的 Type,但它们没有指示如何构造该类型的实例。相反,容器会做出几个您必须遵守的假设:

  • The class must be a concrete type.
    该类必须是具体类型。

  • The class must have only a single relevant constructor that the container can use.
    该类必须只有一个容器可以使用的相关构造函数。

  • For a constructor to be valid, all constructor arguments must be registered with the container or must be arguments with a default value.
    要使构造函数相关,所有构造函数参数都必须注册到容器中,或者必须是具有默认值的参数。

Note These limitations apply to the simple built-in DI container. If you choose to use a third-party container in your app, it may have a different set of limitations.
注意 这些限制适用于简单的内置 DI 容器。如果您选择在应用程序中使用第三方容器,则它可能具有一组不同的限制。

The EmailServerSettings record doesn’t meet these requirements, as it requires you to provide a Host and Port in the constructor, which are a string and int, respectively, without default values:

EmailServerSettings 记录不满足这些要求,因为它要求您在构造函数中提供 Host 和 Port,它们分别是 string 和 int,没有默认值:

public record EmailServerSettings(string Host, int Port);

You can’t register these primitive types in the container. It would be weird to say “For every string constructor argument, in any type, use the "smtp.server.com" value.”

不能在容器中注册这些基元类型。如果说“对于任何类型的每个字符串构造函数参数,请使用 ”smtp.server.com“ 值,那就很奇怪了。

Instead, you can create an instance of the EmailServerSettings object yourself and provide that to the container, as shown in the following listing. The container uses the preconstructed object whenever an instance of the EmailServerSettings object is required.

相反,您可以自己创建 EmailServerSettings 对象的实例,并将其提供给容器,如下面的清单所示。每当需要 EmailServerSettings 对象的实例时,容器都会使用预构造的对象。

Listing 9.4 Providing an object instance when registering services
示例 9.4 在注册服务时提供对象实例

WebApplicationBuilder builder = WebApplication.CreateBuilder(args);

builder.Services.AddScoped<IEmailSender, EmailSender>();
builder.Services.AddScoped<NetworkClient>();
builder.Services.AddSingleton<MessageFactory>();
builder.Services.AddSingleton(
        new EmailServerSettings ❶
        ( ❶
            Host: "smtp.server.com", ❶
            Port: 25 ❶
        )); ❶

WebApplication app = builder.Build();

app.MapGet("/register/{username}", RegisterUser);

app.Run();

❶ This instance of EmailServerSettings will be used whenever an instance is
required.
每当需要实例时,都会使用这个 EmailServerSettings 实例。

This code works fine if you want to have only a single instance of EmailServerSettings in your application; the same object will be shared everywhere. But what if you want to create a new object each time one is requested?

如果您只想在应用程序中只有一个 EmailServerSettings 实例,则此代码可以正常工作;同一对象将在任何地方共享。但是,如果您想在每次请求时都创建一个新对象,该怎么办?

Note When the same object is used whenever it’s requested, it’s known as a singleton. If you create an object and pass it to the container, it’s always registered as a singleton. You can also register any class using the AddSingleton<T>() method, and the container will use only one instance throughout your application. I discuss singletons and other lifetimes in detail in section 9.4. The lifetime is how long the DI container should use a given object to fulfill a service’s dependencies.
注意 当请求时使用相同的对象时,它称为单一实例。如果您创建一个对象并将其传递给容器,则它始终注册为单一实例。您还可以使用 AddSingleton<T>() 方法注册任何类,并且容器将在整个应用程序中仅使用一个实例。我在 9.4 节中详细讨论了 singletons 和其他生命周期。生命周期是 DI 容器应该使用给定对象来实现服务的依赖项的时间。

Instead of providing a single instance that the container will always use, you can provide a function that the container invokes when it needs an instance of the type, as shown in figure 9.3.

alt text
你可以提供一个函数,当容器需要该类型的实例时,你可以提供一个函数,而不是提供容器将始终使用的单个实例,如图 9.3 所示。

Figure 9.3 You can register a function with the DI container that will be invoked whenever a new instance of a service is required.
图 9.3 您可以在 DI 容器中注册一个函数,每当需要服务的新实例时,该函数将被调用。

Note Figure 9.3 is an example of the factory pattern, in which you define how a type is created. Note that the factory functions must be synchronous; you can’t create types asynchronously by (for example) using async.
注意 图 9.3 是工厂模式的一个示例,您可以在其中定义如何创建类型。请注意,工厂函数必须是同步的;您不能 (例如) 使用 async 异步创建类型。

The easiest way to register a service using the factory pattern is with a lambda function (an anonymous delegate), in which the container creates a new EmailServerSettings object whenever it’s needed, as shown in the following listing.

使用工厂模式注册服务的最简单方法是使用 lambda 函数(匿名委托),其中容器在需要时创建新的 EmailServerSettings 对象,如下面的清单所示。

Listing 9.5 Using a lambda factory function to register a dependency
清单 9.5 使用 lambda 工厂函数注册依赖项

WebApplicationBuilder builder = WebApplication.CreateBuilder(args);

builder.Services.AddScoped<IEmailSender, EmailSender>();
builder.Services.AddScoped<NetworkClient>();
builder.Services.AddSingleton<MessageFactory>();

builder.Services.AddScoped( ❶
    provider => ❷
        new EmailServerSettings ❸
        ( ❸
            Host: "smtp.server.com", ❸
            Port: 25 ❸
        )); ❸

WebApplication app = builder.Build();

app.MapGet("/register/{username}", RegisterUser);

app.Run();

❶ Because you’re providing a function to create the object, you aren’t restricted to a singleton.
因为你提供了一个函数来创建对象,所以你不限于单一实例。

❷ The lambda is provided an instance of IServiceProvider.
lambda 提供了 IServiceProvider 的实例。

❸ The constructor is called every time an EmailServerSettings object is required instead of only once.
每次需要 EmailServerSettings 对象时都会调用构造函数,而不仅仅是一次。

In this example, I changed the lifetime of the created EmailServerSettings object to scoped instead of singleton and provided a factory lambda function that returns a new EmailServerSettings object. Every time the container requires a new EmailServerSettings, it executes the function and uses the new object it returns.
在此示例中,我将创建的 EmailServerSettings 对象的生命周期更改为 scoped 而不是 singleton,并提供了一个返回新 EmailServerSettings 对象的工厂 lambda 函数。每次容器需要新的 EmailServerSettings 时,它都会执行该函数并使用它返回的新对象。

When you use a lambda to register your services, you’re given an IServiceProvider instance at runtime, called provider in listing 9.5. This instance is the public API of the DI container itself, which exposes the GetService<T>() and GetRequiredService<T>() extension methods you saw in chapter 8. If you need to obtain dependencies to create an instance of your service, you can reach into the container at runtime in this way, but you should avoid doing so if possible.
当您使用 lambda 注册服务时,在运行时会为您提供一个 IServiceProvider 实例,在列表 9.5 中称为 provider。此实例是 DI 容器本身的公共 API,它公开了 GetService<T>()GetRequiredService<T>() 扩展方法在第 8 章中。如果您需要获取依赖项来创建服务实例,则可以在运行时以这种方式访问容器,但应尽可能避免这样做。

Tip Avoid calling GetService<T>() and GetRequiredService<T>() in your factory functions if possible. Instead, favor constructor injection; it’s more performant and simpler to reason about.
提示 如果可能,请避免在工厂函数中调用 GetService<T>()GetRequiredService<T>()。 相反,支持构造函数注入;它的性能更高,推理也更简单。

Open generics and dependency injection
开放泛型和依赖项注入
As already mentioned, you couldn’t use the generic registration methods with EmailServerSettings because it uses primitive dependencies (in this case, string and int) in its constructor. Neither can you use the generic registration methods to register open generics.
如前所述,您不能将泛型注册方法与 EmailServerSettings 一起使用,因为它在其构造函数中使用基元依赖项(在本例中为 string 和 int)。也不能使用泛型注册方法注册开放泛型。
Open generics are types that contain a generic type parameter, such as Repository <T>. You normally use this sort of type to define a base behavior that you can use with multiple generic types. In the Repository<T> example, you might inject IRepository<Customer> into your services, which should inject an instance of DbRepository<Customer>, for example.
开放泛型是包含泛型类型参数的类型,例如 Repository <T>。通常使用这种类型来定义可与多个泛型类型一起使用的基本行为。在 Repository<T> 示例中,您可以将 IRepository <Customer> 注入到您的服务中,这应该会注入 DbRepository 的实例例如,
To register these types, you must use a different overload of the Add methods, as in this example:
要注册这些类型,必须使用 Add
的不同重载方法,如以下示例所示:
builder.Services.AddScoped(typeof(IRespository<>), typeof(DbRepository<>));
This code ensures that whenever a service constructor requires IRespository<T>, the container injects an instance of DbRepository<T>.
此代码可确保每当服务构造函数需要IRespository<T> 中,容器会注入 DbRepository<T> 的实例。

At this point, all your dependencies are registered. But your Program.cs is starting to look a little messy, isn’t it? The choice is entirely down to personal preference, but I like to group my services into logical collections and create extension methods for them, as in listing 9.6. This approach creates an equivalent to the framework’s AddRazorPages() extension method—a nice, simple registration API. As you add more features to your app, I think you’ll appreciate it too.
此时,您的所有依赖项都已注册。但是你的Program.cs开始看起来有点凌乱了,不是吗?选择完全取决于个人喜好,但我喜欢将我的服务分组到逻辑集合中,并为它们创建扩展方法,如清单 9.6 所示。此方法创建与框架的 AddRazorPages() 扩展方法等效的 — 一个漂亮、简单的注册 API。随着您向应用程序添加更多功能,我想您也会喜欢它。

Listing 9.6 Creating an extension method to tidy up adding multiple services
清单 9.6 创建一个扩展方法来整理添加多个服务

public static class EmailSenderServiceCollectionExtensions
{
    public static IServiceCollection AddEmailSender(
        this IServiceCollection services) ❶
    {
        services.AddScoped<IEmailSender, EmailSender>(); ❷
        services.AddSingleton<NetworkClient>(); ❷
        services.AddScoped<MessageFactory>(); ❷
        services.AddSingleton( ❷
            new EmailServerSettings ❷
            ( ❷
                host: "smtp.server.com", ❷
                port: 25 ❷
            )); ❷
        return services; ❸
    }
}

❶ Creates an extension method on IServiceCollection by using the “this” keyword
使用“this”关键字在 IServiceCollection 上创建扩展方法

❷ Cuts and pastes your registration code from Program.cs
从 Program.cs 剪切并粘贴您的注册码

❸ By convention, returns the IServiceCollection to allow method chaining
按照约定,返回 IServiceCollection 以允许方法链接

With the preceding extension method created, the following listing shows that your startup code is much easier to grok!

创建上述扩展方法后,以下清单显示您的启动代码更容易理解!

Listing 9.7 Using an extension method to register your services
清单 9.7 使用扩展方法注册您的服务

WebApplicationBuilder builder = WebApplication.CreateBuilder(args);

builder.Services.AddEmailSender(); ❶

WebApplication app = builder.Build();

app.MapGet("/register/{username}", RegisterUser);

app.Run();

❶ The extension method registers all the services associated with the
EmailSender.
扩展方法注册与 EmailSender 关联的所有服务。

So far, you’ve seen how to register the simple DI cases in which you have a single implementation of a service. In some scenarios, you may have multiple implementations of an interface. In section 9.3 you’ll see how to register these with the container to match your requirements.

到目前为止,您已经了解了如何注册简单的 DI 案例,其中您有一个服务的单个实现。在某些情况下,您可能有多个接口实现。在 Section 9.3 中,您将看到如何将这些注册到容器中以满足您的需求。

9.3 Registering a service in the container multiple times

9.3 在容器中多次注册服务

One advantage of coding to interfaces is that you can create multiple implementations of a service. Suppose that you want to create a more generalized version of IEmailSender so that you can send messages via Short Message Service (SMS) or Facebook, as well as by email. You create the interface for it as follows,
对接口进行编码的一个优点是,您可以创建服务的多个实现。假设您要创建更通用的 IEmailSender 版本,以便可以通过短消息服务 (SMS) 或 Facebook 以及电子邮件发送消息。您可以按如下方式为其创建接口:

public interface IMessageSender
{
    public void SendMessage(string message);
}

as well as several implementations: EmailSender, SmsSender, and FacebookSender. But how do you register these implementations in the container? And how can you inject these implementations into your RegisterUser handler? The answers vary slightly, depending on whether you want to use all the implementations in your consumer or only one.

以及多种实现:EmailSender、SmsSender 和 FacebookSender。但是如何在容器中注册这些实现呢?如何将这些实现注入到 RegisterUser 处理程序中呢?答案略有不同,具体取决于您是要使用 Consumer 中的所有 implementations,还是只使用 one。

9.3.1 Injecting multiple implementations of an interface

9.3.1 注入接口的多个实现

Suppose that you want to send a message using each of the IMessageSender implementations whenever a new user registers so that they get an email, an SMS text, and a Facebook message, as shown in figure 9.4.

假设您希望在新用户注册时使用每个 IMessageSender 实现发送消息,以便他们收到电子邮件、SMS 文本和 Facebook 消息,如图 9.4 所示。

alt text

Figure 9.4 When a user registers with your application, they call the RegisterUser handler. This handler sends them an email, an SMS text, and a Facebook message using the IMessageSender classes.
图 9.4 当用户注册到您的应用程序时,他们会调用 RegisterUser 处理程序。此处理程序使用 IMessageSender 类向他们发送电子邮件、SMS 文本和 Facebook 消息。

The easiest way to achieve this goal is to register all the service implementations in your DI container and have it inject one of each type into the RegisterUser endpoint handler. Then RegisterUser can use a simple foreach loop to call SendMessage() on each implementation, as shown in figure 9.5.

实现此目标的最简单方法是在 DI 容器中注册所有服务实现,并让它将每种类型中的一个注入到 RegisterUser 端点处理程序中。然后 RegisterUser 可以使用一个简单的 foreach 循环在每个实现上调用 SendMessage(),如图 9.5 所示。

alt text

Figure 9.5 You can register multiple implementations of a service with the DI container, such as IEmailSender in this example. You can retrieve an instance of each of these implementations by requiring IEnumerable in the RegisterUser handler.
图 9.5 你可以向 DI 容器注册服务的多个实现,例如本例中的 IEmailSender。您可以通过在 RegisterUser 处理程序中要求 IEnumerable 来检索这些实现中的每一个的实例。

You register multiple implementations of the same service with a DI container in exactly the same way as for single implementations, using the Add* extension methods as in this example:

使用 Add 扩展方法,使用 Add 扩展方法,以与单个实现完全相同的方式向 DI 容器注册同一服务的多个实现,如下例所示:

WebApplicationBuilder builder = WebApplication.CreateBuilder(args);
builder.Services.AddScoped<IMessageSender, EmailSender>();
builder.Services.AddScoped<IMessageSender, SmsSender>();
builder.Services.AddScoped<IMessageSender, FacebookSender>();

Then you can inject IEnumerable<IMessageSender> into RegisterUser, as shown in listing 9.8. The container injects an array of IMessageSender containing one of each of the implementations you have registered, in the same order as you registered them. Then you can use a standard foreach loop and call SendMessage on each implementation.

然后你可以将 IEnumerable<IMessageSender> 注入到 RegisterUser 中,如清单 9.8 所示。该容器注入一个 IMessageSender 数组,其中包含您已注册的每个实现之一,其顺序与注册它们的顺序相同。然后,您可以使用标准 foreach 循环并在每个实现上调用 SendMessage。

Listing 9.8 Injecting multiple implementations of a service into an endpoint
清单 9.8 将服务的多个实现注入到端点中

string RegisterUser(
    string username,
    IEnumerable<IMessageSender> senders) ❶
    {
    foreach(var sender in senders) ❷
    { ❷
        Sender.SendMessage($”Hello {username}!”); ❷
    } ❷
    return $"Welcome message sent to {username}";
}

❶ Requests an IEnumerable injects an array of IMessageSender
请求 IEnumerable 注入 IMessageSender 数组

❷ Each IMessageSender in the IEnumerable is a different implementation.
IEnumerable 中的每个 IMessageSender 都是不同的实现。

Warning You must use IEnumerable<T> as the handler parameter type to inject all the registered types of a service, T. Even though this parameter will be injected as a T[] array, you can’t use T[] or ICollection<T> as your constructor argument. Doing so will cause an InvalidOperationException, similar to that in figure 9.1.
警告 您必须使用 IEnumerable<T> 作为处理程序参数类型,以注入服务的所有已注册类型。即使此参数将作为 T[]数组,则不能使用 T[] 或 ICollection<T> 作为构造函数参数。这样做会导致InvalidOperationException,类似于图 9.1 中的内容。

It’s simple enough to inject all the registered implementations of a service, but what if you need only one? How does the container know which one to use?

注入服务的所有已注册实现非常简单,但如果你只需要一个呢?容器如何知道要使用哪一个?

9.3.2 Injecting a single implementation when multiple services are registered

9.3.2 在注册多个服务时注入单个实现

Suppose that you’ve already registered all the IMessageSender implementations. What happens if you have a service that requires only one of them? Consider this example:
假设您已经注册了所有 IMessageSender 实现。如果您的服务只需要其中一个,会发生什么情况?请考虑以下示例:

public class SingleMessageSender
{
    private readonly IMessageSender _messageSender;
    public SingleMessageSender(IMessageSender messageSender)
    {
        _messageSender = messageSender;
    }
}

Of the three implementations available, the container needs to pick a single IMessageSender to inject into this service. It does this by using the last registered implementation: FacebookSender from the previous example.

在三种可用的实现中,容器需要选取一个 IMessageSender 以注入到此服务中。它通过使用上一个示例中的 FacebookSender 来实现此目的。

Note The DI container will use the last registered implementation of a service when resolving a single instance of the service.
注意 在解析服务的单个实例时,DI 容器将使用上次注册的服务实现。

This feature can be particularly useful for replacing built-in DI registrations with your own services. If you have a custom implementation of a service that you know is registered within a library’s Add* extension method, you can override that registration by registering your own implementation afterward. The DI container will use your implementation whenever a single instance of the service is requested.

此功能对于将内置 DI 注册替换为您自己的服务特别有用。如果您知道在库的 Add* 扩展方法中注册了服务的自定义实施,则可以通过在之后注册自己的实施来覆盖该注册。每当请求服务的单个实例时,DI 容器都会使用您的实现。

The main disadvantage of this approach is that you still end up with multiple implementations registered; you can inject an IEnumerable<T> as before. Sometimes you want to register a service conditionally so that you always have only a single registered implementation.

这种方法的主要缺点是你最终仍然注册了多个 implementation;您可以像以前一样注入 IEnumerable<T>。有时,您希望有条件地注册一个服务,以便始终只有一个已注册的实现。

9.3.3 Conditionally registering services using TryAdd

9.3.3 使用 TryAdd 有条件地注册服务

Sometimes you want to add an implementation of a service only if one hasn’t already been added. This approach is particularly useful for library authors; they can create a default implementation of an interface and register it only if the user hasn’t already registered their own implementation.

有时,仅当尚未添加服务时,您才希望添加服务的实现。此方法对库作者特别有用;他们可以创建 interface 的默认 implementation ,并且只有在用户尚未注册自己的 implementation 时才能注册它。

You can find several extension methods for conditional registration in the Microsoft.Extensions.DependencyInjection.Extensions namespace, such as TryAddScoped. This method checks whether a service has been registered with the container before calling AddScoped on the implementation. Listing 9.9 shows how you can add SmsSender conditionally if there are no existing IMessageSender implementations. As you initially register EmailSender, the container ignores the SmsSender registration, so it isn’t available in your app.

您可以在 Microsoft.Extensions.DependencyInjection.Exte nsions 命名空间中找到多种用于条件注册的扩展方法,例如 TryAddScoped。此方法在对实现调用 AddScoped 之前,检查是否已向容器注册服务。清单 9.9 展示了如何有条件地添加 SmsSender如果没有现有的 IMessageSender 实现。当您最初注册 EmailSender 时,容器会忽略 SmsSender 注册,因此它在您的应用程序中不可用。

Listing 9.9 Conditionally adding a service using TryAddScoped
清单 9.9 使用 TryAdd 有条件地注册服务

WebApplicationBuilder builder = WebApplication.CreateBuilder(args);

builder.Services.AddScoped<IMessageSender, EmailSender>(); ❶
builder.Services.TryAddScoped<IMessageSender, SmsSender>(); ❷

❶ EmailSender is registered with the container.
EmailSender 已注册到容器中。

❷ There’s already an IMessageSender implementation, so SmsSender isn’t
registered.
已经有一个 IMessageSender 实现,因此 SmsSender 未注册。

Code like this doesn’t often make a lot of sense at the application level, but it can be useful if you’re building libraries for use in multiple apps. The ASP.NET Core framework, for example, uses TryAdd* in many places, which lets you easily register alternative implementations of internal components in your own application if you want.

像这样的代码在应用程序级别通常没有多大意义,但如果您正在构建用于多个应用程序的库,它可能很有用。例如,ASP.NET Core 框架在许多地方都使用 TryAdd*,它允许您根据需要轻松地在自己的应用程序中注册内部组件的替代实施。

You can also replace a previously registered implementation by using the Replace() extension method. Unfortunately, the API for this method isn’t as friendly as the TryAdd methods. To replace a previously registered IMessageSender with SmsSender, you’d use

您还可以使用 Replace() 扩展方法替换以前注册的实现。遗憾的是,此方法的 API 不如 TryAdd 方法友好。要将以前注册的 IMessageSender 替换为 SmsSender,请使用

builder.Services.Replace(new ServiceDescriptor(
    typeof(IMessageSender), typeof(SmsSender), ServiceLifetime.Scoped
));

Tip When using Replace, you must provide the same lifetime that was used to register the service that’s being replaced.
提示 使用 Replace 时,您必须提供用于注册要替换的服务的相同生命周期。

We’ve pretty much covered registering dependencies but touched only vaguely on one important aspect: lifetimes. Understanding lifetimes is crucial in working with DI containers, so it’s important to pay close attention to them when registering your services with the container.

我们几乎已经介绍了注册依赖项,但只模糊地触及了一个重要的方面:生命周期。了解生命周期对于使用 DI 容器至关重要,因此在向容器注册服务时,请务必密切关注它们。

9.4 Understanding lifetimes: When are services created?

9.4 了解生命周期:何时创建服务?

Whenever the DI container is asked for a particular registered service, such as an instance of IMessageSender, it can do either of two things to fulfill the request:

每当向 DI 容器请求特定的已注册服务(如 IMessageSender 的实例)时,它都可以执行以下两项作之一来满足请求:

  • Create and return a new instance of the service
    创建并返回服务的新实例。

  • Return an existing instance of the service
    返回服务的现有实例。

The lifetime of a service controls the behavior of the DI container with respect to these two options. You define the lifetime of a service during DI service registration. The lifetime dictates when a DI container reuses an existing instance of the service to fulfill service dependencies and when it creates a new one.

服务的生存期控制 DI 容器相对于这两个选项的行为。您可以在 DI 服务注册期间定义服务的生命周期。生命周期规定了 DI 容器何时重用服务的现有实例来实现服务依赖项,以及何时创建新实例。

Definition The lifetime of a service is how long an instance of a service should live in a container before the container creates a new instance.
定义 服务的生命周期是指在容器创建新实例之前,服务实例应在容器中存在的时间。

It’s important to get your head around the implications for the different lifetimes used in ASP.NET Core, so this section looks at each lifetime option and when you should use it. In particular, you’ll see how the lifetime affects how often the DI container creates new objects. In section 9.4.4 I’ll show you an antipattern of lifetimes to watch out for, in which a short-lifetime dependency is captured by a long-lifetime dependency. This antipattern can cause some hard-to-debug issues, so it’s important to bear in mind when configuring your app.

了解 ASP.NET Core 中使用的不同生命周期的影响非常重要,因此本节将介绍每个生命周期选项以及何时应该使用它。特别是,您将看到生命周期如何影响 DI 容器创建新对象的频率。在 9.4.4 节中,我将向你展示一个需要注意的生命周期的反模式,其中短生命周期的依赖性被长生命周期的依赖性捕获。这种反模式可能会导致一些难以调试的问题,因此在配置应用程序时请务必记住。

In ASP.NET Core, you can specify one of three lifetimes when registering a service with the built-in container:
在 ASP.NET Core 中,您可以在使用内置容器注册服务时指定三个生命周期之一:

  • Transient—Every time a service is requested, a new instance is created. Potentially, you can have different instances of the same class within the same dependency graph.
    Transient (瞬态) – 每次请求服务时,都会创建一个新实例。您可能会在同一依赖项关系图中拥有同一类的不同实例。

  • Scoped—Within a scope, all requests for a service give you the same object. For different scopes, you get different objects. In ASP.NET Core, each web request gets its own scope.
    范围 - 在一个范围内,服务的所有请求都会为您提供相同的对象。对于不同的范围,你会得到不同的对象。在 ASP.NET Core 中,每个 Web 请求都有自己的范围。

  • Singleton—You always get the same instance of the service, regardless of scope.
    单一实例 - 无论范围如何,您始终会获得相同的服务实例。

Note These concepts align well with most other DI containers, but the terminology may differ. If you’re familiar with a third-party DI container, be sure you understand how the lifetime concepts align with the built-in ASP.NET Core DI container.
注意 这些概念与大多数其他 DI 容器非常一致,但术语可能有所不同。如果您熟悉使用第三方 DI 容器时,请确保您了解生命周期概念如何与内置的 ASP.NET Core DI 容器保持一致。

To illustrate the behavior of each lifetime, I use a simple example in this section. Suppose that you have DataContext, which has a connection to a database, as shown in listing 9.10. It has a single property, RowCount, which represents the number of rows in the Users table of a database. For the purposes of this example, we emulate calling the database by setting the number of rows randomly when the DataContext object is created, so you always get the same value every time you call RowCount on a given DataContext instance. Different instances of DataContext return different RowCount values.

为了说明每个生命周期的行为,我在本节中使用了一个简单的示例。假设你有 DataContext,它与一个数据库有连接,如清单 9.10 所示。它有一个属性 RowCount,该属性表示数据库的 Users 表中的行数。对于此示例,我们通过在创建 DataContext 对象时随机设置行数来模拟调用数据库,因此每次在给定 DataContext 实例上调用 RowCount 时,您始终会获得相同的值。DataContext 的不同实例返回不同的 RowCount 值。

Listing 9.10 DataContext generating a random RowCount on creation
清单 9.10 在创建DataContext时生成一个 random RowCount

class DataContext
{
    public int RowCount { get; } ❶
        = Random.Shared.Next(1, 1_000_000_000); ❷
}

❶ The property is read-only, so it always returns the same value.
该属性是只读的,因此它始终返回相同的值。

❷ Generates a random number between 1 and 1,000,000,000
生成一个介于 1 和 1,000,000,000 之间的随机数

You also have a Repository class that has a dependency on the DataContext, as shown in the next listing. It also exposes a RowCount property, but this property delegates the call to its instance of DataContext. Whatever value DataContext was created with, the Repository displays the same value.

您还有一个依赖于 DataContext 的 Repository 类,如下一个清单所示。它还公开了一个 RowCount 属性,但此属性将调用委托给其 DataContext 实例。无论价值如何DataContext 时,Repository 显示相同的值。

Listing 9.11 Repository service that depends on an instance of DataContext
清单 9.11 依赖于DataContext 的实例

public class Repository
{
    private readonly DataContext _dataContext; ❶
    public Repository(DataContext dataContext) ❶
    { ❶
        _dataContext = dataContext; ❶
    } ❶
    public int RowCount => _dataContext.RowCount; ❷
}

❶ An instance of DataContext is provided using DI.
DataContext 的实例是使用 DI 提供的。
❷ RowCount returns the same value as the current instance of DataContext.
RowCount 返回与 DataContext 的当前实例相同的值。

Finally, you have your endpoint handler, RowCounts, which takes a dependency on both Repository and on DataContext directly. When the minimal API infrastructure creates the arguments needed to call RowCounts, the DI container injects an instance of DataContext and an instance of Repository. To create Repository, it must create a second instance of DataContext. Over the course of two requests, four instances of DataContext will be required, as shown in figure 9.6.

最后,您有终端节点处理程序 RowCounts,它直接依赖于 Repository 和 DataContext。当最小的 API 基础设施创建调用 RowCounts 所需的参数时,DI 容器会注入一个 DataContext 实例和一个 Repository 实例。要创建 Repository,它必须创建 DataContext 的第二个实例。在两个请求的过程中,将需要 4 个 DataContext 实例,如图 9.6 所示。

alt text

Figure 9.6 The DI container uses two instances of DataContext for each request. Depending on the lifetime with which the DataContext type is registered, the container might create one, two, or four instances of DataContext.
图 9.6 DI 容器为每个请求使用两个 DataContext 实例。根据 DataContext 类型注册的生命周期,容器可能会创建一个、两个或四个 DataContext 实例。

The RowCounts handler retrieves the value of RowCount returned from both Repository and DataContext and then returns them as a string, similar to the code in listing 9.12. The sample code associated with this book also records and displays the values from previous requests so you can easily track how the values change with each request.

RowCounts 处理程序检索从 Repository 和 DataContext 返回的 RowCount 的值,然后将它们作为字符串返回,类似于清单中的代码9.12. 与本书关联的示例代码还记录并显示先前请求的值,因此您可以轻松跟踪每个请求的值如何变化。

Listing 9.12 The RowCounts handler depends on DataContext and Repository
清单 9.12 RowCounts 处理程序依赖于DataContext 和存储库

static string RowCounts( ❶
    DataContext db, ❶
    Repository repository) ❶
{
    int dbCount = db.RowCount; ❷
    int repositoryCount = repository.RowCount; ❷

    return: $"DataContext: {dbCount}, Repository: {repositoryCount}"; ❸
}

❶ DataContext and Repository are created using DI.
DataContext 和 Repository 是使用 DI 创建的。

❷ When invoked, the page handler retrieves and records RowCount from both
dependencies.
调用时,页面处理程序会从两个依赖项中检索并记录 RowCount。

❸ The counts are returned in the response.
响应中返回计数。

The purpose of this example is to explore the relationships among the four DataContext instances, depending on the lifetimes you use to register the services with the container. I’m generating a random number in DataContext as a way of uniquely identifying a DataContext instance, but you can think of this example as being a point-in-time snapshot of, say, the number of users logged on to your site or the amount of stock in a warehouse.

此示例的目的是探索 4 个 DataContext 实例之间的关系,具体取决于您用于向容器注册服务的生命周期。我在 DataContext 中生成一个随机数,作为唯一标识 DataContext 实例的一种方式,但您可以将此示例视为登录到您站点的用户数量或仓库中库存量的时间点快照。

I’ll start with the shortest-lived lifetime (transient), move on to the common scoped lifetime, and then take a look at singletons. Finally, I’ll show an important trap you should be on the lookout for when registering services in your own apps.

我将从最短生存期 (transient) 开始,然后转到常见的作用域生存期,然后看一下单例。最后,我将展示一个重要的陷阱在您自己的应用程序中注册服务时要注意。

9.4.1 Transient: Everyone is unique

9.4.1 瞬态:每个人都是独一无二的

In the ASP.NET Core DI container, transient services are always created new whenever they’re needed to fulfill a dependency. You can register your services using the AddTransient extension methods:

在 ASP.NET Core DI 容器中,每当需要临时服务来实现依赖项时,它们总是会创建新的。您可以使用 AddTransient 扩展方法注册您的服务:

builder.Services.AddTransient<DataContext>();
builder.Services.AddTransient<Repository>();

When you register services this way, every time a dependency is required, the container creates a new one. This behavior of the container for transient services applies both between requests and within requests; the DataContext injected into the Repository will be a different instance from the one injected into the RowCounts handler.

当您以这种方式注册服务时,每次需要依赖项时,容器都会创建一个新依赖项。临时服务容器的这种行为适用于请求之间和请求内;注入 Repository 的 DataContext 将与注入 RowCounts 处理程序的实例不同。

Note Transient dependencies can result in different instances of the same type within a single dependency graph.
注意:瞬态依赖关系可能会导致单个依赖关系图中出现相同类型的不同实例。

Figure 9.7 shows the results you get from calling the API repeatedly when you use the transient lifetime for both services. You can see that every value is different, both within a request and between requests. Note that figure 9.7 was generated using the source code for this chapter, which is based on the listings in this chapter, but also displays the results from previous requests to make the behavior easier to observe.

图 9.7 显示了在对这两个服务使用瞬态生命周期时重复调用 API 所获得的结果。您可以看到,每个值都不同,无论是在请求中还是在请求之间。请注意,图 9.7 是使用本章的源代码生成的,该源代码基于本章中的清单,但也显示了来自先前请求的结果,以使行为更易于观察。

alt text

Figure 9.7 When registered using the transient lifetime, all DataContext objects are different, as you see by the fact that all the values are different within and between requests.
图 9.7 当使用瞬态生命周期注册时,所有 DataContext 对象都是不同的,正如您所看到的,请求内部和请求之间的所有值都不同。

Transient lifetimes can result in the creation of a lot of objects, so they make the most sense for lightweight services with little or no state. Using the transient lifetime is equivalent to calling new every time you need a new object, so bear that in mind when using it. You probably won’t use the transient lifetime often; the majority of your services will probably be scoped instead.

瞬态生命周期可能会导致创建大量对象,因此它们对于状态很少或没有状态的轻量级服务最有意义。使用 transient 生命周期相当于每次需要新对象时调用 new,因此在使用它时请记住这一点。您可能不会使用瞬态生存期通常是;您的大多数服务可能会改为限定范围。

9.4.2 Scoped: Let’s stick together

9.4.2 范围:让我们团结一致

The scoped lifetime states that a single instance of an object will be used within a given scope, but a different instance will be used between different scopes. In ASP.NET Core, a scope maps to a request, so within a single request, the container will use the same object to fulfill all dependencies.

作用域生命周期表示将在给定范围内使用对象的单个实例,但将在不同的作用域之间使用不同的实例。在 ASP.NET Core 中,范围映射到请求,因此在单个请求中,容器将使用相同的对象来满足所有依赖项。

In the row-count example, within a single request (a single scope) the same DataContext is used throughout the dependency graph. The DataContext injected into the Repository is the same instance as the one injected into the RowCounts handler.

在行计数示例中,在单个请求(单个范围)中,在整个依赖关系图中使用相同的 DataContext。注入 Repository 的 DataContext 与注入 RowCounts 处理程序的实例相同。

In the next request, you’re in a different scope, so the container creates a new instance of DataContext, as shown in figure 9.8. A different instance means a different RowCount for each request, as you can see. As before, figure 9.8 also shows the counts for previous requests.

在下一个请求中,您处于不同的范围内,因此容器会创建一个新的 DataContext 实例,如图 9.8 所示。如您所见,不同的实例意味着每个请求的 RowCount 不同。和以前一样,图 9.8 也显示了先前请求的计数。

alt text

Figure 9.8 Scoped dependencies use the same instance of DataContext within a single request but a new instance for a separate request. Consequently, the RowCounts are identical within a request.
图 9.8 作用域依赖项在单个请求中使用相同的 DataContext 实例,但对单独的请求使用新实例。因此,请求中的 RowCount是相同的。

You can register dependencies as scoped by using the AddScoped extension methods. In this example, I registered DataContext as scoped and left Repository as transient, but you’d get the same results in this case if both were scoped:

您可以使用 AddScoped 扩展方法将依赖项注册为 scoped。在此示例中,我将 DataContext 注册为范围,并将 Repository 保留为 transient,但在这种情况下,如果两者都是范围,您将得到相同的结果:

builder.Services.AddScoped<DataContext>();

Due to the nature of web requests, you’ll often find services registered as scoped dependencies in ASP.NET Core. Database contexts and authentication services are common examples of services that should be scoped to a request—anything that you want to share across your services within a single request but that needs to change between requests.

由于 Web 请求的性质,您经常会发现在 ASP.NET Core 中注册为范围依赖项的服务。数据库上下文和身份验证服务是应将范围限定为请求的服务的常见示例,请求是您希望在单个请求中跨服务共享但需要在请求之间更改的任何内容。

NOTE If your scoped or transient services implement IDisposable, the DI container automatically disposes them
when the scope ends.
注意 如果您的范围或临时服务实现 IDisposable,则 DI 容器会在范围结束时自动释放它们。

Generally speaking, you’ll find a lot of services registered using the scoped lifetime—especially anything that uses a database, anything that’s dependent on details of the HTTP request, or anything that uses a scoped service. But some services don’t need to change between requests, such as a service that calculates the area of a circle or returns the current time in different time zones. For these services, a singleton lifetime might be more appropriate.

一般来说,您会发现许多使用作用域生命周期注册的服务,尤其是任何使用数据库的服务、任何依赖于 HTTP 请求详细信息的服务,或者任何使用作用域服务的服务。但有些服务不需要在请求之间更改,例如计算圆的面积或返回不同时区的当前时间的服务。对于这些服务,单一实例生存期可能更合适。

9.4.3 Singleton: There can be only one

9.4.3 Singleton:只能有一个

The singleton is a pattern that came before DI; the DI container provides a robust and easy-to-use implementation of it. The singleton is conceptually simple: an instance of the service is created when it’s first needed (or during registration, as in section 9.2), and that’s it. You’ll always get the same instance injected into your services.

singleton 是 DI 之前的模式;DI 容器提供了强大且易于使用的实现。singleton 在概念上很简单:在第一次需要时(或在注册期间,如 9.2 节)创建服务的实例,仅此而已。您将始终将相同的实例注入到您的服务中。

The singleton pattern is particularly useful for objects that are expensive to create, contain data that must be shared across requests, or don’t hold state. The latter two points are important: any service registered as a singleton should be thread-safe.

对于创建成本高昂、包含必须在请求之间共享的数据或不保存状态的对象,单独模式特别有用。后两点很重要:任何注册为单一实例的服务都应该是线程安全的。

Warning Singleton services must be thread-safe in a web application, as they’ll typically be used by multiple threads during concurrent requests.
警告 单例服务在 Web 应用程序中必须是线程安全的,因为它们通常在并发请求期间由多个线程使用。

Let’s consider what using singletons means for the row-count example. We can update the registration of DataContext to be a singleton:

让我们考虑一下使用单例对行计数示例意味着什么。我们可以将 DataContext 的注册更新为单例:

builder.Services.AddSingleton<DataContext>();

Then we can call the RowCounts handler and observe the results in figure 9.9. We can see that every instance has returned the same value, indicating that the same instance of DataContext is used in every request, both when injected directly into the endpoint handler and when referenced transitively by Repository.

然后我们可以调用 RowCounts 处理程序并观察图 9.9 中的结果。我们可以看到每个实例都返回了相同的值,这表明每个请求都使用了相同的 DataContext 实例,无论是直接注入到端点处理程序中时,还是被 Repository 传递引用时。

alt text

Figure 9.9 Any service registered as a singleton always returns the same instance. Consequently, all the calls to the RowCounts handler return the same value, both within a request and between requests.
图 9.9 任何注册为单例的服务总是返回相同的实例。因此,对 RowCounts 处理程序的所有调用在请求内和请求之间都返回相同的值。

Singletons are convenient for objects that need to be shared or that are immutable and expensive to create. A caching service should be a singleton, as all requests need to share the service. It must be thread-safe, though. Similarly, you might register a settings object loaded from a remote server as a singleton if you load the settings once at startup and reuse them through the lifetime of your app.

单例对于需要共享或不可变且创建成本高昂的对象来说很方便。缓存服务应该是单一实例,因为所有请求都需要共享该服务。不过,它必须是线程安全的。同样,如果您在启动时加载一次设置,并在应用程序的生命周期中重复使用它们,则可以将从远程服务器加载的设置对象注册为单一实例。

On the face of it, choosing a lifetime for a service may not seem to be too tricky. But an important gotcha can come back to bite you in subtle ways, as you’ll see in section 9.4.4.

从表面上看,为服务选择生命周期似乎并不太棘手。但是一个重要的问题可能会以微妙的方式回来咬你,正如您将在 9.4.4 节中看到的那样。

9.4.4 Keeping an eye out for captive dependencies

9.4.4 密切关注捕获依赖项

Suppose that you’re configuring the lifetime for the DataContext and Repository examples. You think about the suggestions I’ve provided and decide on the following lifetimes:

假设您正在为 DataContext 和 Repository 示例配置生命周期。您考虑我提供的建议并决定以下生命周期:

  • DataContext—Scoped, as it should be shared for a single request
    DataContext — 范围限定,因为它应该为单个请求共享

  • Repository—Singleton, as it has no state of its own and is thread-safe, so why not?
    存储库 — 单例,因为它没有自己的状态并且是线程安全的,那么为什么不呢?

Warning This lifetime configuration is to explore a bug. Don’t use it in your code; if you do, you’ll experience a similar problem!
警告 此生命周期配置用于探索 bug。不要在代码中使用它;如果你这样做,你会遇到类似的问题!

Unfortunately, you’ve created a captive dependency because you’re injecting a scoped object, DataContext, into a singleton, Repository. As it’s a singleton, the same Repository instance is used throughout the lifetime of the app, so the DataContext that was injected into it will also hang around, even though a new one should be used with every request. Figure 9.10 shows this scenario, in which a new instance of DataContext is created for each scope but the instance inside Repository hangs around for the lifetime of the app.

遗憾的是,您创建了捕获依赖项,因为您正在将范围对象 DataContext 注入到单一实例 Repository 中。由于它是一个单例,因此在应用程序的整个生命周期中使用相同的 Repository 实例,因此注入其中的 DataContext 也将挂起,即使每个请求都应该使用一个新的 DataContext 也是如此。图 9.10 显示了这种情况,其中为每个范围创建了一个新的 DataContext 实例,但Repository 中的实例在应用程序的生命周期内挂起。

alt text

Listing 9.10 DataContext is registered as a scoped dependency, but Repository is a singleton. Even though you expect a new DataContext for every request, Repository captures the injected DataContext and causes it to be reused for the lifetime of the app.

图 9.10 DataContext 注册为范围依赖项,但 Repository 是单例。即使您希望每个请求都有一个新的 DataContext,Repository 也会捕获 注入的 DataContext,并使其在应用程序的生命周期内重复使用。

Captive dependencies can cause subtle bugs that are hard to root out, so you should always keep an eye out for them. These captive dependencies are relatively easy to introduce, so always think carefully when registering a singleton service.

捕获依赖项可能会导致难以根除的细微错误,因此您应该始终留意它们。这些捕获依赖项相对容易引入,因此在注册 singleton 服务时请始终仔细考虑。

Warning A service should use only dependencies that have a lifetime longer than or equal to the service’s lifetime. A service registered as a singleton can safely use only singleton dependencies. A service registered as scoped can safely use scoped or singleton dependencies. A transient service can use dependencies with any lifetime.
警告: 服务应仅使用生命周期长于或等于服务生命周期的依赖项。注册为单一实例的服务可以安全地仅使用单一实例依赖项。注册为 scoped 的服务可以安全地使用 scoped 或单一实例依赖项。临时服务可以使用任何生命周期的依赖项。

At this point, I should mention one glimmer of hope in this cautionary tale: ASP.NET Core automatically checks for these kinds of captive dependencies and throws an exception on application startup if it detects them, or on first use of a captive dependency, as shown in figure 9.11.

在这一点上,我应该在这个警示故事中提到一丝希望:ASP.NET Core 会自动检查这些类型的捕获依赖项,并在应用程序启动时或首次使用捕获依赖项时引发异常,如图 9.11 所示。

alt text

Figure 9.11 When ValidateScopes is enabled, the DI container throws an exception when it creates a service with a captive dependency. By default, this check is enabled only for development environments.
图 9.11 启用 ValidateScopes 后,DI 容器在创建具有捕获依赖项的服务时会引发异常。默认情况下,仅对开发环境启用此检查。

This scope validation check has a performance effect, so by default it’s enabled only when your app is running in a development environment, but it should help you catch most problems of this kind. You can enable or disable this check regardless of environment by configuring the ValidateScopes option on your WebApplicationBuilder in Program.cs by using the Host property, as shown in the following listing.

此范围验证检查会产生性能成本,因此默认情况下,仅当您的应用程序在开发环境中运行时,它才会启用,但它应该可以帮助您捕获大多数此类问题。无论环境如何,您都可以通过使用 Host 属性在 Program.cs WebApplicationBuilder 上配置 ValidateScopes 选项来启用或禁用此检查,如下面的清单所示。

Listing 9.13 Setting the ValidateScopes property to always validate scopes

Listing 9.13 设置ValidateScopes属性以始终验证范围

WebApplicationBuilder builder = WebApplication.CreateBuilder(args); ❶

builder.Host.UseDefaultServiceProvider(o => ❷
{
    o.ValidateScopes = true; ❸
    o.ValidateOnBuild = true; ❹
});

❶ The default builder sets ValidateScopes to validate only in development
environments.
默认生成器将 ValidateScopes 设置为仅在开发环境中验证。

❷ You can override the validation check with the UseDefaultServiceProvider
extension.
您可以使用 UseDefaultServiceProvider 扩展覆盖验证检查。

❸ Setting this to true will validate scopes in all environments, which has
performance implications.
将此项设置为 true 将验证所有环境中的作用域,这会影响性能。

❹ ValidateOnBuild checks that every registered service has all its dependencies registered.
ValidateOnBuild 检查每个已注册的服务是否都已注册其所有依赖项。

Listing 9.13 shows another setting you can enable, ValidateOnBuild, which goes one step further. When the setting is enabled, the DI container checks on application startup that it has dependencies registered for every service it needs to build. If it doesn’t, it throws an exception and shuts down the app, as shown in figure 9.12, letting you know about the misconfiguration. This setting also has a performance effect, so it’s enabled only in development environments by default, but it’s useful for pointing out any missed service registrations.

清单 9.13 显示了另一个你可以启用的设置,ValidateOnBuild,它更进一步。启用该设置后,DI 容器会在应用程序启动时检查它是否为需要构建的每个服务注册了依赖项。如果没有,它会抛出一个异常并关闭应用程序,如图 9.12 所示,让您知道配置错误。此设置也有性能成本,因此默认情况下仅在开发环境中启用,但它对于指出任何错过的服务注册非常有用。

alt text

Figure 9.12 When ValidateOnBuild is enabled, the DI container checks on app startup that it can create all the registered services. If it finds a service it can’t create, it throws an exception. By default, this check is enabled only for development environments.
图 9.12 启用 ValidateOnBuild 后,DI 容器会在应用程序启动时检查它是否可以创建所有已注册的服务。如果它找到一个服务,它就找不到create 时,它会引发异常。默认情况下,仅对开发环境启用此检查。

Warning Unfortunately, the container can’t catch everything. For a list of caveats and exceptions, see this post from my blog: http://mng.bz/QmwG.
警告 遗憾的是,容器无法捕获所有内容。有关注意事项和例外情况的列表,请参阅我博客中的这篇文章:http://mng.bz/QmwG

We’ve almost covered everything about dependency injection now, and there’s only one more thing to consider: how to resolve scoped services on app startup in Program.cs.

我们现在几乎已经涵盖了有关依赖项注入的所有内容,现在只需要考虑一件事:如何在 Program.cs 中解析应用程序启动时的作用域服务。

9.5 Resolving scoped services outside a request

9.5 在请求之外解析分区服务

In chapter 8, I said that there are two main ways to resolve services from the DI container for minimal API applications:

在第 8 章中,我说过,对于最小的 API 应用程序,有两种主要方法可以从 DI 容器中解析服务:

  • Injecting services into an endpoint handler
    将服务注入端点处理程序

  • Accessing the DI container directly in Program.cs
    直接在 Program.cs 中访问 DI 容器

You’ve seen the first of those approaches several times now in this chapter. In chapter 8 you saw that you can access services in Program.cs by calling GetRequiredService<T>() on WebApplication.Services:

在本章中,您已经多次看到这些方法中的第一种。在第 8 章中,您看到您可以通过对 WebApplication.Services 调用 GetRequiredService<T>() 来访问 Program.cs 中的服务:

WebApplicationBuilder builder = WebApplication.CreateBuilder(args);
WebApplication app = builder.Build();
var settings = app.Services.GetRequiredService<EmailServerSettings>();

It’s important, however, that you resolve only singleton services this way. The IServiceProvider exposed as WebApplication.Services is the root DI container for your app. Services resolved this way live for the lifetime of your app, which is fine for singleton services but typically isn’t the behavior you want for scoped or transient services.

但是,请务必以这种方式仅解析单一实例服务。作为 WebApplication.Services 公开的 IServiceProvider 是应用的根 DI 容器。以这种方式解析的服务在应用程序的生命周期内有效,这对于单一实例服务来说很好,但通常不是您想要的作用域或瞬态服务的行为。

Warning Don’t resolve scoped or transient services directly from WebApplication.Services. This approach can lead to leaking of memory, as the objects are kept alive till the app exits and aren’t garbage-collected.
警告 不要直接从 WebApplication.Services 解析范围或暂时性服务。这种方法可能会导致内存泄漏,因为对象在应用程序退出之前保持活动状态,并且不会进行垃圾回收。

Instead, you should only resolve scoped and transient services from an active scope. A new scope is created automatically for every HTTP request, but when you’re resolving services from the DI container directly in Program.cs (or anywhere else that’s outside the context of an HTTP request), you need to create (and dispose of) a scope manually.

相反,您应该只从活动范围解析范围服务和暂时性服务。系统会自动为每个 HTTP 请求创建一个新范围,但是当您在 Program.cs 中(或 HTTP 请求上下文之外的任何其他位置)中直接从 DI 容器中解析服务时,您需要手动创建(和释放)范围。

You can create a new scope by calling CreateScope() or CreateAsyncScope() on IServiceProvider, which returns a disposable IServiceScope object, as shown in figure 9.13. IServiceScope also exposes an IServiceProvider property, but any services resolved from this provider are disposed of automatically when you dispose the IServiceScope, ensuring that all the resources held by the scoped and transient services are released correctly.

您可以通过对 IServiceProvider 调用 CreateScope() 或 CreateAsyncScope() 来创建新范围,这将返回一个可释放的 IServiceScope 对象,如图 9.13 所示。IServiceScope 还公开 IServiceProvider 属性,但在释放 IServiceScope 时,将自动释放从此提供程序解析的任何服务,从而确保正确释放作用域服务和暂时性服务所持有的所有资源。

alt text

Figure 9.13 To resolve scoped or transient services manually, you must create an IServiceScope object by calling CreateScope() on WebApplication.Services. Any scoped or transient services resolved from the DI container exposed as IServiceScope.ServiceProvider are disposed of automatically when you dispose of the IServiceScope object.
图 9.13 要手动解析作用域或临时服务,必须通过在 WebApplication.Services 上调用 CreateScope() 来创建 IServiceScope 对象。在释放 IServiceScope 对象时,将自动释放从公开为 IServiceScope.ServiceProvider 的 DI 容器解析的任何作用域或暂时性服务。

The following listing shows how you can resolve a scoped service in Program.cs using the pattern in figure 9.13. This pattern ensures that the scoped DataContext object is disposed of correctly before the call to app.Run().

下面的清单显示了如何使用图 9.13 中的模式在 Program.cs 中解析范围服务。这
pattern 确保在调用 app 之前正确处理作用域内的 DataContext 对象。

Listing 9.14 Resolving a scoped service using IServiceScope in Program.cs
清单 9.14 使用Program.cs 中的 IServiceScope

WebApplicationBuilder builder = WebApplication.CreateBuilder(args);

builder.Services.AddScoped<DataContext>(); ❶

WebApplication app = builder.Build();

await using (var scope = app.Services.CreateAsyncScope()) ❷
{
    var dbContext = ❸
        scope.ServiceProvider.GetRequiredService<DataContext>(); ❸
    Console.WriteLine($"Retrieved scope: {dbContext.RowCount}");
} ❹
app.Run();

❶ DataContext is registered as scoped, so it shouldn’t be resolved directly from app.Services.
DataContext 已注册为 scoped,因此不应直接从 app 解析app.Services。

❷ Creates an IServiceScope
创建 IServiceScope

❸ Resolves the scoped service from the scoped container
从范围容器解析范围服务

❹ When the IServiceScope is disposed, all resolved services are also disposed.
释放 IServiceScope 时,也会释放所有已解析的服务。

This example uses the async form CreateAsyncScope() instead of CreateScope(), which you generally should favor whenever possible. CreateAsyncScope was introduced in .NET 6 to fix an edge case related to IAsyncDisposable (introduced in .NET Core 3.0). You can read more about this scenario on my blog at http://mng.bz/zXGB.

此示例使用异步形式 CreateAsyncScope() 而不是 CreateScope(),您通常应尽可能使用后者。CreateAsyncScope 是在 .NET 6 中引入的,用于修复与 IAsyncDisposable 相关的边缘情况(在 .NET Core 3.0 中引入)。您可以在我的博客 http://mng.bz/zXGB 上阅读有关此方案的更多信息。

With that, you’ve reached the end of this introduction to DI in ASP.NET Core. Now you know how to register your own services with the DI container, and ideally, you have a good understanding of the three service lifetimes used in .NET. DI appears everywhere in .NET, so it’s important to try to get your head around it.

至此,您已完成 ASP.NET Core 中的 DI 简介的结尾。现在您知道如何注册自己的服务,理想情况下,您对 .NET 中使用的三个服务生存期有很好的了解。DI 在 .NET 中无处不在,因此请务必尝试了解它。

In chapter 10 we’ll look at the ASP.NET Core configuration model. You’ll see how to load settings from a file at runtime, store sensitive settings safely, and make your application behave differently depending on which machine it’s running on. We’ll even use a bit of DI; it gets everywhere in ASP.NET Core!

在第 10 章中,我们将介绍 ASP.NET Core 配置模型。您将了解如何在运行时从文件加载设置,安全地存储敏感设置,以及使您的应用程序根据运行它的机器运行不同的行为。我们甚至会使用一点 DI;它在 ASP.NET Core 中无处不在!

9.6 Summary

9.6 总结

When registering your services, you describe three things: the service type, the implementation type, and the lifetime. The service type defines which class or interface will be requested as a dependency. The implementation type is the class the container should create to fulfill the dependency. The lifetime is how long an instance of the service should be used for.
在注册服务时,您需要描述三项内容:服务类型、实现类型和生命周期。服务类型定义将请求哪个类或接口作为依赖项。implementation type 是容器为实现依赖项而应创建的类。生存期是服务实例的使用时间。

You can register a service by using generic methods if the class is concrete and all its constructor arguments are registered with the container or have default values.
如果类是具体的,并且其所有构造函数参数都已注册到容器或具有默认值,则可以使用泛型方法注册服务。

You can provide an instance of a service during registration, which will register that instance as a singleton. This approach can be useful when you already have an instance of the service available.
您可以在注册期间提供服务的实例,该实例会将该实例注册为单一实例。当您已有可用的服务实例时,此方法可能很有用。

You can provide a lambda factory function that describes how to create an instance of a service with any lifetime you choose. You can take this approach when your services depend on other services that are accessible only when your application is running.
您可以提供一个 lambda 工厂函数,用于描述如何创建具有您选择的任何生命周期的服务实例。当您的服务依赖于仅在应用程序运行时才能访问的其他服务时,您可以采用此方法。

Avoid calling GetService() or GetRequiredService() in your factory functions if possible. Instead, favor constructor injection; it’s more performant and simpler to reason about.
如果可能,请避免在工厂函数中调用 GetService() 或 GetRequiredService()。 相反,支持构造函数注入;它的性能更高,推理也更简单。

You can register multiple implementations for a service. Then you can inject IEnumerable<T> to get access to all the implementations at runtime.
您可以为一个服务注册多个实现。然后,您可以注入 IEnumerable 以在运行时访问所有实现。

If you inject a single instance of a multiple-registered service, the container injects the last implementation registered.
如果您注入多个注册服务的单个实例,则容器将注入最后一个注册的实现。

You can use the TryAddextension methods to ensure that an implementation is registered only if no other implementation of the service has been registered. This approach can be useful for library authors to add default services while still allowing consumers to override the registered services.
您可以使用 TryAdd扩展方法确保仅在未注册服务的其他实施时注册实施。这种方法对于库作者来说非常有用,可以添加默认服务,同时仍允许使用者覆盖已注册的服务。

You define the lifetime of a service during DI service registration to dictate when a DI container will reuse an existing instance of the service to fulfill service dependencies and when it will create a new one.
在 DI 服务注册期间定义服务的生存期,以指示 DI 容器何时重用服务的现有实例来满足服务依赖项,以及何时创建新实例。

A transient lifetime means that every time a service is requested, a new instance is created.
瞬态生存期意味着每次请求服务时,都会创建一个新实例。

A scoped lifetime means that within a scope, all requests for a service will give you the same object. For different scopes, you’ll get different objects. In ASP.NET Core, each web request gets its own scope.
作用域生命周期意味着在一个范围内,对服务的所有请求都将为你提供相同的对象。对于不同的范围,你将获得不同的对象。在 ASP.NET Core 中,每个 Web 请求都有自己的范围。

You’ll always get the same instance of a singleton service, regardless of scope.
无论范围如何,您都将始终获得单一实例服务的相同实例。

A service should use only dependencies with a lifetime longer than or equal to the lifetime of the service. By default, ASP.NET Core performs scope validation to check for errors like this one and throws an exception when it finds them, but this feature is enabled only in development environments, as it has a performance cost.
服务应仅使用生命周期长于或等于服务生命周期的依赖项。默认情况下,ASP.NET Core 执行范围验证以检查此类错误,并在找到错误时引发异常,但此功能仅在开发环境中启用,因为它会降低性能。

To access scoped services in Program.cs, you must first create an IServiceScope object by calling CreateScope() or CreateAsyncScope() on WebApplication.Services. You can resolve services from the IServiceScope.ServiceProvider property. When you dispose IServiceScope, any scoped or transient services resolved from the scope are also disposed.
若要访问 Program.cs 中的分区服务,必须首先通过在 WebApplication 上调用 CreateScope() 或 CreateAsyncScope() 来创建 IServiceScope 对象。服务。可以从 IServiceScope.ServiceProvider 属性解析服务。释放 IServiceScope 时,还会释放从该范围解析的任何作用域或暂时性服务。

ASP.NET Core in Action 8 An introduction to dependency injection

Part 2 Building complete applications

第 2 部分:构建完整的应用程序

We covered a lot of ground in part 1. You saw how an ASP.NET Core application is composed of middleware, and we focused heavily on minimal API endpoints. You saw how to use them to build JSON APIs, how to extract common code using filters and route groups, and how to validate your input data.

我们在第 1 部分中涵盖了很多内容。您了解了 ASP.NET Core 应用程序是如何由中间件组成的,我们主要关注最少的 API 端点。您了解了如何使用它们构建 JSON API,如何使用筛选条件和路由组提取通用代码,以及如何验证输入数据。

In part 2 we’ll dive deeper into the framework and look at a variety of components that you’ll inevitably need when you want to build more complex apps. By the end of this part, you’ll be able to build dynamic applications that can be deployed to multiple environments, each with a different configuration, saving data to a database.

在第 2 部分中,我们将更深入地研究该框架,并了解在构建更复杂的应用程序时不可避免地需要的各种组件。在本部分结束时,您将能够构建可部署到多个环境的动态应用程序,每个环境具有不同的配置,从而将数据保存到数据库。

ASP.NET Core uses dependency injection (DI) throughout its libraries, so it’s important that you understand how this design pattern works. In chapter 8 I introduce DI and discuss why it is used. In chapter 9 you’ll learn how to configure the services in your applications to use DI.

ASP.NET Core 在其整个库中使用依赖关系注入 (DI),因此了解此设计模式的工作原理非常重要。在第 8 章中,我将介绍 DI 并讨论使用它的原因。在第 9 章中,您将学习如何配置应用程序中的服务以使用 DI。

Chapter 10 looks at the ASP.NET Core configuration system, which lets you pass configuration values to your app from a range of sources—JSON files, environment variables, and many more. You’ll learn how to configure your app to use different values depending on the environment in which it is running, and how to bind strongly typed objects to your configuration to help reduce runtime errors.

第 10 章介绍了 ASP.NET Core 配置系统,它允许您将配置值从一系列来源(JSON 文件、环境变量等)传递给您的应用程序。您将学习如何将应用程序配置为根据运行环境使用不同的值,以及如何将强类型对象绑定到配置以帮助减少运行时错误。

In chapter 11 you’ll learn how to document your minimal APIs applications using the OpenAPI specification. Adding an OpenAPI document to your application makes it easier for others to interact with your app, but it has other benefits too. You’ll learn how to use Swagger UI to easily test your app from the browser, and code generation to automatically generate strongly-typed libraries for interacting with your API.

在第 11 章中,您将学习如何使用 OpenAPI 规范来记录您的最小 API 应用程序。将 OpenAPI 文档添加到您的应用程序可以使其他人更轻松地与您的应用程序交互,但它还有其他好处。您将学习如何使用 Swagger UI 从浏览器轻松测试您的应用程序,以及如何生成代码以自动生成用于与您的 API 交互的强类型库。

Most web applications require some sort of data storage, so in chapter 12 I’ll introduce Entity Framework Core (EF Core). This is a cross-platform library that makes it easier to connect your app to a database. EF Core is worthy of a book in and of itself, so I’ll only provide a brief introduction and point you to John Smith’s excellent book Entity Framework Core in Action, second edition (Manning, 2021). I’ll show you how to create a database and how to insert, update, and query simple data.

大多数 Web 应用程序都需要某种类型的数据存储,因此在第 12 章中,我将介绍 Entity Framework Core (EF Core)。这是一个跨平台库,可以更轻松地将应用程序连接到数据库。EF Core 本身就值得一本书,因此我只提供一个简短的介绍,并向您介绍 John Smith 的优秀著作 Entity Framework Core in Action,第二版(Manning,2021 年)。我将向您展示如何创建数据库以及如何插入、更新和查询简单数据。

8 An introduction to dependency injection

8 依赖注入简介

This chapter covers

本章涵盖

  • Understanding the benefits of dependency injection
    了解依赖关系注入的好处

  • Seeing how ASP.NET Core uses dependency injection
    了解 ASP.NET Core 如何使用依赖项注入

  • Retrieving services from the DI container
    从 DI 容器中检索服务

In part 1 of this book you saw the bare bones of how to build applications with ASP.NET Core. You learned how to compose middleware to create your application and how to create minimal API endpoints to handle HTTP requests. This part gave you the tools to start building simple API applications.

在本书的第 1 部分中,您了解了如何使用 ASP.NET Core 构建应用程序的基本内容。您学习了如何编写中间件来创建应用程序,以及如何创建最小的 API 端点来处理 HTTP 请求。这部分为您提供了开始构建简单 API 应用程序的工具。

In this chapter you’ll see how to use dependency injection (DI)—a design pattern that helps you develop loosely coupled code—in your ASP.NET Core applications. ASP.NET Core uses the pattern extensively, both internally in the framework and in the applications you build, so you’ll need to use it in all but the most trivial applications.

在本章中,您将了解如何在 ASP.NET Core 应用程序中使用依赖关系注入 (DI),这是一种帮助您开发松散耦合代码的设计模式。ASP.NET Core 在框架内部和您构建的应用程序中广泛使用该模式,因此您需要在除最琐碎的应用程序之外的所有应用程序中使用它。

You may have heard of DI and possibly even used it in your own applications. If so, this chapter shouldn’t hold many surprises for you. If you haven’t used DI, never fear; I’ll make sure you’re up to speed by the time the chapter is done!

您可能听说过 DI,甚至可能在自己的应用程序中使用它。如果是这样,这一章应该不会给你带来太多惊喜。如果您还没有使用过 DI,请不要担心;我会确保你在章节完成时跟上进度!

This chapter introduces DI in general, the principles it drives, and why you should care about it. You’ll see how ASP.NET Core has embraced DI throughout its implementation and why you should do the same when writing your own applications. Finally, you’ll learn how to retrieve services from DI in your app.

本章介绍了 DI 的一般情况、它驱动的原则以及您应该关注它的原因。您将了解 ASP.NET Core 如何在整个实施过程中采用 DI,以及为什么在编写自己的应用程序时也应该这样做。最后,您将学习如何从应用程序中的 DI 检索服务。

When you finish this chapter, you’ll have a solid understanding of the DI concept. In chapter 9 you’ll see how to apply DI to your own classes. You’ll learn how to configure your app so that the ASP.NET Core framework can create your classes for you, removing the pain of having to create new objects in your code manually. You’ll learn how to control how long your objects are used and some of the pitfalls to be aware of when you write your own applications. In chapter 31 we’ll look at some advanced ways to use DI, including how to wire up a third-party DI container.

完成本章后,您将对 DI 概念有深入的理解。在第 9 章中,您将看到如何将 DI 应用于您自己的类。您将学习如何配置您的应用程序,以便 ASP.NET Core 框架可以为您创建类,从而消除必须在代码中手动创建新对象的痛苦。您将学习如何控制对象的使用时间,以及在编写自己的应用程序时需要注意的一些陷阱。在第 31 章中,我们将介绍一些使用 DI 的高级方法,包括如何连接第三方 DI 容器。

For now, though, let’s get back to basics. What is DI, and why should you care about it?

不过,现在让我们回到基础。什么是 DI,为什么要关心它?

8.1 Understanding the benefits of dependency injection

8.1 了解依赖关系注入的好处

This section aims to give you a basic understanding of what DI is and why you should care about it. The topic itself extends far beyond the reach of this single chapter. If you want a deeper background, I highly recommend checking out Martin Fowler’s articles online. This article from 2004, for example, is a classic: http://mng.bz/pPJ8.

本节旨在让您对 DI 是什么以及为什么您应该关心它有一个基本的了解。这个话题本身远远超出了这一章的范围。如果您想要更深入的背景知识,我强烈建议您在线查看 Martin Fowler 的文章。例如,2004 年的这篇文章就是经典之作:http://mng.bz/pPJ8

Tip For a more directly applicable read with many examples in C#, I recommend picking up Dependency Injection Principles, Practices, and Patterns, by Steven van Deursen and Mark Seemann (Manning, 2019).
提示 要获得更直接适用的 C# 中许多示例,我建议您阅读 Steven van Deursen 和 Mark Seemann 编写的 Dependency Injection Principles, Practices, and Patterns(Manning,2019 年)。

The ASP.NET Core framework has been designed from the ground up to be modular and to adhere to good software engineering practices. As with anything in software, what is considered to be best practice varies over time, but for object-oriented programming, the SOLID principles have held up well.

ASP.NET Core 框架是从头开始设计的,采用模块化设计,并遵循良好的软件工程实践。与软件中的任何事物一样,被认为是最佳实践的内容会随着时间的推移而变化,但对于面向对象的编程,SOLID 原则一直保持得很好。

Definition SOLID is a mnemonic for “single responsibility principle, open-closed, Liskov substitution, interface segregation, and dependency inversion.” This course by Steve Smith introduces the principles using C#: http://mng.bz/Ox1R.
定义 SOLID 是“单一责任原则、开闭、Liskov 替换、接口分离和依赖关系倒置”的助记词。Steve Smith 的这门课程介绍了使用 C# 的原则:http://mng.bz/Ox1R

On that basis, ASP.NET Core has DI (sometimes called dependency inversion or inversion of control [IoC]) baked into the heart of the framework. Regardless of whether you want to use DI within your own application code, the framework libraries themselves depend on it as a concept.

在此基础上,ASP.NET Core 将 DI(有时称为依赖关系反转或控制反转 [IoC])融入到框架的核心中。无论您是否想在自己的应用程序代码中使用 DI,框架库本身都将其作为一个概念。

Note Although related, dependency injection and dependency inversion are two different things. I cover both in a general sense in this chapter, but for a good explanation of the differences, see this post by Derick Bailey, titled “Dependency Injection Is NOT the Same As the Dependency Inversion Principle”: http://mng.bz/5jvB.
注意 尽管相关,但依赖注入和依赖倒置是两个不同的东西。在本章中,我将从一般意义上介绍两者,但要很好地解释这些差异,请参阅 Derick Bailey 的这篇文章,标题为“依赖注入与依赖倒置原则不同”:http://mng.bz/5jvB

When you started programming, chances are that you didn’t use a DI framework immediately. That’s not surprising or even a bad thing; DI adds a certain amount of extra wiring that’s often not warranted in simple applications or when you’re getting started. But when things start to get more complex, DI comes into its own as a great tool to help keep that complexity under control.

当您开始编程时,您很可能没有立即使用 DI 框架。这并不奇怪,甚至不是一件坏事;DI 添加了一定数量的额外布线,这些布线在简单的应用程序中或您开始时通常是不需要的。但是当事情开始变得更加复杂时,DI 就会成为帮助控制这种复杂性的绝佳工具。

Let’s consider a simple example, written without any sort of DI. Suppose that a user has registered on your web app, and you want to send them an email. This listing shows how you might approach this task initially, using a minimal API endpoint handler.

让我们考虑一个简单的例子,它没有任何类型的 DI 编写。假设用户已在您的 Web 应用程序上注册,并且您希望向他们发送电子邮件。此清单显示了最初如何使用最小的 API 端点处理程序来处理此任务。

Listing 8.1 Sending an email without DI when there are no dependencies
清单 8.1 在没有依赖项的情况下发送没有 DI 的邮件

var builder = WebApplication.CreateBuilder(args);
var app = builder.Build();

app.MapGet("/register/{username}", RegisterUser); ❶

app.Run();

string RegisterUser(string username) ❷
{
    var emailSender = new EmailSender(); ❸
    emailSender.SendEmail(username); ❹
    return $"Email sent to {username}!";
}

❶ The endpoint is called when a new user is created.
创建新用户时调用 endpoint。

❷ The RegisterUser function is the handler for the endpoint.
RegisterUser 函数是端点的处理程序。

❸ Creates a new instance of EmailSender
创建 EmailSender 的新实例

❹ Uses the new instance to send the email
使用新实例发送电子邮件

In this example, the RegisterUser handler executes when a new user registers on your app, creating a new instance of an EmailSender class and calling SendEmail() to send the email. The EmailSender class is the class that actually sends the email. For the purposes of this example, you can imagine that it looks something like this:

在此示例中,当新用户在您的应用程序上注册时,将执行处理程序,创建类的新实例并调用以发送电子邮件。类是实际发送电子邮件的类。对于此示例,您可以想象它看起来像这样:

public class EmailSender
{
    public void SendEmail(string username)
    {
        Console.WriteLine($"Email sent to {username}!");
    }
}

Console.WriteLine stands in here for the real process of sending the email.

Console.WriteLine 在此处代替发送电子邮件的真实过程。

Note Although I’m using sending email as a simple example, in practice you may want to move this code out of your handler method. This type of asynchronous task is well suited to using message queues and a background process. For more details, see http://mng.bz/Y1AB.
注意 虽然我使用发送电子邮件作为一个简单的示例,但实际上您可能希望将此代码从 handler 方法中移出。这种类型的异步任务非常适合使用消息队列和后台进程。有关更多详细信息,请参阅 http://mng.bz/Y1AB

If the EmailSender class is as simple as the previous example and has no dependencies, you may not see any need to adopt a different approach to creating objects. And to an extent, you’d be right. But what if you later update your implementation of EmailSender so that some of the email-sending logic is implemented by a different class?

如果 EmailSender 类与上一个示例一样简单,并且没有依赖项,则您可能不需要采用其他方法来创建对象。在某种程度上,你是对的。但是,如果您稍后更新 EmailSender 的实现,以便某些电子邮件发送逻辑由不同的类实现,该怎么办?

Currently, EmailSender would need to do many things to send an email. It would need to

目前,EmailSender 需要做很多事情来发送电子邮件。它需要

  • Create an email message.
    创建电子邮件。

  • Configure the settings of the email server.
    配置电子邮件服务器的设置。

  • Send the email to the email server.
    将电子邮件发送到电子邮件服务器。

Doing all that in one class would go against the single-responsibility principle (SRP), so you’d likely end up with EmailSender depending on other services. Figure 8.1 shows how this web of dependencies might look. RegisterUser wants to send an email using EmailSender, but to do so, it also needs to create the MessageFactory, NetworkClient, and EmailServerSettings objects that EmailSender depends on.
在一个类中完成所有这些作将违反单一责任原则 (SRP),因此您最终可能会使用 EmailSender,具体取决于其他服务。图 8.1 显示了这个依赖关系网络可能是什么样子。RegisterUser 希望使用 EmailSender 发送电子邮件,但为此,它还需要创建 EmailSender 所依赖的 MessageFactory、NetworkClient 和 EmailServerSettings 对象。

alt text

Figure 8.1 Dependency diagram without dependency injection. RegisterUser indirectly depends on all the other classes, so it must create them all.
图 8.1 没有依赖注入的依赖图。RegisterUser 间接依赖于所有其他类,因此它必须创建所有类。

Each class has several dependencies, so the “root” caller—in this case, the RegisterUser handler—needs to know how to create every class it depends on, as well as every class its dependencies depend on. This is sometimes called the dependency graph.

每个类都有多个依赖项,因此“根”调用方(在本例中为 RegisterUser 处理程序)需要知道如何作创建它所依赖的每个类,以及它的依赖项所依赖的每个类。这有时称为依赖关系图。

Definition The dependency graph is the set of objects that must be created to create a specific requested “root” object.
定义 依赖关系图是创建特定请求的 “root” 对象时必须创建的对象集。

EmailSender depends on the MessageFactory and NetworkClient objects, so they’re provided via the constructor, as shown in the following listing.

EmailSender 依赖于 MessageFactory 和 NetworkClient 对象,因此它们是通过构造函数提供的,如下面的清单所示。

Listing 8.2 A service with multiple dependencies
清单 8.2 具有多个依赖项的服务

public class EmailSender
{
    private readonly NetworkClient _client; ❶
    private readonly MessageFactory _factory; ❶
    public EmailSender(MessageFactory factory, NetworkClient client) ❷
    { ❷
        _factory = factory; ❷
        _client = client; ❷
    } ❷
    public void SendEmail(string username)
    {
        var email = _factory.Create(username); ❸
        _client.SendEmail(email); ❸
        Console.WriteLine($"Email sent to {username}!");
    }
}

❶ Now the EmailSender depends on two other classes.
现在 EmailSender 依赖于其他两个类。

❷ Instances of the dependencies are provided in the constructor.
构造函数中提供了依赖项的实例。

❸ The EmailSender coordinates the dependencies to create and send an email.
EmailSender 协调依赖项以创建和发送电子邮件。

On top of that, the NetworkClient class that EmailSender depends on also has a dependency on an EmailServerSettings object:
最重要的是,NetworkClient 类EmailSender 也依赖于EmailServerSettings 对象:

public class NetworkClient
{
    private readonly EmailServerSettings _settings;
    public NetworkClient(EmailServerSettings settings)
    {
        _settings = settings;
    }
}

This example might feel a little contrived, but it’s common to find this sort of chain of dependencies. In fact, if you don’t have it in your code, it’s probably a sign that your classes are too big and aren’t following the SRP.

这个例子可能感觉有点做作,但找到这种依赖关系链是很常见的。事实上,如果您的代码中没有它,则可能表明您的类太大并且没有遵循 SRP。

So how does this affect the code in RegisterUser? The following listing shows how you now have to send an email if you stick to newing up objects in the handler.

那么这对 RegisterUser 中的代码有什么影响呢?下面的清单显示了如果你坚持在处理程序中使用新的ing 对象,你现在必须如何发送电子邮件。

Listing 8.3 Sending email without DI when you create dependencies manually
清单 8.3 手动创建依赖项时发送没有 DI 的邮件

string RegisterUser(string username)
{
    var emailSender = new EmailSender( ❶
        new MessageFactory(), ❷
        new NetworkClient( ❸
            new EmailServerSettings ❹
            ( ❹
                Host: "smtp.server.com", ❹
                Port: 25 ❹
            )) ❹
        );
    emailSender.SendEmail(username); ❺
    return $"Email sent to {username}!";
}

❶ To create EmailSender, you must create all its dependencies.
要创建 EmailSender,您必须创建其所有依赖项。

❷ You need a new MessageFactory.
您需要一个新的 MessageFactory。

❸ The NetworkClient also has dependencies.
NetworkClient 也有依赖项。

❹ You’re already two layers deep, but there could feasibly be more.
您已经有两层了,但可能还有更多。

❺ Finally, you can send the email.
最后,您可以发送电子邮件。

This code is turning into something gnarly. Improving the design of EmailSender to separate out the responsibilities has made calling it from RegisterUser a real chore. This code has several problems:

这段代码正在变成一些粗糙的东西。改进 EmailSender 的设计以分离职责,这使得从 RegisterUser 调用它成为一件真正的苦差事。此代码有几个问题:

  • Not obeying the SRP—Now our code is responsible for both creating an EmailSender object and using it to send an email.
    不遵守 SRP – 现在,我们的代码负责创建 EmailSender 对象并使用它来发送电子邮件。

  • Considerable ceremony—Ceremony refers to code that you have to write but that isn’t adding value directly. Of the 11 lines of code in the RegisterUser method, only the last two are doing anything useful, which makes it harder to read and harder to understand the intent of the methods.
    相当大的仪式 — 仪式是指您必须编写的代码,但这不会直接增加价值。在 RegisterUser 方法的 11 行代码中,只有最后两行代码执行任何有用的作,这使得它更难阅读,也更难理解方法的意图。

  • Tied to the implementation—If you decide to refactor EmailSender and add another dependency, you’d need to update every place it’s used. Likewise, if any dependencies are refactored, you would need to update this code too.
    与实现绑定 — 如果您决定重构 EmailSender 并添加另一个依赖项,则需要更新使用它的每个位置。同样,如果重构了任何依赖项,您也需要更新此代码。

  • Hard to reuse instance—In the example code we created new instances of all the objects. But what if creating a new NetworkClient is computationally expensive and we’d like to reuse instances? We’d have to add extra code to handle that task, further increasing the amount of boilerplate code.
    难以重用实例 – 在示例代码中,我们创建了所有对象的新实例。但是,如果创建新的 NetworkClient 计算成本很高,并且我们想重用实例怎么办?我们必须添加额外的代码来处理该任务,从而进一步增加样板代码的数量。

RegisterUser has an implicit dependency on the EmailSender class, as it creates the object manually itself. The only way to know that RegisterUser uses EmailSender is to look at its source code. By contrast, EmailSender has explicit dependencies on NetworkClient and MessageFactory, which must be provided in the constructor. Similarly, NetworkClient has an explicit dependency on the EmailServerSettings class.

RegisterUser 对 EmailSender 类具有隐式依赖关系,因为它自己手动创建对象。要知道 RegisterUser 使用 EmailSender,唯一的方法是查看其源代码。相比之下,EmailSender 对 NetworkClient 和 MessageFactory 具有显式依赖项,必须在构造函数中提供。同样,NetworkClient 对 EmailServerSettings 类具有显式依赖项。

Tip Generally speaking, any dependencies in your code should be explicit, not implicit. Implicit dependencies are hard to reason about and difficult to test, so you should avoid them wherever you can. DI is useful for guiding you along this path.
提示 一般来说,代码中的任何依赖项都应该是显式的,而不是隐式的。隐式依赖关系很难推理且难以测试,因此您应该尽可能避免使用它们。DI 有助于指导您沿着这条道路前进。

DI aims to solve the problem of building a dependency graph by inverting the chain of dependencies. Instead of the RegisterUser handler creating its dependencies manually, deep inside the implementation details of the code, an already-created instance of EmailSender is passed as an argument to the RegisterUser method.

DI 旨在通过反转依赖关系链来解决构建依赖关系图的问题。RegisterUser 处理程序不是手动创建其依赖项,而是在代码的实现细节深处,将已创建的 EmailSender 实例作为参数传递给 RegisterUser 方法。

Now, obviously something needs to create the object, so the code to do that has to live somewhere. The service responsible for providing the instance is called a DI container or an IoC container, as shown in figure 8.2.

现在,显然需要创建对象,因此执行此作的代码必须位于某个位置。负责提供实例的服务称为 DI 容器或 IoC 容器,如图 8.2 所示。

Definition The DI container or IoC container is responsible for creating instances of services. It knows how to construct an instance of a service by creating all its dependencies and passing them to the constructor. I’ll refer to it as a DI container throughout this book.
定义 DI 容器或 IoC 容器负责创建服务实例。它知道如何通过创建服务的所有依赖项并将它们传递给构造函数来构造服务的实例。在本书中,我将它称为 DI 容器。

alt text

Figure 8.2 Dependency diagram using DI . RegisterUser indirectly depends on all the other classes but doesn’t need to know how to create them. The RegisterUser handler declares that it requires EmailSender, and the container provides it.
图 8.2 使用 DI 的依赖关系图 .RegisterUser 间接依赖于所有其他类,但不需要知道如何创建它们。RegisterUser 处理程序声明它需要 EmailSender,并且容器提供它。

The term DI is often used interchangeably with IoC. But DI is a specific version of the more general principle of IoC. In the context of ASP.NET Core,

术语 DI 通常与 IoC 互换使用。但 DI 是 IoC 更普遍原则的特定版本。在 ASP.NET Core 的上下文中,

  • Without IoC, you’d write the code to listen for requests, check which handler to invoke, and then invoke it. With IoC, the control flow is the other way around. You register your handlers with the framework, but it’s up to the framework to invoke your handler. Your handler is still responsible for creating its dependencies.
    如果没有 IoC,您将编写代码来侦听请求,检查要调用的处理程序,然后调用它。对于 IoC,控制流正好相反。您可以向框架注册处理程序,但由框架来调用您的处理程序。您的处理程序仍负责创建其依赖项。

  • DI takes IoC one step further. As well as invoking your handler, with DI, the framework creates all your handler’s dependencies.
    DI 使 IoC 更进一步。除了调用您的处理程序外,框架还使用 DI 创建所有处理程序的依赖项。

So when you use dependency injection, your RegisterUser handler is no longer responsible for controlling how to create an EmailSender instance. Instead, the framework provides an EmailSender to the handler directly.
因此,当您使用依赖项注入时,您的 RegisterUser 处理程序不再负责控制如何创建 EmailSender 实例。相反,框架直接向处理程序提供 EmailSender。

Note Many DI containers are available for .NET, including Autofac, Lamar, Unity, Ninject, and Simple Injector, and the list goes on! In chapter 31 you’ll see how to replace the default ASP.NET Core container with one of these alternatives.
注意 许多 DI 容器可用于 .NET,包括 Autofac、Lamar、Unity、Ninject 和 Simple Injector,不胜枚举!在第 31 章中,您将看到如何将default ASP.NET Core 容器中替换为这些替代项之一。

The advantage of adopting this pattern becomes apparent when you see how much it simplifies using dependencies. Listing 8.4 shows how the RegisterUser handler would look if you used DI to create EmailSender instead of creating it manually. All the new noise has gone, and you can focus purely on what the endpoint handler is doing: calling EmailSender and returning a string message.

当您看到采用此模式在多大程度上简化了依赖项的使用时,采用此模式的优势就变得显而易见了。清单 8.4 显示了如果使用 DI 创建 EmailSender 而不是手动创建 EmailSender,RegisterUser 处理程序会是什么样子。所有新的干扰都已消失,您可以专注于端点处理程序正在执行的作:调用 EmailSender 并返回字符串消息。

Listing 8.4 Sending an email using DI to inject dependencies
清单 8.4 使用 DI 发送邮件注入依赖

string RegisterUser(string username, EmailSender emailSender) ❶
{
    emailSender.SendEmail(username); ❷
    return $"Email sent to {username}!"; ❷
}

❶ Instead of creating the dependencies implicitly, injects them directly
不是隐式创建依赖项,而是直接注入它们

❷ The handler is easy to read and understand again.
处理程序易于阅读和理解。

One advantage of a DI container is that it has a single responsibility: creating objects or services. The minimal API infrastructure asks the DI container for an instance of a service, and the container takes care of figuring out how to create the dependency graph, based on how you configure it.

DI 容器的一个优点是它只有一个职责:创建对象或服务。最小的 API 基础设施向 DI 容器请求服务实例,容器负责根据您的配置方式确定如何创建依赖关系图。

Note It’s common to refer to services when talking about DI containers, which is slightly unfortunate, as services is one of the most overloaded terms in software engineering! In this context, a service refers to any class or interface that the DI container creates when required.
注意 在谈论 DI 容器时,通常会提到服务,这有点遗憾,因为服务是软件工程中最超载的术语之一!在这个context,服务是指 DI 容器在需要时创建的任何类或接口。

The beauty of this approach is that by using explicit dependencies, you never have to write the mess of code you saw in listing 8.3. The DI container can inspect your service’s constructor and work out how to write much of the code itself. DI containers are always configurable, so if you want to describe how to create an instance of a service manually, you can, but by default you shouldn’t need to.

这种方法的美妙之处在于,通过使用显式依赖项,您永远不必编写清单 8.3 中看到的混乱代码。DI 容器可以检查服务的构造函数,并找出如何编写大部分代码本身。DI 容器始终是可配置的,因此如果您想描述如何手动创建服务实例,您可以这样做,但默认情况下您不需要这样做。

Tip ASP.NET Core supports constructor injection and injection into endpoint handler methods out of the box. Technically, you can inject dependencies into a service in other ways, such as by using property injection, but these techniques aren’t supported by the built-in DI container.
提示 ASP.NET Core 支持构造函数注入和开箱即用的端点处理程序方法注入。从技术上讲,您可以通过其他方式将依赖项注入服务,例如使用属性注入,但内置 DI 容器不支持这些技术。

I hope that this example made the advantages of using DI in your code apparent, but in many ways these benefits are secondary to the main benefit of using DI. In particular, DI helps keep your code loosely coupled by coding to interfaces.

我希望这个例子清楚地表明了在代码中使用 DI 的优势,但在许多方面,这些好处是次要的,而不是使用 DI 的主要好处。特别是,DI 通过编码到接口来帮助保持代码松散耦合。

8.2 Creating loosely coupled code

8.2 创建松散耦合的代码

Coupling is an important concept in object-oriented programming, referring to how a given class depends on other classes to perform its function. Loosely coupled code doesn’t need to know a lot of details about a particular component to use it.

耦合是面向对象编程中的一个重要概念,指的是给定的类如何依赖其他类来执行其功能。松散耦合的代码不需要了解有关特定组件的大量详细信息即可使用它。

The initial example of RegisterUser and EmailSender was an example of tight coupling; you were creating the EmailSender object directly and needed to know exactly how to wire it up. On top of that, the code was difficult to test. Any attempts to test RegisterUser would result in an email’s being sent. If you were testing the controller with a suite of unit tests, that approach would be a surefire way to get your email server blacklisted for spam!

RegisterUser 和 EmailSender 的初始示例是紧密耦合的示例;您直接创建了 EmailSender 对象,并且需要确切地知道如何连接它。最重要的是,代码很难测试。任何测试 RegisterUser 的尝试都会导致发送电子邮件。如果你正在使用一套单元测试来测试控制器,那么这种方法将是让你的电子邮件服务器被列入垃圾邮件黑名单的可靠方法!

Taking EmailSender as a parameter and removing the responsibility of creating the object helps reduce the coupling in the system. If the EmailSender implementation changes so that it has another dependency, you no longer have to update RegisterUser at the same time.

将 EmailSender 作为参数并消除创建对象的责任有助于减少系统中的耦合。如果 EmailSender 实现发生更改,使其具有另一个依赖项,则不再需要同时更新 RegisterUser。

One problem that remains is that RegisterUser is still tied to an implementation rather than an abstraction. Coding to abstractions (often interfaces) is a common design pattern that helps further reduce the coupling of a system, as you’re not tied to a single implementation. This pattern is particularly useful for making classes testable, as you can create stub or mock implementations of your dependencies for testing purposes, as shown in figure 8.3.

仍然存在的一个问题是 RegisterUser 仍然与实现而不是抽象相关联。对抽象(通常是接口)进行编码是一种常见的设计模式,有助于进一步减少系统的耦合,因为您不受单个实现的束缚。此模式对于使类可测试特别有用,因为您可以创建依赖项的存根或模拟实现以进行测试,如图 8.3 所示。

Tip You can choose among many mocking frameworks. I’m most familiar with Moq, but NSubstitute and FakeItEasy are also popular options.
提示: 您可以在许多模拟框架中进行选择。我最熟悉 Moq,但 NSubstitute 和 FakeItEasy 也是受欢迎的选择。

alt text

Figure 8.3 By coding to interfaces instead of an explicit implementation, you can use different IEmailSender implementations in different scenarios, such as a MockEmailSender in unit tests.
图 8.3 通过对接口进行编码而不是显式实现,可以在不同的场景中使用不同的 IEmailSender 实现,例如单元测试中的 MockEmailSender。

As an example, you might create an IEmailSender interface, which EmailSender would implement:
例如,您可以创建一个 IEmailSender接口,EmailSender 将实现该接口:

public interface IEmailSender
{
    public void SendEmail(string username);
}

Then RegisterUser could depend on this interface instead of the specific EmailSender implementation, as shown in the following listing, allowing you to use a different implementation during unit tests, such as a DummyEmailSender.

然后 RegisterUser 可以依赖于此接口而不是特定的 EmailSender 实现,如下面的清单所示,从而允许您在单元测试期间使用不同的实现,例如 DummyEmailSender。

Listing 8.5 Using interfaces with dependency injection
清单 8.5 使用带有依赖注入的接口

string RegisterUser(string username, IEmailSender emailSender) ❶
{
    emailSender.SendEmail(username); ❷
    return $"Email sent to {username}!";
}

❶ Now you depend on IEmailSender instead of the specific EmailSender
implementation.
现在您依赖于 IEmailSender 而不是特定的 EmailSender 实现。

❷ You don’t care what the implementation is as long as it implements
IEmailSender.
您不关心实现是什么,只要它实现 IEmailSender 即可。

The key point here is that the consuming code, RegisterUser, doesn’t care how the dependency is implemented—only that it implements the IEmailSender interface and exposes a SendEmail method. Now the application code is independent of the implementation.

此处的关键点是,使用代码 RegisterUser 并不关心依赖项是如何实现的,只关心它实现 IEmailSender 接口并公开 SendEmail 方法。现在,应用程序代码独立于实现。

I hope that the principles behind DI seem to be sound. Having loosely coupled code makes it easy to change or swap out implementations. But this still leaves a question: how does the application know to use EmailSender in production instead of DummyEmailSender? The process of telling your DI container “When you need IEmailSender, use EmailSender” is called registration.

我希望 DI 背后的原则似乎是合理的。拥有松散耦合的代码可以很容易地更改或换出实现。但这仍然留下了一个问题:应用程序如何知道在生产环境中使用 EmailSender 而不是 DummyEmailSender?告诉 DI 容器“当您需要 IEmailSender 时,请使用 EmailSender”的过程称为注册。

Definition You register services with a DI container so that it knows which implementation to use for each requested service. This registration typically takes the form “For interface X, use implementation Y.”
定义 您可以向 DI 容器注册服务,以便它知道要为每个请求的服务使用哪个实现。此注册通常采用“对于接口 X,使用实现 Y”的形式。

Exactly how you register your interfaces and types with a DI container can vary depending on the specific DI container implementation, but the principles are generally the same. ASP.NET Core includes a simple DI container out of the box, so let’s look at how it’s used during a typical request.
向 DI 容器注册接口和类型的具体方式可能因特定的 DI 容器而异实现,但原则通常是相同的。ASP.NET Core 包含一个简单的开箱即用的 DI 容器,因此让我们看看在典型请求期间如何使用它。

8.3 Using dependency injection in ASP.NET Core

在 ASP.NET Core 中使用依赖项注入

ASP.NET Core was designed from the outset to be modular and composable, with an almost plugin-style architecture, which is generally complemented by DI. Consequently, ASP.NET Core includes a simple DI container that all the framework libraries use to register themselves and their dependencies.

ASP.NET Core 从一开始就设计为模块化和可组合的,具有几乎插件式的架构,通常由 DI 补充。因此,ASP.NET Core 包含一个简单的 DI 容器,所有框架库都使用它来注册自身及其依赖项。

This container is used, for example, to register the minimal API infrastructure—the formatters, the Kestrel web server, and so on. It’s a basic container, so it exposes only a few methods for registering services, but you have the option to replace it with a third-party DI container that gives you extra capabilities, such as autoregistration and setter injection. The DI container is built into the ASP.NET Core hosting model, as shown in figure 8.4.

例如,此容器用于注册最小 API 基础设施 — 格式化程序、Kestrel Web 服务器等。它是一个基本容器,因此它只公开了几种用于注册服务的方法,但您可以选择将其替换为第三方 DI 容器,该容器为您提供额外的功能,例如自动注册和 setter 注入。DI 容器内置于 ASP.NET Core 托管模型中,如图 8.4 所示。

alt text

Figure 8.4 The ASP.NET Core hosting model uses the DI container to fulfill dependencies when creating minimal API endpoint handlers.
图 8.4 ASP.NET Core 托管模型在创建最小 API 端点处理程序时使用 DI 容器来实现依赖项。

The hosting model pulls dependencies from the DI container when they’re needed. If the framework determines that it must invoke RegisterHandler due to the incoming URL/route, the RequestDelegateFactory responsible for creating minimal APIs asks the DI container for an IEmailSender implementation.

托管模型在需要时从 DI 容器中提取依赖项。如果框架确定它必须调用 RegisterHandler,因为传入URL/路由,负责创建最小 API 的 RequestDelegateFactory 向 DI 容器请求 IEmailSender 实现。

Note RequestDelegateFactory is part of the minimal API framework that’s responsible for invoking your minimal API handlers. You won’t use or interact with it directly, but it’s behind the scenes interacting with the DI container. I have a detailed series exploring this type on my blog at http://mng.bz/Gy6v. But be warned: this post goes into far more detail than most developers will ever need (or want)!
注意: RequestDelegateFactory 是负责调用最小 API 处理程序的最小 API 框架的一部分。您不会直接使用它或与之交互,但它在幕后与 DI 容器交互。我在 http://mng.bz/Gy6v 的博客上有一个详细的系列来探索这种类型的类型。但请注意:这篇文章比大多数开发人员需要(或想要)的要详细得多!

The DI container needs to know what to create when asked for IEmailSender, so you must have registered an implementation, such as EmailSender, with the container. When an implementation is registered, the DI container can inject it anywhere, which means that you can inject framework-related services (such as LinkGenerator from chapter 6) into your own custom services. It also means that you can register alternative versions of framework services and have the framework automatically use those versions in place of the defaults.

DI 容器需要知道在请求 IEmailSender 时要创建什么,因此您必须已向容器注册一个实现,例如 EmailSender。注册实现后,DI 容器可以将其注入到任何位置,这意味着您可以将与框架相关的服务(例如第 6 章中的 LinkGenerator)注入到您自己的自定义服务中。这也意味着您可以注册框架服务的替代版本,并让框架自动使用这些版本来代替默认版本。

Other ASP.NET Core infrastructure, such as the Model-View-Controller (MVC) and Razor Pages frameworks (which you learn about in part 3), uses dependency injection in a similar way to minimal APIs. These frameworks use the DI container to create the dependencies required by their own handlers, such as for a Razor Page (figure 8.5).

其他 ASP.NET Core 基础结构,例如模型视图控制器 (MVC) 和 Razor Pages 框架(在第 3 部分中介绍),以与最小 API 类似的方式使用依赖项注入。这些框架使用 DI 容器创建其自己的处理程序所需的依赖项,例如 Razor Page(图 8.5)。

alt text

Figure 8.5 The ASP.NET Core hosting model uses the DI container to fulfill dependencies when creating Razor Pages.
图 8.5 ASP.NET Core 托管模型在创建 Razor Pages 时使用 DI 容器来实现依赖项。

The flexibility to choose exactly how and which components you combine in your applications is one of the selling points of DI. In section 8.4 you’ll learn how to configure DI in your own ASP.NET Core application, using the default, built-in container.
DI 的卖点之一是可以灵活地选择在应用程序中组合的组件以及组合哪些组件。在第 8.4 节中,您将学习如何在拥有 ASP.NET Core 应用程序,使用默认的内置容器。

8.4 Adding ASP.NET Core framework services to the container

8.4 将 ASP.NET Core Framework 服务添加到容器中

Before ASP.NET Core, using DI was optional. By contrast, to build all but the most trivial ASP.NET Core apps, some degree of DI is required. As I’ve mentioned, the underlying framework depends on it, so features such as Razor Pages and authentication require you to configure the required services. In this section you’ll see how to register these framework services with the built-in container. In chapter 9 you’ll learn how to register your own services with the DI container.

在 ASP.NET Core 之前,使用 DI 是可选的。相比之下,要构建除最琐碎的 ASP.NET Core 应用程序之外的所有应用程序,需要一定程度的 DI。正如我所提到的,底层框架依赖于它,因此 Razor Pages 和身份验证等功能要求您配置所需的服务。在本节中,您将了解如何使用内置容器注册这些框架服务。在第 9 章中,您将学习如何使用 DI 容器注册自己的服务。

ASP.NET Core uses DI to configure both its internal components, such as the Kestrel web server, and extra features, such as Razor Pages. To use these components at runtime, the DI container needs to know about all the classes it will need. You register these services with the Services property on the WebApplicationBuilder instance in Program.cs.

ASP.NET Core 使用 DI 来配置其内部组件(如 Kestrel Web 服务器)和额外功能(如 Razor Pages)。要在运行时使用这些组件,DI 容器需要了解它需要的所有类。使用 Program.cs 中 WebApplicationBuilder 实例上的 Services 属性注册这些服务。

Note The Services property of WebApplicationBuilder is of type IServiceCollection. This is where you register the collection of services that the DI container knows about.
注意 的 Services 属性WebApplicationBuilder 的类型为IServiceCollection 的 API API 的您可以在此处注册 DI 容器知道的服务集合。

If you’re thinking “Wait—I have to configure all the internal components myself?”, don’t panic. Most of the core services are registered automatically by WebApplicationBuilder, and you don’t need to do anything else. To use other features, such as Razor Pages or authentication, you do need to register the components explicitly with the container in your app, but that’s not as hard as it sounds. All the common libraries you use expose handy extension methods to take care of the nitty-gritty details. These extension methods configure everything you need in one fell swoop instead of leaving you to wire everything up manually.

如果您在想“等等 — 我必须自己配置所有内部组件”,请不要惊慌。大多数核心服务都是由 WebApplicationBuilder 自动注册的,您无需执行任何其他作。要使用其他功能(如 Razor Pages 或身份验证),您确实需要向应用程序中的容器显式注册组件,但这并不像听起来那么难。您使用的所有公共库都公开了方便的扩展方法,以处理细节。这些扩展方法一举配置了您需要的一切,而不是让您手动连接所有内容。

The Razor Pages framework exposes the AddRazorPages() extension method, for example, which adds all the necessary framework services to your app. Invoke the extension method on the Services property of WebApplicationBuilder in Program.cs, as shown in the following listing.

例如,Razor Pages 框架公开了 AddRazorPages() 扩展方法,该方法将所有必要的框架服务添加到您的应用程序。在 Program.cs 中调用 WebApplicationBuilder 的 Services 属性上的扩展方法,如下面的清单所示。

Listing 8.6 Registering the Razor Pages services with the DI container

WebApplicationBuilder builder = WebApplication.CreateBuilder(args);
builder.Services.AddRazorPages(); ❶

WebApplication app = builder.Build();
app.MapRazorPages(); ❷
app.Run();

❶ The AddRazorPages extension method adds all necessary services to the
IServiceCollection.
AddRazorPages 扩展方法将所有必要的服务添加到 IServiceCollection。

❷ Registers all the Razor Pages in your application as endpoints
将应用程序中的所有 Razor 页面注册为终结点

It’s as simple as that. Under the hood, this call is registering multiple components with the DI container, using the same APIs you’ll see in chapter 9 for registering your own services.
就这么简单。在后台,此调用使用您将在第 9 章中看到的相同 API 向 DI 容器注册多个组件,以注册您自己的服务。

Note Don’t worry about the Razor Pages aspect of this code; you’ll learn how Razor Pages work in part 3. The important point of listing 8.6 is to show how to register and enable various features in ASP.NET Core.
注意 不必担心此代码的 Razor Pages 方面;您将在第 3 部分中了解 Razor Pages 的工作原理。列出 8.6 的重要一点是展示如何在 ASP.NET Core 中注册和启用各种功能。

Most nontrivial libraries that you add to your application will have services that you need to add to the DI container. By convention, each library that has necessary services should expose an Add*() extension method that you can call on WebApplicationBuilder.Services.

您添加到应用程序中的大多数重要库都将包含您需要添加到 DI 容器中的服务。按照约定,每个具有必要服务的库都应该公开一个 Add*() 扩展方法,您可以在 WebApplicationBuilder.Services 上调用该方法。

There’s no way of knowing exactly which libraries will require you to add services to the container; it’s generally a case of checking the documentation for any libraries you use. If you forget to add them, you may find that the functionality doesn’t work, or you might get a handy exception in your logs, like the one shown in figure 8.6. Keep an eye out for these exceptions, and be sure to register any services you need.

无法确切知道哪些库需要您向容器添加服务;通常是检查您使用的任何库的文档的情况。如果你忘记添加它们,你可能会发现该功能不起作用,或者你可能会在日志中得到一个方便的异常,如图 8.6 所示。请留意这些例外情况,并确保注册您需要的任何服务。

alt text

Figure 8.6 If you fail to call AddRazorPages(), you’ll get an exception when your app tries to start.
图 8.6 如果在使用 Razor Pages 的应用程序中调用 AddRazorPages() 失败,则当应用程序尝试启动时将出现异常。

It’s also worth noting that some of the Add*() extension methods allow you to specify additional options when you call them, often by way of a lambda expression. You can think of these options as configuring the installation of a service into your application. The AddRazorPages method, for example, provides a wealth of options for fine-tuning its behavior if you want to get your hands dirty, as shown by the IntelliSense snippet in figure 8.7.

还值得注意的是,某些 Add*() 扩展方法允许您在调用它们时指定其他选项,通常是通过 lambda 表达式。您可以将这些选项视为在应用程序中配置服务安装。例如,AddRazorPages 方法提供了大量选项,用于微调其行为(如果您想动手),如图 8.7 中的 IntelliSense 代码段所示。

alt text

Figure 8.7 Configuring services when adding them to the service collection. The AddRazorPages() function allows you to configure a wealth of the internals of the framework.
图 8.7 在将服务添加到服务集合时配置服务。AddRazorPages() 函数允许您配置框架的大量内部结构。

It’s all very well registering services with the DI container, but the important question is how to use the container to get an instance of a registered service. In section 8.5 we look at two possible ways to access these services and discuss when you should choose one over the other.

向 DI 容器注册服务一切都很好,但重要的问题是如何使用容器来获取已注册服务的实例。在 Section 8.5 中,我们将介绍访问这些服务的两种可能方法,并讨论何时应该选择其中一种。

8.5 Using services from the DI container

8.5 使用 DI 容器中的服务

In a minimal API application, you have two main ways to access services from the DI container:
在最小 API 应用程序中,有两种主要方法可以从 DI 容器访问服务:

  • Inject services into an endpoint handler.
    将服务注入到终端节点处理程序中。

  • Access the DI container directly in Program.cs.
    直接在 Program.cs 中访问 DI 容器。

The first approach—injecting services into an endpoint handler—is the most common way to access the root of a dependency graph. You should use this approach in almost all cases in your minimal API applications. You can inject a service into an endpoint handler by adding it as a parameter to your endpoint handler method, as you saw in chapters 6 and 7 when you injected a LinkGenerator instance into your handler.

第一种方法 — 将服务注入终端节点处理程序 — 是访问依赖关系图根的最常用方法。在最小 API 应用程序中,几乎在所有情况下都应该使用此方法。您可以通过将服务作为参数添加到端点处理程序方法中,将服务注入到端点处理程序中,就像您在第 6 章和第 7 章中看到的那样,当您将 LinkGenerator 实例注入到处理程序中时。

Listing 8.7 Injecting the LinkGenerator service in an endpoint handler

app.MapGet("/links", (LinkGenerator links) => ❶
{
    string link = links.GetPathByName("products");
    return $"View the product at {link}";
});

❶ The DI container creates a LinkGenerator instance and passes it as the argument to the handler.
DI 容器创建一个 LinkGenerator 实例,并将其作为参数传递给处理程序。

The minimal API infrastructure sees that you need an instance of the LinkGenerator, which is a service registered in the container, and asks the DI container to provide an instance of the service. The DI container either creates a new instance of LinkGenerator (or reuses an existing one) and returns it to the minimal API infrastructure. Then the LinkGenerator is passed as an argument to invoke the endpoint handler.

最小的 API 基础结构看到您需要一个 LinkGenerator 的实例,该实例是在容器中注册的服务,并要求 DI 容器提供服务的实例。DI 容器创建 LinkGenerator 的新实例(或重用现有实例)并将其返回到最小的 API 基础结构。然后,将 LinkGenerator 作为参数传递以调用端点处理程序。

Note Whether the DI container creates a new instance or reuses an existing instance depends on the lifetime used to register the service. You’ll learn about lifetimes in chapter 9.
注意 DI 容器是创建新实例还是重用现有实例取决于用于注册服务的生命周期。您将在第 9 章中了解一生。

As already mentioned, the DI container creates an entire dependency graph. The LinkGenerator implementation registered with the DI container declares the dependencies it requires by having parameters in its constructor, just as the EmailSender type from section 8.1 declared its dependencies. When the DI container creates the LinkGenerator, it first creates all the service’s dependencies and uses them to create the final LinkGenerator instance.

如前所述,DI 容器会创建一个完整的依赖项关系图。向 DI 容器注册的 LinkGenerator 实现通过其构造函数中的参数来声明它所需的依赖项,就像第 8.1 节中的 EmailSender 类型声明其依赖项一样。当 DI 容器创建 LinkGenerator 时,它首先创建服务的所有依赖项,并使用它们创建最终的 LinkGenerator 实例。

Injecting services into your handlers is the canonical DI approach for minimal API endpoint handlers, but sometimes you need to access a service outside the context of a request. You may have lots of reasons to do this, but some of the most common relate to working with a database or logging. You may want to run some code when your app is starting to update a database’s schema before the app starts handling requests, for example. If you need to access services in Program.cs outside the context of a request, you can retrieve services from the DI container directly by using the WebApplication.Services property, which exposes the container as an IServiceProvider.

将服务注入处理程序是最小 API 端点处理程序的规范 DI 方法,但有时您需要在请求上下文之外访问服务。您可能有很多理由这样做,但其中一些最常见的原因与使用数据库或日志记录有关。例如,当应用程序开始更新数据库的架构时,您可能希望在应用程序开始处理请求之前运行一些代码。如果需要在请求上下文之外访问 Program.cs 中的服务,则可以使用 WebApplication 直接从 DI 容器中检索服务。Services 属性,该属性将容器公开为 IServiceProvider。

Note You register services with the IServiceCollection exposed on WebApplicationBuilder.Services. You request services with the IServiceProvider exposed on WebApplication.Services.
注意 向 IServiceCollection 注册服务在 WebApplicationBuilder.Services 上公开。你请求IServiceProvider 的服务WebApplication.Services 的 Web 应用程序。

The IServiceProvider acts as a service locator, so you can request services from it directly by using GetService() and GetRequiredService():

IServiceProvider 充当服务定位器,因此您可以使用 GetService() 和 GetRequiredService() 直接向它请求服务:

  • GetService<T>()—Returns the requested service T if it is available in the DI container; otherwise, returns null
    GetService<T>() — 如果请求的服务 T 在 DI 容器中可用,则返回该服务 T;否则,返回 null

  • GetRequiredService<T>()—Returns the requested service T if it is available in the DI container; otherwise, throws an InvalidOperationException
    GetRequiredService<T>() — 如果请求的服务 T 在 DI 容器中可用,则返回该服务 T;否则,将引发 InvalidOperationException

I generally favor GetRequiredService over GetService, as it immediately tells you whether you have a configuration problem with your DI container by throwing an exception, and you don’t have to handle nulls.

我通常更喜欢 GetRequiredService 而不是 GetService,因为它通过引发异常立即告诉您 DI 容器是否存在配置问题,并且您不必处理 null。

You can use either of these methods in Program.cs to retrieve a service from DI. The following listing shows how to retrieve a LinkGenerator from the DI container, but you can access any service registered in the DI container here.

您可以在 Program.cs 中使用这两种方法中的任何一种从 DI 检索服务。下面的清单显示了如何从 DI 容器中检索 LinkGenerator,但您可以在此处访问在 DI 容器中注册的任何服务。

Listing 8.8 Retrieving a service from the DI container using WebApplication.Services
清单 8.8 从 DI 容器中检索服务使用 WebApplication.Services

WebApplicationBuilder builder = WebApplication.CreateBuilder(args);
WebApplication app = builder.Build();

app.MapGet("/", () => "Hello World!");

LinkGenerator links = ❶
    app.Services.GetRequiredService<LinkGenerator>(); ❶

app.Run(); ❷

❶ Retrieves a service from the DI container using the GetRequiredService<T>()
extension method
使用 GetRequiredService<T>() 扩展方法从 DI 容器中检索服务

❷ You must access services before app.Run(), as this call blocks until your app
exits.
您必须先访问服务,然后才能应用。Run(),因为此调用会一直阻止,直到您的应用退出。

This approach, in which you call the DI container directly to ask for a class, is called the service locator pattern. Generally speaking, you should try to avoid this pattern in your code; include your dependencies as constructor or endpoint handler arguments directly, and let the DI container provide them for you. This pattern is the only way to access DI services in the main loop of your application in Program.cs, however, so don’t worry about using it here. Still, you should absolutely avoid accessing WebApplication.Services from inside your endpoint handlers or other types whenever possible.

在这种方法中,您可以直接调用 DI 容器来请求一个类,这种方法称为服务定位器模式。一般来说,您应该尽量避免在代码中使用这种模式;直接将您的依赖项作为构造函数或终端节点处理程序参数包含在内,并让 DI 容器为您提供它们。但是,此模式是在 Program.cs 中访问应用程序主循环中的 DI 服务的唯一方法,因此不必担心在此处使用它。不过,您绝对应该避免访问 WebApplication 。尽可能从终端节点处理程序或其他类型内部获取服务。

Note You can read about the service locator antipattern in Dependency Injection Principles, Practices, and Patterns, by Steven van Deursen and Mark Seemann (Manning, 2019).
注意 您可以在 Steven van Deursen 和 Mark Seemann 编写的 Dependency Injection Principles, Practices, and Patterns(Manning,2019 年)中阅读有关服务定位器反模式的信息。

In this chapter we covered some of the reasons to use DI in your applications, how to enable optional ASP.NET Core features by adding services to the DI container, and how to access services from the DI container by using injection into your endpoint handlers. In chapter 9 you’ll learn about service lifetimes and how to register your own services with the DI container.

在本章中,我们介绍了在应用程序中使用 DI 的一些原因,如何通过向 DI 容器添加服务来启用可选的 ASP.NET Core 功能,以及如何通过使用注入到端点处理程序中来访问 DI 容器中的服务。在第 9 章中,您将了解服务生命周期以及如何向 DI 容器注册自己的服务。

8.6 Summary

8.6 总结

DI is baked into the ASP.NET Core framework. You need to ensure that your application adds all the framework’s dependencies for optional features in Program.cs; otherwise, you’ll get exceptions at runtime when the DI container can’t find the required services.
DI 已融入 ASP.NET Core 框架中。您需要确保您的应用程序为 Program.cs 中的可选功能添加了框架的所有依赖项;否则,当 DI 容器找不到所需的服务时,您将在运行时收到异常。

The dependency graph is the set of objects that must be created to create a specific requested root object. The DI container creates all these dependencies for you.
依赖关系图是创建特定请求的根对象时必须创建的对象集。DI 容器会为您创建所有这些依赖项。

You should aim to use explicit dependencies instead of implicit dependencies in most cases. ASP.NET Core uses constructor arguments and endpoint handler arguments to declare explicit dependencies.
在大多数情况下,您应该使用显式依赖项而不是隐式依赖项。ASP.NET Core 使用构造函数参数和终端节点处理程序参数来声明显式依赖项。

When discussing DI, the term service is used to describe any class or interface registered with the container.
在讨论 DI 时,术语 service 用于描述向容器注册的任何类或接口。

You register services with the DI container so that the container knows which implementation to use for each requested service. This registration typically takes the form “For interface X, use implementation Y.”
您可以向 DI 容器注册服务,以便容器知道要为每个请求的服务使用哪个实现。此注册通常采用“对于接口 X,使用实现 Y”的形式。

You must register services with the container by calling Addextension methods on the IServiceCollection exposed as WebApplicationBuilder.Services in Program.cs. If you forget to register a service that’s used by the framework or in your own code, you’ll get an InvalidOperationException at runtime.
必须通过在 Program.cs 中作为 WebApplicationBuilder.Services 公开的 IServiceCollection 上调用 Add扩展方法来向容器注册服务。如果您忘记注册框架使用的服务或在您自己的代码中注册的服务,您将在运行时收到 InvalidOperationException。

You can retrieve services from the DI container in your endpoint handlers by adding a parameter of the required type.
您可以通过添加所需类型的参数,从终端节点处理程序中的 DI 容器中检索服务。

You can retrieve services from the DI container in Program.cs via the service locator pattern by calling GetService<T>() or GetRequiredService<T>() on the IServiceProvider exposed as WebApplication.Services. Service location is generally considered to be an antipattern; generally, you shouldn’t use it inside your handler methods, but it’s fine to use it directly inside Program.cs.
您可以通过对公开为 WebApplication.Services 的 IServiceProvider 调用 GetService<T>()GetRequiredService<T>() Program.cs 中的服务定位器模式从 DI 容器中检索服务。服务位置通常被视为反模式;通常,您不应该在 Handler 方法中使用它,但可以直接在 Program.cs 中使用它。

GetService<T>() returns null if the requested service isn’t registered with the DI container. By contrast, GetRequiredService<T>() throws an InvalidOperationException.
GetService<T>() 如果请求的服务未注册到 DI 容器,则返回 null。相比之下,GetRequiredService<T>() 会引发 InvalidOperationException。

ASP.NET Core in Action 7 Model binding and validation in minimal APIs

7 Model binding and validation in minimal APIs
7 最小 API 中的模型绑定和验证

This chapter covers

本章涵盖

  • Using request values to create binding models
    使用请求值创建绑定模型

  • Customizing the model-binding process
    自定义模型绑定过程

  • Validating user input using DataAnnotations attributes
    使用 DataAnnotations 属性验证用户输入

In chapter 6 I showed you how to define a route with parameters—perhaps for the unique ID for a product API. But say a client sends a request to the product API. What then? How do you access the values provided in the request and read the JavaScript Object Notation (JSON) in the request body?
在第 6 章中,我向您展示了如何使用参数定义路由 — 可能是为了产品 API 的唯一 ID。但是,假设客户端向产品 API 发送请求。那又如何呢?如何访问请求中提供的值并读取请求正文中的 JavaScript 对象表示法 (JSON)?

For most of this chapter, in sections 7.1-7.9, we’ll look at model binding and how it simplifies reading data from a request in minimal APIs. You’ll see how to take the data posted in the request body or in the URL and bind it to C# objects, which are then passed to your endpoint handler methods as arguments. When your handler executes, it can use these values to do something useful—return a product’s details or change a product’s name, for example.

在本章的大部分内容中,在 7.1-7.9 节中,我们将介绍模型绑定以及它如何简化在最小 API 中从请求中读取数据的过程。您将了解如何获取请求正文或 URL 中发布的数据并将其绑定到 C# 对象,然后将这些对象作为参数传递给您的端点处理程序方法。当您的处理程序执行时,它可以使用这些值来执行一些有用的作,例如,返回产品的详细信息或更改产品的名称。

When your code is executing in an endpoint handler method, you might be forgiven for thinking that you can happily use the binding model without any further thought. Hold on, though. Where did that data come from? From a user—and you know users can’t be trusted! Section 7.10 focuses on how to make sure that the user-provided values are valid and make sense for your app.

当您的代码在终端节点处理程序方法中执行时,您可能会认为无需任何进一步考虑即可愉快地使用绑定模型,这是可以理解的。不过,请稍等。这些数据从何而来?从用户 - 以及你知道用户不可信!第 7.10 节重点介绍如何确保用户提供的值有效且对您的应用有意义。

Model binding is the process of taking the user’s raw HTTP request and making it available to your code by populating plain old CLR objects (POCOs), providing the input to your endpoint handlers. We start by looking at which values in the request are available for binding and where model binding fits in your running app.

模型绑定是通过填充普通旧 CLR 对象 (POCO) 来获取用户的原始 HTTP 请求并将其提供给您的代码的过程,从而为您的端点处理程序提供输入。我们首先查看请求中的哪些值可用于绑定,以及模型绑定在正在运行的应用程序中适合的位置。

7.1 Extracting values from a request with model binding

7.1 使用模型绑定从请求中提取值

In chapters 5 and 6 you learned that route parameters can be extracted from the request’s path and used to execute minimal API handlers. In this section we look in more detail at the process of extracting route parameters and the concept of model binding.

在第 5 章和第 6 章中,您了解了可以从请求的路径中提取路由参数,并用于执行最小的 API 处理程序。在本节中,我们将更详细地了解提取路由参数的过程和模型绑定的概念。

By now, you should be familiar with how ASP.NET Core handles a request by executing an endpoint handler. You’ve also already seen several handlers, similar to

到目前为止,您应该熟悉 ASP.NET Core 如何通过执行终端节点处理程序来处理请求。您也已经看到了几个处理程序,类似于

app.MapPost("/square/{num}", (int num) => num * num);

Endpoint handlers are normal C# methods, so the ASP.NET Core framework needs to be able to call them in the usual way. When handlers accept parameters as part of their method signature, such as num in the preceding example, the framework needs a way to generate those objects. Where do they come from, exactly, and how are they created?

端点处理程序是普通的 C# 方法,因此 ASP.NET Core 框架需要能够以通常的方式调用它们道路。当处理程序接受参数作为其方法签名的一部分时(例如前面示例中的 num),框架需要一种方法来生成这些对象。它们究竟来自哪里,又是如何产生的?

I’ve already hinted that in most cases, these values come from the request itself. But the HTTP request that the server receives is a series of strings. How does ASP.NET Core turn that into a .NET object? This is where model binding comes in.

我已经暗示过,在大多数情况下,这些值来自请求本身。但是服务器收到的 HTTP 请求是一系列字符串。ASP.NET Core 如何将其转换为 .NET 对象?这就是模型绑定的用武之地。

Definition Model binding extracts values from a request and uses them to create .NET objects. These objects are passed as method parameters to the endpoint handler being executed.
DEFINITION 模型绑定从请求中提取值,并使用它们创建 .NET 对象。这些对象作为方法参数传递给正在执行的端点处理程序。

The model binder is responsible for looking through the request that comes in and finding values to use. Then it creates objects of the appropriate type and assigns these values to your model in a process called binding.

模型绑定负责查看传入的请求并查找要使用的值。然后,它会创建适当类型的对象,并在称为 binding 的过程中将这些值分配给模型。

Note Model binding in minimal APIs (and in Razor Pages and Model-View-Controller [MVC]) is a one-way population of objects from the request, not the two-way data binding that desktop or mobile development sometimes uses.
注意 最小 API(以及 Razor Pages 和 Model-View-Controller [MVC])中的模型绑定是来自请求的对象的单向填充,而不是桌面或移动开发有时使用的双向数据绑定。

ASP.NET Core automatically creates the arguments that are passed to your handler by using the request’s properties, such as the request URL, any headers sent in the HTTP request, any data explicitly POSTed in the request body, and so on.

ASP.NET Core 使用请求的属性(例如请求 URL、HTTP 请求中发送的任何标头、请求正文中显式 POST编辑的任何数据等)自动创建传递给处理程序的参数。

Model binding happens before the filter pipeline and your endpoint handler execute, in the EndpointMiddleware, as shown in figure 7.1. The RoutingMiddleware is responsible for matching an incoming request to an endpoint and for extracting the route parameter values, but all the values at that point are strings. It’s only in the EndpointMiddleware that the string values are converted to the real argument types (such as int) needed to execute the endpoint handler.

模型绑定发生在过滤器管道和终端节点处理程序执行之前,在 EndpointMiddleware 中,如图 7.1 所示。RoutingMiddleware 负责将传入请求与终端节点匹配并提取路由参数值,但该点的所有值都是字符串s。只有在 EndpointMiddleware 中,字符串值才会被转换为执行端点处理程序所需的实际参数类型(比如 int)。

alt text

Figure 7.1 The RoutingMiddleware matches the incoming request to an endpoint and extracts the route parameters as strings. When the EndpointMiddleware executes the endpoint, the minimal API infrastructure uses model binding to create the arguments required to execute the endpoint handler, converting the string route values to real argument types such as int.
图 7.1 RoutingMiddleware 将传入的请求匹配到终端节点,并将路由参数提取为字符串s。当 EndpointMiddleware 执行端点时,最小的 API 基础设施使用模型绑定来创建执行端点处理程序所需的参数,将字符串路由值转换为实际参数类型,例如 int。

For every parameter in your minimal API endpoint handler, ASP.NET core must decide how to create the corresponding arguments. Minimal APIs can use six different binding sources to create the handler arguments:

对于最小 API 终端节点处理程序中的每个参数,ASP.NET 核心必须决定如何创建相应的参数。Minimal API 可以使用六个不同的绑定源来创建 handler 参数:

  • Route values—These values are obtained from URL segments or through default values after matching a route, as you saw in chapter 5.
    路由值 — 这些值是从 URL 分段或通过匹配路由后的默认值获取的,如第 5 章所示。

  • Query string values—These values are passed at the end of the URL, not used during routing.
    查询字符串值 – 这些值在 URL 末尾传递,在路由期间不使用。

  • Header values—Header values are provided in the HTTP request.
    标头值 — HTTP 请求中提供标头值。

  • Body JSON—A single parameter may be bound to the JSON body of a request.
    正文 JSON — 单个参数可以绑定到请求的 JSON 正文。

  • Dependency injected services—Services available through dependency injection can be used as endpoint handler arguments. We look at dependency injection in chapters 8 and 9.
    依赖项注入服务 - 通过依赖项注入提供的服务可用作终端节点处理程序参数。我们将在第 8 章和第 9 章中介绍依赖注入。

  • Custom binding—ASP.NET Core exposes methods for you to customize how a type is bound by providing access to the HttpRequest object.
    自定义绑定 — ASP.NET Core 公开了一些方法,供您通过提供对 HttpRequest 对象的访问来自定义类型的绑定方式。

Warning Unlike MVC controllers and Razor Pages, minimal APIs do not automatically bind to the body of requests sent as forms, using the application/x-www-form-urlencoded mime type. Minimal APIs will bind only to a JSON request body. If you need to work with form data in a minimal API endpoint, you can access it on HttpRequest.Form, but you won’t benefit from automatic binding.
警告 与 MVC 控制器和 Razor Pages 不同,最小的 API 不会使用 application/ x-www-form- urlencoded MIME 类型自动绑定到作为表单发送的请求正文。最小 API 将仅绑定到 JSON 请求正文。如果您需要在最小的 API 端点中处理表单数据,您可以在HttpRequest.Form 的 URL 请求,但你不会从自动绑定中受益。

We’ll look at the exact algorithm ASP.NET Core uses to choose which binding source to use in section 7.8, but we’ll start by looking at how ASP.NET Core binds simple types such as int and double.

我们将了解 ASP.NET Core 用于选择在 7.8 节中使用哪个绑定源的确切算法,但首先我们将了解 ASP.NET Core 如何绑定简单类型,例如 int 和 double。

7.2 Binding simple types to a request

7.2 将简单类型绑定到请求

When you’re building minimal API handlers, you’ll often want to extract a simple value from the request. If you’re loading a list of products in a category, for example, you’ll likely need the category’s ID, and in the calculator example at the start of section 7.1, you’ll need the number to square.

在构建最小 API 处理程序时,您通常需要从请求中提取一个简单的值。例如,如果要加载某个类别中的产品列表,则可能需要类别的 ID,在第 7.1 节开头的计算器示例中,需要将数字平方。

When you create an endpoint handler that contains simple types such as int, string, and double, ASP.NET Core automatically tries to bind the value to a route parameter, or a query string value:

当您创建包含简单类型(如 int、string 和 double)的终端节点处理程序时,ASP.NET Core 会自动尝试将值绑定到路由参数或查询字符串值:

  • If the name of the handler parameter matches the name of a route parameter in the route template, ASP.NET Core binds to the associated route value.
    如果 handler 参数的名称与路由模板中的路由参数名称匹配,则 ASP.NET Core 将绑定到关联的路由值。

  • If the name of the handler parameter doesn’t match any parameters in the route template, ASP.NET Core tries to bind to a query string value.
    如果 handler 参数的名称与路由模板中的任何参数都不匹配,则 ASP.NET Core 会尝试绑定到查询字符串值。

If you make a request to /products/123, for example, this will match the following endpoint:

例如,如果您向 /products/123 发出请求,这将匹配以下端点:

app.MapGet("/products/{id}", (int id) => $"Received {id}");

ASP.NET Core binds the id handler argument to the {id} route parameter, so the handler function is called with id=123. Conversely, if you make a request to /products?id=456, this will match the following endpoint instead:

ASP.NET Core 将 id 处理程序参数绑定到 {id} 路由参数,因此使用 id=123 调用处理程序函数。相反,如果您向 /products?id=456 发出请求,则这将匹配以下端点:

app.MapGet("/products", (int id) => $"Received {id}");

In this case, there’s no id parameter in the route template, so ASP.NET Core binds to the query string instead, and the handler function is called with id=456.

在这种情况下,路由模板中没有 id 参数,因此 ASP.NET Core 会改为绑定到查询字符串,并使用 id=456 调用处理程序函数。

In addition to this “automatic” inference, you can force ASP.NET Core to bind from a specific source by adding attributes to the parameters. [FromRoute] explicitly binds to route parameters, [FromQuery] to the query string, and [FromHeader] to header values, as shown in figure 7.2.

除了这种 “自动” 推理之外,您还可以通过向参数添加属性来强制 ASP.NET Core 从特定源进行绑定。[FromRoute] 显式绑定到路由参数,[FromQuery] 显式绑定到查询字符串,[FromHeader] 显式绑定到标头值,如图 7.2 所示。

alt text

Figure 7.2 Model binding an HTTP get request to an endpoint. The [FromRoute], [FromQuery], and [FromHeader] attributes force the endpoint parameters to bind to specific parts of the request. Only the [FromHeader] attribute is required in this case; the route parameter and query string would be inferred automatically.
图 7.2 将 HTTP get 请求绑定到终端节点的模型。[FromRoute]、[FromQuery] 和 [FromHeader] 属性强制终结点参数绑定到请求的特定部分。在这种情况下,只需要 [FromHeader] 属性;Route 参数和 Query String 将自动推断。

The [From] attributes override ASP.NET Core’s default logic and forces the parameters to load from a specific binding source. Listing 7.1 demonstrates three possible [From] attributes:

[From] 属性会覆盖 ASP.NET Core 的默认逻辑,并强制参数从特定的binding 源。清单 7.1 演示了三种可能[From]属性:

  • [FromQuery]—As you’ve already seen, this attribute forces a parameter to bind to the query string.
    [发件人查询]- 如您所见,此属性强制参数绑定到查询字符串。

  • [FromRoute]—This attribute forces the parameter to bind a route parameter value. Note that if a parameter of the required name doesn’t exist in the route template, you’ll get an exception at runtime.
    [从路线]- 此属性强制参数绑定路径参数值。请注意,如果路由模板中不存在所需名称的参数,您将在运行时收到异常。

  • [FromHeader]—This attribute binds a parameter to a header value in the request.
    [发件人标头]— 此属性将参数绑定到请求中的标头值。

Listing 7.1 Binding simple values using [From] attributes
列表 7.1 使用 [From] 绑定简单值属性

using Microsoft.AspNetCore.Mvc;                                       // ❶

WebApplicationBuilder builder = WebApplication.CreateBuilder(args);
WebApplication app = builder.Build();

app.MapGet("/products/{id}/paged",
    ([FromRoute] int id,                                              // ❷
    [FromQuery] int page,                                             // ❸
    [FromHeader(Name = "PageSize")] int pageSize)                     // ❹
    => $"Received id {id}, page {page}, pageSize {pageSize}");
app.Run();

❶ All the [From] attributes are in this namespace.
所有 [From
] 属性都位于此命名空间中。

❷ [FromRoute] forces the argument to bind to the route value.
[FromRoute] 强制参数绑定到路由值。

❸ [FromQuery] forces the argument to bind to the query string.
[FromQuery] 强制参数绑定到查询字符串。

❹ [FromHeader] binds the argument to the specified header.
[FromHeader] 将参数绑定到指定的标头。

Later, you’ll see other attributes, such as [FromBody] and [FromServices], but the preceding three attributes are the only [From*] attributes that operate on simple types such as int and double. prefer to avoid using [FromQuery] and [FromRoute] wherever possible and rely on the default binding conventions instead, as I find that they clutter the method signatures, and it’s generally obvious whether a simple type is going to bind to the query string or a route value.

稍后,您将看到其他属性,例如 [FromBody] 和 [FromServices],但前面的三个属性是唯一对简单类型(如 int 和 double)进行作的 [From*] 属性。我倾向于尽可能避免使用 [FromQuery] 和 [FromRoute],而是依赖默认的绑定约定,因为我发现它们会使方法签名变得混乱,并且通常很明显地将简单类型绑定到查询字符串还是路由值。

Tip ASP.NET Core binds to route parameters and query string values based on convention, but the only way to bind to a header value is with the [FromHeader] attribute.
提示 ASP.NET Core 根据约定绑定到路由参数和查询字符串值,但绑定到标头值的唯一方法是使用 [FromHeader] 属性。

You may be wondering what would happen if you try to bind a type to an incompatible value. What if you try to bind an int to the string value "two", for example? In that case ASP.NET Core throws a BadHttpRequestException and returns a 400 Bad Request response.
您可能想知道,如果尝试将类型绑定到不兼容的值,会发生什么情况。例如,如果您尝试将 int 绑定到字符串值 “two” 怎么办?在这种情况下 ASP.NET Core 会引发 BadHttpRequestException 并返回 400 Bad Request 响应。

Note When the minimal API infrastructure fails to bind a handler parameter due to an incompatible format, it throws a BadHttpRequestException and returns a 400 Bad Request response.
注意 当最小 API 基础设施由于格式不兼容而无法绑定处理程序参数时,它会引发 BadHttpRequestException 并返回 400 Bad Request 响应。

I’ve mentioned several times in this section that you can bind route values, query string values, and headers to simple types, but what is a simple type? A simple type is defined as any type that contains either of the following TryParse methods, where T is the implementing type:

我在本节中多次提到,您可以将路由值、查询字符串值和标头绑定到简单类型,但什么是 简单类型?简单类型定义为包含以下任一 TryParse 方法的任意类型,其中 T 是实现类型:

public static bool TryParse(string value, out T result);
public static bool TryParse(
    string value, IFormatProvider provider, out T result);

Types such as int and bool contain one (or both) these methods. But it’s also worth noting that you can create your own types that implement one of these methods, and they’ll be treated as simple types, capable of binding from route values, query string values, and headers.

int 和 bool 等类型包含一个(或两个)这些方法。但还值得注意的是,您可以创建自己的类型来实现这些方法之一,它们将被视为简单类型,能够从路由值、查询字符串值和标头进行绑定。

Figure 7.3 shows an example of implementing a simple strongly-typed ID[1] that’s treated as a simple type thanks to the TryParse method it exposes. When you send a request to /product/p123, ASP.NET Core sees that the ProductId type used in the endpoint handler contains a TryParse method and that the name of the id parameter has a matching route parameter name. It creates the id argument by calling ProductId.TryParse() and passes in the route value, p123.

图 7.3 显示了实现简单的强类型 ID1 的示例,由于它公开了 TryParse 方法,该 ID 1 被视为简单类型。当您向 /product/p123 发送请求时,ASP.NET Core 会发现终端节点处理程序中使用的 ProductId 类型包含 TryParse 方法,并且 id 参数的名称具有匹配的路由参数名称。它通过调用 ProductId.TryParse() 创建 id 参数,并传入路由值 p123。

alt text

Figure 7.3 The routing middleware matches the incoming URL to the endpoint. The endpoint middleware attempts to bind the route parameter id to the endpoint parameter. The endpoint parameter type ProductId implements TryParse. If parsing is successful, the parsed parameter is used to call the endpoint handler. If parsing fails, the endpoint middleware returns a 400 Bad Request response.
图 7.3 路由中间件将传入的 URL 与端点匹配。终端节点中间件尝试将路由参数 ID 绑定到 endpoint 参数。终端节点参数类型 ProductId 实现 TryParse。如果解析成功,则 parsed 参数用于调用终端节点处理程序。如果解析失败,终端节点中间件将返回 400 Bad Request 响应。

Listing 7.2 shows how you could implement the TryParse method for ProductId. This method creates a ProductId from strings that consist of an integer prefixed with 'p' (p123 or p456, for example). If the input string matches the required format, it creates a ProductId instance and returns true. If the format is invalid, it returns false, binding fails, and a 400 Bad Request is returned.

清单 7.2 展示了如何实现 ProductId 的 TryParse 方法。此方法从字符串s 创建一个 ProductId,该字符串由一个前缀为 'p' 的整数组成(例如 p123 或 p456)。如果输入字符串与所需的格式匹配,它将创建一个 ProductId 实例并返回 true。如果格式无效,则返回 false,绑定失败,并返回 400 Bad Request。

Listing 7.2 Implementing TryParse in a custom type to allow parsing from route values
清单 7.2 在自定义类型中实现 TryParse 以允许从路由值解析

WebApplicationBuilder builder = WebApplication.CreateBuilder(args);
WebApplication app = builder.Build();

app.MapGet("/product/{id}", (ProductId id) => $"Received {id}");             // ❶
app.Run();

readonly record struct ProductId(int Id)                                     // ❷
{
    public static bool TryParse(string? s, out ProductId result)             // ❸
    {
    if (s is not null                                                        // ❹
            && s.StartsWith('p')                                             // ❹
            && int.TryParse(                                                 // ❺
                s.AsSpan().Slice(1),                                         // ❻
                out int id))                                                 // ❼
        {
        result = new ProductId(id);                                          // ❽
            return true;                                                     // ❽
        }
    result = default;                                                        // ❾
        return false;                                                        // ❾
    }
}

❶ ProductId automatically binds to route values as it implements TryParse.
ProductId 在实现 TryParse 时会自动绑定到路由值。

❷ ProductId is a C# 10 record struct.
ProductId 是 C# 10 记录结构。

❸ It implements TryParse, so it’s treated as a simple type by minimal APIs.
它实现了 TryParse,因此它被最小的 API 视为简单类型。

❹ Checks that the string is not null and that the first character in the string is ‘p’ .
检查字符串是否不为 null,以及字符串中的第一个字符是否为 'p' 。

❺ and if it is, tries to parse the remaining characters as an integer
如果是,则尝试将剩余字符解析为整数

❻ Efficiently skips the first character by treating the string as a ReadOnlySpan
通过将字符串视为 ReadOnlySpan 来有效地跳过第一个字符

❼ If the string was parsed successfully, id contains the parsed value.
如果字符串解析成功,则 id 包含解析的值。

❽ Everything parsed successfully, so creates a new ProductId and returns true

❾ Something went wrong, so returns false and assigns a default value to the
(unused) result
所有内容都解析成功,因此创建一个新的 ProductId 并返回 true

Using modern C# and .NET features
使用现代 C# 和 .NET 功能
Listing 7.2 included some C# and .NET features that you may not have seen before, depending on your background:
清单 7.2 包含了一些您以前可能没有见过的 C# 和 .NET 功能,具体取决于您的背景:
· Pattern matching for null values—s is not null. Pattern matching features have been introduced gradually into C# since C# 7. The is not null pattern, introduced in C# 9, has some minor advantages over the common != null expression. You can read all about pattern matching at http://mng.bz/gBxl.
空值的模式匹配 - s 不为空。自 C# 7 以来,模式匹配功能已逐渐引入 C# 中。C# 9 中引入的 is not null 模式与常见的 != null 表达式相比,具有一些细微的优势。您可以在 http://mng.bz/gBxl 阅读有关模式匹配的所有信息。
· Records and struct records—readonly record struct. Records are syntactical sugar over normal class and struct declarations, which make declaring new types more succinct and provide convenience methods for working with immutable types. Record structs were introduced in C# 10. You can read more at http://mng.bz/5wWz.
记录和结构记录 - 只读记录结构。记录是普通类和结构声明的语法糖,这使得声明新类型更加简洁,并为使用不可变类型提供了便捷的方法。记录结构是在 C# 10 中引入的。您可以在 http://mng.bz/5wWz 上阅读更多内容。
· Span for performance—s.AsSpan(). Span and ReadOnlySpan were introduced in .NET Core 2.1 and are particularly useful for reducing allocations when working with string values. You can read more about them at http://mng.bz/6DNy.
Span 用于性能 - s.AsSpan()。 Span 和 ReadOnlySpan 是在 .NET Core 2.1 中引入的,对于在处理字符串值时减少分配特别有用。您可以在 http://mng.bz/6DNy 上阅读更多关于它们的信息。
· ValueTask—It’s not shown in listing 7.2, but many of the APIs in ASP.NET Core use ValueTask instead of the more common Task for APIs that normally complete asynchronously but may complete asynchronously. You can read about why they were introduced and when to use them at http://mng.bz/o1GM.
ValueTask — 它未显示在清单 7.2 中,但 ASP.NET Core 中的许多 API 都使用 ValueTask,而不是更常见的 Task,用于通常异步完成但可能异步完成的 API。您可以在 http://mng.bz/o1GM 上阅读有关引入它们的原因以及何时使用它们的信息。
Don’t worry if you’re not familiar with these constructs. C# is a fast-moving language, so keeping up can be tricky, but there’s generally no reason you need to use the new features. Nevertheless, it’s useful to be able to recognize them sot hat you can read and understand code that uses them.
如果您不熟悉这些结构,请不要担心。C# 是一种快速发展的语言,因此跟上步伐可能很棘手,但通常没有理由需要使用新功能。尽管如此,能够识别它们还是很有用的,这样您就可以阅读和理解使用它们的代码。
If you’re keen to embrace new features, you might consider implementing the IParsable interface when you implement TryParse. This interface uses the static abstract interfaces feature, which was introduced in C# 11, and requires implementing both a TryParse and Parse method. You can read more about the IParsable interface in the announcement post at http://mng.bz/nW2K.
如果您热衷于采用新功能,则可以考虑在实现 TryParse 时实现 IParsable 接口。此接口使用 C# 11 中引入的静态抽象接口功能,并且需要实现 TryParse 和 Parse 方法。‌‌您可以在 http://mng.bz/nW2K 的公告帖子中阅读有关 IParsable 接口的更多信息。

Now we’ve looked extensively at binding simple types to route values, query strings, and headers. In section 7.3 we’ll learn about binding to the body of a request by deserializing JSON to complex types.

现在,我们已经广泛研究了如何将简单类型绑定到路由值、查询字符串和标头。在第 7.3 节中,我们将了解如何通过将 JSON 反序列化为复杂类型来绑定到请求正文。

7.3 Binding complex types to the JSON body

7.3 将复杂类型绑定到 JSON 正文

Model binding in minimal APIs relies on certain conventions to simplify the code you need to write. One such convention, which you’ve already seen, is about binding to route parameters and query string values. Another important convention is that minimal API endpoints assume that requests will be sent using JSON.

最小 API 中的模型绑定依赖于某些约定来简化您需要编写的代码。其中一个约定您已经看到,它是关于绑定到路由参数和查询字符串值的。另一个重要的约定是,最小 API 端点假定将使用 JSON 发送请求。

Minimal APIs can bind the body of a request to a single complex type in your endpoint handler by deserializing the request from JSON. That means that if you have an endpoint such as the one in the following listing, ASP.NET Core will automatically deserialize the request for you from JSON, creating the Product argument.

最小 API 可以通过从 JSON 反序列化请求,将请求正文绑定到终端节点处理程序中的单个复杂类型。这意味着,如果您有一个终端节点(如下面的清单中的终端节点),ASP.NET Core 将自动从 JSON 反序列化请求,从而创建 Product 参数。

Listing 7.3 Automatically deserializing a JSON request from the body
清单 7.3 从正文中自动反序列化 JSON 请求

WebApplicationBuilder builder = WebApplication.CreateBuilder(args);
WebApplication app = builder.Build();

app.MapPost("/product", (Product product) => $"Received {product}");  // ❶

app.Run();

record Product(int Id, string Name, int Stock);                       // ❷

❶ Product is a complex type, so it’s bound to the JSON body of the request.
Product 是一种复杂类型,因此它绑定到请求的 JSON 正文。

❷ Product doesn’t implement TryParse, so it’s a complex type.
Product 没有实现 TryParse,所以它是一个复杂的类型。

If you send a POST request to /product for the app in listing 7.3, you need to provide valid JSON in the request body, such as

如果向清单 7.3 中的应用程序的 /product 发送 POST 请求,则需要在请求正文中提供有效的 JSON,例如

{ "id": 1, "Name": "Shoes", "Stock": 12 }

ASP.NET Core uses the built-in System.Text.Json library to deserialize the JSON into a Product instance and uses it as the product argument in the handler.

ASP.NET Core 使用内置的 System.Text.Json 库将 JSON 反序列化为 Product 实例,并将其用作处理程序中的 product 参数。

Configuring JSON binding with System.Text.Json
使用 System.Text.Json 配置 JSON 绑定
The System.Text.Json library, introduced in .NET Core 3.0, provides a high-performance, low-allocation JSON serialization library. It was designed to be something of a successor to the ubiquitous Newtonsoft.Json library, but it trades flexibility for performance.
.NET Core 3.0 中引入的 System.Text.Json 库提供高性能、低分配的 JSON 序列化库。它旨在成为无处不在的 Newtonsoft.Json 库的继任者,但它以灵活性换取了性能。
Minimal APIs use System.Text.Json for both JSON deserialization (when binding to a request’s body) and serialization (when writing results, as you saw in chapter 6). Unlike for MVC and Razor Pages, you can’t replace the JSON serialization library used by minimal APIs, so there’s no way to use Newtonsoft.Json instead. But you can customize some of the library’s serialization behavior for your minimal APIs.
最小 API 使用 System.Text.Json 进行 JSON 反序列化(绑定到请求正文时)和序列化(写入结果时,如第 6 章所示)。与 MVC 和 Razor Pages 不同,您无法替换最小 API 使用的 JSON 序列化库,因此无法改用 Newtonsoft.Json。但是,您可以为最小的 API 自定义库的某些序列化行为。
You can set System.Text.Json, for example, to relax some of its strictness to allow trailing commas in the JSON and control how property names are serialized with code like the following example:
例如,您可以设置 System.Text.Json 以放宽其一些严格性,以允许 JSON 中使用尾部逗号,并控制如何使用代码序列化属性名称,如以下示例所示:

WebApplicationBuilder builder = WebApplication.CreateBuilder(args);
builder.Services.ConfigureRouteHandlerJsonOptions(o => {
    o.SerializerOptions.AllowTrailingCommas = true;
    o.SerializerOptions.PropertyNamingPolicy = JsonNamingPolicy.CamelCase;
    o.SerializerOptions.PropertyNameCaseInsensitive = true;
});

Typically, the automatic binding for JSON requests is convenient, as most APIs these days are built around JSON requests and responses. The built-in binding uses the most performant approach and eliminates a lot of boilerplate that you’d otherwise need to write yourself. Nevertheless, bear several things in mind when you’re binding to the request body:

通常,JSON 请求的自动绑定很方便,因为现在大多数 API 都是围绕 JSON 请求和响应构建的。内置绑定使用性能最高的方法,并消除了许多您需要自己编写的样板文件。尽管如此,请熊绑定到请求正文时,请记住以下几点:

  • You can bind only a single handler parameter to the JSON body. If more than one complex parameter is eligible to bind to the body, you’ll get an exception at runtime when the app receives its first request.
    您只能将单个处理程序参数绑定到 JSON 正文。如果多个复杂参数符合绑定到正文的条件,则当应用程序收到其第一个请求时,您将在运行时收到异常。

  • If the request body isn’t JSON, the endpoint handler won’t run, and the EndpointMiddleware will return a 415 Unsupported Media Type response.
    如果请求正文不是 JSON,则终端节点处理程序不会运行,并且 EndpointMiddleware 将返回 415 Unsupported Media Type 响应。

  • If you try to bind to the body for an HTTP verb that usually doesn’t send a body (GET, HEAD, OPTIONS, DELETE, TRACE, and CONNECT), you’ll get an exception at runtime. If you change the endpoint in listing 7.3 to MapGet instead of MapPost, for example, you’ll get an exception on your first request, as shown in figure 7.4.
    如果您尝试绑定到通常不发送正文的 HTTP 动词(GET、HEAD、OPTIONS、DELETE、TRACE 和 CONNECT)的正文,则会在运行时收到异常。例如,如果将清单 7.3 中的端点更改为 MapGet 而不是 MapPost,则第一个请求将收到异常,如图 7.4 所示。

  • If you’re sure that you want to bind the body of these requests, you can override the preceding behavior by applying the [FromBody] attribute to the handler parameter. I strongly advise against this approach, though: sending a body with GET requests is unusual, could confuse the consumers of your API, and is discouraged in the HTTP specification (https://www.rfc-editor.org/rfc/rfc9110#name-get).
    如果确定要绑定这些请求的正文,可以通过将 [FromBody] 属性应用于 handler 参数来替代上述行为。不过,我强烈建议不要使用这种方法:发送带有 GET 请求的正文是不寻常的,可能会使 API 的使用者感到困惑,并且在 HTTP 规范 (https://www.rfc- editor.org/rfc/rfc9110#name-get) 中不建议这样做。

  • It’s uncommon to see, but you can also apply [FromBody] to a simple type parameter to force it to bind to the request body instead of to the route/query string. As for complex types, the body is deserialized from JSON into your parameter.
    这种情况并不常见,但你也可以将 [FromBody] 应用于简单类型参数,以强制它绑定到请求正文,而不是路由到路由/查询字符串。对于复杂类型,正文从 JSON 反序列化为参数。

alt text

Figure 7.4 If you try to bind the body to a parameter for a GET request, you’ll get an exception when your app receives its first request.
图 7.4 如果您尝试将 body 绑定到 GET 请求的参数,则当应用程序收到其第一个请求时,您将收到异常。

We’ve discussed binding of both simple types and complex types. Unfortunately, now it’s time to admit to a gray area: arrays, which can be simple types or complex types.

我们已经讨论了简单类型和复杂类型的绑定。不幸的是,现在是时候承认一个灰色地带了:数组,它可以是简单类型或复杂类型。

7.4 Arrays: Simple types or complex types?

7.4 数组:简单类型还是复杂类型?

It’s a little-known fact that entries in the query string of a URL don’t have to be unique. The following URL is valid, for example, even though it includes a duplicate id parameter:

一个鲜为人知的事实是,URL 的查询字符串中的条目不必是唯一的。例如,以下 URL 有效,即使它包含重复的 id 参数:

/products?id=123&id=456

So how do you access these query string values with minimal APIs? If you create an endpoint like

那么,如何使用最少的 API 访问这些查询字符串值呢?如果您创建类似于

app.MapGet("/products", (int id) => $"Received {id}");

a request to /products?id=123 would bind the id parameter to the query string, as you’d expect. But a request that includes two id values in the query string, such as /products?id=123&id=456, will cause a runtime error, as shown in figure 7.5. ASP.NET Core returns a 400 Bad Request response without the handler’s or filter pipeline’s running at all.

如您所料,对 /products?id=123 的请求会将 id 参数绑定到查询字符串。但是,在查询字符串中包含两个 id 值的请求(例如 /products?id=123&id=456)将导致运行时错误,如图 7.5 所示。ASP.NET Core 返回 400 Bad Request 响应,而处理程序或筛选器管道根本没有运行。

alt text

Figure 7.5 Attempting to bind a handler with a signature such as (int id) to a query string that contains ?id=123&id=456 causes an exception at runtime and a 400 Bad Request response.

图 7.5 尝试将具有 (int id) 等签名的处理程序绑定到包含 ?id=123&id=456 的查询字符串会导致运行时出现异常和 400 Bad Request 响应。

If you want to handle query strings like this one, so that users can optionally pass multiple possible values for a parameter, you need to use arrays. The following listing shows an example of an endpoint that accepts multiple id values from the query string and binds them to an array.

如果要处理像这样的查询字符串,以便用户可以选择为参数传递多个可能的值,则需要使用数组。以下清单显示了一个终端节点示例,该终端节点接受来自查询字符串的多个 id 值并将它们绑定到数组。

Listing 7.4 Binding multiple values for a parameter in a query string to an array
清单 7.4 为 中的参数绑定多个值数组的查询字符串

WebApplicationBuilder builder = WebApplication.CreateBuilder(args);
WebApplication app = builder.Build();

app.MapGet("/products/search",
    (int[] id) => $"Received {id.Length} ids");    // ❶

app.Run();

❶ The array will bind to multiple instances of id in the query string.
数组将绑定到查询字符串中 id 的多个实例。

If you’re anything like me, the fact that the int[] handler parameter in listing 7.4 is called id and not ids will really bug you. Unfortunately, you have to use id here so that the parameter binds correctly to a query string like ?id=123&id=456. If you renamed it ids, the query string would need to be ?ids=123&ids=456.

如果你和我一样,清单 7.4 中的 int[] handler 参数叫 id 而不是 ids 这一事实真的会让你感到困扰。遗憾的是,您必须在此处使用 id,以便参数正确绑定到查询字符串,例如 ?id=123&id=456。如果您将其重命名为 ids,则查询字符串需要为 ?ids=123&ids=456。

Luckily, you have another option. You can control the name of the target that a handler parameter binds to by using the [FromQuery] and [FromRoute] attributes, similar to the way you use [FromHeader]. For this example, you can have the best of both words by renaming the handler parameter ids and adding the [FromQuery] attribute:

幸运的是,您还有另一种选择。您可以使用 [FromQuery] 和 [FromRoute] 属性来控制处理程序参数绑定到的目标的名称,类似于使用 [FromHeader] 的方式。对于此示例,您可以通过重命名处理程序参数 ID 并添加 [FromQuery] 属性来获得两全其美的效果:

app.MapGet("/products/search",
([FromQuery(Name = "id")] int[] ids) => $"Received {ids.Length} ids");

Now you can sleep easy. The handler parameter has a better name, but it still binds to the query string ?id=123&id=456 correctly.

现在您可以安心入睡了。handler 参数具有更好的名称,但它仍正确绑定到查询字符串 ?id=123&id=456。

Tip You can bind array parameters to multiple header values in the same way that you do for as query string values, using the [FromHeader] attribute.
提示 可以使用 [FromHeader] 属性,以与查询字符串值相同的方式将数组参数绑定到多个标头值。

The example in listing 7.4 binds an int[], but you can bind an array of any simple type, including custom types with a TryParse method (listing 7.2), as well as string[] and StringValues.

清单 7.4 中的示例绑定了一个 int[],但你可以绑定任何简单类型的数组,包括带有 TryParse 方法的自定义类型(清单 7.2),以及 string[] 和 StringValues。

Note StringValues is a helper type in the Microsoft.Extensions.Primitives namespace that represents zero, one, or many strings in an efficient way.
注意 StringValues 是 Microsoft.Extensions.Primitives 命名空间中的帮助程序类型,它以高效的方式表示零个、一个或多个字符串。

So where is that gray area I mentioned? Well, arrays work as I’ve described only if

那么我提到的灰色地带在哪里呢?好吧,数组只有在

  • You’re using an HTTP verb that typically doesn’t include a request body, such as GET, HEAD, or DELETE.
    您使用的是通常不包含请求正文的 HTTP 动词,例如 GET、HEAD 或 DELETE。

  • The array is an array of simple types (or string[] or StringValues).
    该数组是简单类型(或string[] 或 StringValues)。

If either of these statements is not true, ASP.NET Core will attempt to bind the array to the JSON body of the request instead. For POST requests (or other verbs that typically have a request body), this process works without problems: the JSON body is deserialized to the parameter array. For GET requests (and other verbs without a body), it causes the same unhandled exception you saw in figure 7.4 when a body binding is detected in one of these verbs.

如果这些语句中的任何一个不 为 true,则 ASP.NET Core 将尝试将数组绑定到请求的 JSON 正文。对于 POST 请求(或其他通常具有请求正文的动词),此过程可以正常工作:JSON 正文被反序列化为参数数组。对于 GET 请求(以及其他没有正文的动词),当在其中一个动词中检测到正文绑定时,它会导致您在图 7.4 中看到的相同未处理异常。

Note As before, when binding body parameters, you can work around this situation for GET requests by adding an explicit [FromBody] to the handler parameter, but you shouldn’t!
注意 和以前一样,在绑定 body 参数时,您可以通过向 handler 参数添加显式 [FromBody] 来解决 GET 请求的这种情况,但您不应该这样做!

We’ve covered binding both simple types and complex types, from the URL and the body, and we’ve even looked at some cases in which a mismatch between what you expect and what you receive causes errors. But what if a value you expect isn’t there? In section 7.5 we look at how you can choose what happens.

我们已经介绍了从 URL 和正文绑定简单类型和复杂类型,我们甚至研究了一些情况,在这些情况下,你期望的和你收到的内容不匹配会导致错误。但是,如果您期望的值不存在怎么办?在 7.5 节中,我们将了解如何选择发生的情况。

7.5 Making parameters optional with nullables

7.5 使参数对可为 null 值

We’ve described lots of ways to bind parameters to minimal API endpoints. If you’ve been experimenting with the code samples and sending requests, you may have noticed that if the endpoint can’t bind a parameter at runtime, you get an error and a 400 Bad Request response. If you have an endpoint that binds a parameter to the query string, such as

我们已经介绍了许多将参数绑定到最小 API 端点的方法。如果您一直在试验代码示例并发送请求,您可能已经注意到,如果终端节点在运行时无法绑定参数,则会收到错误和 400 Bad Request 响应。如果您有一个将参数绑定到查询字符串的终端节点,例如

app.MapGet("/products", (int id) => $"Received {id}");

but you send a request without a query string or with the wrong name in the query string, such as a request to /products?p=3, the EndpointMiddleware throws an exception, as shown in figure 7.6. The id parameter is required, so if it can’t bind, you’ll get an error message and a 400 Bad Request response, and the endpoint handler won’t run.

但是您发送的请求没有查询字符串或查询字符串中的名称错误,例如对/products?p=3 中,EndpointMiddleware 会抛出一个exception 的 intent 示例,如图 7.6 所示。id 参数是必需的,因此如果它无法绑定,您将收到一条错误消息和一个400 Bad Request 响应,并且终端节点处理程序不会运行。

alt text

Figure 7.6 If a parameter can’t be bound because a value is missing, the EndpointMiddleware throws an exception and returns a 400 Bad Request response. The endpoint handler doesn’t run.
图 7.6 如果某个参数因为缺少值而无法绑定,则 EndpointMiddleware 会抛出一个exception 并返回 400 Bad Request 响应。终端节点处理程序不运行。

All parameters are required regardless of which binding source they use, whether that’s from a route value, a query string value, a header, or the request body. But what if you want a handler parameter to be optional? If you have an endpoint like this one,

无论它们使用哪个绑定源,无论是来自路由值、查询字符串值、标头还是请求正文,所有参数都是必需的。但是,如果您希望 handler 参数是可选的,该怎么办?如果您有像这样的终端节点,

app.MapGet("/stock/{id?}", (int id) => $"Received {id}");

given that the route parameter is marked optional, requests to both /stock/123 and /stock will invoke the handler. But in the latter case, there’ll be no id route value, and you’ll get an error like the one shown in figure 7.6.

鉴于 route 参数标记为可选,则对 /stock/123 和 /stock 的请求都将调用处理程序。但在后一种情况下,将没有 id 路由值,并且您将收到如图 7.6 所示的错误。

The way around this problem is to mark the handler parameter as optional by making it nullable. Just as ? signifies optional in route templates, it signifies optional in the handler parameters. You can update the handler to use int? instead of int, as shown in the following listing, and the endpoint will handle both /stock/123 and /stock without errors.

解决此问题的方法是通过将 handler 参数设为 null,将其标记为可选。就像 ? 表示 optional 在路由模板中,它在处理程序参数中表示 optional。您可以更新处理程序以使用 int? 而不是 int,如下面的清单所示,并且端点将同时处理 /stock/123 和 /stock,而不会出错。

Listing 7.5 Using optional parameters in endpoint handlers
列表 7.5 在 endpoint 中使用可选参数处理器

WebApplicationBuilder builder = WebApplication.CreateBuilder(args);
WebApplication app = builder.Build();

app.MapGet("/stock/{id?}", (int? id) => $"Received {id}");            // ❶

app.MapGet("/stock2", (int? id) => $"Received {id}");                 // ❷

app.MapPost("/stock", (Product? product) => $"Received {product}");   // ❸

app.Run();

record Product(int Id, string Name, int Stock);

❶ Uses a nullable simple type to indicate that the value is optional, so id is null when calling /stock
使用可为 null 的简单类型来指示值是可选的,因此在调用 /stock 时 id 为 null

❷ This example binds to the query string. Id will be null for the request /stock2.
此示例绑定到查询字符串。请求 /stock2 的 Id 将为 null。

❸ A nullable complex type binds to the body if it’s available; otherwise, it’s null.
如果可用,则可为 null 的复杂类型绑定到正文;否则,它是 null。

If no corresponding route value or query string contains the required value and the handler parameter is optional, the EndpointHandler uses null as the argument when invoking the endpoint handler. Similarly, for complex types that bind to the request body, if the request doesn’t contain anything in the body and the parameter is optional, the handler will have a null argument.

如果没有相应的路由值或查询字符串包含所需的值,并且 handler 参数是可选的,则 EndpointHandler 在调用终端节点处理程序时使用 null 作为参数。同样,对于绑定到请求正文的复杂类型,如果请求不包含body 中的任何内容,并且参数是可选的,则处理程序将具有 null 参数。

Warning If the request body contains the literal JSON value null and the handler parameter is marked optional, the handler argument will also be null. If the parameter isn’t marked optional, you get the same error as though the request didn’t have a body.
警告 如果请求正文包含文本 JSON 值 null,并且 handler 参数标记为可选,则 handler 参数也将为 null。如果参数未标记为 optional,则会收到与请求没有正文相同的错误。

It’s worth noting that you mark complex types binding to the request body as optional by using a nullable reference type (NRT) annotation: ?. NRTs, introduced in C# 8, are an attempt to reduce the scourge of null-reference exceptions in C#, colloquially known as “the billion-dollar mistake.” See http://mng.bz/vneM.

值得注意的是,您可以使用可为 null 的引用类型 (NRT) 注释将绑定到请求正文的复杂类型标记为可选:?。C# 8 中引入的 NRT 旨在减少 C# 中 null 引用异常的祸害,俗称“十亿美元的错误”。请参阅 http://mng.bz/vneM

ASP.NET Core in .NET 7 is built with the assumption that NRTs are enabled for your project (and they’re enabled by default in all the templates), so it’s worth using them wherever you can. If you choose to disable NRTs explicitly, you may find that some of your types are unexpectedly marked optional, which can lead to some hard-to-debug errors.

.NET 7 中的 ASP.NET Core 的构建假设是为您的项目启用了 NRT(并且它们在所有模板中都默认启用),因此值得尽可能使用它们。如果选择显式禁用 NRT,则可能会发现某些类型意外地标记为 optional,这可能会导致一些难以调试的错误。

Tip Keep NRTs enabled for your minimal API endpoints wherever possible. If you can’t use them for your whole project, consider enabling them selectively in Program.cs (or wherever you add your endpoints) by adding #nullable enable to the top of the file.
提示 尽可能为最小 API 终结点启用 NRT。如果您无法在整个项目中使用它们,请考虑通过在文件顶部添加 #nullable enable 来有选择地在 Program.cs 中启用它们(或添加终端节点的任何位置)。

The good news is that ASP.NET Core includes several analyzers built into the compiler to catch configuration problems like the ones described in this section. If you have an optional route parameter but forget to mark the corresponding handler parameter as optional, for example, integrated development environments (IDEs) such as Visual Studio will show a hint, as shown in figure 7.7, and you’ll get a build warning. You can read more about the built-in analyzers at http://mng.bz/4DMV.
好消息是 ASP.NET Core 包含编译器中内置的多个分析器来捕获配置与本节中描述的问题类似。例如,如果你有一个可选的 route 参数,但忘记将相应的 handler 参数标记为可选,则集成开发环境 (IDE)(如 Visual Studio)将显示一个提示,如图 7.7 所示,并且你将收到生成警告。您可以在 http://mng.bz/4DMV 上阅读有关内置分析器的更多信息。

alt text

Figure 7.7 Visual Studio and other IDEs use analyzers to detect potential problems with mismatched optionality.
图 7.7 Visual Studio 和其他 IDE 使用分析器来检测可选性不匹配的潜在问题。

Making your handler parameters optional is one of the approaches you can take, whether they’re bound to route parameters, headers, or the query string. Alternatively, you can provide a default value for the parameter as part of the method signature. You can’t provide default values for parameters in lambda functions in C#, so the following listing shows how to use a local function instead.

将处理程序参数设为可选是您可以采用的方法之一,无论它们是绑定到路由参数、标头还是查询字符串。或者,您可以为参数提供默认值作为方法签名的一部分。在 C# 11,2 中,您无法为 lambda 函数中的参数提供默认值,因此以下清单显示了如何改用本地函数。

Listing 7.6 Using default values for parameters in endpoint handlers
清单 7.6 对 中的参数使用默认值端点处理程序

WebApplicationBuilder builder = WebApplication.CreateBuilder(args);
WebApplication app = builder.Build();

app.MapGet("/stock", StockWithDefaultValue);                     // ❶

app.Run();

string StockWithDefaultValue(int id = 0) => $"Received {id}";    // ❷

❶ The local function StockWithDefaultValue is the endpoint handler.
本地函数 StockWithDefaultValue 是端点处理程序。

❷ The id parameter binds to the query string value if it’s available; otherwise, ithas the value 0.
id 参数绑定到查询字符串值(如果可用);否则,其值为 0。

We’ve thoroughly covered the differences between simple types and complex types and how they bind. In section 7.6 we look at some special types that don’t follow these rules.

我们已经彻底介绍了简单类型和复杂类型之间的区别以及它们如何绑定。在 7.6 节 中,我们看了一些不遵循这些规则的特殊类型。

7.6 Binding services and special types

7.6 绑定服务和特殊类型

In this section you’ll learn how to use some of the special types that you can bind to in your endpoint handlers. By special, I mean types that ASP.NET Core is hardcoded to understand or that aren’t created from the details of the request, by contrast with the binding you’ve seen so far. The section looks at three types of parameters:

在本节中,您将学习如何使用可在终端节点处理程序中绑定到的一些特殊类型。我所说的特殊是指 ASP.NET Core 经过硬编码以理解的类型,或者不是根据请求的详细信息创建的类型,这与你目前看到的绑定形成对比。本节介绍三种类型的参数:

  • Well-known types—that is, hard-coded types that ASP.NET Core knows about, such as HttpContext and HttpRequest
    已知类型 — 即 ASP.NET Core 知道的硬编码类型,例如 HttpContext 和 HttpRequest

  • IFormCollection and IFormFile for working with form data
    IFormFileCollection 和 IFormFile,用于处理文件上传

  • Application services registered in WebApplicationBuilder.Services
    注册的应用程序服务WebApplicationBuilder.Services

We start by looking at the well-known types you can bind to.
我们首先查看可以绑定到的已知类型。

7.6.1 Injecting well-known types

7.6.1 注入已知类型

Throughout this book you’ve seen examples of several well-known types that you can inject into your endpoint handlers, the most notable one being HttpContext. The remaining well-known types provide shortcuts for accessing various properties of the HttpContext object.

在本书中,您已经看到了几种已知类型的示例,您可以将这些类型注入到端点处理程序中,其中最著名的是 HttpContext。其余已知类型提供了用于访问 HttpContext 对象的各种属性的快捷方式。

Note As described in chapter 3, HttpContext acts as a storage box for everything related to a single a request. It contains access to all the low-level details about the request and the response, plus any application services and features you might need.
注意 如第 3 章所述,HttpContext 充当与单个 a 请求相关的所有内容的存储盒。它包含对有关请求和响应的所有低级详细信息的访问,以及您可能需要的任何应用程序服务和功能。

You can use a well-known type in your endpoint handler by including a parameter of the appropriate type. To access the HttpContext in your handler, for example, you could use

您可以通过包含相应类型的参数,在终端节点处理程序中使用已知类型。例如,要在处理程序中访问 HttpContext,您可以使用

app.MapGet("/", (HttpContext context) => "Hello world!");

You can use the following well-known types in your minimal API endpoint handlers:

您可以在最小 API 终端节点处理程序中使用以下已知类型:

  • HttpContext—This type contains all the details on both the request and the response. You can access everything you need from here, but often, an easier way to access the common properties is to use one of the other well-known types.
    HttpContext — 此类型包含有关请求和响应的所有详细信息。您可以从此处访问所需的一切,但通常,访问公共属性的一种更简单的方法是使用其他已知类型之一。
  • HttpRequest—Equivalent to the property HttpContext.Request, this type contains all the details about the request only.
    HttpRequest - 等效于属性 HttpContext.Request,此类型仅包含有关请求的所有详细信息。
  • HttpResponse—Equivalent to the property HttpContext.Response, this type contains all the details about the response only.
    HttpResponse — 等效于属性 HttpContext.Response,此类型仅包含有关响应的所有详细信息。
  • CancellationToken—Equivalent to the property HttpContext.RequestAborted, this token is canceled if the client aborts the request. It’s useful if you need to cancel a long-running task, as described in my post at http://mng.bz/QP2j.
    CancellationToken - 等效于属性 HttpContext.RequestAborted,如果客户端中止请求,则此令牌将被取消。如果您需要取消长时间运行的任务,这很有用,如我在 http://mng.bz/QP2j 上的帖子中所述。
  • ClaimsPrincipal—Equivalent to the property HttpContext.User, this type contains authentication information about the user. You’ll learn more about authentication in chapter 23.
    ClaimsPrincipal — 等效于属性 HttpContext.User,此类型包含有关用户的身份验证信息。您将在第 23 章中了解有关身份验证的更多信息。
  • Stream—Equivalent to the property HttpRequest.Body, this parameter is a reference to the Stream object of the request. This parameter can be useful for scenarios in which you need to process large amounts of data from a request efficiently, without holding it all in memory at the same time.
    Stream — 等效于属性 HttpRequest.Body,此参数是对请求的 Stream 对象的引用。此参数可用于需要高效处理请求中的大量数据,而无需同时将其全部保存在内存中的方案。
  • PipeReader—Equivalent to the property HttpContext.BodyReader, PipeReader provides a higher-level API compared with Stream, but it’s useful in similar scenarios. You can read more about PipeReader and the System.IO.Pipelines namespace at http://mng.bz/XNY6.
    PipeReader — 相当于属性 HttpContext.BodyReader,与 Stream 相比,PipeReader 提供了更高级别的 API,但它在类似情况下很有用。您可以在 http://mng.bz/XNY6 中阅读有关 PipeReader 和 System.IO.Pipelines 命名空间的更多信息。

You can access each of the latter well-known types by navigating via an injected HttpContext object if you prefer. But injecting the exact object you need generally makes for code that’s easier to read.

如果你愿意,你可以通过通过插入的 HttpContext 对象导航来访问后一种已知类型 。但是,注入所需的确切对象通常会使代码更易于阅读。

7.6.2 Injecting services

7.6.2 注入服务

I’ve mentioned several times in this book that you need to configure various core services to work with ASP.NET Core. Many services are registered automatically, but often, you must add more to use extra features, such as when you called AddHttpLogging() in chapter 3 to add request logging to your pipeline.

我在本书中多次提到,您需要配置各种核心服务才能与 ASP.NET Core 配合使用。许多服务是自动注册的,但通常,您必须添加更多服务才能使用额外的功能,例如当您在第 3 章中调用 AddHttpLogging() 以将请求日志记录添加到您的管道时。

Note Adding services to your application involves registering them with a dependency injection (DI) container. You’ll learn all about DI and registering services in chapters 8 and 9.
注意: 向应用程序添加服务涉及向依赖关系注入 (DI) 容器注册服务。您将在第 8 章和第 9 章中了解有关 DI 和注册服务的所有信息。

You can automatically use any registered service in your endpoint handlers, and ASP.NET Core will inject an instance of the service from the DI container. You saw an example in chapter 6 when you used the LinkGenerator service in an endpoint handler. LinkGenerator is one of the core services registered by WebApplicationBuilder, so it’s always available, as shown in the following listing.

您可以在终端节点处理程序中自动使用任何已注册的服务,ASP.NET Core 将从 DI 容器注入服务实例。您在第 6 章中看到了一个示例,当时您在endpoint 处理程序。LinkGenerator 是 WebApplicationBuilder 注册的核心服务之一,因此它始终可用,如下面的清单所示。

Listing 7.7 Using the LinkGenerator service in an endpoint handler
清单 7.7 在端点处理程序

app.MapGet("/links", (LinkGenerator links) =>             // ❶
{
    string link = links.GetPathByName("products");
    return $"View the product at {link}";
});

❶ The LinkGenerator can be used as a parameter because it’s available in the DI container.
LinkGenerator 可以用作参数,因为它在 DI 容器中可用。

Minimal APIs can automatically detect when a service is available in the DI container, but if you want to be explicit, you can also decorate your parameters with the [FromServices] attribute:

最小的 API 可以自动检测 DI 容器中何时有可用的服务,但如果要显式,还可以使用 [FromServices] 属性修饰参数:

app.MapGet("/links", ([FromServices] LinkGenerator links) =>

[FromServices] may be necessary in some rare cases if you’re using a custom DI container that doesn’t support the APIs used by minimal APIs. But generally, I find that I can keep endpoints readable by avoiding the [From*] attributes wherever possible and relying on minimal APIs to do the right thing automatically.

在极少数情况下,如果你使用的自定义 DI 容器不支持最小 API 使用的 API,则可能需要 [FromServices]。但总的来说,我发现我可以通过尽可能避免使用 [From*] 属性并依靠最少的 API 来自动执行正确的作,从而保持端点的可读性。

7.6.3 Binding file uploads with IFormFile and IFormFileCollection

7.6.3 使用 IFormFile 和 IFormFileCollection 绑定文件上传

A common feature of many websites is the ability to upload files. This activity could be relatively infrequent, such as a user’s uploading a profile picture to their Stack Overflow profile, or it may be integral to the application, such as uploading photos to Facebook.

许多网站的一个共同特点是能够上传文件。此活动可能相对不频繁,例如用户将个人资料图片上传到其 Stack Overflow 个人资料,也可能是应用程序不可或缺的一部分,例如将照片上传到 Facebook。

Letting users upload files to your application
允许用户将文件上传到您的应用程序
Uploading files to websites is a common activity, but you should consider carefully whether your application needs that ability. Whenever users can upload files, the situation is fraught with danger.
将文件上传到 Web 站点是一项常见的活动,但您应该仔细考虑您的应用程序是否需要该功能。只要用户可以上传文件,情况就充满了危险。
You should be careful to treat the incoming files as potentially malicious. Don’t trust the filename provided, take care of large files being uploaded, and don’t allow the files to be executed on your server.
应小心将传入文件视为潜在恶意文件。不要相信提供的文件名,注意上传的大文件,并且不允许在您的服务器上执行这些文件。
Files also raise questions about where the data should be stored: in a database, in the filesystem, or in some other storage? None of these questions has a straightforward answer, and you should think hard about the implications of choosing one over the other. Better, don’t let users upload files if you don’t have to!
文件还引发了关于数据应该存储在哪里的问题:在数据库中、在文件系统中,还是在其他存储中?这些问题都没有直接的答案,您应该认真考虑选择一个而不是另一个的影响。更好的是,如果不需要,请不要让用户上传文件!

ASP.NET Core supports uploading files by exposing the IFormFile interface. You can use this interface in your endpoint handlers, and it will be populated with the details of the file upload:

ASP.NET Core 支持通过公开 IFormFile 接口来上传文件。您可以在终端节点处理程序中使用此接口,它将填充文件上传的详细信息:

app.MapGet("/upload", (IFormFile file) => {});

You can also use an IFormFileCollection if you need to accept multiple files:
如果需要接受多个文件,也可以使用 IFormFileCollection:

app.MapGet("/upload", (IFormFileCollection files) =>
{
    foreach (IFormFile file in files)
    {
    }
});

The IFormFile object exposes several properties and utility methods for reading the contents of the uploaded file, some of which are shown here:
IFormFile 对象公开了几个用于读取上载文件内容的属性和实用程序方法,其中一些方法如下所示:

public interface IFormFile
{
    string ContentType { get; }
    long Length { get; }
    string FileName { get; }
    Stream OpenReadStream();
}

As you can see, this interface exposes a FileName property, which returns the filename that the file was uploaded with. But you know not to trust users, right? You should never use the filename directly in your code; users can use it to attack your website and access files that they shouldn’t. Always generate a new name for the file before you save it anywhere.

如您所见,此接口公开了一个 FileName 属性,该属性返回上传文件时使用的文件名。但您知道不要相信用户,对吧?切勿在代码中直接使用文件名;用户可以使用它来攻击您的网站并访问他们不应该访问的文件。在将文件保存到任何位置之前,请始终为文件生成新名称。

Warning There are lots of potential threats to consider when accepting file uploads from users. For more information, see http://mng.bz/yQ9q.
警告 在接受用户上传的文件时,需要考虑许多潜在威胁。有关更多信息,请参阅 http://mng.bz/yQ9q

The IFormFile approach is fine if users are going to be uploading only small files. When your method accepts an IFormFile instance, the whole content of the file is buffered in memory and on disk before you receive it. Then you can use the OpenReadStream method to read the data out.
如果用户只上传小文件,则 IFormFile 方法很好。当您的方法接受IFormFile 实例,则文件的全部内容在您收到之前都会缓冲在内存和磁盘上。然后,您可以使用 OpenReadStream 方法读出数据。

If users post large files to your website, you may start to run out of space in memory or on disk as ASP.NET Core buffers each of the files. In that case, you may need to stream the files directly to avoid saving all the data at the same time. Unfortunately, unlike the model-binding approach, streaming large files can be complex and error-prone, so it’s outside the scope of this book. For details, see Microsoft’s documentation at http://mng.bz/MBgn.

如果用户将大型文件发布到您的网站,您可能会开始耗尽内存或磁盘中的空间,因为 ASP.NET Core 会缓冲每个文件。在这种情况下,您可能需要直接流式传输文件,以避免同时保存所有数据。遗憾的是,与模型绑定方法不同,流式处理大文件可能很复杂且容易出错,因此不在本书的讨论范围之内。有关详细信息,请参阅 Microsoft 的文档 http://mng.bz/MBgn

Tip Don’t use the IFormFile interface to handle large file uploads, as you may see performance problem. Be aware that you can’t rely on users not to upload large files, so avoid file uploads when you can!
提示 不要使用 IFormFile 接口来处理大文件上传,因为您可能会看到性能问题。请注意,您不能指望用户不上传大文件,因此请尽可能避免上传文件!

For the vast majority of minimal API endpoints, the default configuration of model binding for simple and complex types works perfectly well. But you may find some situations in which you need to take a bit more control.
对于绝大多数最小 API 端点,简单类型和复杂类型的模型绑定的默认配置运行良好。但是您可能会发现在某些情况下,您需要采取更多的控制措施。

7.7 Custom binding with BindAsync

7.7 使用 BindAsync 的自定义绑定

The model binding you get out of the box with minimal APIs covers most of the common situations that you’ll run into when building HTTP APIs, but there are always a few edge cases in which you can’t use it.

使用最少的 API 获得的开箱即用的模型绑定涵盖了您将遇到的大多数常见情况。在构建 HTTP API 时,但总有一些边缘情况您无法使用它。

You’ve already seen that you can inject HttpContext into your endpoint handlers, so you have direct access to the request details in your handler, but often, you still want to encapsulate the logic for extracting the data you need. You can get the best of both worlds in minimal APIs by implementing BindAsync in your endpoint handler parameter types and taking advantage of completely custom model binding. To add custom binding for a parameter type, you must implement one of the following two static BindAsync methods in your type T:

您已经看到,您可以将 HttpContext 注入到终端节点处理程序中,因此您可以直接访问处理程序中的请求详细信息,但通常,您仍然希望封装用于提取所需数据的逻辑。通过在终端节点处理程序参数类型中实现 BindAsync 并利用完全自定义的模型绑定,您可以在最少的 API 中实现两全其美的效果。若要为参数类型添加自定义绑定,必须在类型 T 中实现以下两个静态 BindAsync 方法之一:

public static ValueTask<T?> BindAsync(HttpContext context);
public static ValueTask<T?> BindAsync(
HttpContext context, ParameterInfo parameter);

Both methods accept an HttpContext, so you can extract anything you need from the request. But the latter case also provides reflection details about the parameter you’re binding. In most cases the simpler signature should be sufficient, but you never know!

这两种方法都接受 HttpContext,因此您可以从请求中提取所需的任何内容。但后一种情况还提供了有关您正在绑定的参数的反射详细信息。在大多数情况下,更简单的签名应该就足够了,但您永远不知道!

Listing 7.8 shows an example of using BindAsync to bind a record to the request body by using a custom format. The implementation shown in the listing assumes that the body contains two double values, with a line break between them, and if so, it successfully parses the SizeDetails object. If there are any problems along the way, it returns null.

清单 7.8 展示了一个使用 BindAsync 通过自定义格式将记录绑定到请求正文的示例。清单中显示的实现假设主体包含两个 double 值,它们之间有一个换行符,如果是这样,它将成功解析 SizeDetails 对象。如果在此过程中出现任何问题,它将返回 null。

Listing 7.8 Using BindAsync for custom model binding
清单 7.8 使用 BindAsync 进行自定义模型绑定

WebApplicationBuilder builder = WebApplication.CreateBuilder(args);
WebApplication app = builder.Build();

app.MapPost("/sizes", (SizeDetails size) => $"Received {size}");                    // ❶

app.Run();

public record SizeDetails(double height, double width)                              // ❷
{                                                                                   // ❷
    public static async ValueTask<SizeDetails?> BindAsync(                          // ❷
        HttpContext context)                                                        // ❷
    {
    using var sr = new StreamReader(context.Request.Body);                          // ❸

        string? line1 = await sr.ReadLineAsync(context.RequestAborted);             // ❹
        if (line1 is null) { return null; }                                         // ❺

        string? line2 = await sr.ReadLineAsync(context.RequestAborted);             // ❹
        if (line2 is null) { return null; }                                         // ❺

        return double.TryParse(line1, out double height)                            // ❻
            && double.TryParse(line2, out double width)                             // ❻
            ? new SizeDetails(height, width)                                        // ❼
            : null;                                                                 // ❽
    }
}

❶ No extra attributes are needed for the SizeDetails parameter, as it has a BindAsync method.
SizeDetails 参数不需要额外的属性,因为它具有 BindAsync 方法。

❷ SizeDetails implements the static BindAsync method.
SizeDetails 实现静态 BindAsync 方法。

❸ Creates a StreamReader to read the request body
创建一个 StreamReader 来读取请求正文

❹ Reads a line of text from the body
从正文中读取一行文本

❺ If either line is null, indicating no content, stops processing
如果任一行为 null,则表示无内容,则停止处理

❻ Tries to parse the two lines as doubles
尝试将这两行解析为双精度

❼ If the parsing is successful, creates the SizeDetails model and returns it . . .
如果解析成功,则创建 SizeDetails 模型并将其返回 . . .

❽ . . . otherwise, returns null
. . . .否则,返回 null

In listing 7.8 we return null if parsing fails. The endpoint shown will cause the EndpointMiddleware to throw a BadHttpRequestException and return a 400 error, because the size parameter in the endpoint is required (not marked optional). You could have thrown an exception, but it wouldn’t have been caught by the EndpointMiddleware and would have resulted in a 500 response.
在列表 7.8 中,如果解析失败,我们返回 null。显示的端点将导致EndpointMiddleware 抛出一个BadHttpRequestException 并返回 400 错误,因为终端节点中的 size 参数是必需的(未标记为可选)。您可以在 BindAsync 中引发异常,但它不会被 EndpointMiddleware 捕获,并且会导致 500 响应。

7.8 Choosing a binding source

7.8 选择绑定源

Phew! We’ve finally covered all the ways you can bind a request to parameters in minimal APIs. In many cases, things should work as you expect. Simple types such as int and string bind to route values and query string values by default, and complex types bind to the request body. But it can get confusing when you add attributes, BindAsync, and TryParse to the mix!

唷!我们终于介绍了在最小 API 中将请求绑定到参数的所有方法。在许多情况下,事情应该按照您的预期进行。默认情况下,简单类型(如 int 和 string)绑定到路由值和查询字符串值,复杂类型绑定到请求正文。但是,当您将属性、BindAsync 和 TryParse 添加到组合中时,可能会感到困惑!

When the minimal API infrastructure tries to bind a parameter, it checks all the following binding sources in order. The first binding source that matches is the one it uses:

当最小 API 基础设施尝试绑定参数时,它会按顺序检查以下所有绑定源。匹配的第一个绑定源是它使用的绑定源:

  1. If the parameter defines an explicit binding source using attributes such as [FromRoute], [FromQuery], or [FromBody], the parameter binds to that part of the request.
    如果参数使用 [FromRoute]、[FromQuery] 或 [FromBody] 等属性定义显式绑定源,则参数将绑定到请求的该部分。

  2. If the parameter is a well-known type such as HttpContext, HttpRequest, Stream, or IFormFile, the parameter is bound to the corresponding value.
    如果参数是已知类型,如 HttpContext、HttpRequest、Stream 或 IFormFile,则参数将绑定到相应的值。

  3. If the parameter type has a BindAsync() method, use that method for binding.
    如果参数类型具有 BindAsync()方法,请使用该方法进行绑定。

  4. If the parameter is a string or has an appropriate TryParse() method (so is a simple type):
    如果参数是字符串或具有适当的TryParse() 方法(简单类型也是如此):
    a. If the name of the parameter matches a route parameter name, bind to the route value.
    如果参数名称与路由参数名称匹配,则绑定到路由值。
    b. Otherwise, bind to the query string.
    否则,请绑定到查询字符串。

  5. If the parameter is an array of simple types, a string[] or StringValues, the request is a GET or similar HTTP verb that normally doesn’t have a request body, bind to the query string.
    如果参数是简单类型、string[] 或 StringValues 的数组,并且请求是通常没有请求正文的 GET 或类似的 HTTP 动词,请绑定到查询字符串。

  6. If the parameter is a known service type from the dependency injection container, bind by injecting the service from the container.
    如果参数是依赖项注入容器中的已知服务类型,则通过从容器注入服务来绑定。

7.Finally, bind to the body by deserializing from JSON.
最后,通过从 JSON 反序列化来绑定到正文。

The minimal API infrastructure follows this sequence for every parameter in a handler and stops at the first matching binding source.

最小 API 基础结构对处理程序中的每个参数都遵循此序列,并在第一个匹配的绑定源处停止。

Warning If binding fails for the entry, and the parameter isn’t optional, the request fails with a 400 Bad Request response. The minimal API doesn’t try another binding source after one source fails.
警告 如果条目的绑定失败,并且参数不是可选的,则请求将失败,并显示 400 Bad Request响应。最小 API 不会在一个源失败后尝试另一个绑定源。

Remembering this sequence of binding sources is one of the hardest things about minimal APIs to get your head around. If you’re struggling to work out why a request isn’t working as you expect, be sure to come back and check this sequence. I once had a parameter that wasn’t binding to a route parameter, despite its having a TryParse method. When I checked the sequence, I realized that it also had a BindAsync method that was taking precedence!
记住这一系列绑定源是最小 API 最难理解的事情之一。如果你正在努力找出请求没有按预期工作的原因,请务必回来检查此序列。我曾经有一个参数,尽管它有一个 TryParse 方法,但它没有绑定到路由参数。当我检查序列时,我意识到它还具有BindAsync 方法优先!

7.9 Simplifying handlers with AsParameters

7.9 使用 AsParameters 简化处理程序

Before we move on, we’ll take a quick look at a .NET 7 feature for minimal APIs that can simplify some endpoint handlers: the [AsParameters] attribute. Consider the following GET endpoint, which binds to a route value, a header value, and some query values:
在继续之前,我们将快速了解一下 .NET 7 功能,这些功能适用于可简化某些终结点处理程序的最小 API:[AsParameters] 属性。请考虑以下 GET 终端节点,该终端节点绑定到路由值、标头值和一些查询值:

app.MapGet("/category/{id}", (int id, int page, [FromHeader(Name = "sort")] bool? sortAsc, [FromQuery(Name = "q")] string search) => { });

I think you’ll agree that the handler parameters for this method are somewhat hard to read. The parameters define the expected shape of the request, which isn’t ideal. The [AsParameters] attribute lets you wrap all these arguments into a single class or struct, simplifying the method signature and making everything more readable.

我想你会同意这个方法的处理程序参数有点难以阅读。参数定义请求的预期形状,这并不理想。[AsParameters] 属性允许您包装所有这些

参数转换为单个类或结构体,从而简化方法签名并使所有内容更具可读性。

Listing 7.9 shows an example of converting this endpoint to use [AsParameters] by replacing it with a record struct. You could also use a class, record, or struct, and you can use properties instead of constructor parameters if you prefer. See the documentation for all the permutations available at http://mng.bz/a1KB.

清单 7.9 展示了一个通过将这个端点替换为 record 结构体来转换它以使用 [AsParameters] 的示例。您还可以使用 class、record 或 struct,如果您愿意,可以使用 properties 而不是 constructor 参数。请参阅 http://mng.bz/a1KB 上提供的所有排列的文档。

Listing 7.9 Using [AsParameters] to simplify endpoint handler parameters
清单 7.9 使用 [AsParameters] 简化端点处理程序参数

using Microsoft.AspNetCore.Mvc;

WebApplicationBuilder builder = WebApplication.CreateBuilder(args);
WebApplication app = builder.Build();

app.MapGet("/category/{id}",
    ([AsParameters] SearchModel model) => $"Received {model}");    // ❶

app.Run();

record struct SearchModel(
    int id,                                                        // ❷
    int page,                                                      // ❷
    [FromHeader(Name = "sort")] bool? sortAsc,                     // ❷
    [FromQuery(Name = "q")] string search);                        // ❷

❶ [AsParameters] indicates that the constructor or properties of the type should be bound, not the type itself.
[AsParameters] 指示应绑定类型的构造函数或属性,而不是类型本身。

❷ Each parameter is bound as though it were written in the endpoint handler
每个参数都被绑定,就像它是在端点处理程序中写入的一样。

The same attributes and rules apply for binding an [AsParameters] type’s constructor parameters and binding endpoint handler parameters, so you can use [From*] attributes, inject services and well-known types, and read from the body. This approach can make your endpoints more readable if you find that they’re getting a bit unwieldy.

相同的属性和规则适用于绑定 [AsParameters] 类型的构造函数参数和绑定端点处理程序参数,因此您可以使用 [From*] 属性、注入服务和已知类型,以及从正文中读取。这种方法可以使您的如果你发现它们变得有点笨拙,它们会更具可读性。

Tip In chapter 16 you’ll learn about model binding in MVC and Razor Pages. You’ll be pleased to know that in those cases, the [AsParameters] approach works out of the box without the need for an extra attribute.
提示 在第 16 章中,您将了解 MVC 和 Razor Pages 中的模型绑定。您会很高兴地知道,在这些情况下,[AsParameters] 方法开箱即用,无需额外的属性。

That brings us to the end of this section on model binding. If all went well, your endpoint handler’s arguments are created, and the handler is ready to execute its logic. It’s time to handle the request, right? Nothing to worry about.

这让我们结束了本节关于模型绑定的内容。如果一切顺利,则 endpoint 处理程序的参数将创建,并且处理程序已准备好执行其 logic。是时候处理这个请求了,对吧?没什么好担心的。

Not so fast! How do you know that the data you received was valid? How do you know that you haven’t been sent malicious data attempting a SQL injection attack or a phone number full of letters? The binder is relatively blindly assigning values sent in a request, which you’re happily going to plug into your own methods. What stops nefarious little Jimmy from sending malicious values to your application? Except for basic safeguards, nothing is stopping him, which is why it’s important that you always validate the input coming in. ASP.NET Core provides a way to do this in a declarative manner out of the box, which is the focus of section 7.10.

没那么快!您如何知道您收到的数据有效?您如何知道您没有收到尝试 SQL 注入攻击的恶意数据或充满字母的电话号码?Binders 相对盲目地分配请求中发送的值,您很乐意将其插入到自己的方法中。如何阻止邪恶的小 Jimmy 向您的应用程序发送恶意值?除了基本的保护措施外,没有什么能阻止他,这就是为什么你总是验证输入很重要的原因。ASP.NET Core 提供了一种开箱即用的声明式方式执行此作的方法,这是第 7.10 节的重点。

7.10 Handling user input with model validation

7.10 使用模型验证处理用户输入

In this section, I discuss the following topics:

在本节中,我将讨论以下主题:

  • What validation is and why you need it
    什么是验证以及为什么需要验证

  • How to use DataAnnotations attributes to describe the data you expect
    如何使用 DataAnnotations 属性描述所需的数据

  • How to validate your endpoint handler parameters
    如何验证终端节点处理程序参数

Validation in general is a big topic, one that you’ll need to consider in every app you build. Minimal APIs don’t include validation by default, instead opting to provide nonprescriptive hooks via the filters you learned about in chapter 5. This design gives you multiple options for adding validation to your app; be sure that you do add some!

一般来说,验证是一个很大的话题,您在构建的每个应用程序中都需要考虑这个话题。默认情况下,Minimal API 不包含验证,而是选择通过您在第 5 章中学到的过滤器提供非规范性钩子。此设计为您提供了多个选项,用于向应用程序添加验证;确保你确实添加了一些!

7.10.1 The need for validation

7.10.1 验证的必要性

Data can come from many sources in your web application. You could load data from files, read it from a database, or accept values that are sent in a request. Although you may be inclined to trust that the data already on your server is valid (though this assumption is sometimes dangerous!), you definitely shouldn’t trust the data sent as part of a request.

数据可以来自 Web 应用程序中的许多来源。您可以从文件中加载数据、从数据库中读取数据或接受请求中发送的值。尽管您可能倾向于相信服务器上已有的数据是有效的(尽管这种假设有时很危险!),但您绝对不应该相信作为请求的一部分发送的数据。

Tip You can read more about the goals of validation, implementation approaches, and potential attacks at http://mng.bz/gBxE.
提示 您可以在 http://mng.bz/gBxE 上阅读有关验证目标、实施方法和潜在攻击的更多信息。

You should validate your endpoint handler parameters before you use them to do anything that touches your domain, anything that touches your infrastructure, or anything that could leak information to an attacker. Note that this warning is intentionally vague, as there’s no defined point in minimal APIs where validation should occur. I advise that you do it as soon as possible in the minimal API filter pipeline.

在使用终端节点处理程序参数执行任何涉及您的域、涉及您的基础设施或可能将信息泄露给攻击者的任何作之前,您应该先验证它们。请注意,此警告故意含糊不清,因为 minimal 中没有定义点应进行验证的 API。我建议您尽快在最小 API 过滤器管道中执行此作。

Always validate data provided by users before you use it in your methods. You have no idea what the browser may have sent you. The classic example of little Bobby Tables (https://xkcd.com/327) highlights the need to always validate data sent by a user.

在方法中使用用户提供的数据之前,请始终对其进行验证。您不知道浏览器可能向您发送了什么。小 Bobby Tables (https://xkcd.com/327) 的经典示例强调了始终验证用户发送的数据的必要性。

Validation isn’t used only to check for security threats, though. It’s also needed to check for nonmalicious errors:

不过,验证不仅仅用于检查安全威胁。还需要检查非恶意错误:

  • Data should be formatted correctly. Email fields have a valid email format, for example.
    数据的格式应正确。例如,电子邮件字段具有有效的电子邮件格式。

  • Numbers may need to be in a particular range. You can’t buy -1 copies of this book!
    数字可能需要在特定范围内。这本书你买不到 -1 本!

  • Some values may be required, but others are optional. Name may be required for a profile, but phone number is optional.
    某些值可能是必需的,但其他值是可选的。配置文件可能需要名称,但电话号码是可选的。

  • Values must conform to your business requirements. You can’t convert a currency to itself; it needs to be converted to a different currency.
    值必须符合您的业务要求。不能将货币转换为自身;它需要转换为其他货币。

As mentioned earlier, the minimal API framework doesn’t include anything specific to help you with these requirements, but you can use filters to implement validation, as you’ll see in section 7.10.3. .NET 7 also includes a set of attributes that you can use to simplify your validation code significantly.

如前所述,最小 API 框架不包含任何帮助您满足这些要求的特定内容,但您可以使用过滤器来实现验证,如第 7.10.3 节所示。.NET 7 还包括一组属性,您可以使用这些属性来显著简化验证代码。

7.10.2 Using DataAnnotations attributes for validation

7.10.2 使用 DataAnnotations 属性进行验证

Validation attributes—more precisely, DataAnnotations attributes—allow you to specify the rules that your parameters should conform to. They provide metadata about a parameter type by describing the sort of data the binding model should contain, as opposed to the data itself.

验证属性(更准确地说,DataAnnotations 属性)允许您指定参数应遵循的规则。它们通过描述绑定模型应包含的数据类型(而不是数据本身)来提供有关参数类型的元数据。

You can apply DataAnnotations attributes directly to your parameter types to indicate the type of data that’s acceptable. This approach allows you to check that required fields have been provided, that numbers are in the correct range, and that email fields are valid email addresses, for example.

您可以将 DataAnnotations 属性直接应用于参数类型,以指示可接受的数据类型。例如,此方法允许您检查是否提供了必填字段、数字是否在正确的范围内,以及电子邮件字段是否为有效的电子邮件地址。

Consider the checkout page for a currency-converter application. You need to collect details about the user—their name, email, and (optionally) phone number—so you create an API to capture these details. The following listing shows the outline of that API, which takes a UserModel parameter. The UserModel type is decorated with validation attributes that represent the validation rules for the model.

请考虑货币转换器应用程序的结帐页。您需要收集有关用户的详细信息 — 他们的姓名、电子邮件和(可选)电话号码 — 因此您创建一个 API 来捕获这些详细信息。下面的清单显示了该 API 的轮廓,它采用 UserModel 参数。UserModel 类型使用表示模型的验证规则的验证属性进行修饰。

Listing 7.10 Adding DataAnnotations to a type to provide metadata
清单 7.10 将 DataAnnotations 添加到类型中以提供元数据

using System.ComponentModel.DataAnnotations;                        // ❶

WebApplicationBuilder builder = WebApplication.CreateBuilder(args);
WebApplication app = builder.Build();

app.MapPost("/users", (UserModel user) => user.ToString());         // ❷

app.Run();

public record UserModel
{
    [Required]                                                      // ❸
    [StringLength(100)]                                             // ❹
    [Display(Name = "Your name")]                                   // ❺
    public string FirstName { get; set; }

    [Required]
    [StringLength(100)]
    [Display(Name = "Last name")]
    public string LastName { get; set; }

    [Required]
    [EmailAddress]                                                  // ❻
    public string Email { get; set; }

    [Phone]                                                         // ❼
    [Display(Name = "Phone number")]
    public string PhoneNumber { get; set; }
}

❶ Adds this using statement to use the validation attributes
添加此 using 语句以使用验证属性

❷ The API takes a UserModel parameter and binds it to the request body.
API 接受 UserModel 参数并将其绑定到请求正文。

❸ Values marked Required must be provided.
必须提供标记为 Required 的值。

❹ The StringLengthAttribute sets the maximum length for the property.
StringLengthAttribute 设置属性的最大长度。

❺ Customizes the name used to describe the property
自定义用于描述属性的名称

❻ Validates that the value of Email may be a valid email address
验证 Email 的值是否为有效的电子邮件地址

❼ Validates that the value of PhoneNumber has a valid telephone number format
验证 PhoneNumber 的值是否具有有效的电话号码格式

Suddenly, your parameter type, which was sparse on details, contains a wealth of information. You’ve specified that the FirstName property should always be provided; that it should have a maximum length of 100 characters; and that when it’s referred to (in error messages, for example), it should be called "Your name" instead of "FirstName".

突然之间,您的参数类型(细节稀疏)包含了大量信息。您已指定应始终提供 FirstName 属性;最大长度应为 100 个字符;当它被引用时(例如,在错误消息中),它应该被称为 “Your name” 而不是 “FirstName”。

The great thing about these attributes is that they clearly declare the expected state of an instance of the type. By looking at these attributes, you know what the properties will contain, or at least should contain. Then you can then write code after model binding to confirm that the bound parameter is valid, as you’ll see in section 7.10.3.

这些属性的伟大之处在于,它们清楚地声明了该类型实例的预期状态。通过查看这些属性,您知道属性将包含什么,或者至少应该包含什么。然后,您可以在模型绑定后编写代码以确认 bound 参数有效,如 7.10.3 节所示。

You’ve got a plethora of attributes to choose among when you apply DataAnnotations to your types. I’ve listed some of the common ones here, but you can find more in the System.ComponentModel.DataAnnotations namespace. For a more complete list, I recommend using IntelliSense in your IDE or checking the documentation at http://mng.bz/e1Mv.

当您将 DataAnnotations 应用于您的类型时,您有大量的属性可供选择。我在这里列出了一些常见的方法,但您可以在 System.ComponentModel.DataAnnotations 命名空间中找到更多方法。有关更完整的列表,我建议在 IDE 中使用 IntelliSense 或查看 http://mng.bz/e1Mv 中的文档。

  • [CreditCard]—Validates that a property has a valid credit card format
    [信用卡]- 验证属性是否具有有效的信用卡格式

  • [EmailAddress]—Validates that a property has a valid email address format
    [电子邮件地址]- 验证属性是否具有有效的电子邮件地址格式

  • [StringLength(max)]—Validates that a string has at most max number of characters
    [字符串长度(最大)]- 验证字符串是否最多具有最大字符数

  • [MinLength(min)]—Validates that a collection has at least the min number of items
    [最小长度(min)]- 验证集合是否至少具有最小项目数

  • [Phone]—Validates that a property has a valid phone number format
    [电话]- 验证属性是否具有有效的电话号码格式

  • [Range(min, max)]—Validates that a property has a value between min and max
    [范围(最小值、最大值)]- 验证属性的值是否介于 min 和 max 之间

  • [RegularExpression(regex)]—Validates that a property conforms to the regex regular expression pattern
    [正则表达式(正则表达式)]- 验证属性是否符合 regex 正则表达式模式

  • [Url]—Validates that a property has a valid URL format
    [网址]- 验证属性是否具有有效的 URL 格式

  • [Required]—Indicates that the property must not be null
    [必填]- 指示属性不能为 null

  • [Compare]—Allows you to confirm that two properties have the same value (such as Email and ConfirmEmail)
    [比较]- 允许您确认两个属性具有相同的值(例如 Email 和 ConfirmEmail)

Warning The [EmailAddress] and [Phone] attributes validate only that the format of the value is potentially correct. They don’t validate that the email address or phone number exists. For an example of how to do more rigorous phone number validation, see this post on the Twilio blog: http://mng.bz/xmZe.
警告 [EmailAddress] 和 [Phone] 属性仅验证值的格式是否可能正确。它们不会验证电子邮件地址或电话号码是否存在。有关如何执行更严格的电话号码验证的示例,请参阅 Twilio 博客上的这篇文章:http://mng.bz/xmZe

The DataAnnotations attributes aren’t new; they’ve been part of the .NET Framework since version 3.5, and their use in ASP.NET Core is almost the same as in the previous version of ASP.NET. They’re also used for purposes other than validation. Entity Framework Core (among others) uses DataAnnotations to define the types of columns and rules to use when creating database tables from C# classes. You can read more about Entity Framework Core in chapter 12 and in Entity Framework Core in Action, 2nd ed., by Jon P. Smith (Manning, 2021).

DataAnnotations 属性并不新鲜;它们自 3.5 版以来一直是 .NET Framework 的一部分,它们在 ASP.NET Core 中的使用与在以前版本的 ASP.NET 中的使用几乎相同。它们还用于验证以外的目的。Entity Framework Core(以及其他)使用 DataAnnotations 来定义从 C# 类创建数据库表时要使用的列和规则的类型。您可以在第 12 章和 Jon P. Smith 的 Entity Framework Core in Action, 2nd ed.(Manning,2021 年)中阅读有关 Entity Framework Core 的更多信息。

If the DataAnnotation attributes provided out of the box don’t cover everything you need, it’s possible to write custom attributes by deriving from the base ValidationAttribute. You’ll see how to create a custom validation attribute in chapter 32.

如果现成提供的 DataAnnotation 属性不能涵盖您需要的所有内容,则可以通过从基 ValidationAttribute 派生来编写自定义属性。您将在第 32 章中了解如何创建自定义验证属性。

One common limitation with DataAnnotation attributes is that it’s hard to validate properties that depend on the values of other properties. Maybe the UserModel type from listing 7.10 requires you to provide either an email address or a phone number but not both, which is hard to achieve with attributes. In this type of situation, you can implement IValidatableObject in your models instead of, or in addition to, using attributes. In listing 7.11, a validation rule is added to UserModel whether the email or phone number is provided. If it isn’t, Validate() returns a ValidationResult describing the problem.

DataAnnotation 属性的一个常见限制是很难验证依赖于其他属性的值的属性。也许清单 7.10 中的 UserModel 类型要求您提供电子邮件地址或电话号码,但不能同时提供两者,这很难通过属性实现。在这种情况下,您可以在模型中实现 IValidatableObject ,而不是使用属性,或者同时使用属性。在列表 7.11 中,无论提供了电子邮件还是电话号码,都会向 UserModel 添加验证规则。如果不是,则 Validate() 返回描述问题的 ValidationResult。

Listing 7.11 Implementing IValidatableObject
清单 7.11 实现 IValidatableObject

using System.ComponentModel.DataAnnotations;
public record CreateUserModel : IValidatableObject               // ❶
{
    [EmailAddress]                                               // ❷
    public string Email { get; set; }

    [Phone]                                                      // ❷
    public string PhoneNumber { get; set; }

    public IEnumerable<ValidationResult> Validate(               // ❸
        ValidationContext validationContext)                     // ❸
    {
        if(string.IsNullOrEmpty(Email)                           // ❹
        && string.IsNullOrEmpty(PhoneNumber))                    // ❹
        {
            yield return new ValidationResult(                   // ❺
            "You must provide an Email or a PhoneNumber",        // ❺
            New[] { nameof(Email), nameof(PhoneNumber) });       // ❺
        }
    }
}

❶ Implements the IValidatableObject interface
实现 IValidatableObject 接口

❷ The DataAnnotation attributes continue to validate basic format requirements.
DataAnnotation 属性继续验证基本格式要求。

❸ Validate is the only function to implement in IValidatableObject.
Validate 是在 IValidatableObject 中实现的唯一函数。

❹ Checks whether the object is valid . . .
检查对象是否有效 . . .

❺ . . . and if not, returns a result describing the error
. . . .如果不是,则返回描述错误的结果

IValidatableObject helps cover some of the cases that attributes alone can’t handle, but it’s not always the best option. The Validate function doesn’t give easy access to your app’s services, and the function executes only if all the DataAnnotation attribute conditions are met.

IValidatableObject 有助于涵盖某些仅靠属性无法处理的情况,但它并不总是最佳选择。Validate 函数无法轻松访问应用程序的服务,并且仅当满足所有 DataAnnotation 属性条件时,该函数才会执行。

Tip DataAnnotations are good for input validation of properties in isolation but not so good for validating complex business rules. You’ll most likely need to perform this validation outside the DataAnnotations framework.
提示 DataAnnotations 适用于隔离属性的输入验证,但不太适合验证复杂的业务规则。您很可能需要在 DataAnnotations 框架之外执行此验证。

Alternatively, if you’re not a fan of the DataAnnotation attribute-based-plus-IValidatableObject approach, you could use the popular FluentValidation library (https://github.com/JeremySkinner/FluentValidation) in your minimal APIs instead. Minimal APIs are completely flexible, so you can use whichever approach you prefer.

或者,如果您不喜欢 DataAnnotation 基于属性的加 IValidatableObject 方法,则可以在最小 API 中使用流行的 FluentValidation 库 (https://github.com/JeremySkinner/FluentValidation)。最小 API 是完全灵活的,因此您可以使用自己喜欢的任何方法。

DataAnnotations attributes provide the basic metadata for validation, but no part of listing 7.10 or listing 7.11 uses the validation attributes you added. You still need to add code to read the parameter type’s metadata, check whether the data is valid, and return an error response if it’s invalid. ASP.NET Core doesn’t include a dedicated validation API for that task in minimal APIs, but you can easily add it with a small NuGet package.

DataAnnotations 属性提供了用于验证的基本元数据,但清单 7.10 或清单 7.11 的任何部分都没有使用您添加的验证属性。您仍然需要添加code 读取参数类型的元数据,检查数据是否有效,如果无效,则返回错误响应。ASP.NET Core 在最少的 API 中不包含用于该任务的专用验证 API,但你可以使用小型 NuGet 包轻松添加它。

7.10.3 Adding a validation filter to your minimal APIs

7.10.3 将验证筛选器添加到最小 API

Microsoft decided not to include any dedicated validation APIs in minimal APIs. By contrast, validation is a built-in core feature of Razor Pages and MVC. Microsoft’s reasoning was that the company wanted to provide flexibility and choice for users to add validation in the way that works best for them, but didn’t want to affect performance for those who didn’t want to use their implementation.

Microsoft 决定不在最小 API 中包含任何专用的验证 API。相比之下,验证是 Razor Pages 和 MVC 的内置核心功能。Microsoft 的理由是,该公司希望为用户提供灵活性和选择,以便以最适合他们的方式添加验证,但又不想影响那些不想使用其实现的人的性能。

Consequently, validation in minimal APIs typically relies on the filter pipeline. As a classic cross-cutting concern, validation is a good fit for a filter. The only downside is that typically, you need to write your own filter rather than use an existing API. The positive side is that validation gives you complete flexibility, including the ability to use an alternative validation library (such as FluentValidation) if you prefer.

因此,最小 API 中的验证通常依赖于筛选器管道。作为一个典型的横切关注点,验证非常适合 filter。唯一的缺点是,通常您需要编写自己的过滤器,而不是使用现有的 API。积极的一面是,验证为您提供了完全的灵活性,包括如果您愿意,可以使用替代验证库(例如 FluentValidation)。

Luckily, Damian Edwards, a project manager architect on the ASP.NET Core team at Microsoft, has a NuGet package called MinimalApis.Extensions that provides the filter for you. Using a simple validation system that hooks into the DataAnnotations on your models, this NuGet package provides an extension method called WithParameterValidation() that you can add to your endpoints. To add the package, search for MinimalApis.Extensions from the NuGet Package Manager in your IDE (be sure to include prerelease versions), or run the following, using the .NET command-line interface:

幸运的是,Microsoft ASP.NET Core 团队的项目经理架构师 Damian Edwards 有一个名为 MinimalApis.Extensions 的 NuGet 包,可以为您提供筛选器。使用挂接到模型上的 DataAnnotations 的简单验证系统,此 NuGet 包提供了一个名为WithParameterValidation() 中,您可以将其添加到终端节点中。若要添加包,请从 IDE 中的 NuGet 包管理器中搜索 MinimalApis.Extensions(请务必包含预发行版本),或使用 .NET 命令行界面运行以下命令:

dotnet add package MinimalApis.Extensions

After you’ve added the package, you can add validation to any of your endpoints by adding a filter using WithParameterValidation(), as shown in listing 7.12. After the UserModel is bound to the JSON body of the request, the validation filter executes as part of the filter pipeline. If the user parameter is valid, execution passes to the endpoint handler. If the parameter is invalid, a 400 Bad Request Problem Details response is returned containing a description of the errors, as shown in figure 7.8.

添加包后,您可以通过使用 WithParameterValidation() 添加过滤器来向任何端点添加验证,如清单 7.12 所示。将 UserModel 绑定到请求的 JSON 正文后,验证筛选条件将作为筛选条件管道的一部分执行。如果 user 参数有效,则执行将传递给终端节点处理程序。如果该参数无效,则返回 400 Bad Request Problem Details 响应,其中包含错误描述,如图 7.8 所示。

alt text

Figure 7.8 If the data sent in the request body is not valid, the validation filter automatically returns a 400 Bad Request response, containing the validation errors, and the endpoint handler doesn’t execute.
图 7.8 如果请求正文中发送的数据无效,则验证筛选条件会自动返回 400 Bad Request 响应,其中包含验证错误,并且终端节点处理程序不会执行。

Listing 7.12 Adding validation to minimal APIs using MinimalApis. Extensions
清单 7.12 使用 MinimalApis.Extensions 向最小 API 添加验证

using System.ComponentModel.DataAnnotations;

WebApplicationBuilder builder = WebApplication.CreateBuilder(args);
WebApplication app = builder.Build();

app.MapPost("/users", (UserModel user) => user.ToString())
    .WithParameterValidation();                               // ❶
app.Run();

public record UserModel                                       // ❷
{
    [Required]
    [StringLength(100)]
    [Display(Name = "Your name")]
    public string Name { get; set; }

    [Required]
    [EmailAddress]
    public string Email { get; set; }
}

❶ Adds the validation filter to the endpoint
将验证过滤器添加到端点

❷ The UserModel defines its validation requirements using DataAnnotations
attributes.
UserModel 使用 DataAnnotations 属性定义其验证要求。

Listing 7.12 shows how you can validate a complex type, but in some cases, you may want to validate simple types. You may want to validate that the id value in the following handler should be between 1 and 100:

清单 7.12 展示了如何验证复杂类型,但在某些情况下,你可能想要验证简单类型。您可能需要验证以下处理程序中的 id 值是否应介于 1 和 100 之间:

app.MapGet("/user/{id}", (int id) => $"Received {id}")
    .WithParameterValidation();

Unfortunately, that’s not easy to do with DataAnnotations attributes. The validation filter will check the int type, see that it’s not a type that has any DataAnnotations on its properties, and won’t validate it.

遗憾的是,使用 DataAnnotations 属性并不容易做到这一点。验证筛选器将检查 int 类型,查看它不是在其属性上具有任何 DataAnnotations 的类型,并且不会对其进行验证。

Warning Adding attributes to the handler, as in ([Range(1, 100)] int id), doesn’t work. The attributes here are added to the parameter, not to properties of the int type, so the validator won’t find them.
警告 向处理程序添加属性(如 ([Range(1, 100)] int id) )不起作用。这里的 attributes 是添加到 parameter 的,而不是 int 类型的 properties 中,所以 validator 不会找到它们。

There are several ways around this problem, but the simplest is to use the [AsParameters] attribute you saw in section 7.9 and apply annotations to the model. The following listing shows how.

有几种方法可以解决此问题,但最简单的方法是使用您在 小节 中看到的 [AsParameters] 属性7.9 并将注释应用于模型。下面的清单显示了如何作。

Listing 7.13 Adding validation to minimal APIs using MinimalApis.Extensions
清单 7.13 使用MinimalApis.扩展

using System.ComponentModel.DataAnnotations;

WebApplicationBuilder builder = WebApplication.CreateBuilder(args);
WebApplication app = builder.Build();

app.MapPost("/user/{id}",
    ([AsParameters] GetUserModel model) => $"Received {model.Id}")       // ❶
    .WithParameterValidation();                                          // ❷

app.Run();

struct GetUserModel
{
    [Range(1, 10)]                                                       // ❸
    Public int Id { get; set; }                                          // ❸
}

❶ Uses [AsParameters] to create a type than can be validated
使用 [AsParameters] 创建可验证的类型

❷ Adds the validation filter to the endpoint
将验证筛选器添加到端点

❸ Adds validation attributes to your simple types
将验证属性添加到简单类型

That concludes this look at model binding in minimal APIs. You saw how the ASP.NET Core framework uses model binding to simplify the process of extracting values from a request and turning them into normal .NET objects you can work with quickly. The many ways to bind may be making your head spin, but normally, you can stick to the basics and fall back to the more complex types as and when you need them.

对最小 API 中的模型绑定的介绍到此结束。您了解了 ASP.NET Core 框架如何使用模型绑定来简化从请求中提取值并将其转换为可快速使用的普通 .NET 对象的过程。许多绑定方式可能会让您头晕目眩,但通常情况下,您可以坚持使用基本方法,并在需要时回退到更复杂的类型。

Although the discussion is short, the most important aspect of this chapter is its focus on validation—a common concern for all web applications. Whether you choose to use DataAnnotations or a different validation approach, you must make sure to validate any data you receive in all your endpoints.

虽然讨论很简短,但本章最重要的方面是它对验证的关注——一个共同的关注点适用于所有 Web 应用程序。无论您选择使用 DataAnnotations 还是其他验证方法,都必须确保验证您在所有终端节点中收到的任何数据。

In chapter 8 we leave minimal APIs behind to look at dependency injection in ASP.NET Core and see how it helps create loosely coupled applications. You’ll learn how to register the ASP.NET Core framework services with a container, add your own services, and manage service lifetimes.

在第 8 章中,我们抛弃了最少的 API,看看 ASP.NET Core 中的依赖注入,看看它如何帮助创建松散耦合的应用程序。您将学习如何向容器注册 ASP.NET Core 框架服务、添加您自己的服务以及管理服务生命周期。

7.11 Summary

7.11 总结

Model binding is the process of creating the arguments for endpoint handlers from the details of an HTTP request. Model binding takes care of extracting and parsing the strings in the request so that you don’t have to.
模型绑定是根据 HTTP 请求的详细信息为终端节点处理程序创建参数的过程。模型绑定负责提取和分析请求中的字符串,因此您不必这样做。

Simple values such as int, string, and double can bind to route values, query string values, and headers. These values are common and easy to extract from the request without any manual parsing.
简单值(如 int、string 和 double)可以绑定到路由值、查询字符串值和标头。这些值很常见,并且很容易从请求中提取,而无需任何手动解析。

If a simple value fails to bind because the value in the request is incompatible with the handler parameter, a BadHttpRequestException is thrown, and a 400 Bad Request response is returned.
如果由于请求中的值与 handler 参数不兼容而导致 simple 值绑定失败,则会引发 BadHttpRequestException,并返回 400 Bad Request 响应。

You can turn a custom type into a simple type by adding a TryParse method with the signature bool TryParse(string value, out T result). If you return false from this method, minimal APIs will return a 400 Bad Request response.
您可以通过添加具有签名 bool TryParse(string value, out T result) 的 TryParse 方法,将自定义类型转换为简单类型。如果从此方法返回 false,则最少的 API 将返回 400 Bad Request 响应。

Complex types bind to the request body by default by deserializing from JSON. Minimal APIs can bind only to JSON bodies; you can’t use model binding to access form values.
默认情况下,复杂类型通过从 JSON 反序列化来绑定到请求正文。最小 API 只能绑定到 JSON 正文;您不能使用模型绑定来访问表单值。

By default, you can’t bind the body of GET requests, which goes against the expectations for GET requests. Doing so will cause an exception at runtime.
默认情况下,您无法绑定 GET 请求的正文,因为这与 GET 请求的预期背道而驰。这样做会导致运行时出现异常。

Arrays of simple types bind by default to query string values for GET requests and to the request body for POST requests. This difference can cause confusion, so always consider whether an array is the best option.
默认情况下,简单类型的数组绑定到 GET 请求的查询字符串值和 POST 请求的请求正文。这种差异可能会引起混淆,因此请始终考虑数组是否是最佳选择。

All the parameters of a handler must bind correctly. If a parameter tries to bind to a missing value, you’ll get a BadHttpRequestException and a 400 Bad Request response.
处理程序的所有参数都必须正确绑定。如果参数尝试绑定到缺失值,您将收到 BadHttpRequestException 和 400 Bad Request 响应。

You can use well-known types such as HttpContext and any services from the dependency injection container in your endpoint handlers. Minimal APIs check whether each complex type in your handler is registered as a service in the DI container; if not, they treat it as a complex type to bind to the request body instead.
您可以在终端节点处理程序中使用已知类型(如 HttpContext)和依赖项注入容器中的任何服务。最小 API 检查处理程序中的每个复杂类型是否在 DI 容器中注册为服务;否则,它们会将其视为复杂类型,以绑定到请求正文。

You can read files sent in the request by using the IFormFile and IFormFileCollection interfaces in your endpoint handlers. Take care accepting file uploads with these interfaces, as they can open your application to attacks from users.
您可以使用终端节点处理程序中的 IFormFile 和 IFormFileCollection 接口读取请求中发送的文件。请小心接受使用这些接口上传的文件,因为它们可能会使您的应用程序受到用户的攻击。

You can completely customize how a type binds by using custom binding. Create a static function with the signature ·public static ValueTask<T?> BindAsync(HttpContext context)·, and return the bound property. This approach can be useful for handling complex scenarios, such as arbitrary JSON uploads.
您可以使用自定义绑定完全自定义类型的绑定方式。创建签名为 ·public static ValueTask<T?> BindAsync(HttpContext context)· 的静态函数,并返回绑定属性。此方法可用于处理复杂场景,例如任意 JSON 上传。

You can override the default binding source for a parameter by applying [From] attributes to your handler parameters, such as [FromHeader], [FromQuery], [FromBody], and [FromServices]. These parameters take precedence over convention-based assumptions.
您可以通过将 [From
] 属性应用于处理程序参数(如 [FromHeader]、[FromQuery]、[FromBody] 和 [FromServices])来覆盖参数的默认绑定源。这些参数优先于基于约定的假设。

You can encapsulate an endpoint handler’s parameters by creating a type containing all the parameters as properties or a constructor argument and decorate the parameter with the [AsParameters] attribute. This approach can help you simplify your endpoint’s method signature.
可以通过创建包含所有参数作为属性或构造函数参数的类型来封装终结点处理程序的参数,并使用 [AsParameters] 属性修饰参数。此方法可以帮助您简化终端节点的方法签名。

Validation is necessary to check for security threats. Check that data is formatted correctly, confirm that it conforms to expected values and verify that it meets your business rules.
验证对于检查安全威胁是必要的。检查数据的格式是否正确,确认它符合预期值,并验证它是否符合您的业务规则。

Minimal APIs don’t have built-in validation APIs, so you typically apply validation via a minimal API filter. This approach provides flexibility ,as you can implement validation in the way that suits you best, though it typically means that you need to use a third-party package.
最小 API 没有内置的验证 API,因此您通常通过最小 API 过滤器应用验证。此方法提供了灵活性,因为您可以以最适合您的方式实施验证,但这通常意味着您需要使用第三方包。

The MinimalApis.Extensions NuGet package provides a validation filter that uses DataAnnotations attributes to declaratively define the expected values. You can add the filter with the extension method WithParameterValidation().
MinimalApis.Extensions NuGet 包提供了一个验证筛选器,该筛选器使用 DataAnnotations 属性以声明方式定义预期值。您可以使用扩展方法 WithParameterValidation() 添加过滤器。

To add custom validation of simple types with MinimalApis.Extensions, you must create a containing type and use the [AsParameters] attribute.
若要使用 MinimalApis.Extensions 添加简单类型的自定义验证,必须创建包含类型并使用 [AsParameters] 属性。


  1. I have a series discussing strongly-typed IDs and their benefits on my blog at http://mng.bz/a1Kz.
    我在 http://mng.bz/a1Kz 的博客上有一个系列讨论强类型 ID 及其好处。

  2. C# 12, which will be released with .NET 8, should include support for default values in lambda expressions. For more details, see http://mng.bz/AoRg.
    C# 12 将与 .NET 8 一起发布,它应该包括对 lambda 表达式中默认值的支持。有关更多详细信息,请参阅 http://mng.bz/AoRg

ASP.NET Core in Action 6 Mapping URLs to endpoints using routing

6 Mapping URLs to endpoints using routing
6 使用路由将 URL 映射到端点

This chapter covers

本章涵盖

  • Mapping URLs to endpoint handlers
    将 URL 映射到端点处理程序
  • Using constraints and default values to match URLs
    使用约束和默认值来匹配 URL
  • Generating URLs from route parameters
    从路由参数生成 URL

In chapter 5 you learned how to define minimal APIs, how to return responses, and how to work with filters and route groups. One crucial aspect of minimal APIs that we touched on only lightly is how ASP.NET Core selects a specific endpoint from all the handlers defined, based on the incoming request URL. This process, called routing, is the focus of this chapter.

在第 5 章中,您学习了如何定义最小 API、如何返回响应以及如何使用筛选条件和路由组。我们仅略微涉及的最小 API 的一个关键方面是 ASP.NET Core 如何根据传入请求 URL 从定义的所有处理程序中选择特定端点。此过程称为 routing,是本章的重点。

This chapter begins by identifying the need for routing and why it’s useful. You’ll learn about the endpoint routing system introduced in ASP.NET Core 3.0 and why it was introduced, and explore the flexibility routing can bring to the URLs you expose.

本章首先确定 routing 的需求以及它为什么有用。您将了解 ASP.NET Core 3.0 中引入的端点路由系统及其引入原因,并探索路由可以为您公开的 URL 带来的灵活性。

The bulk of this chapter focuses on the route template syntax and how it can be used with minimal APIs. You’ll learn about features such as optional parameters, default parameters, and constraints, as well as how to extract values from the URL automatically. Although we’re focusing on minimal APIs in this chapter, the same routing system is used with Razor Pages and Model-View-Controller (MVC), as you’ll see in chapter 14.

本章的大部分内容重点介绍路由模板语法以及如何将其与最少的 API 一起使用。您将了解可选参数、默认参数和约束等功能,以及如何自动从 URL 中提取值。尽管我们在本章中重点介绍了最少的 API,但 Razor Pages 和模型视图控制器 (MVC) 使用相同的路由系统,如第 14 章所示。

In section 6.4 I describe how to use the routing system to generate URLs, which you can use to create links and redirect requests for your application. One benefit of using a routing system is that it decouples your handlers from the underlying URLs they’re associated with. You can use URL generation to avoid littering your code with hardcoded URLs like /product/view/3. Instead, you can generate the URLs at runtime, based on the routing system. This approach makes changing the URL for a given endpoint easier: instead of your having to hunt down every place where you used the endpoint’s URL, the URLs are updated for you automatically, with no other changes required.

在 6.4 节中,我将介绍如何使用路由系统生成 URL,您可以使用这些 URL 为您的应用程序创建链接和重定向请求。使用路由系统的一个好处是,它将处理程序与它们关联的底层 URL 分离。您可以使用 URL 生成来避免将代码与硬编码的 URL (如 /product/view/3)混在一起。相反,您可以在运行时根据路由系统生成 URL。这种方法使更改给定终端节点的 URL 变得更加容易:您不必寻找使用终端节点 URL 的每个位置,URL 会自动为您更新,无需进行其他更改。

By the end of this chapter, you should have a much clearer understanding of how an ASP.NET Core application works. You can think of routing as being the glue that ties the middleware pipeline to endpoints. With middleware, endpoints, and routing under your belt, you’ll be writing web apps in no time!

在本章结束时,您应该对 ASP.NET Core 应用程序的工作原理有了更清晰的了解。您可以将路由视为将中间件管道与终端节点联系起来的粘合剂。有了中间件、终端节点和路由,您将立即编写 Web 应用程序!

6.1 What is routing?

6.1 什么是路由?

Routing is the process of mapping an incoming request to a method that will handle it. You can use routing to control the URLs you expose in your application. You can also use routing to enable powerful features such as mapping multiple URLs to the same handler and automatically extracting data from a request’s URL.

路由是将传入请求映射到将处理该请求的方法的过程。您可以使用路由来控制在应用程序中公开的 URL。您还可以使用路由来启用强大的功能,例如映射多个 URL 指向同一处理程序,并自动从请求的 URL 中提取数据。

In chapter 4 you saw that an ASP.NET Core application contains a middleware pipeline, which defines the behavior of your application. Middleware is well suited to handling both cross-cutting concerns, such as logging and error handling, and narrowly focused requests, such as requests for images and CSS files.

在第 4 章中,您看到 ASP.NET Core 应用程序包含一个中间件管道,它定义了应用程序的行为。中间件非常适合处理横切关注点(如日志记录和错误处理)和范围狭窄的请求(如图像和 CSS 文件请求)。

To handle more complex application logic, you’ll typically use the EndpointMiddleware at the end of your middleware pipeline. This middleware can handle an appropriate request by invoking a method known as a handler and using the result to generate a response. Previous chapters described using minimal API endpoint handlers, but there are other types of handlers, such as MVC Action methods and Razor Pages, as you’ll learn in part 2 of this book.

为了处理更复杂的应用程序逻辑,您通常会在中间件管道的末尾使用 EndpointMiddleware。此中间件可以通过调用称为处理程序的方法并使用结果生成响应来处理适当的请求。前面的章节介绍了使用最少的 API 端点处理程序,但还有其他类型的处理程序,例如 MVC作方法和 Razor Pages,您将在本书的第 2 部分中学习。

One aspect that I’ve glossed over so far is how the EndpointMiddleware selects which handler executes when you receive a request. What makes a request appropriate for a given handler? The process of mapping a request to a handler is routing.

到目前为止,我所讨论的一个方面是 EndpointMiddleware 如何选择在您收到请求时执行哪个处理程序。什么使请求适合给定的处理程序?将请求映射到处理程序的过程是路由。

Definition Routing in ASP.NET Core is the process of selecting a specific handler for an incoming HTTP request. In minimal APIs, the handler is the endpoint handler associated with a route. In Razor Pages, the handler is a page handler method defined in a Razor Page. In MVC, the handler is an action method in a controller.
定义 ASP.NET Core 中的路由是为传入的 HTTP 请求选择特定处理程序的过程。在最小 API 中,处理程序是与路由关联的端点处理程序。在 Razor Pages 中,处理程序是在 Razor Page 中定义的页面处理程序方法。在 MVC 中,处理程序是控制器中的作方法。

In chapters 3 to 5, you saw several simple applications built with minimal APIs. In chapter 5, you learned the basics of routing for minimal APIs, but it’s worth exploring why routing is useful as well as how to use it. Even a simple URL path such as /person uses routing to determine which handler should be executed, as shown in figure 6.1.

在第 3 章到第 5 章中,您看到了几个使用最少 API 构建的简单应用程序。在第 5 章中,您学习了最小 API 的路由基础知识,但值得探索为什么路由很有用以及如何使用它。即使是简单的 URL 路径,如 /person,也使用路由来确定应该执行哪个处理程序,如图 6.1 所示。

Figure 6.1 The router compares the request URL with a list of configured route templates to determine which handler to execute.
图 6.1 路由器将请求 URL 与已配置的路由模板列表进行比较,以确定要执行哪个处理程序。

On the face of it, that seems pretty simple. You may wonder why I need a whole chapter to explain that obvious mapping. The simplicity of the mapping in this case belies how powerful routing can be. If this approach, using a direct comparison with static strings, were the only one available, you’d be severely limited in the applications you could feasibly build.

从表面上看,这似乎很简单。你可能会想为什么我需要一整章来解释这个明显的映射。在这种情况下,映射的简单性掩盖了路由的强大功能。如果这种方法(使用与静态字符串的直接比较)是唯一可用的方法,那么您可以构建的应用程序将受到严重限制。

Consider an e-commerce application that sells multiple products. Each product needs to have its own URL, so if you were using a purely static routing system, you’d have only two options:

考虑一个销售多种产品的电子商务应用程序。每个产品都需要有自己的 URL,因此如果您使用的是纯静态路由系统,则只有两个选项:

  • Use a different handler for every product in your product range. That approach would be unfeasible for almost any realistically sized product range.
    为您的产品系列中的每个产品使用不同的处理程序。这种方法对于几乎任何实际规模的产品系列都是不可行的。

  • Use a single handler, and use the query string to differentiate among products. This approach is much more practical, but you’d end up with somewhat-ugly URLs, such as "/product?name=big-widget" or "/product?id=12".
    使用单个处理程序,并使用查询字符串来区分产品。 这种方法要实用得多,但您最终会得到一些难看的 URL,例如“/product?name=big-widget“ 或 ”/product?id=12“ 的 API 版本。

Definition The query string is part of a URL containing additional data that doesn’t fit in the path. It isn’t used by the routing infrastructure to identify which handler to execute, but ASP.NET Core can extract values from the query string automatically in a process called model binding, as you’ll see in chapter 7. The query string in the preceding example is id=12.
定义 查询字符串是 URL 的一部分,其中包含不适合路径的其他数据。路由基础设施不使用它来标识要执行的处理程序,但 ASP.NET Core 可以在称为模型绑定的过程中自动从查询字符串中提取值,如第 7 章所示。前面示例中的查询字符串为 id=12。

With routing, you can have a single endpoint handler that can handle multiple URLs without having to resort to ugly query strings. From the point of the view of the endpoint handler, the query string and routing approaches are similar; the handler returns the results for the correct product dynamically as appropriate. The difference is that with routing, you can completely customize the URLs, as shown in figure 6.2. This feature gives you much more flexibility and can be important in real-life applications for search engine optimization (SEO).

通过路由,您可以拥有一个可以处理多个 URL 的终端节点处理程序,而不必求助于难懂的查询字符串。从端点的视角handler,则查询字符串和路由方法类似;处理程序会根据需要动态返回正确产品的结果。区别在于,使用路由,您可以完全自定义 URL,如图 6.2 所示。此功能为您提供了更大的灵活性,并且在搜索引擎优化 (SEO) 的实际应用程序中可能很重要。

Note With the flexibility of routing, you can encode the hierarchy of your site properly in your URLs, as described in Google’s SEO starter guide at http://mng.bz/EQ2J.
注意 借助路由的灵活性,您可以在 URL 中正确编码网站的层次结构,如 http://mng.bz/EQ2J 的 Google SEO 入门指南中所述。

Figure 6.2 If you use static URL-based mapping, you need a different handler for every product in your product range. With a query string, you can use a single handler, and the query string contains the data. With routing, multiple URLs map to a single handler, and a dynamic parameter captures the difference in the URL.
图 6.2 如果使用基于静态 URL 的映射,则产品范围中的每个产品都需要不同的处理程序。使用查询字符串,您可以使用单个处理程序,并且查询字符串包含数据。使用路由时,多个 URL 映射到单个处理程序,并且动态参数捕获 URL 中的差异。

As well as enabling dynamic URLs, routing fundamentally decouples the URLs in your application from the definition of your handlers.

除了启用动态 URL 之外,路由还从根本上将应用程序中的 URL 与处理程序的定义分离。

File-system based routing
基于文件系统的路由
In one alternative to routing, the location of a handler on disk dictates the URL you use to invoke it. The downside of this approach is that if you want to change an exposed URL, you also need to change the location of the handler on disk.
在路由的另一种替代方法中,处理程序在磁盘上的位置决定了用于调用它的 URL。这种方法的缺点是,如果要更改公开的 URL,还需要更改处理程序在磁盘上的位置。
This file-based approach may sound like a strange choice, but it has many advantages for some apps, primarily in terms of simplicity. As you’ll see in part 2, Razor Pages is partially file-based but also uses routing to get the best of both worlds!
这种基于文件的方法听起来可能很奇怪,但对于某些应用程序来说,它有很多优点,主要是在简单性方面。正如您将在第 2 部分中看到的那样,Razor Pages 部分基于文件,但也使用路由来获得两全其美的效果!

With routing it’s easy to modify your exposed URLs without changing any filenames or locations. You can also use routing to create friendlier URLs for users, which can improve discovery and “hackability.” All of the following routes could point to the same handler:

通过路由,可以轻松修改公开的 URL,而无需更改任何文件名或位置。您还可以使用路由为用户创建更友好的 URL,这可以提高发现和“可黑客攻击性”。以下所有路由都可以指向同一个处理程序:

  • /rates/view/1
  • /rates/view/USD
  • /rates/current-exchange-rate/USD
  • /current-exchange-rate-for-USD

This level of customization isn’t often necessary, but it’s quite useful to have the capability to customize your app’s URLs when you need it. In the next section we’ll look at how routing works in practice in ASP.NET Core.

这种级别的自定义通常不是必需的,但能够在需要时自定义应用程序的 URL 非常有用。在下一节中,我们将了解 ASP.NET Core 中的路由实际工作原理。

6.2 Endpoint routing in ASP.NET Core

6.2 ASP.NET Core 中的终端节点路由

In this section I describe how endpoint routing works in ASP.NET Core, specifically with respect to minimal APIs and the middleware pipeline. In chapter 14 you’ll learn how routing is used with Razor Pages and the ASP.NET Core MVC framework.

在本节中,我将介绍终端节点路由在 ASP.NET Core 中的工作原理,特别是关于最小 API 和中间件管道。在第 14 章中,您将了解如何将路由与 Razor Pages 和 ASP.NET Core MVC 框架一起使用。

Routing has been part of ASP.NET Core since its inception, but it has been through some big changes. In ASP.NET Core 2.0 and 2.1, routing was restricted to Razor Pages and the ASP.NET Core MVC framework. There was no dedicated routing middleware in the middleware pipeline; routing happened only within Razor Pages or MVC components.

路由自成立以来一直是 ASP.NET Core 的一部分,但它经历了一些重大变化。在 ASP.NET Core 中2.0 和 2.1 中,路由仅限于 Razor Pages 和 ASP.NET Core MVC 框架。中间件管道中没有专用的路由中间件;路由仅在 Razor Pages 或 MVC 组件中发生。

Unfortunately, restricting routing to the MVC and Razor Pages infrastructure made some things a bit messy. Some cross-cutting concerns, such as authorization, were restricted to the MVC infrastructure and were hard to use from other middleware in your application. That restriction caused inevitable duplication, which wasn’t ideal.

遗憾的是,将路由到 MVC 和 Razor Pages 基础结构会使某些事情变得有点混乱。一些横切关注点(如授权)仅限于 MVC 基础设施,并且很难从应用程序中的其他中间件中使用。这种限制导致了不可避免的重复,这并不理想。

ASP.NET Core 3.0 introduced a new routing system: endpoint routing. Endpoint routing makes the routing system a more fundamental feature of ASP.NET Core and no longer ties it to the MVC infrastructure. Now Razor Pages, MVC, and other middleware can all use the same routing system. .NET 7 continues to use the same endpoint routing system, which is integral to the minimal API functionality that was introduced in .NET 6.

ASP.NET Core 3.0 引入了一个新的路由系统:端点路由。端点路由使路由系统成为 ASP.NET Core 的更基本功能,不再将其绑定到 MVC 基础设施。现在,Razor Pages、MVC 和其他中间件都可以使用相同的路由系统。.NET 7 继续使用相同的终结点路由系统,这是 .NET 6 中引入的最小 API 功能不可或缺的一部分。

Endpoint routing is fundamental to all but the simplest ASP.NET Core apps. It’s implemented with two pieces of middleware, which you’ve already seen:

端点路由是除最简单的 ASP.NET Core 应用程序之外的所有应用程序的基础。它是通过两个中间件实现的,您已经看到了:

  • EndpointRoutingMiddleware—This middleware chooses which registered endpoints execute for a given request at runtime. To make it easier to distinguish between the two types of middleware, I’ll be referring to this middleware as the RoutingMiddleware throughout this book.
    EndpointRoutingMiddleware — 此中间件选择在运行时为给定请求执行哪些已注册的终端节点。为了更容易区分这两种类型的中间件,我在本书中将此中间件称为 RoutingMiddleware。

  • EndpointMiddleware—This middleware is typically placed at the end of your middleware pipeline. The middleware executes the endpoint selected by the RoutingMiddleware at runtime.
    EndpointMiddleware — 此中间件通常位于中间件管道的末尾。中间件在运行时执行 RoutingMiddleware 选择的端点。

You register the endpoints in your application by calling Map* functions on an IEndpointRouteBuilder instance. In .NET 7 apps, this instance typically is a WebApplication instance but doesn’t have to be, as you’ll see in chapter 30.

您可以通过在 IEndpointRouteBuilder 实例上调用 Map* 函数在应用程序中注册终端节点。在 .NET 7 应用程序中,此实例通常是 Web- Application 实例,但并非必须如此,如第 30 章所示。

Definition An endpoint in ASP.NET Core is a handler that returns a response. Each endpoint is associated with a URL pattern. Depending on the type of application you’re building, minimal API handlers, Razor Page handlers, or MVC controller action methods typically make up the bulk of the endpoints in an application. You can also use simple middleware as an endpoint or a health-check endpoint, for example.
定义 ASP.NET Core 中的终端节点是返回响应的处理程序。每个端点都与一个 URL 模式相关联。根据要生成的应用程序类型,最少的 API 处理程序、Razor Page 处理程序或 MVC 控制器作方法通常构成应用程序中的大部分终结点。例如,您还可以使用简单的中间件作为终端节点,或者您可以使用运行状况检查终端节点。

WebApplication implements IEndpointRouteBuilder, so you can register endpoints on it directly. Listing 6.1 shows how you’d register several endpoints:

WebApplication 实现 IEndpointRouteBuilder,因此您可以直接在其上注册端点。清单 6.1 展示了如何注册多个端点:

  • A minimal API handler using MapGet(), as you’ve seen in previous chapters.
    使用 MapGet() 的最小 API 处理程序,如前几章所示。

  • A health-check endpoint using MapHealthChecks(). You can read more about health checks at http://mng.bz/N2YD.
    使用 MapHealthChecks() 的运行状况检查终端节点。您可以在 http://mng.bz/N2YD 上阅读有关运行状况检查的更多信息。

  • All Razor Pages endpoints in the application using MapRazorPages(). You’ll learn more about routing with Razor Pages in chapter 14.
    使用 MapRazorPages() 的应用程序中的所有 Razor Pages 终结点。您将在第 14 章中了解有关使用 Razor Pages 进行路由的更多信息。

Listing 6.1 Registering multiple endpoints with WebApplication
清单 6.1 使用 注册多个端点Web应用程序

WebApplicationBuilder builder = WebApplication.CreateBuilder(args);
builder.Services.AddHealthChecks();          //  ❶
builder.Services.AddRazorPages();            //  ❶

WebApplication app = builder.Build();

app.MapGet("/test", () => "Hello world!");   //  ❷
app.MapHealthChecks("/healthz");             //  ❸
app.MapRazorPages();                         //  ❹

app.Run();

❶ Adds the services required by the health-check middleware and Razor Pages
添加运行状况检查中间件和 Razor Pages 所需的服务

❷ Registers a minimal API endpoint that returns “Hello World!” at the route /test
注册一个最小的 API 端点,该端点在路由 /test 中返回 “Hello World!”

❸ Registers a health-check endpoint at the route /healthz
在路由 /healthz 中注册一个健康检查端点

❹ Registers all the Razor Pages in your application as endpoints
将应用程序中的所有 Razor Pages 注册为端点

Each endpoint is associated with a route template that defines which URLs the endpoint should match. You can see two route templates, "/healthz" and "/test", in listing 6.1.

每个终端节点都与一个路由模板相关联,该模板定义终端节点应匹配的 URL。在清单 6.1 中可以看到两个路由模板,“/healthz” 和 “/test”。

DEFINITION A route template is a URL pattern that is used to match against request URLs, which are strings of fixed values, such as "/test" in the previous listing. They can also contain placeholders for variables, as you’ll see in section 6.3.
定义: 路由模板是一种 URL 模式,用于匹配请求 URL,请求 URL 是固定值的字符串,如上一个列表中的 “/test”。 它们还可以包含变量的占位符,如 6.3 节所示。

The WebApplication stores the registered routes and endpoints in a dictionary that’s shared by the RoutingMiddleware and the EndpointMiddleware.

WebApplication 将注册的路由和终端节点存储在 RoutingMiddleware 和 EndpointMiddleware 共享的字典中。

TIP By default, WebApplication automatically adds the RoutingMiddleware to the start of the middleware and EndpointMiddleware to the end of the middleware pipeline, though you can override the location in the pipeline by calling UseRouting() or UseEndpoints(). See section 4.2.3 for more details about automatically added middleware.
提示: 默认情况下,WebApplication 会自动将 RoutingMiddleware 添加到中间件的开头,将 EndpointMiddleware 添加到中间件管道的末尾,但您可以通过调用 UseRouting() 或 UseEndpoints() 来覆盖管道中的位置。有关自动添加的中间件的更多详细信息,请参见 Section 4.2.3。

At runtime, the RoutingMiddleware compares an incoming request with the routes registered in the dictionary. If the RoutingMiddleware finds a matching endpoint, it makes a note of which endpoint was selected and attaches that to the request’s HttpContext object. Then it calls the next middleware in the pipeline. When the request reaches the EndpointMiddleware, the middleware checks to see which endpoint was selected and executes the endpoint (and any associated endpoint filters), as shown in figure 6.3.

在运行时,RoutingMiddleware 将传入请求与字典中注册的路由进行比较。如果 RoutingMiddleware 找到匹配的端点,它会记下选择了哪个端点,并将其附加到请求的 HttpContext 对象。然后,它会调用管道中的下一个中间件。当请求到达 EndpointMiddleware 时,中间件会检查选择哪个端点并执行该端点(以及任何关联的端点过滤器),如图 6.3 所示。

Figure 6.3 Endpoint routing uses a two-step process. The RoutingMiddleware selects which endpoint to execute, and the EndpointMiddleware executes it. If the request URL doesn’t match a route template, the endpoint middleware won’t generate a response.
图 6.3 终端节点路由使用两步过程。RoutingMiddleware 选择要执行的端点,EndpointMiddleware 执行它。如果请求 URL 与路由模板不匹配,则终端节点中间件不会生成响应。

If the request URL doesn’t match a route template, the RoutingMiddleware doesn’t select an endpoint, but the request still continues down the middleware pipeline. As no endpoint is selected, the EndpointMiddleware silently ignores the request and passes it to the next middleware in the pipeline. The EndpointMiddleware is typically the final middleware in the pipeline, so the “next” middleware is normally the dummy middleware that always returns a 404 Not Found response, as you saw in chapter 4.

如果请求 URL 与路由模板不匹配,则 RoutingMiddleware 不会选择终端节点,但请求仍会继续沿中间件管道向下移动。由于未选择任何终端节点,因此 EndpointMiddleware 会静默忽略该请求并将其传递给管道中的下一个中间件。EndpointMiddleware 通常是管道中的最后一个中间件,因此 “next” 中间件通常是始终返回 404 Not Found 响应的虚拟中间件,如第 4 章所示。

TIP If the request URL doesn’t match a route template, no endpoint is selected or executed. The whole middleware pipeline is still executed, but typically a 404 response is returned when the request reaches the dummy 404 middleware.
提示: 如果请求 URL 与路由模板不匹配,则不会选择或执行任何终端节点。整个中间件管道仍然会执行,但当请求到达虚拟 404 中间件时,通常会返回 404 响应。

The advantage of having two separate pieces of middleware to handle this process may not be obvious at first blush. Figure 6.3 hinted at the main benefit: all middleware placed after the RoutingMiddleware can see which endpoint is going to be executed before it is.

使用两个单独的中间件来处理此过程的优势乍一看可能并不明显。图 6.3 暗示了主要的好处:所有放在 RoutingMiddleware 后面的中间件都可以在执行之前看到哪个端点将被执行。

NOTE Only middleware placed after the RoutingMiddleware can detect which endpoint is going to be executed.
注意: 只有放在 RoutingMiddleware 之后的 middleware 才能检测到将要执行的端点。

Figure 6.4 shows a more realistic middleware pipeline in which middleware is placed both before the RoutingMiddleware and between the RoutingMiddleware and the EndpointMiddleware.

图 6.4 显示了一个更真实的中间件管道,其中中间件放置在 RoutingMiddleware 之前以及 RoutingMiddleware 和 EndpointMiddleware 之间。

Figure 6.4 Middleware placed before the routing middleware doesn’t know which endpoint the routing middleware will select. Middleware placed between the routing middleware and the endpoint middleware can see the selected endpoint.
图 6.4 放置在路由中间件前面的中间件不知道路由中间件将选择哪个端点。放置在路由中间件和终端节点中间件之间的中间件可以看到所选终端节点。

The StaticFileMiddleware in figure 6.4 is placed before the RoutingMiddleware, so it executes before an endpoint is selected. Conversely, the AuthorizationMiddleware is placed after the RoutingMiddleware, so it can tell which minimal API endpoint will be executed eventually. In addition, it can access certain metadata about the endpoint, such as its name and the permissions required to access it.

图 6.4 中的 StaticFileMiddleware 位于 RoutingMiddleware 之前,因此它在选择端点之前执行。相反,AuthorizationMiddleware 位于 RoutingMiddleware 之后,因此它可以判断最终将执行哪个最小的 API 端点。此外,它还可以访问有关终端节点的某些元数据,例如其名称和访问终端节点所需的权限。

TIP The AuthorizationMiddleware needs to know which endpoint will be executed, so it must be placed after the RoutingMiddleware and before the EndpointMiddleware in your middleware pipeline. I discuss authorization in more detail in chapter 24.
提示: AuthorizationMiddleware 需要知道将执行哪个端点,因此它必须放在中间件管道中的 RoutingMiddleware 之后和 EndpointMiddleware 之前。我在第 24 章中更详细地讨论了授权。

It’s important to remember the different roles of the two types of routing middleware when building your application. If you have a piece of middleware that needs to know which endpoint (if any) a given request will execute, you need to make sure to place it after the RoutingMiddleware and before the EndpointMiddleware.

在构建应用程序时,请务必记住这两种类型的路由中间件的不同角色。如果你有一个中间件需要知道给定请求将执行哪个端点(如果有的话),你需要确保将其放在 RoutingMiddleware 之后和 EndpointMiddleware 之前。

TIP If you want to place middleware before the RoutingMiddleware, such as the StaticFileMiddleware in figure 6.4, you need to override the automatic middleware added by WebApplication by calling UseRouting() at the appropriate point in your middleware pipeline. See listing 4.3 in chapter 4 for an example.
提示: 如果你想把中间件放在 RoutingMiddleware 之前,比如图 6.4 中的 StaticFileMiddleware,你需要在中间件管道中的适当位置调用 UseRouting() 来覆盖 WebApplication 添加的自动中间件。有关示例,请参见第 4 章中的清单 4.3。

I’ve covered how the RoutingMiddleware and EndpointMiddleware interact to provide routing capabilities in ASP.NET Core, but we’ve looked at only simple route templates so far. In the next section we’ll look at some of the many features available with route templates.

我已经介绍了 RoutingMiddleware 和 EndpointMiddleware 如何交互以在 ASP.NET Core 中提供路由功能,但到目前为止,我们只了解了简单的路由模板。在下一节中,我们将了解路由模板提供的众多功能中的一些。

6.3 Exploring the route template syntax

6.3 探索路由模板语法

So far in this book we’ve looked at simple route templates consisting of fixed values, such as /person and /test, as well as using a basic route parameter such as /fruit/{id}. In this section we explore the full range of features available in route templates, such as default values, optional segments, and constraints.

到目前为止,在本书中,我们已经了解了由固定值组成的简单路由模板,例如 /person 和 /test,以及使用基本路由参数,例如/fruit/{id} 中。在本节中,我们将探讨路由模板中提供的全部功能,例如默认值、可选分段和约束。

6.3.1 Working with parameters and literal segments

6.3.1 使用参数和文本段

Route templates have a rich, flexible syntax. Figure 6.5, however, shows a simple example, similar to ones you’ve already seen.

路由模板具有丰富、灵活的语法。然而,图 6.5 显示了一个简单的例子,类似于你已经看到的那些。

Figure 6.5 A simple route template showing a literal segment and two required route parameters
图 6.5 一个简单的路由模板,其中显示了一个文本段和两个必需的路由参数

The routing middleware parses a route template by splitting it into segments. A segment is typically separated by the / character, but it can be any valid character.

路由中间件通过将路由模板拆分为段来解析路由模板。段通常由字符分隔,但它可以是任何有效字符。/

DEFINITION Segments that use a character other than / are called complex segments. I generally recommend that you avoid them and stick to using / as a separator. Complex segments have some peculiarities that make them hard to use, so be sure to check the documentation at http://mng.bz/D4RE before you use them.
定义: 使用其他字符的线段称为复杂线段。我通常建议您避免使用它们并坚持用作分隔符。复杂区段具有一些特性,使其难以使用,因此请务必在使用 http://mng.bz/D4RE 之前查看文档。

Each segment is either
每个段是

• A literal value such as product in figure 6.5
如图 6.5 所示的 Literal 值product

• A route parameter such as {category} and {name} in figure 6.5
路由参数,如图 6.5 中的 和{category}{name}

The request URL must match literal values exactly (ignoring case). If you need to match a particular URL exactly, you can use a template consisting only of literals.

请求 URL 必须与文字值完全匹配(忽略大小写)。如果需要精确匹配特定 URL,可以使用仅包含文本的模板。

TIP Literal segments in ASP.NET Core aren’t case-sensitive.
提示: ASP.NET Core 中的文本段不区分大小写。

Imagine that you have a minimal API in your application defined using
假设您在应用程序中有一个使用

app.MapGet("/About/Contact", () => {/* */})

This route template, “/About/Contact", consists only of literal values, so it matches only the exact URL (ignoring case). None of the following URLs would match this route template:
此路由模板 “/About/Contact” 仅包含文本值,因此它仅匹配确切的 URL(忽略大小写)。以下 URL 都不匹配此路由模板:

• /about
• /about-us/contact
• /about/contact/email
• /about/contact-us

Route parameters are sections of a URL that may vary but are still a match for the template. You define them by giving them a name and placing them in braces, such as {category} or {name}. When used in this way, the parameters are required, so the request URL must have a segment that they correspond to, but the value can vary.

路由参数是 URL 的部分,这些部分可能会有所不同,但仍与模板匹配。您可以通过为它们命名并将它们放在大括号中来定义它们,例如{类别}或 {name} 的以这种方式使用时,参数是必需的,因此请求 URL 必须具有它们对应的区段,但该值可能会有所不同。

The ability to use route parameters gives you great flexibility. The simple route template "/{category}/{name}" could be used to match all the product-page URLs in an e-commerce application:
使用路由参数的能力为您提供了极大的灵活性。简单的路由模板 “/{category}/{name}” 可用于匹配电子商务应用程序中的所有产品页面 URL:

• /bags/rucksack-a—Where category=bags and name=rucksack-a
• /shoes/black-size9—Where category=shoes and name=black-size9

But note that this template would not map the following URLs:
但请注意,此模板不会映射以下 URL:

• /socks/—No name parameter specified
• /trousers/mens/formal—Extra URL segment, formal, not found in route template

When a route template defines a route parameter and the route matches a URL, the value associated with the parameter is captured and stored in a dictionary of values associated with the request. These route values typically drive other behavior in the endpoint and can be injected into the handlers (as you saw briefly in chapter 5) in a process called model binding.

当路由模板定义路由参数并且路由与 URL 匹配时,将捕获与该参数关联的值并将其存储在与请求关联的值字典中。这些路由值通常驱动端点中的其他行为,并且可以在称为模型绑定的过程中注入处理程序(如您在第 5 章中简要看到的那样)。

DEFINITION Route values are the values extracted from a URL based on a given route template. Each route parameter in a template has an associated route value, and the values are stored as a string pair in a dictionary. They can be used during model binding, as you’ll see in chapter 7.
定义: 路由值 是根据给定路由模板从 URL 中提取的值。模板中的每个路由参数都有一个关联的路由值,这些值作为字符串对存储在字典中。它们可以在模型绑定期间使用,如第 7 章所示。

Literal segments and route parameters are the two cornerstones of ASP.NET Core route templates. With these two concepts, it’s possible to build all manner of URLs for your application. In the remainder of section 6.3 we’ll look at additional features that let you have optional URL segments, provide default values when a segment isn’t specified, and place additional constraints on the values that are valid for a given route parameter.

文字段和路由参数是 ASP.NET Core 路由模板的两个基石。有了这两个概念,就可以为您的应用程序构建各种 URL。在第 6.3 节的其余部分中,我们将介绍其他功能,这些功能允许您使用可选的 URL 段,在未指定段时提供默认值,以及对给定路由参数有效的值设置其他约束。

6.3.2 Using optional and default values

6.3.2 使用可选值和默认值

In section 6.3.1 you saw a simple route template with a literal segment and two required routing parameters. Figure 6.6 shows a more complex route that uses several additional features.

在 6.3.1 节中,您看到了一个简单的路由模板,其中包含一个文字段和两个必需的路由参数。图6.6 显示了一个更复杂的路由,它使用了几个附加功能。

Figure 6.6 A more complex route template showing literal segments, named route parameters, optional parameters, and default values.
图 6.6 一个更复杂的路由模板,显示文本段、命名路由参数、可选参数和默认值。

The literal product segment and the required {category} parameter are the same as those in in figure 6.6. The {name} parameter looks similar, but it has a default value specified for it by =all. If the URL doesn’t contain a segment corresponding to the {name} parameter, the router will use the all value instead.

文本 product segment 和所需的 {category}参数与图 6.6 中的相同。这{name} 参数看起来类似,但它的默认值由 =all 指定。如果 URL 不包含与 {name} 参数对应的段,则路由器将改用 all 值。

The final segment of figure 6.6, {id?}, defines an optional route parameter called id. This segment of the URL is optional. If this segment is present, the router captures the value for the {id} parameter; if the segment isn’t there, the router doesn’t create a route value for id.

图 6.6 的最后一段 {id?} 定义了一个名为 id 的可选路由参数。URL 的此段是可选的。如果存在此段,则路由器将捕获 {id} 参数的值;如果 segment 不存在,则路由器不会为 id 创建 route 值。

You can specify any number of route parameters in your templates, and these values will be available to you for model binding. The complex route template shown in figure 6.6 allows you to match a greater variety of URLs by making {name} and {id} optional and by providing a default for {name}. Table 6.1 shows some of the URLs that this template would match and the corresponding route values that the router would set.

您可以在模板中指定任意数量的路由参数,这些值将可用于模型绑定。图中所示的复杂路由模板6.6 允许您通过以下方式匹配更多种类的 URL{姓名}和 {id} 可选,并通过为{姓名}。表 6.1 显示了此模板将匹配的一些 URL 以及路由器将设置的相应路由值。

Table 6.1 URLs that would match the template of figure 6.7 and their corresponding route values
表 6.1 与图 6.7 中的模板匹配的 URL 及其相应的路由值

URL Route values
/product/shoes/formal/3 category=shoes, name=formal, id=3
/product/shoes/formal category=shoes, name=formal
/product/shoes category=shoes, name=all
/product/bags/satchels category=bags, name=satchels
/product/phones category=phones, name=all
/product/computers/laptops/ABC-123 category=computers, name=laptops,id=ABC-123

NOTE that there’s no way to specify a value for the optional {id} parameter without also specifying the {category} and {name} parameters. You can put an optional parameter (that doesn’t have a default) only at the end of a route template.
注意: 无法为可选的{id} 参数,但未指定 {category}和 {name} 参数。您可以放置一个可选参数(没有默认值)仅在路由模板的末尾。

Using default values allows you to have multiple ways to call the same URL, which may be desirable in some cases. Given the route template in figure 6.6, the following two URLs are equivalent:

使用默认值允许您通过多种方式调用同一 URL,这在某些情况下可能是可取的。给定图 6.6 中的路由模板,以下两个 URL 是等效的:

• /product/shoes
• /product/shoes/all

Both URLs will execute the same endpoint handler, with the same route values of category=shoes and name=all. Using default values allows you to use shorter, more memorable URLs in your application for common URLs but still gives you the flexibility to match a variety of routes in a single template.

这两个 URL 将执行相同的端点处理程序,具有相同的路由值 category=shoes 和 name=all。使用默认值允许您在应用程序中为常见 URL 使用更短、更易记的 URL,但您仍然可以灵活地在单个模板中匹配各种路由。

6.3.3 Adding additional constraints to route parameters

6.3.3 向路由参数添加其他约束

By defining whether a route parameter is required or optional and whether it has a default value, you can match a broad range of URLs with terse template syntax. Unfortunately, in some cases this approach ends up being a little too broad. Routing only matches URL segments to route parameters; it doesn’t know anything about the data you’re expecting those route parameters to contain. If you consider a template similar to the one in figure 6.6, "/{category}/{name=all}/{id?}", all of the following URLs would match:

通过定义路由参数是必需的还是可选的,以及它是否具有默认值,您可以使用简洁的模板语法匹配各种 URL。不幸的是,在某些情况下,这种方法最终有点过于宽泛。路由仅将 URL 段与路由参数匹配;它不知道您期望这些路由参数包含的数据。如果您考虑类似于图 6.6 中的模板,“/{category}/{name=all}/{id?}”,则以下所有 URL 都将匹配:

• /shoes/sneakers/test
• /shoes/sneakers/123
• /Account/ChangePassword
• /ShoppingCart/Checkout/Start
• /1/2/3

These URLs are perfectly valid given the template’s syntax, but some might cause problems for your application. These URLs have two or three segments, so the router happily assigns route values and matches the template when you might not want it to! These are the route values assigned:

根据模板的语法,这些 URL 是完全有效的,但有些 URL 可能会给您的应用程序带来问题。这些 URL 有两到三个段,因此路由器会很高兴地分配路由值,并在您可能不希望的时候匹配模板!以下是分配的路由值:

• /shoes/sneakers/test has route values category=shoes, name=sneakers, and id=test.

• /shoes/sneakers/123 has route values category=shoes, name=sneakers, and id=123.

• /Account/ChangePassword has route values category=Account, and name=ChangePassword.

• /Cart/Checkout/Start has route values category=Cart, name=Checkout, and id=Start.
• /1/2/3 has route values category=1, name=2, and id=3.

Typically, the router passes route values to handlers through model binding, which you saw briefly in chapter 5 (and which chapter 7 discusses in detail). A minimal API endpoint defined as

通常,路由器通过模型绑定将 route 值传递给处理程序,您在第 5 章中简要看到过(第 7 章详细讨论了)。定义为

app.MapGet("/fruit/{id}", (int id) => "Hello world!");

would obtain the id argument from the id route value. If the id route parameter ends up assigned a noninteger value from the URL, you’ll get an exception when it’s bound to the integer id parameter.

将从 route 值中获取id参数。如果 route 参数最终从 URL 分配了一个非整数值,则当它绑定到 integer 参数时,您将收到异常。

To avoid this problem, it’s possible to add more constraints to a route template that must be satisfied for a URL to be considered a match. You can define constraints in a route template for a given route parameter by using : (colon). {id:int}, for example, would add the IntRouteConstraint to the id parameter. For a given URL to be considered a match, the value assigned to the id route value must be convertible to an integer.

为避免此问题,可以向路由模板添加更多约束,必须满足这些约束才能将 URL 视为匹配项。您可以使用 :(冒号)在路由模板中为给定路由参数定义约束。{id:int},则会添加IntRouteConstraint 设置为 id 参数。要使给定 URL 被视为匹配项,分配给 id 路由值的值必须可转换为整数。

You can apply a large number of route constraints to route templates to ensure that route values are convertible to appropriate types. You can also check more advanced constraints, such as that an integer value has a particular minimum value, that a string value has a maximum length, and that a value matches a given regular expression. Table 6.2 describes some of the available constraints. You can find a more complete list online in Microsoft’s documentation at http://mng.bz/BmRJ.

您可以将大量路由约束应用于路由模板,以确保路由值可转换为适当的类型。您还可以检查更高级的约束,例如整数值是否具有特定的最小值、字符串值是否具有最大长度或值是否与给定的正则表达式匹配。表 6.2 描述了一些可用的约束。您可以找到更完整的在线列表,请参阅 Microsoft 的文档,网址为 http://mng.bz/BmRJ

Table 6.2 A few route constraints and their behavior when applied
Constraint
表 6.2 一些路由约束及其应用时的行为

Constraint Example Description Match examples
int {qty:int} Matches any integer 123, -123, 0
Guid {id:guid} Matches any Guid d071b70c-a812-4b54-87d2-7769528e2814
decimal {cost:decimal} Matches any decimal value 29.99, 52,-1.01
min(value) {age:min(18)} Matches integer values of 18 or greater 18, 20
length(value) {name:length(6)} Matches string values with a length of 6 Andrew,123456
optional int {qty:int?} Optionally matches any integer 123, -123,0,null
optional int max(value) {qty:int:max(10)?} Optionally matches any integer of 10 or less 3, -123, 0,null

TIP As you can see from table 6.2, you can also combine multiple constraints by separating the constraints with colons.
提示: 从表 6.2 中可以看出,您还可以通过用冒号分隔约束来组合多个约束。

Using constraints allows you to narrow down the URLs that a given route template will match. When the routing middleware matches a URL to a route template, it interrogates the constraints to check that they’re all valid. If they aren’t valid, the route template isn’t considered a match, and the endpoint won’t be executed.

使用 constraints 可以缩小给定路由模板将匹配的 URL 的范围。当路由中间件将 URL 与路由模板匹配时,它会询问约束以检查它们是否都有效。如果它们无效,则路由模板不被视为匹配项,并且不会执行终端节点。

WARNING Don’t use route constraints to validate general input, such as to check that an email address is valid. Doing so will result in 404 “Page not found” errors, which will be confusing for the user. You should also be aware that all these built-in constraints assume invariant culture, which may prove to be problematic if your application uses URLs localized for other languages.
警告: 不要使用路由约束来验证常规输入,例如检查电子邮件地址是否有效。这样做将导致 404 “Page not found” 错误,这将使用户感到困惑。您还应该知道,所有这些内置约束都假定固定区域性,如果您的应用程序使用针对其他语言本地化的 URL,这可能会带来问题。

Constraints are best used sparingly, but they can be useful when you have strict requirements on the URLs used by the application, as they can allow you to work around some otherwise-tricky combinations. You can even create custom constraints, as described in the documentation at http://mng.bz/d14Q.

约束最好谨慎使用,但当您对应用程序使用的 URL 有严格要求时,它们可能很有用,因为它们可以让您解决一些其他棘手的组合。您甚至可以创建自定义约束,如 http://mng.bz/d14Q 中的文档中所述。

Constraints and overlapping routes
约束和重叠路由
If you have a well-designed set of URLs for your application, you’ll probably find that you don’t need to use route constraints. Route constraints are most useful when you have overlapping route templates.
如果您的应用程序有一组设计良好的 URL,您可能会发现不需要使用路由约束。当您有重叠的路由模板时,路由约束最有用。
Suppose that you have an endpoint with the route template "/{number}/{name}" and another with the template "/{product}/{id}". When a request with the URL /shoes/123 arrives, which template is chosen? Both match, so the routing middleware panics and throws an exception—not ideal.
假设您有一个路由模板为 “/{number}/{name}” 的终端节点,另一个终端节点的模板为 “/{product}/{id}”。当 URL 为 /shoes/123 的请求到达时,选择哪个模板?两者都匹配,因此路由中间件会 panic 并引发异常 — 这并不理想。
Using constraints can fix this problem. If you update the first template to "/{number:int}/{name}", the integer constraint means that the URL is no longer a match, and the routing middleware can choose correctly. Note, however, that the URL /123/shoes still matches both route templates, so you’re not out of the woods.
使用约束可以解决此问题。如果将第一个模板更新为 “/{number:int}/{name}”,则整数约束表示 URL 不再匹配,路由中间件可以正确选择。但请注意,URL /123/shoes 仍然与两个路由模板匹配,因此您不会陷入困境。
Generally, you should avoid overlapping route templates like these, as they’re often confusing and more trouble than they’re worth. If your route templates are well defined so that each URL maps to a single template, ASP.NET Core routing will work without any difficulties. Sticking to the built-in conventions as far as possible is the best way to stay on the happy path!
通常,您应该避免像这样的重叠路由模板,因为它们通常会令人困惑并且比它们的价值更麻烦。如果您的路由模板定义明确,以便每个 URL 都映射到单个模板,则 ASP.NET Core 路由将毫无困难地工作。尽可能坚持内在的约定俗成是保持快乐道路的最佳方式!

We’re coming to the end of our look at route templates, but before we move on, there’s one more type of parameter to think about: the catch-all parameter.

我们即将结束对路由模板的介绍,但在我们继续之前,还有一种类型的参数需要考虑:catch-all 参数。

6.3.4 Matching arbitrary URLs with the catch-all parameter

6.3.4 使用 catch-all 参数匹配任意 URL

You’ve seen how route templates take URL segments and attempt to match them to parameters or literal strings. These segments normally split around the slash character, /, so the route parameters themselves won’t contain a slash. What do you do if you need them to contain a slash or don’t know how many segments you’re going to have?

您已经了解了路由模板如何获取 URL 段并尝试将它们与参数或文本字符串匹配。这些段通常围绕斜杠字符 / 进行分割,因此,路由参数本身不会包含斜杠。如果您需要它们包含斜杠或不知道您将拥有多少个段,该怎么办?

Imagine that you’re building a currency-converter application that shows the exchange rate from one currency to one or more other currencies. You’re told that the URLs for this page should contain all the currencies as separate segments. Here are some examples:

假设您正在构建一个货币转换器应用程序,该应用程序显示从一种货币到一种或多种其他货币的汇率。您被告知此页面的 URL 应包含所有货币作为单独的段。以下是一些示例:

• /USD/convert/GBP—Show USD with exchange rate to GBP.

• /USD/convert/GBP/EUR—Show USD with exchange rates to GBP and EUR.

• /USD/convert/GBP/EUR/CAD—Show USD with exchange rates for GBP, EUR, and CAD.

If you want to support showing any number of currencies, as these URLs do, you need a way to capture everything after the convert segment. You could achieve this goal by using a catch-all parameter in the route template, as shown in figure 6.7.

如果要像这些 URL 一样支持显示任意数量的货币,则需要一种方法来捕获 convert 区段之后的所有内容。您可以通过在路由模板中使用 catch-all 参数来实现此目标,如图 6.7 所示。

Figure 6.7 You can use catch-all parameters to match the remainder of a URL. Catch-all parameters may include the / character or may be an empty string.
图 6.7 您可以使用 catch-all 参数来匹配 URL 的其余部分。Catch-all 参数可以包含 / 字符,也可以是空字符串。

You can declare catch-all parameters by using either one or two asterisks inside the parameter definition, as in {*others} and {**others}. These parameters match the remaining unmatched portion of a URL, including any slashes or other characters that aren’t part of earlier parameters. They can also match an empty string. For the USD/convert/GBP/EUR URL, the value of the route value others would be the single string "GBP/EUR".

您可以通过在参数定义中使用一个或两个星号来声明 catch-all 参数,如 和 。这些参数与 URL 的剩余不匹配部分匹配,包括任何斜杠或不属于早期参数的其他字符。它们还可以匹配空字符串。对于 URL,route 值的值将是单个字符串 。{*others}{**others}USD/convert/GBP/EURothers"GBP/EUR"

TIP Catch-all parameters are greedy and will capture the whole unmatched portion of a URL. Where possible, to avoid confusion, avoid defining route templates with catch-all parameters that overlap other route templates.
提示: Catch-all 参数是贪婪的,将捕获 URL 的整个不匹配部分。为避免混淆,请避免使用与其他路由模板重叠的 catch-all 参数定义路由模板。

The one- and two-asterisk versions of the catch-all parameter behave identically when routing an incoming request to an endpoint. The difference occurs only when you’re generating URLs (which we’ll cover in the next section): the one-asterisk version URL encodes forward slashes, and the two-asterisk version doesn’t. Typically, the round-trip behavior of the two-asterisk version is what you want.

在将传入请求路由到终端节点时,catch-all 参数的一个星号和两个星号版本的行为相同。仅在生成 URL 时(我们将在下一节中介绍)才会出现差异:一个星号版本的 URL 对正斜杠进行编码,而两个星号的 URL 则不编码。通常,两个星号版本的往返行为是您想要的。

NOTE For examples and a comparison between the one and two-asterisk catch-all versions, see the documentation at http://mng.bz/rWyX.
注意: 有关示例以及 1 个星号和 2 个星号 catch-all 版本之间的比较,请参阅 http://mng.bz/rWyX 中的文档。

You read that last paragraph correctly: mapping URLs to endpoints is only half of the responsibilities of the routing system in ASP.NET Core. It’s also used to generate URLs so that you can reference your endpoints easily from other parts of your application.

您正确地阅读了最后一段:将 URL 映射到终端节点只是 ASP.NET Core 中路由系统职责的一半。它还用于生成 URL,以便您可以轻松地从应用程序的其他部分引用终端节点。

6.4 Generating URLs from route parameters

6.4 从路由参数生成 URL

In this section we’ll look at the other half of routing: generating URLs. You’ll learn how to generate URLs as a string you can use in your code and how to send redirect URLs automatically as a response from your endpoints.

在本节中,我们将了解路由的另一半:生成 URL。您将学习如何将 URL 生成为可在代码中使用的字符串,以及如何自动发送重定向 URL 作为来自终端节点的响应。

One of the benefits and byproducts of using the routing infrastructure in ASP.NET Core is that your URLs can be somewhat fluid. You can change route templates however you like in your application—by renaming /cart to /basket, for example—and won’t get any compilation errors.

在 ASP.NET Core 中使用路由基础设施的好处和副产品之一是您的 URL 可能有些不稳定。您可以在应用程序中根据需要更改路由模板 - 通过将 /cart 重命名为/basket 的 URL,并且不会收到任何编译错误。

Endpoints aren’t isolated, of course; inevitably, you’ll want to include a link to one endpoint in another. Trying to manage these links within your app manually would be a recipe for heartache, broken links, and 404 errors. If your URLs were hardcoded, you’d have to remember to do a find-and-replace operation with every rename!

当然,终端节点不是孤立的;不可避免地,您需要在另一个终端节点中包含指向一个终端节点的链接。尝试在你的应用程序中手动管理这些链接将导致心痛、链接断开和 404 错误。如果您的 URL 是硬编码的,则必须记住在每次重命名时执行查找和替换作!

Luckily, you can use the routing infrastructure to generate appropriate URLs dynamically at runtime instead, freeing you from the burden. Conceptually, this process is almost the exact reverse of the process of mapping a URL to an endpoint, as shown in figure 6.8. In the routing case, the routing middleware takes a URL, matches it to a route template, and splits it into route values. In the URL generation case, the generator takes in the route values and combines them with a route template to build a URL.

幸运的是,您可以使用路由基础设施在运行时动态生成适当的 URL,从而减轻您的负担。从概念上讲,此过程几乎与将 URL 映射到端点的过程完全相反,如图 6.8 所示。在路由情况下,路由中间件采用 URL,将其与路由模板匹配,并将其拆分为路由值。在 URL生成的情况下,生成器会接收路由值并将它们与路由模板组合在一起以构建 URL。

Figure 6.8 A comparison between routing and URL generation. Routing takes in a URL and generates route values, but URL generation uses route values to generate a URL.
图 6.8 路由和 URL 生成之间的比较。路由接收 URL 并生成route 值,但 URL 生成使用路由值来生成 URL。

You can use the LinkGenerator class to generate URLs for your minimal APIs. You can use it in any part of your application, so you can use it in middleware and any other services too. LinkGenerator has various methods for generating URLs, such as GetPathByPage and GetPathByAction, which are used specifically for routing to Razor Pages and MVC actions, so we’ll look at those in chapter 14. We’re interested in the methods related to named routes.

您可以使用 LinkGenerator 类为您的最小 API 生成 URL。您可以在应用程序的任何部分使用它,因此您也可以在中间件和任何其他服务中使用它。LinkGenerator 具有各种生成 URL 的方法,例如 GetPathByPage 和 GetPathByAction,它们专门用于路由到 Razor Pages 和 MVC作,因此我们将在第 14 章中介绍这些方法。我们对与命名路由相关的方法感兴趣。

6.4.1 Generating URLs for a minimal API endpoint with LinkGenerator

6.4.1 使用 LinkGenerator 为最小 API 端点生成 URL

You’ll need to generate URLs in various places in your application, and one common location is your minimal API endpoints. The following listing shows how you could generate a link to one endpoint from another by annotating the target endpoint with a name and using the LinkGenerator class.

您需要在应用程序的不同位置生成 URL,一个常见位置是最小 API 终端节点。下面的清单显示了如何通过使用名称注释目标终端节点并使用 LinkGenerator 类来生成从另一个终端节点到另一个终端节点的链接 。

Listing 6.2 Generating a URL LinkGenerator and a named endpoint
清单 6.2 生成一个 URL LinkGenerator 和一个命名的端点

app.MapGet("/product/{name}", (string name) => $"The product is {name}")        // ❶
    .WithName("product");                                                       // ❷

app.MapGet("/links", (LinkGenerator links) =>                                   // ❸
{
    string link = links.GetPathByName("product",                                // ❹
        new { name = "big-widget" });                                           // ❹
    return $"View the product at {link}";                                       // ❺
});

❶ The endpoint echoes the name it receives in the route template.
端点回显它在路由模板中接收的名称。

❷ Gives the endpoint a name by adding metadata to it
通过向终端节点添加元数据来为终端节点命名

❸ References the LinkGenerator class in the endpoint handler
在端点处理程序中引用 LinkGenerator 类

❹ Creates a link using the route name “product” and provides a value for the route parameter
使用路由名称 “product” 创建链接,并为路由参数提供值

❺ Returns the value “View the product at /product/big-widget”
返回值 “View the product at /product/big-widget”

The WithName() method adds metadata to your endpoints so that they can be referenced by other parts of your application. In this case, we’re adding a name to the endpoint so we can refer to it later. You’ll learn more about metadata in chapter 11.

WithName() 方法将元数据添加到端点,以便应用程序的其他部分可以引用它们。在本例中,我们将向终端节点添加一个名称,以便稍后可以引用它。您将在第 11 章中了解有关元数据的更多信息。

Note Endpoint names are case-sensitive (unlike the route templates themselves) and must be globally unique. Duplicate names cause exceptions at runtime.
注意: 终端节点名称区分大小写(与路由模板本身不同),并且必须全局唯一。重复的名称会导致运行时出现异常

The LinkGenerator is a service available anywhere in ASP.NET Core. You can access it from your endpoints by including it as a parameter in the handler.

LinkGenerator 是一项在 ASP.NET Core 中的任何位置都可用的服务。您可以通过将其作为参数包含在处理程序中,从终端节点访问它。

NOTE You can reference the LinkGenerator in your handler because it’s registered with the dependency injection container automatically. You’ll learn about dependency injection in chapters 8 and 9.
注意: 您可以在处理程序中引用 LinkGenerator,因为它会自动注册到依赖项注入容器中。您将在第 8 章和第 9 章中了解依赖关系注入。

The GetPathByName() method takes the name of a route and, optionally, route data. The route data is packaged as key-value pairs into a single C# anonymous object. If you need to pass more than one route value, you can add more properties to the anonymous object. Then the helper will generate a path based on the referenced endpoint’s route template.

GetPathByName() 方法采用路由的名称,也可以选择获取路由数据。路由数据作为键值对打包到单个 C# 匿名对象中。如果需要传递多个路由值,可以添加更多properties 添加到匿名对象。然后,帮助程序将根据引用的端点的路由模板生成路径。

Listing 6.2 shows how to generate a path. But you can also generate a complete URL by using the GetUriByName() method and providing values for the host and scheme, as in this example:

清单 6.2 展示了如何生成路径。但是,您也可以通过使用 GetUriByName() 方法并为 host 和 scheme 提供值来生成完整的 URL,如下例所示:

links.GetUriByName("product", new { Name = "super-fancy-widget"},
    "https", new HostString("localhost"));

Also, some methods available on LinkGenerator take an HttpContext. These methods are often easier to use in an endpoint handler, as they extract ambient values such as the scheme and hostname from the incoming request and reuse them for URL generation.

此外,LinkGenerator 上可用的一些方法采用 HttpContext。这些方法通常更容易在端点处理程序中使用,因为它们从传入请求中提取环境值(如 scheme 和 hostname),并将它们重新用于 URL 生成。

WARNING Be careful when using the GetUriByName method. It’s possible to expose vulnerabilities in your app if you use unvalidated host values. For more information on host filtering and why it’s important, see this post: http://mng.bz/V1d5.
警告: 使用 GetUriByName 方法时要小心。如果您使用未经验证的 host 值,则可能会暴露应用程序中的漏洞。有关主机筛选及其重要性的更多信息,请参阅此博文:http://mng.bz/V1d5

In listing 6.2, as well as providing the route name, I passed in an anonymous object to GetPathByName:
在清单 6.2 中,除了提供路由名称外,我还向 GetPathByName 传入了一个匿名对象:

string link = links.GetPathByName("product", new { name = "big-widget"});

This object provides additional route values when generating the URL, in this case setting the name parameter to "big-widget":

此对象在生成 URL 时提供额外的路由值,在本例中,将 name 参数设置为 “big- widget”。

If a selected route explicitly includes the defined route value in its definition, such as in the "/product/{name}" route template, the route value will be used in the URL path, resulting in /product/big-widget. If a route doesn’t contain the route value explicitly, as in the "/product" template, the route value is appended to the query string as additional data. as in /product?name=big-widget.

如果所选路由在其定义中显式包含定义的路由值,例如在“/product/{name}”路由模板中,则路由值将在 URL 路径中使用,从而生成 /product/big-widget。如果路由没有显式包含路由值(如“/product”模板中所示),则路由值将作为附加数据附加到查询字符串中。如 /product?name=big-widget 中所示。

6.4.2 Generating URLs with IResults

6.4.2 使用 IResults 生成 URL

Generating URLs that link to other endpoints is common when you’re creating a REST API, for example. But you don’t always need to display URLs. Sometimes, you want to redirect a user to a URL automatically. In that situation you can use Results.RedirectToRoute() to handle the URL generation instead.

例如,在创建 REST API 时,生成链接到其他终端节点的 URL 很常见。但您并不总是需要显示 URL。有时,您希望自动将用户重定向到 URL。在这种情况下,您可以使用 Results.RedirectToRoute() 来处理 URL 生成。

NOTE Redirects are more common with server-rendered applications such as Razor Pages, but they’re perfectly valid for API applications too.
注意: 重定向在服务器呈现的应用程序(如 Razor Pages)中更为常见,但它们对 API 应用程序也完全有效。

Listing 6.3 shows how you can return a response from an endpoint that automatically redirects a user to a different named endpoint. The RedirectToRoute() method takes the name of the endpoint and any required route parameters, and generates a URL in a similar way to LinkGenerator. The minimal API framework automatically sends the generated URL as the response, so you never see the URL in your code. Then the user’s browser reads the URL from the response and automatically redirects to the new page.

清单 6.3 展示了如何从端点返回响应,该响应会自动将用户重定向到不同的命名端点。RedirectToRoute() 方法采用端点的名称和任何必需的路由参数,并以与 LinkGenerator 类似的方式生成 URL。最小 API 框架会自动将生成的 URL 作为响应发送,因此您永远不会在代码中看到 URL。然后,用户的浏览器读取 URL并自动重定向到新页面。

Listing 6.3 Generating a redirect URL using Results.RedirectToRoute()
清单 6.3 使用 Result 生成重定向 URLs.RedirectToRoute()

app.MapGet("/test", () => "Hello world!")
    .WithName("hello");                        // ❶

app.MapGet("/redirect-me",
    () => Results.RedirectToRoute("hello"))    // ❷

❶ Annotates the route with the name “hello”
使用名称 “hello” 注释路由

❷ Generates a response that sends a redirect to the “hello” endpoint
生成一个响应,将重定向发送到 “hello” 端点

By default, RedirectToRoute() generates a 302 Found response and includes the generated URL in the Location response header. You can control the status code used by setting the optional parameters preserveMethod and permanent as follows:
默认情况下,RedirectToRoute() 会生成 302 Found 响应,并将生成的 URL 包含在 Location 响应标头中。您可以通过设置可选参数 preserveMethod 和 permanent 来控制使用的状态码,如下所示:

• permanent=false, preserveMethod=false—302 Found

• permanent=true, preserveMethod=false—301 Moved Permanently

• permanent=false, preserveMethod=true—307 Temporary Redirect

• permanent=true, preserveMethod=true—308 Permanent Redirect

NOTE Each of the redirect status codes has a slightly different semantic meaning, though in practice, many sites simply use 302. Be careful with the permanent move status codes; they’ll cause browsers to never call the original URL, always favoring the redirect location. For a good explanation of these codes (and the useful 303 See Other status code), see the Mozilla documentation at http://mng.bz/x4GB.
注意: 每个重定向状态代码的语义含义略有不同,但实际上,许多站点只需使用 302。小心永久移动状态代码;它们将导致浏览器从不调用原始 URL,始终优先使用重定向位置。有关这些代码(以及有用的 303 See Other 状态代码)的良好解释,请参阅 Mozilla 文档 http://mng.bz/x4GB

As well as redirecting to a specific endpoint, you can redirect to an arbitrary URL by using the Results.Redirect() method. This method works in the same way as RedirectToRoute() but takes a URL instead of a route name and can be useful for redirecting to external URLs.

除了重定向到特定端点外,您还可以使用 Results.Redirect() 方法重定向到任意 URL。此方法的工作方式与 RedirectToRoute() 相同,但采用 URL 而不是路由名称,可用于重定向到外部 URL。

Whether you’re generating URLs by using LinkGenerator or RedirectToRoute(), you need to be careful in these route generation methods. Make sure to provide the correct endpoint name and any necessary route parameters. If you get something wrong—if you have a typo in your endpoint name or forget to include a required route parameter, for example—the URL generated will be null. Sometimes it’s worth checking the generated URL for null explicitly to make sure that there are no problems.

无论您是使用 LinkGenerator 还是 RedirectToRoute() 生成 URL,都需要小心使用这些路由生成方法。确保提供正确的终端节点名称和任何必要的路由参数。如果出现错误(例如,如果终端节点名称中有拼写错误或忘记包含必需的路由参数),生成的 URL 将为 null。有时,值得显式检查生成的 URL 是否为 null,以确保没有问题。

6.4.3 Controlling your generated URLs with RouteOptions

6.4.3 使用 RouteOptions 控制生成的 URL

Your endpoint routes are the public surface of your APIs, so you may well have opinions on how they should look. By default, LinkGenerator does its best to generate routes the same way you define them; if you define an endpoint with the route template /MyRoute, LinkGenerator generates the path /MyRoute. But what if that path isn’t what you want? What if you’d rather have LinkGenerator produce prettier paths, such as /myroute or /myroute/? In this section you’ll learn how to configure URL generation both globally and on a case-by-case basis.

您的终端节点路由是 API 的公共表面,因此您可能对它们的外观有自己的想法。默认情况下,LinkGenerator 会尽最大努力以与定义路由相同的方式生成路由;如果您定义了一个端点使用路由模板 /MyRoute,LinkGenerator 会生成路径 /MyRoute。但是,如果这条路不是您想要的呢?如果您希望 LinkGenerator 生成更漂亮的路径,例如 /myroute 或 /myroute/,该怎么办?在本节中,您将学习如何全局和逐个配置 URL 生成。

NOTE Whether to add a trailing slash to your URLs is largely a question of taste, but the choice has some implications in terms of both usability and search results. I typically choose to add trailing slashes for Razor Pages applications but not for APIs. For details, see http://mng.bz/Ao1W.
注意: 是否向 URL 添加尾部斜杠在很大程度上是一个品味问题,但这种选择在可用性和搜索结果方面都有一些影响。我通常选择为 Razor Pages 应用程序添加尾部斜杠,但不为 API 添加。有关详细信息,请参阅 http://mng.bz/Ao1W

When ASP.NET Core matches an incoming URL against your route templates by using routing, it uses a case-insensitive comparison, as you saw in chapter 5. So if you have a route template /MyRoute, requests to /myroute, /MYROUTE, and even /myROUTE match. But when generating URLs, LinkGenerator needs to choose a single version to use. By default, it uses the same casing that you defined in your route templates. So if you write

当 ASP.NET Core 使用路由将传入 URL 与路由模板匹配时,它会使用不区分大小写的比较,如第 5 章所示。因此,如果您有路由模板 /MyRoute,则对 /myroute、/MYROUTE 甚至 /myROUTE 的请求都会匹配。但是在生成 URL 时,LinkGenerator 需要选择一个版本来使用。默认情况下,它使用您在路由模板中定义的相同大小写。所以如果你写

app.MapGet("/MyRoute", () => "Hello world!").WithName("route1");

LinkGenerator.GetPathByName("route1") returns/MyRoute.
LinkGenerator.GetPathByName(“route1”) 返回/MyRoute。

Although that’s a good default, you’d probably prefer that all the links generated by your app be consistent. I like all my links to be lowercase, regardless of whether I accidentally failed to make my route template lowercase.

尽管这是一个很好的默认值,但你可能希望你的应用程序生成的所有链接都是一致的。我喜欢我的所有链接都是小写的,无论我是否意外地未能将我的路由模板设置为小写。

You can control the route generation rules by using RouteOptions. You configure the RouteOptions for your app using the Configure extension method on WebApplicationBuilder.Services, which updates the RouteOptions instance for the app using the configuration system.

您可以使用 RouteOptions 控制路由生成规则。您可以使用 WebApplicationBuilder.Services 上的 Configure 扩展方法为应用程序配置 RouteOptions,该方法使用配置系统更新应用程序的 RouteOptions 实例。

Note You’ll learn all about the configuration system and the Configure method in chapter 10.
注意 您将在第 10 章中了解有关配置系统和Configure方法的所有信息。

RouteOptions contains several configuration options, as shown in listing 6.4. These settings control whether the URLs your app generates are forced to be lowercase, whether the query string should also be lowercase, and whether a trailing slash (/) should be appended to the final URLs. In the listing, I set the URL to be lowercased, for the trailing slash to be added, and for the query string to remain unchanged.

RouteOptions 包含几个配置选项,如清单 6.4 所示。这些设置控制是否强制应用程序生成的 URL 为小写,查询字符串是否也应为小写,以及是否应将尾部斜杠 (/) 附加到最终 URL。在清单中,我将 URL 设置为小写,以便添加尾部斜杠,并使查询字符串保持不变。

Note In listing 6.4 the whole path is lowercased, including any route parameter segments such as {name}. Only the query string retains its original casing.
注意 在清单 6.4 中,整个路径都是小写的,包括任何路由参数段,比如 {name}。只有查询字符串保留其原始大小写。

Listing 6.4 Configuring link generation using RouteOptions
清单 6.4 使用路由选项

WebApplicationBuilder builder = WebApplication.CreateBuilder(args);
builder.Services.Configure<RouteOptions>(o =>                                        // ❶
{                                                                                    // ❶
    o.LowercaseUrls = true;                                                          // ❶
    o.AppendTrailingSlash = true;                                                    // ❶
    o.LowercaseQueryStrings = false;                                                 // ❷
});

WebApplication app = builder.Build();

app.MapGet("/HealthCheck", () => Results.Ok()).WithName("healthcheck");
app.MapGet("/{name}", (string name) => name).WithName("product");

app.MapGet("/", (LinkGenerator links) =>
new[]
{
    links.GetPathByName("healthcheck"),                                              // ❸
    links.GetPathByName("product",                                                   // ❹
        new { Name = "Big-Widget", Q = "Test"})                                      // ❹
});

app.Run();

❶ Configures the RouteOptions used for link generation
配置用于链接生成的 RouteOptions

❷ All the settings default to false.
所有设置都默认为 false。

❸ Returns /healthcheck/
返回 /healthcheck/

❹ Returns /big-widget/?Q=Test
返回 /big-widget/?Q=Test

Whatever default options you choose, you should try to use them throughout your whole app, but in some cases that may not be possible. You might have a legacy API that you need to emulate, for example, and can’t use lowercase URLs. In these cases, you can override the defaults by passing an optional LinkOptions parameter to LinkGenerator methods. The values you set in LinkOptions override the default values set in RouteOptions. Generating a link for the app in listing 6.4 by using

无论您选择什么默认选项,您都应该尝试在整个应用程序中使用它们,但在某些情况下,这可能无法实现。例如,您可能有一个需要模拟的旧 API,并且不能使用小写 URL。在这些情况下,您可以通过将可选的 LinkOptions 参数传递给 LinkGenerator 方法来覆盖默认值。在 LinkOptions 中设置的值将覆盖在 RouteOptions 中设置的默认值。

links.GetPathByName("healthcheck",
options: new LinkOptions
{
    LowercaseUrls = false,
    AppendTrailingSlash = false,
});

would return the value /HealthCheck. Without the LinkOptions parameter, GetPathByName would return /healthcheck/.

将返回值 /HealthCheck。如果没有LinkOptions 参数,GetPathByName 将返回
/healthcheck/ 中。

Congratulations—you’ve made it all the way through this detailed discussion of routing! Routing is one of those topics that people often get stuck on when they come to building an application, which can be frustrating. We’ll revisit routing when we look at Razor Pages in chapter 14 and web API controllers in chapter 20, but rest assured that this chapter has covered all the tricky details!

恭喜 — 您已经完成了这个关于路由的详细讨论!路由是人们在构建应用程序时经常陷入困境的话题之一,这可能会令人沮丧。当我们在第 14 章中查看 Razor 页面,在第 20 章中查看 Web API 控制器时,我们将重新讨论路由,但请放心,本章已经涵盖了所有棘手的细节!

In chapter 7 we’ll dive into model binding. You’ll see how the route values generated during routing are bound to your endpoint handler parameters and, perhaps more important, how to validate the values you’re provided.

在第 7 章中,我们将深入探讨模型绑定。您将看到路由期间生成的路由值如何绑定到终端节点处理程序参数,也许更重要的是,如何验证您提供的值。

6.5 Summary

6.5 总结

Routing is the process of mapping an incoming request URL to an endpoint that executes to generate a response. Routing provides flexibility to your API implementations, enabling you to map multiple URLs to a single endpoint, for example.
路由是将传入请求 URL 映射到终端节点的过程,该终端节点执行以生成响应。路由为您的 API 实施提供了灵活性,例如,使您能够将多个 URL 映射到单个终端节点。

ASP.NET Core uses two pieces of middleware for routing. The EndpointRoutingMiddleware and the EndpointMiddleware. WebApplication adds both pieces of middleware to your pipeline by default, so typically, you don’t add them to your application manually.
ASP.NET Core 使用两个中间件进行路由。EndpointRoutingMiddleware 和 EndpointMiddleware.默认情况下,WebApplication 会将这两个中间件添加到您的管道中,因此通常不会手动将它们添加到您的应用程序中。

The EndpointRoutingMiddleware selects which endpoint should be executed by using routing to match the request URL. The EndpointMiddleware executes the endpoint. Having two separate middleware components means that middleware placed between them can react based on the endpoint that will execute when it reaches the end of the pipeline.
EndpointRoutingMiddleware 通过使用路由来匹配请求 URL,从而选择应该执行的端点。EndpointMiddleware 执行 endpoint。拥有两个单独的中间件组件意味着放置在它们之间的中间件可以根据到达管道末尾时将执行的端点做出反应。

Route templates define the structure of known URLs in your application. They’re strings with placeholders for variables that can contain optional values and map to endpoint handlers. You should think about your routes carefully, as they’re the public surface of your application.
路由模板定义应用程序中已知 URL 的结构。它们是带有变量占位符的字符串,这些变量可以包含可选值并映射到终端节点处理程序。您应该仔细考虑路由,因为它们是应用程序的公共表面。

Route parameters are variable values extracted from a request’s URL. You can use route parameters to map multiple URLs to the same endpoint and to extract the variable value from the URL automatically.
路由参数是从请求的 URL 中提取的变量值。您可以使用路由参数将多个 URL 映射到同一终端节点,并自动从 URL 中提取变量值。

Route parameters can be optional and can use default values when a value is missing. You should use optional and default parameters sparingly, as they can make your APIs harder to understand, but they can be useful in some cases. Optional parameters must be the last segment of a route.
路由参数可以是可选的,并且在缺少值时可以使用默认值。您应该谨慎使用可选参数和默认参数,因为它们会使您的 API 更难理解,但在某些情况下它们可能很有用。可选参数必须是路由的最后一段。

Route parameters can have constraints that restrict the possible values allowed. If a route parameter doesn’t match its constraints, the route isn’t considered to be a match. This approach can help you disambiguate between two similar routes, but you shouldn’t use constraints for validation.
路由参数可以具有限制允许的可能值的约束。如果路由参数与其约束条件不匹配,则不会将该路由视为匹配项。此方法可以帮助您消除两个相似路由之间的歧义,但您不应使用 constraints 进行验证。

Use a catch-all parameter to capture the remainder of a URL into a route value. Unlike standard route parameters, catch-all parameters can include slashes (/) in the captured values.
使用 catch-all 参数将 URL 的其余部分捕获到路由值中。与标准路由参数不同,catch-all 参数可以在捕获的值中包含斜杠 (/)。

You can use the routing infrastructure to generate URLs for your application. This approach ensures that all your links remain correct if you change your endpoint’s route templates.
您可以使用路由基础设施为您的应用程序生成 URL。此方法可确保在更改终端节点的路由模板时所有链接都保持正确。

The LinkGenerator can be used to generate URLs from minimal API endpoints. Provide the name of the endpoint to link to and any required route values to generate an appropriate URL.
LinkGenerator 可用于从最小的 API 端点生成 URL。提供要链接到的端点的名称以及生成相应 URL 所需的任何路由值。

You can use the RedirectToRoute method to generate URLs while also generating a redirect response. This approach is useful when you don’t need to reference the URL in code.
您可以使用 RedirectToRoute 方法生成 URL,同时生成重定向响应。当您不需要在代码中引用 URL 时,此方法非常有用。

By default, URLs are generated using the same casing as the route template and any supplied route parameters. Instead, you can force lowercase URLs, lowercase query strings, and trailing slashes by customizing RouteOptions, calling builder.Services.Configure<RouteOptions>().
默认情况下,URL 是使用与路由模板相同的大小写和提供的任何路由参数生成的。相反,您可以通过自定义 RouteOptions、调用 builder.Services.Configure<RouteOptions>()来强制使用小写 URL、小写查询字符串和尾部斜杠。

You can change the settings for a single URL generation by passing a LinkOptions object to the LinkGenerator methods. These methods can be useful when you need to differ from the defaults for a single endpoint, such as when you’re trying to match an existing legacy route.
您可以通过将 LinkOptions 对象传递给 LinkGenerator 方法来更改单个 URL 生成的设置。当您需要与单个终端节点的默认值不同时,例如当您尝试匹配现有的旧路由时,这些方法可能很有用。

ASP.NET Core in Action 5 Creating a JSON API with minimal APIs

5 Creating a JSON API with minimal APIs
5 使用最少的 API 创建 JSON API

This chapter covers

本章涵盖

• Creating a minimal API application to return JSON to clients
创建最小 API 应用程序以将 JSON 返回给客户端

• Generating responses with IResult
生成响应IResult

• Using filters to perform common actions like validation
使用筛选器执行常见作,如验证

• Organizing your APIs with route groups
使用路由组组织 API

So far in this book you’ve seen several examples of minimal API applications that return simple Hello World! responses. These examples are great for getting started, but you can also use minimal APIs to build full-featured HTTP API applications. In this chapter you’ll learn about HTTP APIs, see how they differ from a server-rendered application, and find out when to use them.

到目前为止,在本书中,您已经看到了几个最小 API 应用程序的示例,这些应用程序返回简单的 Hello World!。这些示例非常适合入门,但您也可以使用最少的 API 来构建功能齐全的 HTTP API 应用程序。在本章中,您将了解 HTTP API,了解它们与服务器呈现的应用程序有何不同,并了解何时使用它们。

Section 5.2 starts by expanding on the minimal API applications you’ve already seen. You’ll explore some basic routing concepts and show how values can be extracted from the URL automatically. Then you’ll learn how to handle additional HTTP verbs such as POST and PUT, and explore various ways to define your APIs.

在5.2 中节,首先扩展了您已经见过的最小 API 应用程序。您将探索一些基本的路由概念,并展示如何从 URL 中自动提取值。然后,您将学习如何处理其他 HTTP 动词(如 POST 和 PUT),并探索定义 API 的各种方法。

In section 5.3 you’ll learn about the different return types you can use with minimal APIs. You’ll see how to use the Results and TypedResults helper classes to easily create HTTP responses that use status codes like 201 Created and 404 Not Found. You’ll also learn how to follow web standards for describing your errors by using the built-in support for Problem Details.

在5.3 中节,您将了解可以与最少的 API 一起使用的不同返回类型。您将看到如何使用Results 和 TypedResults 帮助程序类轻松创建使用状态代码(如 201 Created 和 404 Not Found)的 HTTP 响应。您还将学习如何使用对 Problem Details 的内置支持来遵循 Web 标准来描述错误。

Section 5.4 introduces one of the big features added to minimal APIs in .NET 7: filters. You can use filters to build a mini pipeline (similar to the middleware pipeline from chapter 4) for each of your endpoints. Like middleware, filters are great for extracting common code from your endpoint handlers, making your handlers easier to read.

在5.3 中节,介绍了 .NET 7 中添加到最小 API 的重要功能之一:过滤器。您可以使用过滤器为每个终端节点构建一个微型管道(类似于第 4 章中的中间件管道)。与中间件一样,筛选器非常适合从终结点处理程序中提取常见代码,从而使处理程序更易于阅读。

You’ll learn about the other big .NET 7 feature for minimal APIs in section 5.5: route groups. You can use route groups to reduce the duplication in your minimal APIs, extracting common routing prefixes and filters, making your APIs easier to read, and reducing boilerplate. In conjunction with filters, route groups address many of the common complaints raised against minimal APIs when they were released in .NET 6.

您将在 5.5:路由组 部分了解最小 API 的其他重要 .NET 7 功能。您可以使用路由组来减少最小 API 中的重复,提取常见的路由前缀和筛选条件,使您的 API 更易于阅读,并减少样板文件。与筛选器结合使用,路由组可以解决在 .NET 6 中发布最小 API 时针对最小 API 提出的许多常见投诉。

One great aspect of ASP.NET Core is the variety of applications you can create with it. The ability to easily build a generalized HTTP API presents the possibility of using ASP.NET Core in a greater range of situations than can be achieved with traditional web apps alone. But should you build an HTTP API, and if so, why? In the first section of this chapter, I’ll go over some of the reasons why you may—or may not—want to create a web API.

ASP.NET Core 的一个重要方面是您可以使用它创建的各种应用程序。与单独使用传统 Web 应用程序相比,轻松构建通用 HTTP API 的能力为在更大范围内使用 ASP.NET Core 提供了可能性。但是,您应该构建 HTTP API,如果是这样,为什么?在本章的第一部分中,我将介绍您可能希望(也可能不希望)创建 Web API 的一些原因。

5.1 What is an HTTP API, and when should you use one?

5.1 什么是 HTTP API,何时应使用 HTTP API?

Traditional web applications handle requests by returning HTML, which is displayed to the user in a web browser. You can easily build applications like that by using Razor Pages to generate HTML with Razor templates, as you’ll learn in part 2 of this book. This approach is common and well understood, but the modern application developer has other possibilities to consider (figure 5.1), as you first saw in chapter 2.
传统的 Web 应用程序通过返回 HTML 来处理请求,HTML 在 Web 浏览器中显示给用户。通过使用 Razor Pages 通过 Razor 模板生成 HTML,可以轻松构建此类应用程序,您将在本书的第 2 部分中学习。这种方法很常见,也很容易理解,但现代应用程序开发人员还有其他可能性需要考虑(图 5.1),正如您在第 2 章中第一次看到的那样。

alt text

Figure 5.1 Modern developers have to consider several consumers of their applications. As well as traditional users with web browsers, these users could be single-page applications, mobile applications, or other apps.
图 5.1 现代开发人员必须考虑其应用程序的多个使用者。除了使用 Web 浏览器的传统用户外,这些用户还可以是单页应用程序、移动应用程序或其他应用程序。

Client-side single-page applications (SPAs) have become popular in recent years with the development of frameworks such as Angular, React, and Vue. These frameworks typically use JavaScript running in a web browser to generate the HTML that users see and interact with. The server sends this initial JavaScript to the browser when the user first reaches the app. The user’s browser loads the JavaScript and initializes the SPA before loading any application data from the server.

近年来,随着 Angular、React 和 Vue 等框架的发展,客户端单页应用程序 (SPA) 变得流行起来。这些框架通常使用在 Web 浏览器中运行的 JavaScript 来生成用户看到并与之交互的 HTML。当用户首次访问应用程序时,服务器会将此初始 JavaScript 发送到浏览器。用户的浏览器在从服务器加载任何应用程序数据之前加载 JavaScript 并初始化 SPA。

NOTE Blazor WebAssembly is an exciting new SPA framework. Blazor lets you write an SPA that runs in the browser like other SPAs, but it uses C# and Razor templates instead of JavaScript by using the new web standard, WebAssembly. I don’t cover Blazor in this book, so to find out more, I recommend Blazor in Action, by Chris Sainty (Manning, 2022).

注意:Blazor WebAssembly 是一个令人兴奋的新 SPA 框架。Blazor 允许您编写一个在浏览器,但它使用新的 Web 标准 WebAssembly 使用 C# 和 Razor 模板,而不是 JavaScript。我在这本书中没有介绍 Blazor,因此要了解更多信息,我推荐 Chris Sainty 的 Blazor in Action(曼宁,2022 年)。

Once the SPA is loaded in the browser, communication with a server still occurs over HTTP, but instead of sending HTML directly to the browser in response to requests, the server-side application sends data—normally, in the ubiquitous JavaScript Object Notation (JSON) format—to the client-side application. Then the SPA parses the data and generates the appropriate HTML to show to a user, as shown in figure 5.2. The server-side application endpoint that the client communicates with is sometimes called an HTTP API, a JSON API, or a REST API, depending on the specifics of the API’s design.

在浏览器中加载 SPA 后,与服务器的通信仍通过 HTTP 进行,但服务器端应用程序不是直接向浏览器发送 HTML 以响应请求,而是将数据(通常以无处不在的 JavaScript 对象表示法 (JSON) 格式)发送到客户端应用程序。然后,SPA 解析数据并生成相应的 HTML 以向用户显示,如图 5.2 所示。客户端与之通信的服务器端应用程序终端节点有时称为 HTTP API、JSON API 或 REST API,具体取决于 API 设计的具体情况。

alt text

Figure 5.2 A sample client-side SPA using Blazor WebAssembly. The initial requests load the SPA files into the browser, and subsequent requests fetch data from a web API, formatted as JSON.
图 5.2 使用 Blazor WebAssembly 的客户端 SPA 示例。初始请求将 SPA 文件加载到浏览器中,后续请求从 Web API 获取数据,格式为 JSON。

DEFINITION An HTTP API exposes multiple URLs via HTTP that can be used to access or change data on a server. It typically returns data using the JSON format. HTTP APIs are sometimes called web APIs, but as web API refers to a specific technology in ASP.NET Core, in this book I use HTTP API to refer to the generic concept.
定义: HTTP API 通过 HTTP 公开多个 URL,可用于访问或更改服务器上的数据。它通常使用 JSON 格式返回数据。HTTP API 有时也称为 Web API,但由于 Web API 指的是 ASP.NET Core 中的特定技术,因此在本书中,我使用 HTTP API 来指代通用概念。

These days, mobile applications are common and, from the server application’s point of view, similar to client-side SPAs. A mobile application typically communicates with a server application by using an HTTP API, receiving data in JSON format, just like an SPA. Then it modifies the application’s UI depending on the data it receives.

如今,移动应用程序很常见,从服务器应用程序的角度来看,它类似于客户端 SPA。移动应用程序通常使用 HTTP API 与服务器应用程序通信,以 JSON 格式接收数据,就像 SPA 一样。然后,它根据接收到的数据修改应用程序的 UI。

One final use case for an HTTP API is where your application is designed to be partially or solely consumed by other backend services. Imagine that you’ve built a web application to send emails. By creating an HTTP API, you can allow other application developers to use your email service by sending you an email address and a message. Virtually all languages and platforms have access to an HTTP library they could use to access your service from code.

HTTP API 的最后一个用例是,您的应用程序被设计为部分或全部由其他后端服务使用。假设您已经构建了一个用于发送电子邮件的 Web 应用程序。通过创建 HTTP API,您可以允许其他应用程序开发人员通过向您发送电子邮件地址和消息来使用您的电子邮件服务。几乎所有语言和平台都可以访问 HTTP 库,它们可以使用该库从代码访问您的服务。

That’s all there is to an HTTP API: it exposes endpoints (URLs) that client applications can send requests to and retrieve data from. These endpoints are used to power the behavior of the client apps, as well as to provide all the data the client apps need to display the correct interface to a user.

这就是 HTTP API 的全部内容:它公开了客户端应用程序可以向其发送请求和检索数据的端点 (URL)。这些端点用于支持客户端应用程序的行为,以及提供客户端应用程序向用户显示正确界面所需的所有数据。

NOTE You have even more options when it comes to creating APIs in ASP.NET Core. You can create remote procedure call APIs using gRPC, for example, or provide an alternative style of HTTP API using the GraphQL standard. I don’t cover those technologies in this book, but you can read about gRPC at https://docs.microsoft.com/aspnet/core/grpc and find out about GraphQL in Building Web APIs with ASP.NET Core, by Valerio De Sanctis (Manning, 2023).
注意:在 ASP.NET Core 中创建 API 时,您有更多选择。例如,您可以使用 gRPC 创建远程过程调用 API,或使用 GraphQL 标准提供 HTTP API 的替代样式。我不会在本书中介绍这些技术,但您可以在 https://docs.microsoft.com/aspnet/core/grpc 阅读有关 gRPC 的信息 ,并在 Valerio De Sanctis(Manning,2023 年)撰写的使用 ASP.NET Core 构建 Web API 中了解 GraphQL。

Whether you need or want to create an HTTP API for your ASP.NET Core application depends on the type of application you want to build. Perhaps you’re familiar with client-side frameworks, or maybe you need to develop a mobile application, or you already have an SPA build pipeline configured. In each case, you’ll most likely want to add HTTP APIs for the client apps to access your application.

您是否需要或想要为 ASP.NET Core 应用程序创建 HTTP API 取决于要构建的应用程序类型。也许您熟悉客户端框架,或者您需要开发移动应用程序,或者您已经配置了 SPA 构建管道。在每种情况下,您很可能希望为客户端应用程序添加 HTTP API 以访问您的应用程序。

One selling point for using an HTTP API is that it can serve as a generalized backend for all your client applications. You could start by building a client-side application that uses an HTTP API. Later, you could add a mobile app that uses the same HTTP API, making little or no modification to your ASP.NET Core code.

使用 HTTP API 的一个卖点是它可以用作所有客户端应用程序的通用后端。您可以从构建使用 HTTP API 的客户端应用程序开始。稍后,您可以添加使用相同 HTTP API 的移动应用程序,对 ASP.NET Core 代码进行少量修改或不进行修改。

If you’re new to web development, HTTP APIs can also be easier to understand initially, as they typically return only JSON. Part 1 of this book focuses on minimal APIs so that you can focus on the mechanics of ASP.NET Core without needing to write HTML or CSS.

如果您不熟悉 Web 开发,HTTP API 最初也更容易理解,因为它们通常只返回 JSON。本书的第 1 部分重点介绍最少的 API,以便您可以专注于 ASP.NET Core 的机制,而无需编写 HTML 或 CSS。

In part 3, you’ll learn how to use Razor Pages to create server-rendered applications instead of minimal APIs. Server-rendered applications can be highly productive. They’re generally recommended when you have no need to call your application from outside a web browser or when you don’t want or need to make the effort of configuring a client-side application.

在第 3 部分中,您将学习如何使用 Razor Pages 创建服务器呈现的应用程序,而不是最少的 API。服务器渲染的应用程序可以非常高效。当您不需要从 Web 浏览器外部调用应用程序,或者当您不想或不需要配置客户端应用程序时,通常建议使用它们。

NOTE Although there’s been an industry shift toward client-side frameworks, server-side rendering using Razor is still relevant. Which approach you choose depends largely on your preference for building HTML applications in the traditional manner versus using JavaScript (or Blazor!) on the client.
注意: 尽管行业已经转向客户端框架,但使用 Razor 的服务器端渲染仍然很重要。选择哪种方法在很大程度上取决于您在传统方式与在客户端上使用 JavaScript(或 Blazor)的比较。

Having said that, whether to use HTTP APIs in your application isn’t something you necessarily have to worry about ahead of time. You can always add them to an ASP.NET Core app later in development, as the need arises.

话虽如此,是否在应用程序中使用 HTTP API 并不是您必须提前担心的事情。您始终可以在以后的开发过程中根据需要将它们添加到 ASP.NET Core 应用程序中。

SPAs with ASP.NET Core
具有 ASP.NET Core 的 SPA
The cross-platform, lightweight design of ASP.NET Core means that it lends itself well to acting as a backend for your SPA framework of choice. Given the focus of this book and the broad scope of SPAs in general, I won’t be looking at Angular, React, or other SPAs here. Instead, I suggest checking out the resources appropriate to your chosen SPA. Books are available from Manning for all the common client-side JavaScript frameworks, as well as Blazor:
ASP.NET Core 的跨平台轻量级设计意味着它非常适合充当所选 SPA 框架的后端。鉴于本书的重点和 SPA 的广泛范围,我不会在这里讨论 Angular、React 或其他 SPA。相反,我建议查看适用于您选择的 SPA 的资源。Manning 提供了适用于所有常见客户端 JavaScript 框架以及 Blazor 的书籍:
· React in Action, by Mark Tielens Thomas (Manning, 2018)
React in Action,作者:Mark Tielens Thomas(曼宁出版社,2018 年)
· Angular in Action, by Jeremy Wilken (Manning, 2018)
Angular in Action,作者:Jeremy Wilken(曼宁,2018 年)
· Vue.js in Action, by Erik Hanchett with Benjamin Listwon (Manning, 2018)
Vue.js in Action,埃里克·汉切特 (Erik Hanchett) 和本杰明·利斯特旺 (Benjamin Listwon) 著(曼宁出版社,2018 年)
· Blazor in Action, by Chris Sainty (Manning, 2022)
Blazor in Action,作者:Chris Sainty(曼宁,2022 年)

After you’ve established that you need an HTTP API for your application, creating one is easy, as it’s the default application type in ASP.NET Core! In the next section we look at various ways you can create minimal API endpoints and ways to handle multiple HTTP verbs.

在您确定应用程序需要 HTTP API 后,创建一个 API 很容易,因为它是 ASP.NET Core 中的默认应用程序类型!在下一节中,我们将介绍创建最小 API 端点的各种方法以及处理多个 HTTP 动词的方法。

5.2 Defining minimal API endpoints

5.2 定义最小 API 端点

Chapters 3 and 4 gave you an introduction to basic minimal API endpoints. In this section, we’ll build on those basic apps to show how you can handle multiple HTTP verbs and explore various ways to write your endpoint handlers.

第 3 章和第 4 章介绍了基本的最小 API 端点。在本节中,我们将以这些基本应用程序为基础,展示如何处理多个 HTTP 动词,并探索编写终端节点处理程序的各种方法。

5.2.1 Extracting values from the URL with routing

5.2.1 使用路由 从 URL 中提取值

You’ve seen several minimal API applications in this book, but so far, all the examples have used fixed paths to define the APIs, as in this example:

您在本书中已经看到了几个最小的 API 应用程序,但到目前为止,所有示例都使用固定路径来定义 API,如以下示例所示:

app.MapGet("/", () => "Hello World!");
app.MapGet("/person", () => new Person("Andrew", "Lock"));

These two APIs correspond to the paths / and /person, respectively. This basic functionality is useful, but typically you need some of your APIs to be more dynamic. It’s unlikely, for example, that the /person API would be useful in practice, as it always returns the same Person object. What might be more useful is an API to which you can provide the user’s first name, and the API returns all the users with that name.

这两个 API 分别对应于路径 / 和 /person。此基本功能很有用,但通常需要某些 API 更加动态。例如,/person API 在实践中不太可能有用,因为它总是返回相同的 Person 对象。可能更有用的是 API,您可以向其提供用户的名字,并且 API 会返回具有该名称的所有用户。

You can achieve this goal by using parameterized routes for your API definitions. You can create a parameter in a minimal API route using the expression {someValue}, where someValue is any name you choose. The value will be extracted from the request URL’s path and can be used in the lambda function endpoint.

您可以通过对 API 定义使用参数化路由来实现此目标。您可以在最小使用表达式 {someValue} 的 API 路由,其中 someValue 是您选择的任何名称。该值将从请求 URL 的路径中提取,并可在 lambda 函数终端节点中使用。

NOTE I introduce only the basics of extracting values from routes in this chapter. You’ll learn a lot more about routing in chapter 6, including why we use routing and how it fits into the ASP.NET Core pipeline, as well as the syntax you can use.
注意: 在本章中,我只介绍了从 routes 中提取值的基础知识。在第 6 章中,您将了解有关 routing 的更多信息,包括我们为什么使用 routing、它如何适应 ASP.NET Core 管道,以及您可以使用的语法。

If you create an API using the route template /person/{name}, for example, and send a request to the path /person/Andrew, the name parameter will have the value "Andrew". You can use this feature to build more useful APIs, such as the one shown in the following listing.

如果您使用路由模板创建 API /person/{name} 并向路径 /person/Andrew 发送请求,则 name 参数将具有值 “Andrew”。您可以使用此功能来构建更有用的 API,例如以下清单中所示的 API。

Listing 5.1 A minimal API that uses a value from the URL
清单 5.1 一个最小的 API,它使用网址

WebApplicationBuilder builder = WebApplication.CreateBuilder(args);
WebApplication app = builder.Build();
var people = new List<Person>                                    // ❶
{                                                                // ❶
    new("Tom", "Hanks"),                                         // ❶
    new("Denzel", "Washington"),                                 // ❶
    new("Leondardo", "DiCaprio"),                                // ❶
    new("Al", "Pacino"),                                         // ❶
    new("Morgan", "Freeman"),                                    // ❶
};                                                               // ❶
app.MapGet("/person/{name}", (string name) =>                    // ❷
people.Where(p => p.FirstName.StartsWith(name)));                // ❸

app.Run();

public record Person(string FirstName, string LastName);

❶ Creates a list of people as the data for the API
创建人员列表作为 API 的数据

❷ The route is parameterized to extract the name from the URL.
路由参数化以从 URL 中提取名称。

❸ The extracted value can be injected into the lambda handler.
提取的值可以注入到 lambda 处理程序中。

If you send a request to /person/Al for the app defined in listing 5.1, the name parameter will have the value "Al", and the API will return the following JSON:
如果您向 /person/Al 发送列表 5.1 中定义的应用程序的请求,则 name 参数的值将为 “Al”,并且 API 将返回以下 JSON:

[{"firstName":"Al","lastName":"Pacino"}]

NOTE By default, minimal APIs serialize C# objects to JSON. You’ll see how to return other types of results in section 5.3.
注意: 默认情况下,最小 API 将 C# 对象序列化为 JSON。您将在 5.3 节 中看到如何返回其他类型的结果。

The ASP.NET Core routing system is quite powerful, and we’ll explore it in more detail in chapter 6. But with this simple capability, you can already build more complex applications.
ASP.NET Core 路由系统非常强大,我们将在第 6 章中更详细地探讨它。但借助这个简单的功能,您已经可以构建更复杂的应用程序。

5.2.2 Mapping verbs to endpoints

5.2.2 将动词映射到端点

So far in this book we’ve defined all our minimal API endpoints by using the MapGet() function. This function matches requests that use the GET HTTP verb. GET is the most-used verb; it’s what a browser uses when you enter a URL in the address bar of your browser or follow a link on a web page.

到目前为止,在本书中,我们已经使用 MapGet() 函数定义了所有最小 API 端点 。此函数匹配使用 GET HTTP 动词的请求。GET 是最常用的动词;当您在浏览器的地址栏中输入 URL 或点击网页上的链接时,浏览器会使用它。

You should use GET only to get data from the server, however. You should never use it to send data or to change data on the server. Instead, you should use an HTTP verb such as POST or DELETE. You generally can’t use these verbs by navigating web pages in the browser, but they’re easy to send from a client-side SPA or mobile app.

但是,您应该只使用 GET 从服务器获取数据。切勿使用它来发送数据或更改服务器上的数据。 相反,您应该使用 HTTP 动词,例如 POST 或 DELETE。您通常不能使用这些动词,但它们很容易从客户端 SPA 或移动应用程序发送。

TIP If you’re new to web programming or are looking for a refresher, Mozilla Developer Network (MDN), maker of the Firefox web browser, has a good introduction to HTTP at http://mng.bz/KeMK.
提示: 如果您是 Web 编程的新手或正在寻找复习者,Firefox Web 浏览器的制造商 Mozilla Developer Network (MDN) 在 http://mng.bz/KeMK 上对 HTTP 进行了很好的介绍。

In theory, each of the HTTP verbs has a well-defined purpose, but in practice, you may see apps that only ever use POST and GET. This is often fine for server-rendered applications like Razor Pages, as it’s typically simpler, but if you’re creating an API, I recommend that you use the HTTP verbs with the appropriate semantics wherever possible.

理论上,每个 HTTP 动词都有一个明确定义的用途,但在实践中,您可能会看到仅使用 POST 和 GET 的应用程序。这通常适用于服务器呈现的应用程序(如 Razor Pages),因为它通常更简单,但如果您正在创建 API,我建议您尽可能使用具有适当语义的 HTTP 动词。

You can define endpoints for other verbs with minimal APIs by using the appropriate Map functions. To map a POST endpoint, for example, you’d use MapPost(). Table 5.1 shows the minimal API Map methods available, the corresponding HTTP verbs, and the typical semantic expectations of each verb on the types of operations that the API performs.

您可以使用适当的 Map 函数,使用最少的 API 为其他谓词定义端点。例如,要映射 POST 终端节点,您可以使用 MapPost()。表 5.1 显示了可用的最小 API Map 方法、相应的 HTTP 动词以及每个动词对 API 执行的作类型的典型语义期望。

Table 5.1 The minimal API map endpoints and the corresponding HTML verbs
表 5.1 最小 API 映射端点和相应的 HTML 动词

Method HTTP verb Expected operation
MapGet(path, handler) GET Fetch data only; no modification of state. May be safe to cache.
仅获取数据;不修改状态。可以安全地缓存。
MapPost(path, handler) POST Create a new resource.
创建新资源。
MapPut(path, handler) PUT Create or replace an existing resource.
创建或替换现有资源。
MapDelete(path, handler) DELETE Delete the given resource.
删除给定的资源。
MapPatch(path, handler) PATCH Modify the given resource.
修改给定的资源。
MapMethods(path, methods,handler) Multiple verbs Multiple operations
多个动作
Map(path, handler) All verbs Multiple operations
多个动作
MapFallback(handler) All verbs Useful for SPA fallback routes
对 SPA 回退路由很有用。

RESTful applications (as described in chapter 2) typically stick close to these verb uses where possible, but some of the actual implementations can differ, and people can easily get caught up in pedantry. Generally, if you stick to the expected operations described in table 5.1, you’ll create a more understandable interface for consumers of the API.

RESTful 应用程序(如第 2 章所述)通常尽可能地使用这些动词用法,但一些实际实现可能会有所不同,人们很容易陷入迂腐。通常,如果您坚持使用 表 5.1 中描述的预期作,您将为 API 的使用者创建一个更易于理解的界面。

NOTE You may notice that if you use the MapMethods() and Map() methods listed in table 5.1, your API probably doesn’t correspond to the expected operations of the HTTP verbs it supports, so I avoid these methods where possible. MapFallback() doesn’t have a path and is called only if no other endpoint matches. Fallback routes can be useful when you have a SPA that uses client-side routing. See http://mng.bz/9DMl for a description of the problem and an alternative solution.
注意: 您可能会注意到,如果使用表 5.1 中列出的 MapMethods() 和 Map() 方法,则 API 可能与它支持的 HTTP 动词的预期作不对应,因此我尽可能避免使用这些方法。MapFallback() 没有路径,仅当没有其他终端节点匹配时才会调用。当您拥有使用客户端路由的 SPA 时,回退路由可能很有用。有关问题的说明和替代解决方案,请参阅 http://mng.bz/9DMl

As I mentioned at the start of section 5.2.2, testing APIs that use verbs other than GET is tricky in the browser. You need to use a tool that allows sending arbitrary requests such as Postman (https://www.postman.com) or the HTTP Client plugin in JetBrains Rider. In chapter 11 you’ll learn how to use a tool called Swagger UI to visualize and test your APIs.

正如我在 5.2.2 节开头提到的,在浏览器中测试使用 GET 以外的动词的 API 是很棘手的。您需要使用允许发送任意请求的工具,例如 Postman (https://www.postman.com) 或 JetBrains Rider 中的 HTTP Client 插件。在第 11 章中,您将学习如何使用名为 Swagger UI 的工具来可视化和测试您的 API。

TIP The HTTP client plugin in JetBrains Rider makes it easy to craft HTTP requests from inside your API, and even discovers all the endpoints in your application automatically, making them easier to test. You can read more about it at https://www.jetbrains.com/help/rider/Http_client_in_product__code_editor.html.
提示: JetBrains Rider 中的 HTTP 客户端插件可以轻松地从 API 内部构建 HTTP 请求,甚至可以自动发现应用程序中的所有端点,使其更易于测试。您可以在 https://www.jetbrains.com/help/rider/Http_client_in_product__code_editor.html 上阅读更多相关信息。

As a final note before we move on, it’s worth mentioning the behavior you get when you call a method with the wrong HTTP verb. If you define an API like the one in listing 5.1,and call it by using a POST request to /person/Al instead of a GET request, the handler won’t run, and the response you get will have status code 405 Method Not Allowed.
在我们继续之前,最后要注意的是,当你使用错误的 HTTP 动词调用方法时,你得到的行为是值得一提的。如果你定义了一个类似于清单 5.1 中的 API。并使用对 /person/Al 的 POST 请求而不是 GET 请求来调用它,则处理程序不会运行,并且您获得的响应将具有状态代码 405 Method Not Allowed。

app.MapGet("/person/{name}", (string name) =>
    people.Where(p => p.FirstName.StartsWith(name)));

TIP You should never see this response when you’re calling the API correctly, so if you receive a 405 response, make sure to check that you’re using the right HTTP verb and the right path. Often when I see a 405, I’ve used the correct verb but made a typo in the URL!
提示: 正确调用 API 时,您应该永远不会看到此响应,因此,如果您收到 405 响应,请务必检查您是否使用了正确的 HTTP 动词和正确的路径。通常,当我看到 405 时,我使用了正确的动词,但在 URL 中打错了字!

In all the examples in this book so far, you provide a lambda function as the handler for an endpoint. But in section 5.2.3, you’ll see that there are many ways to define the handler.

到目前为止,在本书的所有示例中,您都提供了一个 lambda 函数作为终端节点的处理程序。但是在 5.2.3 节 中,你会看到有很多方法可以定义处理程序。

5.2.3 Defining route handlers with functions

5.2.3 使用函数定义路由处理程序

For basic examples, using a lambda function as the handler for an endpoint is often the simplest approach, but you can take many approaches, as shown in listing 5.2. This listing also demonstrates creating a simple CRUD (Create, Read, Update, Delete) API using different HTTP verbs, as discussed in section 5.2.1.

对于基本示例,使用 lambda 函数作为终端节点的处理程序通常是最简单的方法,但您可以采用多种方法,如清单 5.2 所示。此清单还演示了使用不同的 HTTP 动词创建简单的 CRUD(创建、读取、更新、删除)API,如 5.2.1 节所述。

Listing 5.2 Creating route handlers for a simple CRUD API
清单 5.2 为简单的 CRUD API 创建路由处理程序

WebApplicationBuilder builder = WebApplication.CreateBuilder(args);
WebApplication app = builder.Build();

app.MapGet("/fruit", () => Fruit.All);                             // ❶

var getFruit = (string id) => Fruit.All[id];                       // ❷
app.MapGet("/fruit/{id}", getFruit);                               // ❷

app.MapPost("/fruit/{id}", Handlers.AddFruit);                     // ❸

Handlers handlers = new();                                         // ❹
app.MapPut("/fruit/{id}", handlers.ReplaceFruit);                  // ❹

app.MapDelete("/fruit/{id}", DeleteFruit);                         // ❺

app.Run();

void DeleteFruit(string id)                                        // ❺
{
    Fruit.All.Remove(id);
}

record Fruit(string Name, int Stock)
{
    public static readonly Dictionary<string, Fruit> All = new();
};

class Handlers
{
    public void ReplaceFruit(string id, Fruit fruit)                // ❻
    {
        Fruit.All[id] = fruit;
    }
public static void AddFruit(string id, Fruit fruit)                 // ❼
    {
    Fruit.All.Add(id, fruit);
}
}

❶ Lambda expressions are the simplest but least descriptive way to create a handler.
Lambda 表达式是创建处理程序的最简单但描述性最差的方法。

❷ Storing the lambda expression as a variable means you can name it—getFruit in this case.
将 lambda 表达式存储为变量意味着您可以将其命名为 getFruit,在本例中为 getFruit。

❸ Handlers can be static methods in any class.
处理程序可以是任何类中的静态方法。

❹ Handlers can also be instance methods.
处理程序也可以是实例方法。

❺ You can also use local functions, introduced in C# 7.0, as handler methods.
还可以使用 C# 7.0 中引入的本地函数作为处理程序方法。

❻ Handlers can also be instance methods.
处理程序也可以是实例方法。

❼ Converts the response to a JsonObject
将响应转换为 JsonObject

Listing 5.2 demonstrates the various ways you can pass handlers to an endpoint by simulating a simple API for interacting with a collection of Fruit items:
清单 5.2 通过模拟一个简单的 API 来与 Fruit 项目集合交互,演示了将处理程序传递给端点的各种方法:

• A lambda expression, as in the MapGet("/fruit") endpoint
lambda 表达式,如终端节点中所示MapGet("/fruit")

• A Func<T, TResult> variable, as in the MapGet("/fruit/{id}") endpoint
一个Func<T, TResult>`变量,如端点,MapGet("/fruit/{id}")

• A static method, as in the MapPost endpoint
静态方法,如端点MapPost

• A method on an instance variable, as in the MapPut endpoint
实例变量上的方法,如端点中所示MapPut

• A local function, as in the MapDelete endpoint
本地函数,如端点MapDelete

All these approaches are functionally identical, so you can use whichever pattern works best for you.
所有这些方法在功能上都是相同的,因此您可以使用最适合您的模式。

Each Fruit record in listing 5.2 has a Name and a Stock level and is stored in a dictionary with an id. You call the API by using different HTTP verbs to perform the CRUD operations against the dictionary.

清单 5.2 中的每个 Fruit 记录都有一个 Name 和一个 Stock 级别,并存储在一个带有 id 的字典中。您可以使用不同的 HTTP 动词调用 API,以对字典执行 CRUD作。

WARNING This API is simple. It isn’t thread-safe, doesn’t validate user input, and doesn’t handle edge cases. We’ll remedy some of those deficiencies in section 5.3.
警告: 此 API 很简单。它不是线程安全的,不验证用户输入,也不处理边缘情况。我们将在第 5.3 节中纠正其中一些缺陷。

The handlers for the POST and PUT endpoints in listing 5.2 accept both an id parameter and a Fruit parameter, showing another important feature of minimal APIs. Complex types—that is, types that can’t be extracted from the URL by means of route parameters—are created by deserializing the JSON body of a request.

清单 5.2 中 POST 和 PUT 端点的处理程序同时接受 id 参数和 Fruit 参数,这显示了最小 API 的另一个重要特性。复杂类型(即无法通过路由参数从 URL 中提取的类型)是通过反序列化请求的 JSON 正文来创建的。

NOTE By contrast with APIs built using ASP.NET and ASP.NET Core web API controllers (which we cover in chapter 20), minimal APIs can bind only to JSON bodies and always use the System.Text.Json library for JSON deserialization.
注意: 与使用 ASP.NET 和 ASP.NET Core Web API 控制器构建的 API(我们将在第 20 章中介绍)相比,最小的 API 只能绑定到 JSON 正文,并始终使用 System.Text.Json 库进行 JSON 反序列化。

Figure 5.3 shows an example of a POST request sent with Postman. Postman sends the request body as JSON, which the minimal API automatically deserializes into a Fruit instance before calling the endpoint handler. You can bind only a single object in your endpoint handler to the request body in this way. I cover model binding in detail in chapter 7.

图 5.3 显示了使用 Postman 发送的 POST 请求的示例。Postman 以 JSON 格式发送请求正文,最小 API 会自动将其反序列化为 Fruit
实例。通过这种方式,您只能将终端节点处理程序中的单个对象绑定到请求正文。我在第 7 章中详细介绍了模型绑定。

alt text

Figure 5.3 Sending a POST request with Postman. The minimal API automatically deserializes the JSON in the request body to a Fruit instance before calling the endpoint handler.
图 5.3 使用 Postman 发送 POST 请求。在调用终端节点处理程序之前,最小 API 会自动将请求正文中的 JSON 反序列化为 Fruit 实例。

Minimal APIs leave you free to organize your endpoints any way you choose. That flexibility is often cited as a reason to not use them, due to the fear that developers will keep all the functionality in a single file, as in most examples (such as listing 5.2). In practice, you’ll likely want to extract your endpoints to separate files so as to modularize them and make them easier to understand. Embrace that urge; that’s the way they were intended to be used!

最少的 API 让您可以自由地按照您选择的任何方式组织终端节点。这种灵活性经常被引用为不使用它们的理由,因为担心开发人员会保留所有功能在单个文件中,就像大多数示例一样(比如清单 5.2)。在实践中,您可能希望将终端节点提取到单独的文件中,以便将它们模块化并使其更易于理解。拥抱这种冲动;这就是它们的使用方式!

Now you have a simple API, but if you try it out, you’ll quickly run into scenarios in which your API seems to break. In section 5.3 you learn how to handle some of these scenarios by returning status codes.

现在你有一个简单的 API,但如果你尝试一下,你很快就会遇到 API 似乎崩溃的情况。在 Section 5.3 中,您将学习如何通过返回状态代码来处理其中一些场景。

5.3 Generating responses with IResult

5.3 使用 IResult 生成响应

You’ve seen the basics of minimal APIs, but so far, we’ve looked only at the happy path, where you can handle the request successfully and return a response. In this section we look at how to handle bad requests and other errors by returning different status codes from your API.

您已经了解了最小 API 的基础知识,但到目前为止,我们只了解了 Happy Path,您可以在其中成功处理请求并返回响应。在本节中,我们将了解如何通过从 API 返回不同的状态代码来处理错误请求和其他错误。

The API in listing 5.2 works well as long as you perform only operations that are valid for the current state of the application. If you send a GET request to /fruit, for example, you’ll always get a 200 success response, but if you send a GET request to /fruit/f1 before you create a Fruit with the id f1, you’ll get an exception and a 500 Internal Server Error response, as shown in figure 5.4.

清单 5.2 中的 API 运行良好,只要您只执行对应用程序当前状态有效的作。例如,如果向 /fruit 发送 GET 请求,则始终会收到 200 成功响应,但如果在创建 ID 为 f1 的 Fruit 之前向 /fruit/f1 发送 GET 请求,则会收到异常和 500 Internal Server Error 响应,如图 5.4 所示。

alt text

Figure 5.4 If you try to retrieve a fruit by using a nonexistent id for the simplistic API in listing 5.2, the endpoint throws an exception. This exception is handled by the DeveloperExceptionPageMiddleware but provides a poor experience.
图 5.4 如果你尝试使用清单 5.2 中简单 API 的不存在的 id 来检索水果,端点会抛出一个异常。此异常由 DeveloperExceptionPage-Middleware 处理,但提供的体验很差。

Throwing an exception whenever a user requests an id that doesn’t exist clearly makes for a poor experience all round. A better approach is to return a status code indicating the problem, such as 404 Not Found or 400 Bad Request. The most declarative way to do this with minimal APIs is to return an IResult instance.

每当用户请求不存在的 ID 时引发异常,显然会导致整体体验不佳。更好的方法是返回指示问题的状态代码,例如 404 Not Found 或 400 Bad Request。使用最少的 API 执行此作的最声明性方法是返回 IResult 实例。

All the endpoint handlers you’ve seen so far in this book have returned void, a string, or a plain old CLR object (POCO) such as Person or Fruit. There is one other type of object you can return from an endpoint: an IResult implementation. In summary, the endpoint middleware handles each return type as follows:

到目前为止,您在本书中看到的所有端点处理程序都返回了 void、字符串或普通的旧 CLR 对象 (POCO),例如 Person 或 Fruit。您可以从端点返回另一种类型的对象:IResult 实现。总之,终端节点中间件按如下方式处理每个返回类型:

  • void or Task—The endpoint returns a 200 response with no body.
    void或Task200 — 终端节点返回没有正文的响应。

  • string or Task—The endpoint returns a 200 response with the string serialized to the body as text/plain.
    string或 Task— 终端节点返回一个200响应,其中字符串序列化为正文text/plain。

  • IResult or Task<IResult>—The endpoint executes the IResult.ExecuteAsync method. Depending on the implementation, this type can customize the response, returning any status code.
    IResult或Task<IResult> - 端点执行IResult.ExecuteAsync方法。根据实现,此类型可以自定义响应,返回任何状态代码。

  • T or Task<T>—All other types (such as POCO objects) are serialized to JSON and returned in the body of a 200 response as application/json.
    T或Task<T> — 所有其他类型的(如 POCO 对象)都序列化为 JSON,并在响应正文中作为application/json .

The IResult implementations provide much of the flexibility in minimal APIs, as you’ll see in section 5.3.1.

IResult 实现在最小的 API 中提供了很大的灵活性,正如您将在 5.3.1 节中看到的那样。

5.3.1 Returning status codes with Results and TypedResults

5.3.1 使用 Results 和 TypedResults 返回状态代码

A well-designed API uses status codes to indicate to a client what went wrong when a request failed, as well as potentially provide more descriptive codes when a request is successful. You should anticipate common problems that may occur when clients call your API and return appropriate status codes to indicate the causes to users.

设计良好的 API 使用状态代码向客户端指示请求失败时出了什么问题,并可能在请求成功时提供更具描述性的代码。您应该预见到客户端调用 API 时可能出现的常见问题,并返回适当的状态代码以向用户指示原因。

ASP.NET Core exposes the simple static helper types Results and TypedResults in the namespace Microsoft.AspNetCore.Http. You can use these helpers to create a response with common status codes, optionally including a JSON body. Each of the methods on Results and TypedResults returns an implementation of IResult, which the endpoint middleware executes to generate the final response.

ASP.NET Core 在命名空间 Microsoft.AspNetCore.Http 中公开了简单的静态帮助程序类型 Results 和 TypedResults。您可以使用这些帮助程序创建具有常见状态代码的响应,可以选择包括 JSON 正文。Results 和 TypedResults 上的每个方法都返回 IResult 的实现,端点中间件执行该实现以生成最终响应。

NOTE Results and TypedResults perform the same function, as helpers for generating common status codes. The only difference is that the Results methods return an IResult, whereas TypedResults return a concrete generic type, such as Ok. There’s no difference in terms of functionality, but the generic types are easier to use in unit tests and in OpenAPI documentation, as you’ll see in chapters 36 and 11. TypedResults were added in .NET 7.
注意: Results 和 TypedResults 执行相同的功能,作为生成常见状态代码的帮助程序。唯一的区别是 Results 方法返回 IResult,而 TypedResults 返回具体的泛型类型,例如 Ok<T>。在功能方面没有区别,但泛型类型更易于使用单元测试和 OpenAPI 文档,如第 36 章和第 11 章所示。TypedResults 已添加到 .NET 7 中。

The following listing shows an updated version of listing 5.2, in which we address some of the deficiencies in the API and use Results and TypedResults to return different status codes to clients.

下面的清单显示了清单 5.2 的更新版本,其中我们解决了 API 中的一些缺陷,并使用 Results 和 TypedResults 向客户端返回不同的状态代码。

Listing 5.3 Using Results and TypedResults in a minimal API
清单 5.3 在最小 API 中使用 和ResultsTypedResults

using System.Collections.Concurrent;

WebApplicationBuilder builder = WebApplication.CreateBuilder(args);
WebApplication app = builder.Build();

var _fruit = new ConcurrentDictionary<string, Fruit>();                        // ❶

app.MapGet("/fruit", () => _fruit);

app.MapGet("/fruit/{id}", (string id) =>
    _fruit.TryGetValue(id, out var fruit)                                      // ❷
        ? TypedResults.Ok(fruit)                                               // ❸
        : Results.NotFound());                                                 // ❹

app.MapPost("/fruit/{id}", (string id, Fruit fruit) =>
    _fruit.TryAdd(id, fruit)                                                   // ❺
        ? TypedResults.Created($"/fruit/{id}", fruit)                          // ❻
        : Results.BadRequest(new                                               // ❼
            { id = "A fruit with this id already exists" }));                  // ❼

app.MapPut("/fruit/{id}", (string id, Fruit fruit) =>
{
    _fruit[id] = fruit;
    return Results.NoContent();                                                // ❽
});

app.MapDelete("/fruit/{id}", (string id) =>
{
    _fruit.TryRemove(id, out _);                                               // ❾
    return Results.NoContent();                                                // ❾
});

app.Run();

record Fruit(string Name, int stock);

❶ Uses a concurrent dictionary to make the API thread-safe
使用并发字典使 API 线程安全

❷ Tries to get the fruit from the dictionary. If the ID exists in the dictionary, this returns true . . .
尝试从字典中获取 fruit。如果字典中存在 ID,则返回 true . . .

❸ . . . and we return a 200 OK response, serializing the fruit in the body as JSON.
. . . .然后我们返回一个 200 OK 响应,将 body 中的水果序列化为 JSON。

❹ If the ID doesn’t exist, returns a 404 Not Found response
如果 ID 不存在,则返回 404 Not Found 响应

❺ Tries to add the fruit to the dictionary. If the ID hasn’t been added yet. this returns true . . .
尝试将 fruit 添加到字典中。如果尚未添加 ID。这将返回 true . . .

❻ . . . and we return a 201 response with a JSON body and set the Location
header to the given path.
. . . .我们返回一个带有 JSON 正文的 201 响应,并将 Location 标头设置为给定路径。

❼ If the ID already exists, returns a 400 Bad Request response with an error message
如果 ID 已存在,则返回 400 Bad Request 响应,并显示错误消息

❽ After adding or replacing the fruit, returns a 204 No Content response
添加或替换水果后,返回 204 No Content 响应

❾ After deleting the fruit, always returns a 204 No Content response
删除水果后,始终返回 204 No Content 响应

Listing 5.3 demonstrates several status codes, some of which you may not be familiar with:

清单 5.3 演示了几个状态代码,其中一些你可能不熟悉:

• 200 OK—The standard successful response. It often includes content in the body of the response but doesn’t have to.
200 OK - 标准成功响应。它通常在响应正文中包含内容,但并非必须。

• 201 Created—Often returned when you successfully created an entity on the server. The Created result in listing 5.3 also includes a Location header to describe the URL where the entity can be found, as well as the JSON entity itself in the body of the response.
201 Created (已创建) – 当您在服务器上成功创建实体时,通常会返回。清单 5.3 中的 Created 结果还包括一个 Location 标头,用于描述可以找到实体的 URL,以及响应正文中的 JSON 实体本身。

• 204 No Content—Similar to a 200 response but without any content in the response body.
204 无内容 — 类似于 200 响应,但响应正文中没有任何内容。

• 400 Bad Request—Indicates that the request was invalid in some way; often used to indicate data validation failures
400 Bad Request — 表示请求在某种程度上无效;通常用于表示数据验证失败。

• 404 Not Found—Indicates that the requested entity could not be found
404 Not Found - 表示找不到请求的实体。

These status codes more accurately describe your API and can make an API easier to use. That said, if you use only 200 OK responses for all your successful responses, few people will mind or think less of you! You can see a summary of all the possible status codes and their expected uses at http://mng.bz/jP4x.

这些状态代码可以更准确地描述您的 API,并使 API 更易于使用。也就是说,如果你只使用 200 个 OK 回复来获得所有成功的回复,那么很少有人会介意或少看你!您可以在 http://mng.bz/jP4x 上查看所有可能的状态代码及其预期用途的摘要。

NOTE The 404 status code in particular causes endless debate in online forums. Should it be only used if the request didn’t match an endpoint? Is it OK to use 404 to indicate a missing entity (as in the previous example)? There are endless proponents in both camps, so take your pick!
注意: 尤其是 404 状态代码在在线论坛中引起了无休止的争论。是否应仅在请求与终端节点不匹配时才使用它?是否可以使用 404 来表示缺少的实体(如前面的示例所示)?两个阵营都有无穷无尽的支持者,所以任你选择吧!

Results and TypedResults include methods for all the common status code results you could need, but if you don’t want to use them for some reason, you can always set the status code yourself directly on the HttpResponse, as in listing 5.4. In fact, the listing shows how to define the entire response manually, including the status code, the content type, and the response body. You won’t need to take this manual approach often, but it can be useful in some situations.

Results 和 TypedResults 包含你可能需要的所有常见状态码结果的方法,但是如果你由于某种原因不想使用它们,你总是可以直接在 HttpResponse 上自己设置状态码,如清单 5.4 所示。事实上,该清单显示了如何手动定义整个响应,包括状态代码、内容类型和响应正文。您不需要经常采用这种手动方法,但它在某些情况下可能很有用。

Listing 5.4 Writing the response manually using HttpResponse
清单 5.4 使用HttpResponse

WebApplicationBuilder builder = WebApplication.CreateBuilder(args);
WebApplication app = builder.Build();

app.MapGet("/teapot", (HttpResponse response) =>                           // ❶
{
    response.StatusCode = 418;                                             // ❷
    response.ContentType = System.Net.Mime.MediaTypeNames.Text.Plain;      // ❸
    return response.WriteAsync("I'm a teapot!");                           // ❹
});

app.Run();

❶ Accesses the HttpResponse by including it as a parameter in your endpoint
handler
通过将 HttpResponse 作为参数包含在端点处理程序中来访问 HttpResponse

❷ You can set the status code directly on the response.
您可以直接在响应中设置状态代码。

❸ Defines the content type that will be sent in the response
定义将在响应中发送的内容类型

❹ You can write data to the response stream manually.
您可以手动将数据写入响应流。

HttpResponse represents the response that will be sent to the client and is one of the special types that minimal APIs know to inject into your endpoint handlers (instead of trying to create it by deserializing from the request body). You’ll learn about the other types you can use in your endpoint handlers in chapter 7.

HttpResponse 表示将发送到客户端的响应,并且是最小 API 知道注入到端点处理程序中的特殊类型之一(而不是尝试通过从请求正文反序列化来创建它)。您将在第 7 章中了解可以在端点处理程序中使用的其他类型。

5.3.2 Returning useful errors with Problem Details

5.3.2 使用 Problem Details 返回有用的错误

In the MapPost endpoint of listing 5.3, we checked to see whether an entity with the given id already existed. If it did, we returned a 400 response with a description of the error. The problem with this approach is that the client—typically, a mobile app or SPA—must know how to read and parse that response. If each of your APIs has a different format for errors, that arrangement can make for a confusing API. Luckily, a web standard called Problem Details describes a consistent format to use.

在清单 5.3 的 MapPost 端点中,我们检查了是否已经存在具有给定 id 的实体。如果是这样,我们将返回 400 响应,其中包含错误说明。‌这种方法的问题在于,客户端(通常是移动应用程序或 SPA)必须知道如何读取和解析该响应。如果每个 API 的错误,这种安排可能会导致 API 混乱。幸运的是,一个名为 Problem Details 的 Web 标准描述了要使用的一致格式。

DEFINITION Problem Details is a web specification (https://www.rfc-editor.org/rfc/rfc7807.html) for providing machine-readable errors for HTTP APIs. It defines the required and optional fields that should be in the JSON body for errors.
定义: 问题详细信息 是一个 Web 规范 (https://www.rfc-editor.org/rfc/rfc7807.xhtml),用于为 HTTP API 提供机器可读的错误。它定义了 JSON 正文中应包含的 errors 必填字段和可选字段。

ASP.NET Core includes two helper methods for generating Problem Details responses from minimal APIs: Results.Problem() and Results.ValidationProblem() (plus their TypedResults counterparts). Both of these methods return Problem Details JSON. The only difference is that Problem() defaults to a 500 status code, whereas ValidationProblem() defaults to a 400 status and requires you to pass in a Dictionary of validation errors, as shown in the following listing.

ASP.NET Core 包含两个帮助程序方法,用于从最小 API 生成问题详细信息响应:Results.Problem() 和 Results.ValidationProblem()(以及它们的 TypedResults 对应项)。这两种方法都返回 Problem Details JSON。唯一的区别是 Problem() 默认为 500 状态代码,而 ValidationProblem() 默认为 400 状态,并要求您传入验证错误的 Dictionary,如下面的清单所示。

Listing 5.5 Returning Problem Details using Results.Problem
清单 5.5 使用Results.Problem

WebApplicationBuilder builder = WebApplication.CreateBuilder(args);
WebApplication app = builder.Build();

var _fruit = new System.Collections.Concurrent.ConcurrentDictionary<string, Fruit>();

app.MapGet("/fruit", () => _fruit);

app.MapGet("/fruit/{id}", (string id) =>
    _fruit.TryGetValue(id, out var fruit)
        ? TypedResults.Ok(fruit)
        : Results.Problem(statusCode: 404));                              // ❶

app.MapPost("/fruit/{id}", (string id, Fruit fruit) =>
    _fruit.TryAdd(id, fruit)
     ? TypedResults.Created($"/fruit/{id}", fruit)
     : Results.ValidationProblem(new Dictionary<string, string[]>         // ❷
        {                                                                 // ❷
            { "id", new[] { "A fruit with this id already exists" }}      // ❷
        }));

record Fruit(string Name, int stock);

❶ Returns a Problem Details object with a 404 status code
返回状态代码为 404 的 Problem Details 对象

❷ Returns a Problem Details object with a 400 status code and includes the
validation errors
返回具有 400 状态代码的 Problem Details 对象,并包含验证错误

The ProblemHttpResult returned by these methods takes care of including the correct title and description based on the status code, and generates the appropriate JSON, as shown in figure 5.5. You can override the default title and description by passing additional arguments to the Problem() and ValidationProblem() methods.
这些方法返回的 ProblemHttpResult 负责根据状态代码包含正确的标题和描述,并生成适当的 JSON,如图 5.5 所示。您可以通过向 Problem() 和 ValidationProblem() 方法传递其他参数来覆盖默认的标题和描述。

alt text

Figure 5.5 You can return a Problem Details response by using the Problem and ValidationProblem methods. The ValidationProblem response shown here includes a description of the error, along with the validation errors in a standard format. This example shows the response when you try to create a fruit with an id that has already been used.
图 5.5 您可以使用 Problem 和 ValidationProblem 方法返回 Problem Details 响应。此处显示的 ValidationProblem 响应包括错误说明,以及标准格式的验证错误。此示例显示了当您尝试创建具有已使用的 id 的水果时的响应。

Deciding on an error format is an important step whenever you create an API, and as Problem Details is already a web standard, it should be your go-to approach, especially for validation errors. Next, you’ll learn how to ensure that all your error responses are Problem Details.

无论何时创建 API,确定错误格式都是一个重要的步骤,由于 Problem Details 已经是一个 Web 标准,因此它应该是您的首选方法,尤其是对于验证错误。接下来,您将学习如何确保所有错误响应都是 Problem Details。

5.3.3 Converting all your responses to Problem Details

5.3.3 将您的所有响应转换为 Problem Details

In section 5.3.2 you saw how to use the Results.Problem() and Results.ValidationProblem() methods in your minimal API endpoints to return Problem Details JSON. The only catch is that your minimal API endpoints aren’t the only thing that could generate errors. In this section you’ll learn how to make sure that all your errors return Problem Details JSON, keeping the error responses consistent across your application.

在第 5.3.2 节中,您了解了如何在最小 API 端点中使用 Results.Problem() 和 Results.ValidationProblem() 方法来返回问题详细信息 JSON。唯一的问题是,您的最小 API 终端节点并不是唯一可能产生错误的东西。在本节中,您将学习如何确保所有错误都返回 Problem Details JSON,从而在整个应用程序中保持错误响应的一致性。

A minimal API application could generate an error response in several ways:

最小的 API 应用程序可以通过多种方式生成错误响应:

• Returning an error status code from an endpoint handler
从终端节点处理程序返回错误状态代码

• Throwing an exception in an endpoint handler, which is caught by the ExceptionHandlerMiddleware or the DeveloperExceptionPageMiddleware and converted to an error response.
在端点处理程序中抛出异常,该异常被 ExceptionHandlerMiddleware 或 DeveloperExceptionPageMiddleware 捕获并转换为错误响应

• The middleware pipeline returning a 404 response because a request isn’t handled by an endpoint
中间件管道返回 404 响应,因为请求未由终端节点处理

• A middleware component in the pipeline throwing an exception
管道中引发异常的中间件组件

• A middleware component returning an error response because a request requires authentication, and no credentials were provided
中间件组件返回错误响应,因为请求需要身份验证,并且未提供凭据

There are essentially two classes of errors, which are handled differently: exceptions and error status code responses. To create a consistent API for consumers, we need to make sure that both error types return Problem Details JSON in the response.
基本上有两类错误,它们的处理方式不同:异常和错误状态代码响应。要为使用者创建一致的 API,我们需要确保两种错误类型在响应中都返回 Problem Details JSON。

Converting exceptions to Problem Details

将异常转换为 Problem Details

In chapter 4 you learned how to handle exceptions with the ExceptionHandlerMiddleware. You saw that the middleware catches any exceptions from later middleware and generates an error response by executing an error-handling path. You could add the middleware to your pipeline with an error-handling path of "/error":

在第 4 章中,您学习了如何使用 ExceptionHandlerMiddleware 处理异常。您看到中间件从后面的中间件中捕获任何异常,并通过执行错误处理路径生成错误响应。您可以将中间件添加到错误处理路径为 “/error” 的管道中:

app.UseExceptionHandler("/error");

ExceptionHandlerMiddleware invokes this path after it captures an exception to generate the final response. The trouble with this approach for minimal APIs is that you need a dedicated error endpoint, the sole purpose of which is to generate a Problem Details response.

ExceptionHandlerMiddleware 在捕获异常后调用此路径以生成最终响应。对于最小 API,这种方法的问题在于,您需要一个专用的错误终端节点,其唯一目的是生成 Problem Details 响应。

Luckily, in .NET 7, you can configure the ExceptionHandlerMiddleware (and DeveloperExceptionPageMiddleware) to convert an exception to a Problem Details response automatically. In .NET 7, you can add the new IProblemDetailsService to your app by calling AddProblemDetails() on WebApplicationBuilder.Services. When the ExceptionHandlerMiddleware is configured without an error-handling path, it automatically uses the IProblemDetailsService to generate the response, as shown in figure 5.6.

幸运的是,在 .NET 7 中,您可以配置 ExceptionHandlerMiddleware(和 DeveloperExceptionPageMiddleware)以自动将异常转换为 Problem Details 响应。在.NET 7 中,您可以通过在 WebApplicationBuilder.Services 上调用 AddProblemDetails() 将新的 IProblemDetailsService 添加到您的应用程序。当 ExceptionHandlerMiddleware 配置为没有错误处理路径时,它会自动使用 IProblemDetailsService 来生成响应,如图 5.6 所示。

WARNING Calling AddProblemDetails() registers the IProblemDetailsService service in the dependency injection container so that other services and middleware can use it. If you configure ExceptionHandlerMiddleware without an error-handling path but forget to call AddProblemDetails(), you’ll get an exception when your app starts. You’ll learn more about dependency injection in chapters 8 and 9.
警告: 调用 AddProblemDetails() 会在依赖项注入容器中注册 IProblemDetailsService 服务,以便其他服务和中间件可以使用它。如果你在配置 ExceptionHandlerMiddleware 时没有错误处理路径,但忘记调用 AddProblemDetails(),那么当应用启动时会出现异常。您将在第 8 章和第 9 章中了解有关依赖关系注入的更多信息。

alt text

Figure 5.6. The ExceptionHandlerMiddleware catches exceptions that occur later in the middleware pipeline. If the middleware isn’t configured to reexecute the pipeline, it generates a Problem Details response by using the IProblemDetailsService.
图 5.6 ExceptionHandlerMiddleware 捕获中间件管道中稍后发生的异常。如果中间件未配置为重新执行管道,它将使用 IProblemDetailsService 生成 Problem Details 响应。

Listing 5.6 shows how to configure Problem Details generation in your exception handlers. Add the required IProblemDetailsService service to your app, and call UseExceptionHandler() without providing an error-handling path, and the middleware will generate a Problem Details response automatically when it catches an exception.

清单 5.6 展示了如何在异常处理程序中配置 Problem Details 生成。将所需的 IProblemDetailsService 服务添加到您的应用程序,并在不提供错误处理路径的情况下调用 UseExceptionHandler(),中间件将在捕获异常时自动生成 Problem Details 响应。

Listing 5.6 Configuring ExceptionHandlerMiddleware to use Problem Details
清单 5.6 配置ExceptionHandlerMiddleware使用 Problem Details

WebApplicationBuilder builder = WebApplication.CreateBuilder(args);
builder.Services.AddProblemDetails();                   //❶

WebApplication app = builder.Build();

if (!app.Environment.IsDevelopment())
{
    app.UseExceptionHandler();                           //❷
}

app.MapGet("/", void () => throw new Exception());       //❸

app.Run();

❶ Adds the IProblemDetailsService implementation
添加 IProblemDetailsService 实现

❷ Configures the ExceptionHandlerMiddleware without a path so that it uses the IProblemDetailsService
配置不带路径的 ExceptionHandlerMiddleware,以便它使用 IProblemDetailsService

❸ Throws an exception to demonstrate the behavior
引发异常以演示行为

As discussed in chapter 4, WebApplication automatically adds the DeveloperExceptionPageMiddleware to your app in the development environment. This middleware similarly supports returning Problem Details when two conditions are satisfied:

如第 4 章所述,WebApplication 会自动将 DeveloperExceptionPageMiddleware 添加到开发环境中的应用程序中。此中间件同样支持在满足两个条件时返回 Problem Details:

• You’ve registered an IProblemDetailsService with the app (by calling AddProblemDetails() in Program.cs)
您已向应用程序注册了 IProblemDetailsService(通过在 Program.cs 中调用 AddProblemDetails())。

• The request indicates that it doesn’t support HTML. If the client supports HTML, middleware uses the HTML developer exception page from chapter 4 instead.
该请求指示它不支持 HTML。如果客户端支持 HTML,中间件会改用第 4 章中的 HTML 开发人员例外页面。

The ExceptionHandlerMiddleware and DeveloperExceptionPageMiddleware take care of converting all your exceptions to Problem Details responses, but you still need to think about nonexception errors, such as the automatic 404 response generated when a request doesn’t match any endpoints.

ExceptionHandlerMiddleware 和 DeveloperExceptionPageMiddleware 负责将所有异常转换为 Problem Details 响应,但您仍然需要考虑非异常错误,例如当请求与任何端点不匹配时生成的自动 404 响应。

Converting error status codes to Problem Details

C将错误状态代码反转为 PROBLEM DETAILS

Returning error status codes is the common way to communicate errors to a client with minimal APIs. To ensure a consistent API for consumers, you should return a Problem Details response whenever you return an error. Unfortunately, as already mentioned, you don’t control all the places where an error code may be created. The middleware pipeline automatically returns a 404 response when an unmatched request reaches the end of the pipeline, for example.

返回错误状态代码是使用最少 API 将错误传达给客户端的常用方法。为了确保使用者的 API 一致,您应该在返回错误时返回 Problem Details 响应。遗憾的是,如前所述,您无法控制可能创建错误代码的所有位置。例如,当不匹配的请求到达管道末尾时,中间件管道会自动返回 404 响应。

Instead of generating a Problem Details response in your endpoint handlers, you can add middleware to convert responses to Problem Details automatically by using the StatusCodePagesMiddleware, as shown in figure 5.7. Any response that reaches the middleware with an error status code and doesn’t already have a body has a Problem Details body added by the middleware. The middleware converts all error responses automatically, regardless of whether they were generated by an endpoint or from other middleware.

您可以添加中间件来转换使用 StatusCodePagesMiddleware 自动响应 Problem Details,如图 5.7 所示。任何到达中间件时带有错误状态代码且尚未具有正文的响应都会由中间件添加 Problem Details 正文。中间件会自动转换所有错误响应,无论它们是由终端节点还是来自其他中间件。

alt text

Figure 5.7 The StatusCodePagesMiddleware intercepts responses with an error status code that have no response body and adds a Problem Details response body.

图 5.7 StatusCodePagesMiddleware 拦截带有错误状态码且没有响应体的响应,并添加 Problem Details 响应体。

NOTE You can also use the StatusCodePagesMiddleware to reexecute the middleware pipeline with an error handling path, as you can with the ExceptionHandlerMiddleware (chapter 4). This technique is most useful for Razor Pages applications when you want to have a different error page for specific status codes, as you’ll see in chapter 15.
注意: 您还可以使用 StatusCodePagesMiddleware 通过错误处理路径重新执行中间件管道,就像使用 ExceptionHandlerMiddleware(第 4 章)一样。当希望为特定状态代码使用不同的错误页时,此技术对 Razor Pages 应用程序最有用,如第 15 章所示。

Add the StatusCodePagesMiddleware to your app by using the UseStatusCodePages() extension method, as shown in listing 5.7. Ensure that you also add the IProblemDetailsService to your app by using AddProblemDetails().

使用 UseStatusCodePages() 扩展方法将 StatusCodePagesMiddleware 添加到您的应用程序中,如下面的清单所示。确保还使用 AddProblemDetails() 将 IProblemDetailsService 添加到您的应用程序。

Listing 5.7 Using StatusCodePagesMiddleware to return Problem Details
清单 5.7 使用 StatusCodePagesMiddleware 返回问题详情

WebApplicationBuilder builder = WebApplication.CreateBuilder(args);
builder.Services.AddProblemDetails();            // ❶

WebApplication app = builder.Build();

if (!app.Environment.IsDevelopment())
{
    app.UseExceptionHandler();
}

app.UseStatusCodePages();                        // ❷

app.MapGet("/", () => Results.NotFound());       // ❸

app.Run();

❶ Adds the IProblemDetailsService implementation
添加 IProblemDetailsService 实现

❷ Adds the StatusCodePagesMiddleware
添加了 StatusCodePagesMiddleware

❸ The StatusCodePagesMiddleware automatically adds a Problem Details body to the 404 response.
StatusCodePagesMiddleware 会自动将 Problem Details 正文添加到 404 响应中。

The StatusCodePagesMiddleware, coupled with exception-handling middleware, ensures that your API returns a Problem Details response for all error responses.

StatusCodePagesMiddleware 与异常处理中间件相结合,可确保 API 为所有错误响应返回 Problem Details 响应。

TIP You can also customize how the Problem Details response is generated by passing parameters to the AddProblemDetails() method or by implementing your own IProblemDetailsService.
提示: 您还可以通过向 AddProblemDetails() 方法传递参数或通过实现您自己的 IProblemDetailsService 来自定义生成问题详细信息响应的方式。

So far in section 5.3, I’ve described returning objects as JSON, returning strings as text, and returning custom status codes and Problem Details by using Results. Sometimes, however, you need to return something bigger, such as a file or a binary. Luckily, you can use the convenient Results class for that task too.
到目前为止,在第 5.3 节中,我已经介绍了以 JSON 格式返回对象、以文本格式返回字符串以及使用 Results 返回自定义状态代码和问题详细信息。但是,有时您需要返回更大的内容,例如文件或二进制文件。幸运的是,您也可以使用方便的 Results 类来完成该任务。

5.3.4 Returning other data types

5.3.4 返回其他数据类型

The methods on Results and TypedResults are convenient ways of returning common responses, so it’s only natural that they include helpers for other common scenarios, such as returning a file or binary data:
Results 和 TypedResults 上的方法是返回常见响应的便捷方法,因此它们包含其他常见方案(例如返回文件或二进制数据)的帮助程序是很自然的:

• Results.File()—Pass in the path of the file to return, and ASP.NET Core takes care of streaming it to the client.
Results.File() - 传入要返回的文件的路径,ASP.NET Core 负责将其流式传输到客户端。

• Results.Byte()—For returning binary data, you can pass this method a byte[] to return.
Results.Byte() — 要返回二进制数据,您可以向此方法传递一个 byte[] 以返回。

• Results.Stream()—You can send data to the client asynchronously by using a Stream.
Results.Stream() — 您可以使用 Stream 将数据异步发送到客户端。

In each of these cases, you can provide a content type for the data, and a filename to be used by the client. Browsers offer to save binary data files using the suggested filename. The File and Byte methods even support range requests by specifying enableRangeProcessing as true.
在上述每种情况下,您都可以为数据提供内容类型,以及客户端要使用的文件名。浏览器提供使用建议的文件名保存二进制数据文件。File 和 Byte 方法甚至通过将 enableRangeProcessing 指定为 true 来支持范围请求。

DEFINITION Clients can create range requests using the Range header to request a specific range of bytes from the server instead of the whole file, reducing the bandwidth required for a request. When range requests are enabled for Results.File() or Results.Byte(), ASP.NET Core automatically handles generating an appropriate response. You can read more about range requests at http://mng.bz/Wzd0.
定义: 客户端可以使用 Range 标头创建范围请求,以从服务器而不是整个文件请求特定范围的字节,从而减少请求所需的带宽。当为 Results.File() 或 Results.Byte() 启用范围请求时,ASP.NET Core 会自动处理生成适当的响应。您可以在 http://mng.bz/Wzd0 中阅读有关范围请求的更多信息。

If the built-in Results helpers don’t provide the functionality you need, you can always fall back to creating a response manually, as in listing 5.4. If you find yourself creating the same manual response several times, you could consider creating a custom IResult type to encapsulate this logic. I show how to create a custom IResult that returns XML and registers it as an extension in this blog post: http://mng.bz/8rNP.

如果内置的 Results 帮助程序没有提供你需要的功能,你总是可以回退到手动创建响应,如清单 5.4 所示。如果您发现自己多次创建相同的手动响应,则可以考虑创建自定义 IResult 类型来封装此逻辑。在以下博客文章中,我将介绍如何创建返回 XML 并将其注册为扩展的自定义 IResult:http://mng.bz/8rNP

5.4 Running common code with endpoint filters

使用终端节点筛选器运行通用代码

In section 5.3 you learned how to use Results to return different responses when the request isn’t valid. We’ll look at validation in more detail in chapter 7, but in this section, you’ll learn how to use filters to extract common code that executes before (or after) an endpoint executes.

在第 5.3 节中,您学习了如何在请求无效时使用 Results 返回不同的响应。我们将在第 7 章中更详细地介绍验证,但在本节中,您将学习如何使用过滤器来提取在端点执行之前(或之后)执行的常见代码。

Let’s start by adding some extra validation to the fruit API from listing 5.5. The following listing adds an additional check to the MapGet endpoint to ensure that the provided id isn’t empty and that it starts with the letter f.

让我们首先向清单 5.5 中的 fruit API 添加一些额外的验证。下面的清单向 MapGet 端点添加了一项额外的检查,以确保提供的 id 不为空,并且它以字母 f 开头。

Listing 5.8 Adding basic validation to minimal API endpoints
清单 5.8 向最小API添加基本验证端点

WebApplicationBuilder builder = WebApplication.CreateBuilder(args);
WebApplication app = builder.Build();

var _fruit = new System.Collections.Concurrent.ConcurrentDictionary<string, Fruit>();

app.MapGet("/fruit/{id}", (string id) =>
{
    if (string.IsNullOrEmpty(id) || !id.StartsWith('f'))                   // ❶
    {
        return Results.ValidationProblem(new Dictionary<string, string[]>
        {
            {"id", new[] {"Invalid format. Id must start with 'f'"}}
        });
    }
    return _fruit.TryGetValue(id, out var fruit)
        ? TypedResults.Ok(fruit)
        : Results.Problem(statusCode: 404);
});

app.Run();
record Fruit(string Name, int stock);

❶ Adds extra validation that the provided id has the required format
添加额外的验证,证明提供的 ID 具有所需的格式

Even though this check is basic, it starts to clutter our endpoint handler, making it harder to read what the endpoint is doing. One improvement would be to move the validation code to a helper function. But you’re still inevitably going to clutter your endpoint handlers with calls to methods that are tangential to the main function of your endpoint.

尽管此检查是基本的,但它开始使我们的 endpoint 处理程序变得混乱,从而更难读取 endpoint 正在做什么。一项改进是将验证代码移动到 helper 函数。但是,您仍然不可避免地会因为对与终端节点的主函数相切的方法的调用而使终端节点处理程序变得混乱。

NOTE Chapter 7 discusses additional validation patterns in detail.
注意: 第 7 章详细讨论了其他验证模式。

It’s common to perform various cross-cutting activities for every endpoint. I’ve already mentioned validation; other cross-cutting activities include logging, authorization, and auditing. ASP.NET Core has built-in support for some of these features, such as authorization (chapter 24), but you’re likely to have some common code that doesn’t fit into the specific pigeonholes of validation or authorization.

通常为每个端点执行各种横切活动。我已经提到了验证;其他横切活动包括日志记录、授权和审计。ASP.NET Core 内置了对其中一些功能的支持,例如授权(第 24 章),但您可能有一些通用代码不适合验证或授权的特定分类。

Luckily, ASP.NET Core includes a feature in minimal APIs for running these tangential concerns: endpoint filters. You can specify a filter for an endpoint by calling AddEndpointFilter()on the result of a call to MapGet (or similar) and passing in a function to execute. You can even add multiple calls to AddEndpointFilter(), which builds up an endpoint filter pipeline, analogous to the middleware pipeline. Figure 5.8 shows that the pipeline is functionally identical to the middleware pipeline in figure 4.3.

幸运的是,ASP.NET Core 在最小的 API 中包含一个功能,用于运行这些无关紧要的问题:终端节点筛选器。您可以通过对 MapGet(或类似)的调用结果调用 AddEndpointFilter() 并传入要执行的函数来为终端节点指定过滤器。您甚至可以添加对 AddEndpointFilter() 的多个调用,这将构建一个端点过滤器管道,类似于中间件管道。图 5.8 显示,该管道在功能上与图 4.3 中的中间件管道相同。

alt text

Figure 5.8. The endpoint filter pipeline. Filters execute code and then call next(context) to invoke the next filter in the pipeline. If there are no more filters in the pipeline, the endpoint handler is invoked. After the handler has executed, the filters may run further code.
图 5.8 端点过滤器管道。筛选器执行代码,然后调用 next(context) 以调用管道中的下一个筛选器。如果管道中没有更多筛选器,则调用终端节点处理程序。处理程序执行后,过滤器可以运行更多代码。

Each endpoint filter has two parameters: a context parameter, which provides details about the selected endpoint handler, and the next parameter, which represents the filter pipeline. When you invoke the methodlike next parameter by calling next(context), you invoke the remainder of the filter pipeline. If there are no more filters in the pipeline, you invoke the endpoint handler, as shown in figure 5.8.

每个终端节点筛选条件都有两个参数:一个 context 参数(提供有关所选终端节点处理程序的详细信息)和 next 参数(表示筛选条件管道)。当您通过调用 next(context) 调用类似 next 参数的 methodlike 时,将调用筛选管道的其余部分。如果管道中,您可以调用端点处理程序,如图 5.8 所示。

Listing 5.9 shows how to run the same validation logic you saw in listing 5.8 in an endpoint filter. The filter function accesses the endpoint method arguments by using the context.GetArgument<T>() function, passing in a position; 0 is the first argument of your endpoint handler, 1 is the second argument, and so on. If the argument isn’t valid, the filter function returns an IResult object response. If the argument is valid, the filter calls await next(context) instead, executing the endpoint handler.

清单 5.9 展示了如何在端点过滤器中运行清单 5.8 中看到的相同验证逻辑。filter 函数使用上下文访问端点方法参数。GetArgument() 函数,传入一个位置;0 是终端节点处理程序的第一个参数,1 是第二个参数,依此类推。如果参数无效,则 filter 函数将返回 IResult 对象响应。如果参数有效,则筛选器将改为调用 await next(context),并执行端点处理程序。

Listing 5.9 Using AddEndpointFilter to extract common code
清单 5.9 使用 AddEndpointFilter 提取通用代码

WebApplicationBuilder builder = WebApplication.CreateBuilder(args);
WebApplication app = builder.Build();
var _fruit = new System.Collections.Concurrent.ConcurrentDictionary<string, Fruit>();

app.MapGet("/fruit/{id}", (string id) =>
    _fruit.TryGetValue(id, out var fruit)
        ? TypedResults.Ok(fruit)
        : Results.Problem(statusCode: 404))
    .AddEndpointFilter(ValidationHelper.ValidateId);                       // ❶

app.Run();

class ValidationHelper
{
    internal static async ValueTask<object?> ValidateId(                   // ❷
        EndpointFilterInvocationContext context,                           // ❸
        EndpointFilterDelegate next)                                       // ❹
    {
        var id = context.GetArgument<string>(0);                           // ❺
        if (string.IsNullOrEmpty(id) || !id.StartsWith('f'))
        {
            return Results.ValidationProblem(
                new Dictionary<string, string[]>
                {
                    {"id", new[]{"Invalid format. Id must start with 'f'"}}
                });
        }

        return await next(context);                                        // ❻
    }
}  
record Fruit(string Name, int stock);

❶ Adds the filter to the endpoint using AddEndpointFilter
使用 AddEndpointFilter 将筛选器添加到端点

❷ The method must return a ValueTask.
该方法必须返回 ValueTask。

❸ context exposes the endpoint method arguments and the HttpContext.
context 公开端点方法参数和 HttpContext。

❹ next represents the filter method (or endpoint) that will be called next.
next 表示接下来将调用的 filter 方法 (或 endpoint)。

❺ You can retrieve the method arguments from the context.
您可以从上下文中检索方法参数。

❻ Calling next executes the remaining filters in the pipeline.
调用 next 将执行管道中的剩余过滤器。

NOTE The EndpointFilterDelegate is a named delegate type. It’s effectively a Func<EndpointFilterInvocationContext, ValueTask<object?>>.
注意: EndpointFilterDelegate 是一种命名委托类型。它实际上是 Func<EndpointFilterInvocationContext, ValueTask<object?>>

There are many parallels between the middleware pipeline and the filter endpoint pipeline, and we’ll explore them in section 5.4.1.
middleware pipeline 和 filter endpoint pipeline 之间有许多相似之处,我们将在 Section 5.4.1 中探讨它们。

5.4.1 Adding multiple filters to an endpoint

5.4.1 向终端节点 添加多个筛选条件

The middleware pipeline is typically the best place for handling cross-cutting concerns such as logging, authentication, and authorization, as these functions apply to all requests. Nevertheless, it can be common to have additional cross-cutting concerns that are endpoint-specific, as we’ve already discussed. If you need many endpoint-specific operations, you might consider using multiple endpoint filters.

中间件管道通常是处理横切关注点(如日志记录、身份验证和授权)的最佳位置,因为这些功能适用于所有请求。尽管如此,正如我们已经讨论过的,通常还会有特定于端点的其他横切关注点。如果您需要许多特定于终端节点的作,则可以考虑使用多个终端节点筛选条件。

As you saw in figure 5.8, adding multiple filters to an endpoint builds up a pipeline. Like the middleware pipeline, the endpoint filter pipeline can execute code both before and after the rest of the pipeline executes. Similarly, the filter pipeline can short-circuit in the same way as the middleware pipeline by returning a result and not calling next.

如图 5.8 所示,向端点添加多个过滤器会构建一个管道。与中间件管道一样,终端节点筛选器管道可以在管道的其余部分执行之前和之后执行代码。同样,filter 管道可以像中间件管道一样短路,方法是返回 result 而不调用 next。

NOTE You’ve already seen an example of a short circuit in the filter pipeline. In listing 5.9 we short-circuit the pipeline if the id is invalid by returning a Problem Details object instead of calling next(context).
注意: 您已经看到了 filter pipeline 中短路的示例。在示例 5.9 中,如果 id 无效,我们通过返回 Problem Details 对象而不是调用 next(context) 来短路管道。

As with middleware, the order in which you add filters to the endpoint filter pipeline is important. The filters you add first are called first in the pipeline, and filters you add last are called last. On the return journey through the pipeline, after the endpoint handler is invoked, the filters are called in reverse order, as with the middleware pipeline. As an example, consider the following listing, which adds an extra filter to the endpoint shown in listing 5.9.

与中间件一样,将筛选器添加到终端节点筛选器管道的顺序也很重要。您首先添加的过滤器在管道中称为 first,您最后添加的过滤器称为 last。在通过管道的返回旅程中,调用终端节点处理程序后,过滤器将按相反的顺序调用,就像中间件管道一样。例如,考虑下面的清单,它向清单 5.9 中所示的端点添加了一个额外的过滤器。

Listing 5.10 Adding multiple filters to the endpoint filter pipeline
列表 5.10 向端点添加多个过滤器过滤管道


WebApplicationBuilder builder = WebApplication.CreateBuilder(args);
WebApplication app = builder.Build();
var _fruit = new System.Collections.Concurrent.ConcurrentDictionary<string, Fruit>();

app.MapGet("/fruit/{id}", (string id) =>
    _fruit.TryGetValue(id, out var fruit)
        ? TypedResults.Ok(fruit)
        : Results.Problem(statusCode: 404))
    .AddEndpointFilter(ValidationHelper.ValidateId)                 // ❶ 这个ValidationHelper.ValidateId在下面定义了
    .AddEndpointFilter(async (context, next) =>                     // ❷
    {
    app.Logger.LogInformation("Executing filter...");               // ❸
        object? result = await next(context);                       // ❹
        app.Logger.LogInformation($"Handler result: {result}");     // ❺
        return result;                                              // ❻
    });

app.Run();
record Fruit(string Name, int stock);


class ValidationHelper
{
    internal static async ValueTask<object?> ValidateId(
        EndpointFilterInvocationContext context, EndpointFilterDelegate next)
    {
        var id = context.GetArgument<string>(0);
        if (string.IsNullOrEmpty(id) || !id.StartsWith('f'))
        {
            return Results.ValidationProblem(new Dictionary<string, string[]>
            {
                { "id", new[] { "Invalid format. Id must start with 'f'" } }
            });
        }
        return await next(context);
    }

    internal static EndpointFilterDelegate ValidateIdFactory(
        EndpointFilterFactoryContext context, EndpointFilterDelegate next)
    {
        System.Reflection.ParameterInfo[] parameters = context.MethodInfo.GetParameters();
        int? idPosition = null;
        for (int i = 0; i < parameters.Length; i++)
        {
            if (parameters[i].Name == "id" &&
                parameters[i].ParameterType == typeof(string))
            {
                idPosition = i;
                break;
            }
        }

        if (!idPosition.HasValue)
        {
            return next;
        }

        return async (invocationContext) =>
        {
            var id = invocationContext.GetArgument<string>(idPosition.Value);
            if (string.IsNullOrEmpty(id) || !id.StartsWith('f'))
            {
                return Results.ValidationProblem(new Dictionary<string, string[]>
                {
                    { "id", new[] { "Invalid format. Id must start with 'f'" } }
                });
            }
            return await next(invocationContext);
        };
    }
}
class IdValidationFilter : IEndpointFilter
{
    public async ValueTask<object?> InvokeAsync(EndpointFilterInvocationContext context, EndpointFilterDelegate next)
    {
        var id = context.GetArgument<string>(0);
        if (string.IsNullOrEmpty(id) || !id.StartsWith('f'))
        {
            return Results.ValidationProblem(new Dictionary<string, string[]>
        {
            { "id", new[] { "Invalid format. Id must start with 'f'" } }
        });
        }
        return await next(context);
    }
}

❶ Adds the validation filter as before
像以前一样添加验证过滤器

❷ Adds a new filter using a lambda function
使用 lambda 函数添加新的筛选条件

❸ Logs a message before executing the rest of the pipeline
在执行管道的其余部分之前记录一条消息

❹ Executes the remainder of the pipeline and the endpoint handler
执行管道的其余部分和端点处理程序

❺ Logs the result returned by the rest of the pipeline
记录管道其余部分返回的结果

❻ Returns the result unmodified
返回未经修改的结果

The extra filter is implemented as a lambda function and simply writes a log message when it executes. Then it runs the rest of the filter pipeline (which contains only the endpoint handler in this example) and logs the result returned by the pipeline. Chapter 26 covers logging in detail. For this example, we’ll look at the logs written to the console.

额外的筛选条件作为 lambda 函数实现,只需在执行时写入日志消息。然后,它运行筛选条件管道的其余部分(在本例中仅包含终端节点处理程序)并记录管道返回的结果。第 26 章详细介绍了日志记录。在此示例中,我们将查看写入控制台的日志。

Figure 5.9 shows the log messages written when we send two requests to the API in listing 5.10. The first request is for an entry that exists, so it returns a 200 OK result. The second request uses an invalid id format, so the first filter rejects it. Figure 5.9 shows that neither the second filter nor the endpoint handler runs in this case; the filter pipeline has been short-circuited.
图 5.9 显示了我们向 API 发送两个请求时写入的日志消息 5.10.第一个请求是针对存在的条目,因此它返回 200 OK 结果。第二个请求使用无效的 id 格式,因此第一个筛选条件会拒绝它。图 5.9 显示在这种情况下,第二个过滤器和端点处理程序都没有运行;过滤器管道已短路。

alt text

Figure 5.9 Sending two requests to the API from listing 5.10. The first request is valid, so both filters execute. An invalid id is provided in the second request, so the first filter short-circuits the requests, and the second filter doesn’t execute.
图 5.9 向清单 5.10 中的 API 发送两个请求.第一个请求有效,因此两个筛选条件都执行。第二个请求中提供了无效的 ID,因此第一个筛选条件会使请求短路,第二个筛选条件不会执行。

By adding calls to AddEndpointFilter, you can create arbitrarily large endpoint filter pipelines, but the fact that you can doesn’t mean you should. Moving code to filters can reduce clutter in your endpoints, but it makes the flow of your application harder to understand. I suggest that you avoid using filters unless you find duplicated code in multiple endpoints, and then favor a filter over a simple method call only if it significantly simplifies the code required.

通过添加对 AddEndpointFilter 的调用,您可以创建任意大的终端节点筛选器管道,但您可以创建的事实并不意味着您应该这样做。将代码移动到筛选器可以减少终端节点中的混乱,但会使应用程序流更难理解。我建议您避免使用筛选器,除非您在多个终端节点中发现重复的代码,然后只有在它显著简化了所需的代码时,才使用筛选器而不是简单的方法调用。

5.4.2 Filters or middleware: Which should you choose?

5.4.2 过滤器或中间件:您应该选择哪个?

The endpoint filter pipeline is similar to the middleware pipeline in many ways, but you should consider several subtle differences when deciding which approach to use. The similarities include three main parallels:

终端节点筛选管道在许多方面与中间件管道相似,但在决定使用哪种方法时,应考虑几个细微的差异。相似之处包括三个主要的相似之处:

• Requests pass through a middleware component on the way in, and responses pass through again on the way out. Similarly, endpoint filters can run code before calling the next filter in the pipeline and can run code after the response is generated, as shown in figure 5.8.
请求在传入时通过中间件组件,响应在传出时再次传递。同样,终端节点筛选器可以在调用管道中的下一个筛选器之前运行代码,并且可以在生成响应后运行代码,如图 5.8 所示。

• Middleware can short-circuit a request by returning a response instead of passing it on to later middleware. Filters can also short-circuit the filter pipeline by returning a response.
中间件可以通过返回响应而不是将其传递给后续中间件来使请求短路。筛选器还可以通过返回响应来使筛选器管道短路。

• Middleware is often used for cross-cutting application concerns, such as logging, performance profiling, and exception handling. Filters also lend themselves to cross-cutting concerns.
中间件通常用于横切应用程序问题,例如日志记录、性能分析和异常处理。过滤器还适用于横切关注点。

By contrast, there are three main differences between middleware and filters:

相比之下,中间件和过滤器之间有三个主要区别:

• Middleware can run for all requests; filters will run only for requests that reach the EndpointMiddleware and execute the associated endpoint.
Filters have access to additional details about the endpoint that will execute, such as the return value of the endpoint, such as an IResult.
中间件可以针对所有请求运行filters 将仅针对到达 EndpointMiddleware 并执行关联端点的请求运行。筛选器可以访问有关将要执行的终结点的其他详细信息,例如终结点的返回值,例如 IResult。

• Middleware in general won’t see these intermediate steps, so it sees only the generated response.
中间件通常不会看到这些中间步骤,因此它只能看到生成的响应。

• Filters can easily be restricted to a subset of requests, such as a single endpoint or a group of endpoints. Middleware generally applies to all requests (though you can achieve something similar with custom middleware components).
筛选器可以轻松地限制为请求的子集,例如单个终端节点或一组终端节点。中间件通常适用于所有请求(尽管您可以使用自定义中间件组件实现类似的功能)。

That’s all well and good, but how should we interpret these differences? When should we choose one over the other?
这一切都很好,但我们应该如何解释这些差异呢?我们什么时候应该选择一个而不是另一个?

I like to think of middleware versus filters as a question of specificity. Middleware is the more general concept, operating on lower-level primitives such as HttpContext, so it has wider reach. If the functionality you need has no endpoint-specific requirements, you should use a middleware component. Exception handling is a great example; exceptions could happen anywhere in your application, and you need to handle them, so using exception-handling middleware makes sense.

我喜欢将中间件与过滤器视为一个特异性问题。中间件是更通用的概念,它在 HttpContext 等较低级别的原语上运行,因此它的范围更广。如果您需要的功能没有特定于端点的要求,则应使用中间件组件。异常处理就是一个很好的例子;异常可能发生在应用程序中的任何位置,您需要处理它们,因此使用异常处理中间件是有意义的。

On the other hand, if you do need access to endpoint details, or if you want to behave differently for some requests, you should consider using a filter. Validation is a good example. Not all requests need the same validation. Requests for static files, for example, don’t need parameter validation, the way requests to an API endpoint do. Applying validation to the endpoints via filters makes sense in this case.

另一方面,如果您确实需要访问终端节点详细信息,或者您希望对某些请求采取不同的行为,则应考虑使用筛选条件。验证就是一个很好的例子。并非所有请求都需要相同的验证。例如,对静态文件的请求不需要参数验证,对 API 终端节点的请求方式。在这种情况下,通过过滤器对终端节点应用验证是有意义的。

TIP Where possible, consider using middleware for cross-cutting concerns. Use filters when you need different behavior for different endpoints or where the functionality relies on endpoint concepts such as IResult objects.
提示: 在可能的情况下,考虑将中间件用于横切关注点。当您需要对不同的终端节点进行不同的行为时,或者当功能依赖于终端节点概念(如 IResult 对象)时,请使用过滤器。

So far, the filters we’ve looked at have been specific to a single endpoint. In section 5.4.3 we look at creating generic filters that you can apply to multiple endpoints.

到目前为止,我们查看的筛选器特定于单个终结点。在第 5.4.3 节中,我们将介绍如何创建可应用于多个终端节点的通用过滤器。

5.4.3 Generalizing your endpoint filters

5.4.3 通用化终端节点筛选条件

One common problem with filters is that they end up closely tied to the implementation of your endpoint handlers. Listing 5.9, for example, assumes that the id parameter is the first parameter in the method. In this section you’ll learn how to create generalized versions of filters that work with multiple endpoint handlers.

筛选器的一个常见问题是,它们最终与终结点处理程序的实现密切相关。例如,清单 5.9 假设 id 参数是方法中的第一个参数。在本节中,您将学习如何创建使用多个终端节点处理程序的 filters 的通用版本。

The fruit API we’ve been working with in this chapter contains several endpoint handlers that take multiple parameters. The MapPost handler, for example, takes a string id parameter and a Fruit fruit parameter:

我们在本章中使用的 fruit API 包含几个采用多个参数的端点处理程序。例如,MapPost 处理程序采用字符串 id 参数和 Fruit fruit 参数:

app.MapPost("/fruit/{id}", (string id, Fruit fruit) => { /* */ });

In this example, the id parameter is listed first, but there’s no requirement for that to be the case. The parameters to the handler could be reversed, and the endpoint would be functionally identical:
在此示例中,首先列出 id 参数,但不需要这样做。处理程序的参数可以反转,并且端点在功能上是相同的:

app.MapPost("/fruit/{id}", (Fruit fruit, string id) => { /* */ });

Unfortunately, with this order, the ValidateId filter described in listing 5.9 won’t work. The ValidateId filter assumes that the first parameter to the handler is id, which isn’t the case in our revised MapPost implementation.

遗憾的是,按照这个顺序,清单 5.9 中描述的 ValidateId 过滤器将不起作用。ValidateId 筛选器假定处理程序的第一个参数是 id,而在我们修订后的 MapPost 实现中,情况并非如此。

ASP.NET Core provides a solution that uses a factory pattern for filters. You can register a filter factory by using the AddEndpointFilterFactory() method. A filter factory is a method that returns a filter function. ASP.NET Core executes the filter factory when it’s building your app and incorporates the returned filter into the filter pipeline for the app, as shown in figure 5.10. You can use the same filter-factory function to emit a different filter for each endpoint, with each filter tailored to the endpoint’s parameters.

ASP.NET Core 提供了一种对筛选器使用工厂模式的解决方案。您可以使用 AddEndpointFilterFactory() 方法注册过滤器工厂。过滤器工厂是一种返回过滤器函数的方法。 ASP.NET Core 在构建应用程序时执行过滤器工厂,并将返回的过滤器合并到应用程序的过滤器管道中,如图 5.10 所示。您可以使用相同的 filter- factory 函数为每个终端节点发出不同的过滤器,每个过滤器都根据终端节点的参数进行定制。

alt text

Figure 5.10 A filter factory is a generalized way to add endpoint filters. The factory reads details about the endpoint, such as its method signature, and builds a filter function. This function is incorporated into the final filter pipeline for the endpoint. The build step means that a single filter factory can create filters for multiple endpoints with different method signatures.
图 5.10 过滤器工厂是添加端点过滤器的一种通用方法。工厂读取有关端点的详细信息,例如其方法签名,并构建一个 filter 函数。此函数将合并到终端节点的最终筛选管道中。构建步骤意味着单个过滤器工厂可以为具有不同方法签名的多个端点创建过滤器。

Listing 5.11 shows an example of the factory pattern in practice. The filter factory is applied to multiple endpoints. For each endpoint, the factory first checks for a parameter called id; if it doesn’t exist, the factory returns next and doesn’t add a filter to the pipeline. If the id parameter exists, the factory returns a filter function, which is virtually identical to the filter function in listing 5.9; the main difference is that this filter handles a variable location of the id parameter.

清单 5.11 显示了实践中工厂模式的一个例子。过滤器工厂应用于多个端点。对于每个终端节点,工厂首先检查名为 ;如果不存在,则 Factory 将返回并且不会向管道添加筛选器。如果参数存在,工厂将返回一个 filter 函数,该函数与清单 5.9 中的 filter 函数几乎相同;主要区别在于此筛选器处理参数的可变位置.

Listing 5.11 Using a filter factory to create an endpoint filter
Listing 5.11 使用过滤器工厂创建端点过滤器


using System.Collections.Concurrent;
using System.Reflection;

WebApplicationBuilder builder = WebApplication.CreateBuilder(args);
WebApplication app = builder.Build();
var _fruit = new ConcurrentDictionary<string, Fruit>();

app.MapGet("/fruit/{id}", (string id) =>
    _fruit.TryGetValue(id, out var fruit)
        ? TypedResults.Ok(fruit)
        : Results.Problem(statusCode: 404))
    .AddEndpointFilterFactory(ValidationHelper.ValidateIdFactory);               // ❶

app.MapPost("/fruit/{id}", (Fruit fruit, string id) =>
    _fruit.TryAdd(id, fruit)
        ? TypedResults.Created($"/fruit/{id}", fruit)
        : Results.ValidationProblem(new Dictionary<string, string[]>
            {
                { "id", new[] { "A fruit with this id already exists" } }
            }))
    .AddEndpointFilterFactory(ValidationHelper.ValidateIdFactory);               // ❶
app.Run();

record Fruit(string Name, int Stock);
class ValidationHelper
{
    internal static EndpointFilterDelegate ValidateIdFactory(
        EndpointFilterFactoryContext context,                                    // ❷
        EndpointFilterDelegate next)
    {
        ParameterInfo[] parameters =                                             // ❸
            context.MethodInfo.GetParameters();                                  // ❸
        int? idPosition = null;
        for (int i = 0; i < parameters.Length; i++)                              // ❹
        {                                                                        // ❹
            if (parameters[i].Name == "id" &&                                    // ❹
             parameters[i].ParameterType == typeof(string))                      // ❹
            {                                                                    // ❹
                idPosition = i;                                                  // ❹
                break;                                                           // ❹
            }                                                                    // ❹
        }                                                                        // ❹

        if (!idPosition.HasValue)                                                // ❺
        {                                                                        // ❺
            return next;                                                         // ❺
        }                                                                        // ❺

        return async (invocationContext) =>                                      // ❻
        {
            var id = invocationContext                                           // ❼
                .GetArgument<string>(idPosition.Value);                          // ❼
            if (string.IsNullOrEmpty(id) || !id.StartsWith('f'))                 // ❼
            {                                                                    // ❼
                return Results.ValidationProblem(                                // ❼
                    new Dictionary<string, string[]>                             // ❼
                { { "id", new[] { "Id must start with 'f'" }} });                // ❼
            }                                                                    // ❼

            return await next(invocationContext);                                // ❽
        }
        ;
    }
}

❶ The filter factory can handle endpoints with different method signatures.
过滤器工厂可以处理具有不同方法签名的端点。

❷ The context parameter provides details about the endpoint handler method.
context 参数提供有关端点处理程序方法的详细信息。

❸ GetParameters() provides details about the parameters of the handler being called.
GetParameters() 提供有关正在调用的处理程序的参数的详细信息。

❹ Loops through the parameters to find the string id parameter and record its position
遍历参数以找到字符串 id 参数并记录其位置

❺ If the id parameter isn’t not found, doesn’t add a filter, but returns the remainder of the pipeline
如果未找到 id 参数,则不添加筛选器,但返回管道的其余部分

❻ If the id parameter exists, returns a filter function (the filter executed for the endpoint)
如果 id 参数存在,则返回一个 filter 函数(为终端节点执行的 filter)

❼ If the id isn’t valid, returns a Problem Details result
如果 ID 无效,则返回 Problem Details 结果

❽ If the id is valid, executes the next filter in the pipeline
如果 id 有效,则执行管道中的下一个过滤器

The code in listing 5.11 is more complex than anything else we’ve seen so far, as it has an extra layer of abstraction. The endpoint middleware passes an EndpointFilterFactoryContext object to the factory function, which contains extra details about the endpoint in comparison to the context passed to a normal filter function. Specifically, it includes a MethodInfo property and an EndpointMetadata property.

清单 5.11 中的代码比我们目前看到的任何其他代码都要复杂,因为它有一个额外的抽象层。端点中间件将 EndpointFilterFactoryContext 对象传递给工厂函数,与传递给普通 filter 函数的上下文相比,该对象包含有关端点的额外详细信息。具体来说,它包括 MethodInfo 属性和 EndpointMetadata 属性。

NOTE You’ll learn about endpoint metadata in chapter 6.
注意: 您将在第 6 章中了解终端节点元数据。

The MethodInfo property can be used to control how the filter is created based on the definition of the endpoint handler. Listing 5.11 shows how you can loop through the parameters to check for the details you need—a string id parameter, in this case—and customize the filter function you return.
MethodInfo 属性可用于控制如何根据端点处理程序的定义创建过滤器。清单 5.11 展示了如何遍历参数来检查所需的细节 — 在本例中为 string id 参数 — 并自定义返回的 filter 函数。

If you find all these method signatures to be confusing, I don’t blame you. Remembering the difference between an EndpointFilterFactoryContext and EndpointFilterInvocationContext and then trying to satisfy the compiler with your lambda methods can be annoying. Sometimes, you yearn for a good ol’ interface to implement. Let’s do that now.

如果您发现所有这些方法签名都令人困惑,我不怪您。记住 EndpointFilterFactoryContext 和 EndpointFilterInvocationContext 之间的区别,然后尝试使用 lambda 方法满足编译器可能会很烦人。有时,您渴望实现一个好的 ol' 接口。我们现在就开始吧。

5.4.4 Implementing the IEndpointFilter interface

5.4.4 实现 IEndpointFilter 接口

Creating a lambda method for AddEndpointFilter() that satisfies the compiler can be a frustrating experience, depending on the level of support your integrated development environment (IDE) provides. In this section you’ll learn how to sidestep the issue by defining a class that implements IEndpointFilter instead.

为 AddEndpointFilter() 创建满足编译器的 lambda 方法可能是一种令人沮丧的体验,具体取决于集成开发环境 (IDE) 提供的支持级别。在本节中,您将学习如何通过定义一个实现 IEndpointFilter 的类来回避这个问题。

You can implement IEndpointFilter by defining a class with an InvokeAsync() that has the same signature as the lambda defined in listing 5.9. The advantage of using IEndpointFilter is that you get IntelliSense and autocompletion for the method signature. The following listing shows how to implement an IEndpointFilter class that’s equivalent to listing 5.9.

您可以通过使用 InvokeAsync() 定义一个类来实现 IEndpointFilter,该类与清单 5.9 中定义的 lambda 具有相同的签名。使用 IEndpointFilter 的优点是您可以获得方法签名的 IntelliSense 和自动完成。下面的清单显示了如何实现一个等效于清单 5.9 的 IEndpointFilter 类。

Listing 5.12 Implementing IEndpointFilter
清单 5.12 实现IEndpointFilter


WebApplicationBuilder builder = WebApplication.CreateBuilder(args);
WebApplication app = builder.Build();
var _fruit = new System.Collections.Concurrent.ConcurrentDictionary<string, Fruit>();

app.MapGet("/fruit/{id}", (string id) =>
    _fruit.TryGetValue(id, out var fruit)
        ? TypedResults.Ok(fruit)
        : Results.Problem(statusCode: 404))
    .AddEndpointFilter<IdValidationFilter>();                // ❶

app.Run();

record Fruit(string Name, int Stock);
class IdValidationFilter : IEndpointFilter                   // ❷
{
    public async ValueTask<object?> InvokeAsync(             // ❸
        EndpointFilterInvocationContext context,             // ❸
        EndpointFilterDelegate next)                         // ❸
    {
        var id = context.GetArgument<string>(0);
        if (string.IsNullOrEmpty(id) || !id.StartsWith('f'))
        {
            return Results.ValidationProblem(
                new Dictionary<string, string[]>
                {
                    {"id", new[]{"Invalid format. Id must start with 'f'"}}
                });
        }

    return await next(context);
    }
}

❶ Adds the filter using the generic AddEndpointFilter method
使用泛型 AddEndpointFilter 方法添加筛选器

❷ The filter must implement IEndpointFilter . . .
筛选器必须实现 IEndpointFilter . . . .

❸ . . . which requires implementing a single method.
. . . .这需要实现单个方法。

Implementing IEndpointFilter is a good option when your filters become more complex, but note that there’s no equivalent interface for the filter-factory pattern shown in section 5.4.3. If you want to generalize your filters with a filter factory, you’ll have to stick to the lambda (or helper-method) approach shown in listing 5.11.

当筛选器变得更加复杂时,实现 IEndpointFilter 是一个不错的选择,但请注意,第 5.4.3 节中所示的筛选器工厂模式没有等效的接口。如果你想用一个过滤器工厂来推广你的过滤器,你就必须坚持使用 lambda(或辅助方法)方法,如清单 5.11 所示。

5.5 Organizing your APIs with route groups

使用路由组组织 API

One criticism levied against minimal APIs in .NET 6 was that they were necessarily quite verbose, required a lot of duplicated code, and often led to large endpoint handler methods. .NET 7 introduced two new mechanisms to address these critiques:

对 .NET 6 中最小 API 的一个批评是,它们必然非常冗长,需要大量重复的代码,并且经常导致大型端点处理程序方法。.NET 7 引入了两种新机制来解决这些批评:

• Filters—Introduced in section 5.4, filters help separate validation checks and cross-cutting functions such as logging from the important logic in your endpoint handler functions.
过滤器 — 在第 5.4 节中介绍,过滤器有助于将验证检查和横切函数(如日志记录)与端点处理程序函数中的重要逻辑分开。

• Route groups—Described in this section, route groups help reduce duplication by applying filters and routing to multiple handlers at the same time.
路由组 — 本节介绍了路由组,通过同时将筛选条件和路由应用于多个处理程序来帮助减少重复。

When designing APIs, it’s important to maintain consistency in the routes you use for your endpoints, which often means duplicating part of the route pattern across multiple APIs. As an example, all the endpoints in the fruit API described throughout this chapter (such as in listing 5.3) start with the route prefix /fruit:
在设计 API 时,保持用于终端节点的路由的一致性非常重要,这通常意味着跨多个 API 复制部分路由模式。例如,本章中描述的 fruit API 中的所有端点(例如清单 5.3)都以路由前缀 /fruit 开头:

MapGet("/fruit", () => {/* */})

MapGet("/fruit/{id}", (string id) => {/* */})

MapPost("/fruit/{id}", (Fruit fruit, string id) => {/* */})

MapPut("/fruit/{id}", (Fruit fruit, string id) => {/* */})

MapDelete("/fruit/{id}", (string id) => {/* */})

Additionally, the last four endpoints need to validate the id parameter. This validation can be extracted to a helper method and applied as a filter, but you still need to remember to apply the filter when you add a new endpoint.

此外,最后四个端点需要验证 id 参数。此验证可以提取到帮助程序方法并作为筛选器应用,但您仍需要记住在添加新终端节点时应用筛选器。

All this duplication can be removed by using route groups. You can use route groups to extract common path segments or filters to a single location, reducing the duplication in your endpoint definitions. You create a route group by calling MapGroup("/fruit") on the WebApplication instance, providing a route prefix for the group ("/fruit", in this case), and MapGroup() returns a RouteGroupBuilder.

有这些重复都可以通过使用路由组来删除。您可以使用路由组将公共路径段或筛选条件提取到单个位置,从而减少终端节点定义。通过在 WebApplication 实例上调用 MapGroup(“/fruit”) 来创建路由组,为该组提供路由前缀(在本例中为 “/fruit”),MapGroup() 将返回 RouteGroupBuilder。

When you have a RouteGroupBuilder, you can call the same Map* extension methods on RouteGroupBuilder as you do on WebApplication. The only difference is that all the endpoints you define on the group will have the prefix "/fruit" applied to each endpoint you define, as shown in figure 5.11. Similarly, you can call AddEndpointFilter() on a route group, and all the endpoints on the group will also use the filter.

当您拥有 RouteGroupBuilder 时,您可以在 RouteGroupBuilder 上调用与在 WebApplication 上相同的 Map* 扩展方法。唯一的区别是,您在组上定义的所有端点都将将前缀 “/fruit” 应用于您定义的每个端点,如图 5.11 所示。同样,您可以在路由组上调用 AddEndpointFilter(),该组上的所有端点也将使用该过滤器。

alt text

Figure 5.11 Using route groups to simplify the definition of endpoints. You can create a route group by calling MapGroup() and providing a prefix. Any endpoints created on the route group inherit the route template prefix, as well as any filters added to the group.
图 5.11 使用路由组简化终端节点的定义。您可以通过调用 MapGroup() 并提供前缀来创建路由组。在路由组上创建的任何终端节点都会继承路由模板前缀,以及添加到组的任何筛选条件。

You can even create nested groups by calling MapGroup() on a group. The prefixes are applied to your endpoints in order, so the first MapGroup() call defines the prefix used at the start of the route. app.MapGroup("/fruit").MapGroup("/citrus"), for example, would have the prefix "/fruit/citrus".

您甚至可以通过对组调用 MapGroup() 来创建嵌套组。前缀按顺序应用于您的终端节点,因此第一个 MapGroup() 调用定义使用的前缀在路线的起点处。应用程序。MapGroup(“/fruit”) 的例如,MapGroup(“/citrus”) 将具有前缀 “/fruit/citrus”。

Tip If you don’t want to add a prefix but still want to use the route group for applying filters, you can pass the prefix "/" to MapGroup().
提示 如果您不想添加前缀,但仍想使用路由组来应用筛选条件,则可以将前缀“/”传递给 MapGroup()。

Listing 5.13 shows an example of rewriting the fruit API to use route groups. It creates a top-level fruitApi, which applies the "/fruit" prefix, and creates a nested route group called fruitApiWithValidation for the endpoints that require a filter. You can find the complete example comparing the versions with and without route groups in the source code for this chapter.

清单 5.13 展示了一个重写 fruit API 以使用路由组的示例。它创建一个顶级 fruitApi,该 fruitApi 应用“/fruit”前缀,并为需要筛选条件的终端节点创建一个名为 fruitApiWithValidation 的嵌套路由组。您可以在本章的源代码中找到比较带和不带路由组的版本的完整示例。

Listing 5.13 Reducing duplication with route groups
清单 5.13 减少路由组的重复


WebApplicationBuilder builder = WebApplication.CreateBuilder(args);
WebApplication app = builder.Build();

var _fruit = new System.Collections.Concurrent.ConcurrentDictionary<string, Fruit>();

RouteGroupBuilder fruitApi = app.MapGroup("/fruit");                               // ❶

fruitApi.MapGet("/", () => _fruit);                                                // ❷

RouteGroupBuilder fruitApiWithValidation = fruitApi.MapGroup("/")                  // ❸
    .AddEndpointFilter(ValidationHelper.ValidateIdFactory);                        // ❹

// 还有其他代码,详细的查看源代码

fruitApiWithValidation.MapGet("/{id}", (string id) =>                              // ❺
    _fruit.TryGetValue(id, out var fruit)
        ? TypedResults.Ok(fruit)
        : Results.Problem(statusCode: 404));

fruitApiWithValidation.MapPost("/{id}", (Fruit fruit, string id) =>                // ❺
    _fruit.TryAdd(id, fruit)
        ? TypedResults.Created($"/fruit/{id}", fruit)
        : Results.ValidationProblem(new Dictionary<string, string[]>
            {
                { "id", new[] { "A fruit with this id already exists" } }
        }));

fruitApiWithValidation.MapPut("/{id}", (string id, Fruit fruit) =>                 // ❺
{
    _fruit[id] = fruit;
    return Results.NoContent();
});

fruitApiWithValidation.MapDelete("/fruit/{id}", (string id) =>                     // ❺
{
    _fruit.TryRemove(id, out _);
    return Results.NoContent();
});

app.Run();
record Fruit(string Name, int Stock);

❶ Creates a route group by calling MapGroup and providing a prefix
通过调用 MapGroup 并提供前缀来创建路由组

❷ Endpoints defined on the route group will have the group prefix prepended to the route.
在路由组上定义的终端节点将在路由前面加上组前缀。

❸ You can create nested route groups with multiple prefixes.
您可以创建具有多个前缀的嵌套路由组。

❹ You can add filters to the route group . . .
您可以向路由组添加过滤器 . . .

❺ . . . and the filter will be applied to all the endpoints defined on the route group.
. . . .筛选条件将应用于路由组上定义的所有终端节点。

In .NET 6, minimal APIs were a bit too verbose to be generally recommended, but with the addition of route groups and filters, minimal APIs have come into their own. In chapter 6 you’ll learn more about routing and route template syntax, as well as how to generate links to other endpoints.
在 .NET 6 中,最小 API 有点过于冗长,通常不推荐使用,但随着路由组和筛选器的添加,最小 API 已经有了自己的功能。在第 6 章中,您将了解有关路由和路由模板语法的更多信息,以及如何生成指向其他终端节点的链接。

5.6 Summary

5.6 总结

HTTP verbs define the semantic expectation for a request. GET is used to fetch data, POST creates a resource, PUT creates or replaces a resource, and DELETE removes a resource. Following these conventions will make your API easier to consume.
HTTP 动词定义请求的语义期望。GET 用于获取数据,POST 创建资源,PUT 创建或替换资源,DELETE 删除资源。遵循这些约定将使 API 更易于使用。

Each HTTP response includes a status code. Common codes include 200 OK, 201 Created, 400 Bad Request, and 404 Not Found. It’s important to use the correct status code, as clients use these status codes to infer the behavior of your API.
每个 HTTP 响应都包含一个状态代码。常见代码包括 200 OK、201 Created、400 错误请求,404 未找到。使用正确的状态代码非常重要,因为客户端使用这些状态代码来推断 API 的行为。

An HTTP API exposes methods or endpoints that you can use to access or change data on a server using the HTTP protocol. An HTTP API is typically called by mobile or client-side web applications.
HTTP API 公开可用于使用 HTTP 协议访问或更改服务器上的数据的方法或端点。HTTP API 通常由移动或客户端 Web 应用程序调用。

You define minimal API endpoints by calling Map functions on the WebApplication instance, passing in a route pattern to match and a handler function. The handler functions runs in response to matching requests.
通过在 WebApplication 实例上调用 Map 函数,传入要匹配的路由模式和处理程序函数,可以定义最小的 API 端点。处理程序函数运行以响应匹配的请求。

There are different extension methods for each HTTP verb. MapGet handles GET requests, for example, and MapPost maps POST requests. You use these extension methods to define how your app handles a given route and HTTP verb.
每个 HTTP 动词都有不同的扩展方法。例如,MapGet 处理 GET 请求,而 MapPost 映射 POST 请求。您可以使用这些扩展方法来定义您的应用程序如何处理给定的路由和 HTTP 动词。

You can define your endpoint handlers as lambda expressions, Func<T, TResult> and Action<T> variables, local functions, instance methods, or static methods. The best approach depends on how complex your handler is, as well as personal preference.
您可以将终端节点处理程序定义为 lambda 表达式、Func、TResult 和 Action 变量、本地函数、实例方法或静态方法。最好的方法取决于您的处理程序的复杂程度,以及个人喜好。

Returning void from your endpoint handler generates a 200 response with no body by default. Returning a string generates a text/plain response. Returning an IResult instance can generate any response. Any other object returned from your endpoint handler is serialized to JSON. This convention helps keep your endpoint handlers succinct.
默认情况下,从终端节点处理程序返回 void 会生成一个没有正文的 200 响应。返回字符串会生成 text/plain 响应。返回 IResult 实例可以生成任何响应。从终端节点处理程序返回的任何其他对象都将序列化为 JSON。此约定有助于保持终结点处理程序的简洁性。

You can customize the response by injecting an HttpResponse object into your endpoint handler and then setting the status code and response body. This approach can be useful if you have complex requirements for an endpoint.
您可以通过将 HttpResponse 对象注入终端节点处理程序,然后设置状态代码和响应正文来自定义响应。如果您对终端节点有复杂的要求,则此方法可能很有用。

The Results and TypedResults helpers contain static methods for generating common responses, such as a 404 Not Found response using Results.NotFound(). These helpers simplifying returning common status codes.
Results 和 TypedResults 帮助程序包含用于生成常见响应的静态方法,例如使用 Results.NotFound() 的 404 Not Found 响应。这些帮助程序简化了返回常见状态代码的过程。

You can return a standard Problem Details object by using Results.Problem() and Results.ValiationProblem(). Problem() generates a 500 response by default (which can be changed), and ValidationProblem() generates a 400 response, with a list of validation errors. These methods make returning Problem Details objects more concise than generating the response manually.
您可以使用 Results.Problem() 和 Results.ValiationProblem() 返回标准 Problem Details 对象。默认情况下,Problem() 会生成 500 响应(可以更改),而 ValidationProblem() 会生成 400 响应,其中包含验证错误列表。这些方法使返回 Problem Details 对象比手动生成响应更简洁。

You can use helper methods to generate other common result types on Results, such as File() for returning a file from disk, Bytes() for returning arbitrary binary data, and Stream() for returning an arbitrary stream.
您可以使用帮助程序方法在 Results 上生成其他常见的结果类型,例如用于从磁盘返回文件的 File()、用于返回任意二进制数据的 Bytes() 和用于返回任意流的 Stream()。

You can extract common or tangential code from your endpoint handlers by using endpoint filters, which can keep your endpoint handlers easy to read.
您可以使用终端节点筛选条件从终端节点处理程序中提取常见或无关代码,这可以使您的终端节点处理程序易于阅读。

Add a filter to an endpoint by calling AddEndpointFilter() and providing the lambda function to run (or use a static/instance method). You can also implement IEndpointFilter and call AddEndpointFilter(), where T is the name of your implementing class.
通过调用 AddEndpointFilter() 并提供要运行的 lambda 函数(或使用 static/instance 方法),向终端节点添加筛选条件。您还可以实现 IEndpointFilter 并调用 AddEndpointFilter(),其中 T 是实现类的名称。

You can generalize your filter functions by creating a factory, using the overload of AddEndpointFilter() that takes an EndpointFilterFactoryContext. You can use this approach to support endpoint handlers with various method signatures.
你可以通过创建一个工厂来通用你的过滤器函数,使用采用EndpointFilterFactoryContext的AddEndpointFilter()的重载。您可以使用此方法来支持具有各种方法签名的终端节点处理程序。

You can reduce duplication in your endpoint routes and filter configuration by using route groups. Call MapGroup() on WebApplication, and provide a prefix. All endpoints created on the returned RouteGroupBuilder will use the prefix in their route templates.
您可以使用路由组减少终端节点路由和筛选条件配置中的重复。在 WebApplication 上调用 MapGroup() 并提供前缀。在返回的 RouteGroupBuilder 上创建的所有终端节点都将在其路由模板中使用该前缀。

You can also call AddEndpointFilter() on route groups. Any endpoints defined on the group will also have the filter, as though you defined them on the endpoint directly, removing the need to duplicate the call on each endpoint.
您还可以在路由组上调用 AddEndpointFilter()。 在组上定义的任何终端节点也将具有筛选条件,就像您直接在终端节点上定义它们一样,无需在每个终端节点上复制调用。

ASP.NET Core in Action 4 Handling requests with the middleware pipeline

4 Handling requests with the middleware pipeline

使用中间件管道处理请求

This chapter covers

本章涵盖

  • Understanding middleware
    了解中间件
  • Serving static files using middleware
    使用中间件提供静态文件
  • Adding functionality using middleware
    使用中间件添加功能
  • Combining middleware to form a pipeline
    组合中间件形成管道
  • Handling exceptions and errors with middleware
    使用中间件处理异常和错误

In chapter 3 you had a whistle-stop tour of a complete ASP.NET Core application to see how the components come together to create a web application. In this chapter, we’ll focus on one small subsection: the middleware pipeline.

在第 3 章中,您简要介绍了一个完整的 ASP.NET Core 应用程序,以了解这些组件如何组合在一起以创建 Web 应用程序。在本章中,我们将重点介绍一个小部分:中间件管道。

In ASP.NET Core, middleware consists of C# classes or functions that handle an HTTP request or response. Middleware is chained together, with the output of one acting as the input to the next to form a pipeline.

在 ASP.NET Core 中,中间件由处理 HTTP 请求或响应的 C# 类或函数组成。中间件链接在一起,一个中间件的输出充当下一个中间件的输入,形成一个管道。

The middleware pipeline is one of the most important parts of configuration for defining how your application behaves and how it responds to requests. Understanding how to build and compose middleware is key to adding functionality to your applications.

中间件管道是配置中最重要的部分之一,用于定义应用程序的行为方式和响应请求的方式。了解如何构建和组合中间件是向应用程序添加功能的关键。

In this chapter you’ll learn what middleware is and how to use it to create a pipeline. You’ll see how you can chain multiple middleware components together, with each component adding a discrete piece of functionality. The examples in this chapter are limited to using existing middleware components, showing how to arrange them in the correct way for your application. In chapter 31 you’ll learn how to build your own middleware components and incorporate them into the pipeline.

在本章中,您将了解什么是中间件以及如何使用它来创建管道。您将了解如何将多个中间件组件链接在一起,每个组件添加一个独立的功能。本章中的示例仅限于使用现有的中间件组件,展示了如何为您的应用程序以正确的方式排列它们。在第 31 章中,您将学习如何构建自己的中间件组件并将其合并到管道中。

We’ll begin by looking at the concept of middleware, all the things you can achieve with it, and how a middleware component often maps to a cross-cutting concern. These functions of an application cut across multiple different layers. Logging, error handling, and security are classic cross-cutting concerns that are required by many parts of your application. Because all requests pass through the middleware pipeline, it’s the preferred location to configure and handle this functionality.

我们首先要了解中间件的概念,你可以用它实现的所有事情,以及中间件组件通常如何映射到一个横切关注点。应用程序的这些功能跨越多个不同的层。日志记录、错误处理和安全性是应用程序的许多部分都需要的典型横切关注点。由于所有请求都通过中间件管道传递,因此它是配置和处理此功能的首选位置。

In section 4.2 I’ll explain how you can compose individual middleware components into a pipeline. You’ll start out small, with a web app that displays only a holding page. From there, you’ll learn how to build a simple static-file server that returns requested files from a folder on disk.

在 Section 4.2 中,我将解释如何将单个中间件组件组合到一个管道中。您将从小规模开始,使用仅显示保留页的 Web 应用程序。从那里,您将学习如何构建一个简单的静态文件服务器,该服务器从磁盘上的文件夹返回请求的文件。

Next, you’ll move on to a more complex pipeline containing multiple middleware. In this example you’ll explore the importance of ordering in the middleware pipeline, and you’ll see how requests are handled when your pipeline contains multiple middleware.

接下来,您将转到包含多个中间件的更复杂的管道。在此示例中,您将探索中间件管道中排序的重要性,并了解当管道包含多个中间件时如何处理请求。

In section 4.3 you’ll learn how you can use middleware to deal with an important aspect of any application: error handling. Errors are a fact of life for all applications, so it’s important that you account for them when building your app.

在 Section 4.3 中,您将学习如何使用 middleware 来处理任何应用程序的一个重要方面:错误处理。错误是所有应用程序都不可避免的事实,因此在构建应用程序时考虑错误非常重要。

You can handle errors in a few ways. Errors are among the classic cross-cutting concerns, and middleware is well placed to provide the required functionality. In section 4.3 I’ll show how you can handle exceptions with middleware provided by Microsoft. In particular, you’ll learn about two different components:

您可以通过多种方式处理错误。错误是典型的横切关注点之一,中间件可以很好地提供所需的功能。在 Section 4.3 中,我将展示如何使用 Microsoft 提供的中间件处理异常。具体而言,您将了解两个不同的组件:

  • DeveloperExceptionPageMiddleware—Provides quick error feedback when building an application
    DeveloperExceptionPageMiddleware— 在构建应用程序时提供快速错误反馈

  • ExceptionHandlerMiddleware—Provides a generic error page in production so that you don’t leak any sensitive details
    ExceptionHandlerMiddleware- 在生产中提供通用错误页面,以便您不会泄露任何敏感详细信息

You won’t see how to build your own middleware in this chapter; instead, you’ll see that you can go a long way by using the components provided as part of ASP.NET Core. When you understand the middleware pipeline and its behavior, you’ll find it much easier to understand when and why custom middleware is required. With that in mind, let’s dive in!

在本章中,您不会看到如何构建自己的中间件;相反,您会发现,通过使用作为 ASP.NET Core 的一部分提供的组件,您可以走很长一段路。当您了解中间件管道及其行为时,您会发现更容易理解何时以及为什么需要自定义中间件。考虑到这一点,让我们开始吧!

4.1 Defining middleware

4.1 定义中间件

The word middleware is used in a variety of contexts in software development and IT, but it’s not a particularly descriptive word.

中间件这个词在软件开发和 IT 中的各种上下文中都有使用,但它不是一个特别具有描述性的词。

In ASP.NET Core, middleware is C# classes[1] that can handle an HTTP request or response. Middleware can
在 ASP.NET Core 中,中间件是可以处理 HTTP 请求或响应的 C# 类[1]。中间件可以

  • Handle an incoming HTTP request by generating an HTTP response
    通过生成 HTTP 响应来处理传入的 HTTP 请求

  • Process an incoming HTTP request, modify it, and pass it on to another piece of middleware
    处理传入的 HTTP 请求,对其进行修改,并将其传递给另一个中间件

  • Process an outgoing HTTP response, modify it, and pass it on to another piece of middleware or to the ASP.NET Core web server
    处理传出的 HTTP 响应,对其进行修改,并将其传递给另一个中间件或 ASP.NET Core Web 服务器

You can use middleware in a multitude of ways in your own applications. A piece of logging middleware, for example, might note when a request arrived and then pass it on to another piece of middleware. Meanwhile, a static-file middleware component might spot an incoming request for an image with a specific name, load the image from disk, and send it back to the user without passing it on.

您可以在自己的应用程序中以多种方式使用中间件。例如,一个日志记录中间件可能会记录请求何时到达,然后将其传递给另一个中间件。同时,静态文件中间件组件可能会发现对具有特定名称的图像的传入请求,从磁盘加载图像,并将其发送回给用户,而无需传递。

The most important piece of middleware in most ASP.NET Core applications is the EndpointMiddleware class. This class normally generates all your HTML and JavaScript Object Notation (JSON) responses, and is the focus of most of this book. Like image-resizing middleware, it typically receives a request, generates a response, and then sends it back to the user (figure 4.1).

在大多数 ASP.NET Core 应用程序中,最重要的中间件是类。此类通常会生成所有 HTML 和 JavaScript 对象表示法 (JSON) 响应,并且是本书大部分内容的重点。与图像大小调整中间件一样,它通常接收请求,生成响应,然后将其发送回给用户(图 4.1)。

alt text

Figure 4.1 Example of a middleware pipeline. Each middleware component handles the request and passes it on to the next middleware component in the pipeline. After a middleware component generates a response, it passes the response back through the pipeline. When it reaches the ASP.NET Core web server, the response is sent to the user’s browser.
图 4.1 中间件管道示例。每个中间件组件都处理请求并将其传递给管道中的下一个中间件组件。中间件组件生成响应后,它会通过管道将响应传回。当它到达 ASP.NET Core Web 服务器时,响应将发送到用户的浏览器。

Definition This arrangement—whereby a piece of middleware can call another piece of middleware, which in turn can call another, and so on—is referred to as a pipeline. You can think of each piece of middleware as being like a section of pipe; when you connect all the sections, a request flows through one piece and into the next.
定义 这种安排(即一个中间件可以调用另一个中间件,而另一个中间件又可以调用另一个中间件,依此类推)称为管道。您可以将每个中间件视为一段管道;当您连接所有部分时,请求将流经一个部分并进入下一个部分。

One of the most common use cases for middleware is for the cross-cutting concerns of your application. These aspects of your application need to occur for every request, regardless of the specific path in the request or the resource requested, including

中间件最常见的用例之一是应用程序的横切关注点。无论请求中的具体路径或请求的资源如何,每个请求都需要出现应用程序的这些方面,包括

  • Logging each request
    记录每个请求

  • Adding standard security headers to the response
    向响应添加标准安全标头

  • Associating a request with the relevant user
    将请求与相关用户关联

  • Setting the language for the current request
    设置当前请求的语言

In each of these examples, the middleware receives a request, modifies it, and then passes the request on to the next piece of middleware in the pipeline. Subsequent middleware could use the details added by the earlier middleware to handle the request in some way. In figure 4.2, for example, the authentication middleware associates the request with a user. Then the authorization middleware uses this detail to verify whether the user has permission to make that specific request to the application.

在上述每个示例中,中间件都会接收请求,对其进行修改,然后将请求传递到管道中的下一个中间件。后续中间件可以使用早期中间件添加的详细信息以某种方式处理请求。例如,在图 4.2 中,身份验证中间件将请求与用户相关联。然后,授权中间件使用此详细信息来验证用户是否有权向应用程序发出该特定请求。

alt text

Figure 4.2 Example of a middleware component modifying a request for use later in the pipeline. Middleware can also short-circuit the pipeline, returning a response before the request reaches later middleware.
图 4.2 中间件组件修改请求以供稍后在管道中使用的示例。中间件还可以使管道短路,在请求到达后面的中间件之前返回响应。

If the user has permission, the authorization middleware passes the request on to the endpoint middleware to allow it to generate a response. If the user doesn’t have permission, the authorization middleware can short-circuit the pipeline, generating a response directly; it returns the response to the previous middleware, and the endpoint middleware never sees the request. This scenario is an example of the chain-of-responsibility design pattern.

如果用户具有权限,则授权中间件会将请求传递给终端节点中间件,以允许其生成响应。如果用户没有权限,授权中间件可以使管道短路,直接生成响应;它将响应返回给前面的中间件,而 Endpoint 中间件永远不会看到该请求。此方案是责任链设计模式的一个示例。

Definition When a middleware component short-circuits the pipeline and returns a response, it’s called terminal middleware.
定义 当中间件组件使管道短路并返回响应时,它称为终端中间件。

A key point to glean from this example is that the pipeline is bidirectional. The request passes through the pipeline in one direction until a piece of middleware generates a response, at which point the response passes back through the pipeline, passing through each piece of middleware a second time, in reverse order, until it gets back to the first piece of middleware. Finally, the first/last piece of middleware passes the response back to the ASP.NET Core web server.

从这个例子中可以了解到的一个关键点是管道是双向的。请求沿一个方向通过管道,直到一个中间件生成响应,此时响应通过管道传回,以相反的顺序第二次通过每个中间件,直到它返回到第一个中间件。最后,第一个/最后一个中间件将响应传递回 ASP.NET Core Web 服务器。

The HttpContext object
对象HttpContext
I mentioned the HttpContext in chapter 3, and it’s sitting behind the scenes here too. The ASP.NET Core web server constructs an HttpContext for each request, which the ASP.NET Core application uses as a sort of storage box for a single request. Anything that’s specific to this particular request and the subsequent response can be associated with and stored in it. Examples are properties of the request, request-specific services, data that’s been loaded, or errors that have occurred. The web server fills the initial HttpContext with details of the original HTTP request and other configuration details, and then passes it on to the middleware pipeline and the rest of the application.
我在第 3 章中提到了HttpContext,它也位于幕后。ASP.NET Core Web 服务器为每个请求构建一个,ASP.NET Core 应用程序将其用作单个请求的存储盒。特定于此特定请求和后续响应的任何内容都可以与该请求相关联并存储在其中。示例包括请求的属性、特定于请求的服务、已加载的数据或发生的错误。Web 服务器使用原始 HTTP 请求的详细信息和其他配置详细信息填充初始请求,然后将其传递给中间件管道和应用程序的其余部分。HttpContextHttpContextHttpContext
All middleware has access to the HttpContext for a request. It can use this object to determine whether the request contains any user credentials, to identify which page the request is attempting to access, and to fetch any posted data, for example. Then it can use these details to determine how to handle the request.
所有中间件都可以访问 for a request.例如,它可以使用此对象来确定请求是否包含任何用户凭证,确定请求尝试访问的页面,以及获取任何已发布的数据。然后,它可以使用这些详细信息来确定如何处理请求。
When the application finishes processing the request, it updates the HttpContext with an appropriate response and returns it through the middleware pipeline to the web server. Then the ASP.NET Core web server converts the representation to a raw HTTP response and sends it back to the reverse proxy, which forwards it to the user’s browser.
当应用程序完成对请求的处理后,它会使用适当的响应进行更新,并通过中间件管道将其返回到 Web 服务器。然后,ASP.NET Core Web 服务器将表示形式转换为原始 HTTP 响应,并将其发送回反向代理,反向代理将其转发到用户的浏览器。

As you saw in chapter 3, you define the middleware pipeline in code as part of your initial application configuration in Program.cs. You can tailor the middleware pipeline specifically to your needs; simple apps may need only a short pipeline, whereas large apps with a variety of features may use much more middleware. Middleware is the fundamental source of behavior in your application. Ultimately, the middleware pipeline is responsible for responding to any HTTP requests it receives.

正如您在第 3 章中看到的,您在代码中定义了中间件管道,作为 Program.cs 中初始应用程序配置的一部分。您可以根据您的需求专门定制中间件管道;简单的应用程序可能只需要一个短的管道,而具有各种功能的大型应用程序可能会使用更多的中间件。中间件是应用程序中行为的基本来源。最终,中间件管道负责响应它收到的任何 HTTP 请求。

Requests are passed to the middleware pipeline as HttpContext objects. As you saw in chapter 3, the ASP.NET Core web server builds an HttpContext object from an incoming request, which passes up and down the middleware pipeline. When you’re using existing middleware to build a pipeline, this detail is one that you’ll rarely have to deal with. But as you’ll see in the final section of this chapter, its presence behind the scenes provides a route to exerting extra control over your middleware pipeline.

请求作为对象传递到中间件管道。正如您在第 3 章中所看到的,ASP.NET Core Web 服务器从传入请求构建一个对象,该请求在中间件管道中上下传递。当您使用现有中间件构建管道时,您很少需要处理这些细节。但正如您将在本章的最后一部分中看到的那样,它在幕后的存在为对中间件管道施加额外控制提供了一条途径。

You can also think of your middleware pipeline as being a series of concentric components, similar to a traditional matryoshka (Russian) doll, as shown in figure 4.3. A request progresses through the pipeline by heading deeper into the stack of middleware until a response is returned. Then the response returns through the middleware, passing through the components in reverse order from the request.

您还可以将中间件管道视为一系列同心组件,类似于传统的俄罗斯套娃,如图 4.3 所示。请求通过更深入地进入中间件堆栈在管道中前进,直到返回响应。然后,响应通过中间件返回,以与请求相反的顺序传递组件。

alt text

Figure 4.3 You can also think of middleware as being a series of nested components; a request is sent deeper into the middleware, and the response resurfaces from it. Each middleware component can execute logic before passing the response on to the next middleware component and can execute logic after the response has been created, on the way back out of the stack.
图 4.3 你也可以把 middleware 看作是一系列嵌套的组件;请求被发送到中间件的更深处,响应从中重新出现。每个中间件组件都可以在将响应传递到下一个中间件组件之前执行逻辑,并且可以在创建响应后执行逻辑,在返回堆栈的途中执行逻辑。

Middleware vs. HTTP modules and HTTP handlers
中间件与 HTTP 模块和 HTTP 处理程序
In the previous version of ASP.NET, the concept of a middleware pipeline isn’t used. Instead, you have HTTP modules and HTTP handlers.
在早期版本的 ASP.NET 中,未使用中间件管道的概念。相反,您有 HTTP 模块和 HTTP 处理程序。
An HTTP handler is a process that runs in response to a request and generates the response. The ASP.NET page handler, for example, runs in response to requests for .aspx pages. Alternatively, you could write a custom handler that returns resized images when an image is requested.
HTTP 处理程序是为响应请求而运行并生成响应的进程。例如,ASP.NET 页处理程序在响应对 .aspx 页的请求时运行。或者,您可以编写一个自定义处理程序,在请求图像时返回调整大小的图像。
HTTP modules handle the cross-cutting concerns of applications, such as security, logging, and session management. They run in response to the life-cycle events that a request progresses through when it’s received by the server. Examples of events include BeginRequest, AcquireRequestState, and PostAcquireRequestState.
HTTP 模块处理应用程序的横切关注点,例如安全性、日志记录和会话管理。它们运行以响应服务器收到请求时所经历的生命周期事件。事件的示例包括BeginRequest, AcquireRequestState, 和 PostAcquireRequestState.
This approach works, but sometimes it’s tricky to reason about which modules will run at which points. Implementing a module requires relatively detailed understanding of the state of the request at each individual life-cycle event.
这种方法有效,但有时很难推断哪些模块将在哪些点运行。实现模块需要相对详细地了解每个生命周期事件中的请求状态。
The middleware pipeline makes understanding your application far simpler. The pipeline is defined completely in code, specifying which components should run and in which order. Behind the scenes, the middleware pipeline in ASP.NET Core is simply a chain of method calls, with each middleware function calling the next in the pipeline.
中间件管道使理解您的应用程序变得更加简单。管道完全在代码中定义,指定哪些组件应运行以及运行顺序。在幕后,ASP.NET Core 中的中间件管道只是一个方法调用链,每个中间件函数都调用管道中的下一个。

That’s pretty much all there is to the concept of middleware. In the next section, I’ll discuss ways you can combine middleware components to create an application and how to use middleware to separate the concerns of your application.

这几乎就是中间件概念的全部内容。在下一节中,我将讨论组合中间件组件来创建应用程序的方法,以及如何使用中间件来分离应用程序的关注点。

4.2 Combining middleware in a pipeline

4.2 将中间件组合到一个管道中

Generally speaking, each middleware component has a single primary concern; it handles only one aspect of a request. Logging middleware deals only with logging the request, authentication middleware is concerned only with identifying the current user, and static-file middleware is concerned only with returning static files.

一般来说,每个中间件组件都有一个主要关注点;它只处理请求的一个方面。日志记录中间件只处理记录请求,身份验证中间件只关心识别当前用户,静态文件中间件只关心返回静态文件。

Each of these concerns is highly focused, which makes the components themselves small and easy to reason about. This approach also gives your app added flexibility. Adding static-file middleware, for example, doesn’t mean you’re forced to have image-resizing behavior or authentication; each of these features is an additional piece of middleware.

这些关注点中的每一个都是高度集中的,这使得组件本身很小并且易于推理。此方法还为应用提供了更大的灵活性。例如,添加静态文件中间件并不意味着您被迫具有图像大小调整行为或身份验证;这些功能中的每一个都是中间件的附加部分。

To build a complete application, you compose multiple middleware components into a pipeline, as shown in section 4.1. Each middleware component has access to the original request, as well as any changes made to the HttpContext by middleware earlier in the pipeline. When a response has been generated, each middleware component can inspect and/or modify the response as it passes back through the pipeline before it’s sent to the user. This feature allows you to build complex application behaviors from small, focused components.

要构建一个完整的应用程序,您需要将多个中间件组件组合到一个管道中,如第 4.1 节所示。每个中间件组件都可以访问原始请求,以及管道中较早时对 by 中间件所做的任何更改。生成响应后,每个中间件组件都可以在响应通过管道传回响应之前检查和/或修改响应,然后再将其发送给用户。此功能允许您从小型、专注的组件构建复杂的应用程序行为。

In the rest of this section, you’ll see how to create a middleware pipeline by combining various middleware components. Using standard middleware components, you’ll learn to create a holding page and to serve static files from a folder on disk. Finally, you’ll take a look at a more complex pipeline such as you’d get in a minimal API application with multiple middleware, routing, and endpoints.

在本节的其余部分,您将了解如何通过组合各种中间件组件来创建中间件管道。使用标准中间件组件,您将学习如何创建保留页并从磁盘上的文件夹中提供静态文件。最后,您将了解更复杂的管道,例如在具有多个中间件、路由和终端节点的最小 API 应用程序中获得的管道。

4.2.1 Simple pipeline scenario 1: A holding page

4.2.1 简单管道场景 1:一个保持页

For your first app in this chapter and your first middleware pipeline, you’ll learn how to create an app consisting of a holding page. Adding a holding page can be useful occasionally when you’re setting up your application to ensure that it’s processing requests without errors.

对于本章中的第一个应用程序和第一个中间件管道,您将学习如何创建由保持页面组成的应用程序。在设置应用程序时,添加保留页有时可能很有用,以确保它处理请求时没有错误。

Tip Remember that you can view the application code for this book in the GitHub repository at http://mng.bz/Y1qN.
提示 请记住,您可以在 http://mng.bz/Y1qN 的 GitHub 存储库中查看本书的应用程序代码。

In previous chapters, I mentioned that the ASP.NET Core framework is composed of many small individual libraries. You typically add a piece of middleware by referencing a package in your application’s .csproj project file and configuring the middleware in Program.cs. Microsoft ships many standard middleware components with ASP.NET Core for you to choose among; you can also use third-party components from NuGet and GitHub, or you can build your own custom middleware. You can find the list of built-in middleware at http://mng.bz/Gyxq.

在前面的章节中,我提到了 ASP.NET Core 框架由许多小型的单个库组成。通常,您可以通过引用应用程序的 .csproj 项目文件中的包并在 Program.cs 中配置中间件来添加中间件。Microsoft Core 附带了许多标准中间件组件 ASP.NET 供您选择;您还可以使用 NuGet 和 GitHub 中的第三方组件,也可以构建自己的自定义中间件。您可以在 http://mng.bz/Gyxq 中找到内置中间件的列表。

Note I discuss building custom middleware in chapter 31.
注意 我在第 31 章中讨论了构建自定义中间件。

In this section, you’ll see how to create one of the simplest middleware pipelines, consisting only of WelcomePageMiddleware. WelcomePageMiddleware is designed to provide a sample HTML page quickly when you’re first developing an application, as you can see in figure 4.4. You wouldn’t use it in a production app, as you can’t customize the output, but it’s a single, self-contained middleware component you can use to ensure that your application is running correctly.

在本节中,您将了解如何创建最简单的中间件管道之一,其中仅由WelcomePageMiddleware. WelcomePageMiddleware旨在在您首次开发应用程序时快速提供示例 HTML 页面,如图 4.4 所示。您不会在生产应用程序中使用它,因为您无法自定义输出,但它是一个独立的中间件组件,您可以使用它来确保您的应用程序正确运行。

alt text

Figure 4.4 The Welcome-page middleware response. Every request to the application, at any path, will return the same Welcome-page response.
图 4.4 Welcome-page 中间件响应。在任何路径上对应用程序的每个请求都将返回相同的 Welcome-page 响应。

Tip WelcomePageMiddleware is included as part of the base ASP.NET Core framework, so you don’t need to add a reference to any additional NuGet packages.
提示 WelcomePageMiddleware作为基本 ASP.NET Core 框架的一部分包含在内,因此无需添加对任何其他 NuGet 包的引用。

Even though this application is simple, the same process you’ve seen before occurs when the application receives an HTTP request, as shown in figure 4.5.

尽管此应用程序很简单,但当应用程序收到 HTTP 请求时,您之前看到的相同过程也会发生,如图 4.5 所示。
alt text

Figure 4.5 WelcomePageMiddleware handles a request. The request passes from the reverse proxy to the ASP.NET Core web server and finally to the middleware pipeline, which generates an HTML response.
图 4.5 WelcomePageMiddleware处理请求。请求从反向代理传递到 ASP.NET Core Web 服务器,最后传递到中间件管道,中间件管道会生成 HTML 响应。

The request passes to the ASP.NET Core web server, which builds a representation of the request and passes it to the middleware pipeline. As it’s the first (only!) middleware in the pipeline, WelcomePageMiddleware receives the request and must decide how to handle it. The middleware responds by generating an HTML response, no matter what request it receives. This response passes back to the ASP.NET Core web server, which forwards it to the reverse proxy and then to the user to display in their browser.

请求传递到 ASP.NET Core Web 服务器,该服务器构建请求的表示形式并将其传递给中间件管道。因为它是管道中的第一个(唯一的)中间件,所以WelcomePageMiddleware接收请求并且必须决定如何处理它。中间件通过生成 HTML 响应来响应,无论它收到什么请求。此响应将传递回 ASP.NET Core Web 服务器,该服务器将其转发到反向代理,然后转发给用户以在其浏览器中显示。

As with all ASP.NET Core applications, you define the middleware pipeline in Program.cs by calling Use* methods on the WebApplication instance. To create your first middleware pipeline, which consists of a single middleware component, you need a single method call. The application doesn’t need any extra configuration or services, so your whole application consists of the four lines in the following listing.

与所有 ASP.NET Core 应用程序一样,您可以通过调用实例上的方法在 Program.cs 中定义中间件管道。要创建您的第一个中间件管道(由单个中间件组件组成),您需要一个方法调用。该应用程序不需要任何额外的配置或服务,因此您的整个应用程序由以下清单中的 4 行组成。

Listing 4.1 Program.cs for a Welcome-page middleware pipeline
列表 4.1 Welcome-page 中间件管道的 Program.cs

WebApplicationBuilder builder = WebApplication.CreateBuilder(args);   // ❶
WebApplication app = builder.Build();                                 // ❶
app.UseWelcomePage();                                                 // ❷
app.Run();                                                            // ❸

❶ Uses the default WebApplication configuration
使用默认的 WebApplication 配置
❷ The only custom middleware in the pipeline
管道中唯一的自定义中间件
❸ Runs the application to handle requests
运行应用程序以处理请求

You build up the middleware pipeline in ASP.NET Core by calling methods on WebApplication (which implements IApplicationBuilder). WebApplication doesn’t define methods like UseWelcomePage itself; instead, these are extension methods.

您可以通过调用 WebApplication(实现 IApplicationBuilder)上的方法,在 ASP.NET Core 中构建中间件管道。WebApplication 不定义 UseWelcomePage 本身等方法;相反,这些是扩展方法。

Using extension methods allows you to add functionality to the WebApplication class, while keeping the implementation isolated from it. Under the hood, the methods typically call another extension method to add the middleware to the pipeline. Behind the scenes, for example, the UseWelcomePage method adds the WelcomePageMiddleware to the pipeline by calling
使用扩展方法可以向 WebApplication 类添加功能,同时保持实现与该类隔离。在后台,这些方法通常会调用另一个扩展方法以将中间件添加到管道中。例如,在后台,UseWelcomePage 方法通过调用

UseMiddleware<WelcomePageMiddleware>();

This convention of creating an extension method for each piece of middleware and starting the method name with Use is designed to improve discoverability when you add middleware to your application.[2] ASP.NET Core includes a lot of middleware as part of the core framework, so you can use IntelliSense in Visual Studio and other integrated development environments (IDEs) to view all the middleware that’s available, as shown in figure 4.6.

这种为每个中间件创建一个扩展方法并以 Use 开头的方法名称的约定旨在提高向应用程序添加中间件时的可发现性。2 ASP.NET Core 包含许多中间件作为核心框架的一部分,因此您可以在 Visual Studio 和其他集成开发环境 (IDE) 中使用 IntelliSense 来查看所有可用的中间件,如图 4.6 所示。

alt text

Figure 4.6 IntelliSense makes it easy to view all the available middleware to add to your middleware pipeline.
图 4.6 使用 IntelliSense 可以轻松查看要添加到中间件管道的所有可用中间件。

Calling the UseWelcomePage method adds the WelcomePageMiddleware as the next middleware in the pipeline. Although you’re using only a single middleware component here, it’s important to remember that the order in which you make calls to IApplicationBuilder in Configure defines the order in which the middleware will run in the pipeline.

调用 UseWelcomePage 方法会将 WelcomePageMiddleware 添加为管道中的下一个中间件。尽管您在此处只使用单个中间件组件,但请务必记住,您在 Configure 中调用 IApplicationBuilder 的顺序定义了中间件在管道中运行的顺序。

Warning When you’re adding middleware to the pipeline, always take care to consider the order in which it will run. A component can access only data created by middleware that comes before it in the pipeline.
警告 当您将中间件添加到管道时,请始终注意考虑它的运行顺序。组件只能访问管道中位于其前面的中间件创建的数据。

This application is the most basic kind, returning the same response no matter which URL you navigate to, but it shows how easy it is to define your application behavior with middleware. Next, we’ll make things a little more interesting by returning different responses when you make requests to different paths.

此应用程序是最基本的类型,无论您导航到哪个 URL,它都会返回相同的响应,但它显示了使用中间件定义应用程序行为是多么容易。接下来,当您向不同的路径发出请求时,我们将返回不同的响应,从而使事情变得更有趣。

4.2.2 Simple pipeline scenario 2: Handling static files

4.2.2 简单管道场景 2:处理静态文件

In this section, I’ll show you how to create one of the simplest middleware pipelines you can use for a full application: a static-file application. Most web applications, including those with dynamic content, serve some pages by using static files. Images, JavaScript, and CSS stylesheets are normally saved to disk during development and are served up when requested from the special wwwroot folder of your project, normally as part of a full HTML page request.

在本节中,我将向您展示如何创建可用于完整应用程序的最简单的中间件管道之一:静态文件应用程序。大多数 Web 应用程序(包括具有动态内容的应用程序)都使用静态文件来提供某些页面。图像、JavaScript 和 CSS 样式表通常在开发过程中保存到磁盘中,并在从项目的特殊 wwwroot 文件夹请求时提供,通常作为完整 HTML 页面请求的一部分。

Definition By default, the wwwroot folder is the only folder in your application that ASP.NET Core will serve files from. It doesn’t serve files from other folders for security reasons. The wwwroot folder in an ASP.NET Core project is typically deployed as is to production, including all the files and folders it contains.
定义 默认情况下,wwwroot 文件夹是应用程序中 ASP.NET Core 将从中提供文件的唯一文件夹。出于安全原因,它不会提供来自其他文件夹的文件。ASP.NET Core 项目中的 wwwroot 文件夹通常按原样部署到生产环境,包括它包含的所有文件和文件夹。

You can use StaticFileMiddleware to serve static files from the wwwroot folder when requested, as shown in figure 4.7. In this example, an image called moon.jpg exists in the wwwroot folder. When you request the file using the /moon.jpg path, it’s loaded and returned as the response to the request.
当请求时,您可以使用 wwwroot 文件夹中的静态文件,如图 4.7 所示。在此示例中,名为 moon.jpg 的映像存在于 wwwroot 文件夹中。当您使用路径请求文件StaticFileMiddleware/moon.jpg时,该文件将加载并作为对请求的响应返回。

alt text

Figure 4.7 Serving a static image file using the static-file middleware
图 4.7 使用 static-file 中间件提供静态图像文件

If the user requests a file that doesn’t exist in the wwwroot folder, such as missing.jpg, the static-file middleware won’t serve a file. Instead, a 404 HTTP error code response will be sent to the user’s browser, which displays its default “File Not Found” page, as shown in figure 4.8.

如果用户请求 wwwroot 文件夹中不存在的文件(如 missing.jpg),则静态文件中间件不会提供文件。相反,404 HTTP 错误代码响应将发送到用户的浏览器,该浏览器显示其默认的 “File Not Found” 页面,如图 4.8 所示。

alt text

Figure 4.8 Returning a 404 to the browser when a file doesn’t exist. The requested file didn’t exist in the wwwroot folder, so the ASP.NET Core application returned a 404 response. Then the browser (Microsoft Edge, in this case) show the user a default “File Not Found” error pager
图 4.8 当文件不存在时向浏览器返回 404。请求的文件在 wwwroot 文件夹中不存在,因此 ASP.NET Core 应用程序返回 404 响应。然后,浏览器(在本例中为 Microsoft Edge)向用户显示默认的“找不到文件”错误分页程序

Note How this page looks depends on your browser. In some browsers, you may see a blank page.
注意 此页面的外观取决于您的浏览器。在某些浏览器中,您可能会看到一个空白页面。

Building the middleware pipeline for this simple static-file application is easy. The pipeline consists of a single piece of middleware, StaticFileMiddleware, as you can see in the following listing. You don’t need any services, so configuring the middleware pipeline with UseStaticFiles is all that’s required.

为这个简单的静态文件应用程序构建中间件管道很容易。该管道由一个中间件StaticFileMiddleware 组成,如下面的清单所示。您不需要任何服务,因此使用 UseStaticFiles 配置中间件管道就是全部需要的。

Listing 4.2 Program.cs for a static-file middleware pipeline
列表 4.2 静态文件中间件管道的 Program.cs

WebApplicationBuilder builder = WebApplication.CreateBuilder(args);
WebApplication app = builder.Build();
app.UseStaticFiles();                                                  // ❶
app.Run();

❶ Adds the StaticFileMiddleware to the pipeline
将 StaticFileMiddleware 添加到管道中

Tip Remember that you can view the application code for this book in the GitHub repository at http://mng.bz/Y1qN.
提示 记住,您可以在 http://mng.bz/Y1qN 的 GitHub 存储库中查看本书的应用程序代码。

When the application receives a request, the ASP.NET Core web server handles it and passes it to the middleware pipeline. StaticFileMiddleware receives the request and determines whether it can handle it. If the requested file exists, the middleware handles the request and returns the file as the response, as shown in figure 4.9.

当应用程序收到请求时,ASP.NET Core Web 服务器会处理该请求并将其传递给中间件管道。StaticFileMiddleware 接收请求并确定它是否可以处理它。如果请求的文件存在,中间件会处理请求并返回该文件作为响应,如图 4.9 所示。

alt text

Figure 4.9 StaticFileMiddleware handles a request for a file. The middleware checks the wwwroot folder to see if whether requested moon.jpg file exists. The file exists, so the middleware retrieves it and returns it as the response to the web server and, ultimately, to the browser.
图 4.9 StaticFileMiddleware 处理文件请求。中间件检查 wwwroot 文件夹以查看请求的 moon.jpg 文件是否存在。该文件存在,因此中间件会检索它并将其作为响应返回给 Web 服务器,并最终返回给浏览器。

If the file doesn’t exist, the request effectively passes through the static-file middleware unchanged. But wait—you added only one piece of middleware, right? Surely you can’t pass the request through to the next middleware component if there isn’t another one.

如果文件不存在,则请求将原封不动地有效地通过 static-file 中间件。但是等等 — 您只添加了一个中间件,对吧?当然,如果没有另一个中间件组件,你就不能将请求传递给下一个中间件组件。

ASP.NET Core automatically adds a dummy piece of middleware to the end of the pipeline. This middleware always returns a 404 response if it’s called.

ASP.NET Core 会自动将一个虚拟中间件添加到管道的末尾。如果调用此中间件,则始终返回 404 响应。

Tip If no middleware generates a response for a request, the pipeline automatically returns a simple 404 error response to the browser.
提示 如果没有中间件为请求生成响应,则管道会自动向浏览器返回简单的 404 错误响应。

HTTP response status codes
HTTP 响应状态代码
Every HTTP response contains a status code and, optionally, a reason phrase describing the status code. Status codes are fundamental to the HTTP protocol and are a standardized way of indicating common results. A 200 response, for example, means that the request was successfully answered, whereas a 404 response indicates that the resource requested couldn’t be found. You can see the full list of standardized status codes at https://www.rfc-editor.org/rfc/rfc9110#name-status-codes.
每个 HTTP 响应都包含一个状态代码和一个描述状态代码的原因短语(可选)。状态代码是 HTTP 协议的基础,是表示常见结果的标准化方式。例如,200 响应表示请求已成功响应,而 404 响应表示找不到请求的资源。您可以在 https://www.rfc-editor.org/rfc/rfc9110#name-status-codes 上查看标准化状态代码的完整列表。
Status codes are always three digits long and are grouped in five classes, based on the first digit:
状态代码始终为三位数,并根据第一位数字分为五类:
· 1xx—Information. This code is not often used; it provides a general acknowledgment.
1xx - 信息。此代码不经常使用;它提供了一个一般性的确认。
· 2xx—Success. The request was successfully handled and processed.
2xx - 成功。已成功处理和处理请求。
· 3xx—Redirection. The browser must follow the provided link to allow the user to log in, for example.
3xx — 重定向。例如,浏览器必须按照提供的链接允许用户登录。
· 4xx—Client error. A problem occurred with the request. The request sent invalid data, for example, or the user isn’t authorized to perform the request.
4xx — 客户端错误。请求出现问题。例如,请求发送了无效数据,或者用户无权执行请求。
· 5xx—Server error. A problem on the server caused the request to fail.
5xx — 服务器错误。服务器上的问题导致请求失败。
These status codes typically drive the behavior of a user’s browser. The browser will handle a 301 response automatically, for example, by redirecting to the provided new link and making a second request, all without the user’s interaction.
这些状态代码通常驱动用户浏览器的行为。浏览器将自动处理 301 响应,例如,重定向到提供的新链接并发出第二个请求,所有这些都无需用户交互。
Error codes are in the 4xx and 5xx classes. Common codes include a 404 response when a file couldn’t be found, a 400 error when a client sends invalid data (such as an invalid email address), and a 500 error when an error occurs on the server. HTTP responses for error codes may include a response body, which is content to display when the client receives the response.
错误代码位于 4xx 和 5xx 类中。常见代码包括找不到文件时的 404 响应、客户端发送无效数据(例如无效的电子邮件地址)时的 400 错误,以及服务器上发生错误时的 500 错误。错误代码的 HTTP 响应可能包括响应正文,该正文是客户端收到响应时要显示的内容。

This basic ASP.NET Core application makes it easy to see the behavior of the ASP.NET Core middleware pipeline and the static-file middleware in particular, but it’s unlikely that your applications will be this simple. It’s more likely that static files will form one part of your middleware pipeline. In the next section you’ll see how to combine multiple middleware components as we look at a simple minimal API application.

这个基本的 ASP.NET Core 应用程序可以轻松查看 ASP.NET Core 中间件管道的行为,尤其是静态文件中间件,但您的应用程序不太可能如此简单。静态文件更有可能构成中间件管道的一部分。在下一节中,您将看到如何组合多个中间件组件,因为我们将了解一个简单的最小 API 应用程序。

4.2.3 Simple pipeline scenario 3: A minimal API application

4.2.3 简单管道场景 3:一个最小的 API 应用程序

By this point, you should have a decent grasp of the middleware pipeline, insofar as you understand that it defines your application’s behavior. In this section you’ll see how to combine several standard middleware components to form a pipeline. As before, you do this in Program.cs by adding middleware to the WebApplication object.

此时,您应该对中间件管道有一定的了解,只要您了解它定义了应用程序的行为。在本节中,您将了解如何组合多个标准中间件组件以形成一个管道。和以前一样,您可以通过将中间件添加到 WebApplication 对象来在 Program.cs 中执行此作。

You’ll begin by creating a basic middleware pipeline that you’d find in a typical ASP.NET Core minimal APIs template and then extend it by adding middleware. Figure 4.10 shows the output you see when you navigate to the home page of the application—identical to the sample application in chapter 3.

首先,您将创建一个基本的中间件管道,该管道可以在典型的 ASP.NET Core 最小 API 模板中找到,然后通过添加中间件来扩展它。图 4.10 显示了导航到应用程序主页时看到的输出,与第 3 章中的示例应用程序相同。

alt text

Figure 4.10 A simple minimal API application. The application uses only four pieces of middleware: routing middleware to choose the endpoint to run, endpoint middleware to generate the response from a Razor Page, static-file middleware to serve image files, and exception-handler middleware to capture any errors.
图 4.10 一个简单的最小 API 应用程序。应用程序只使用四个中间件:路由中间件来选择要运行的端点,endpoint 中间件(用于从 Razor 页面生成响应)、静态文件中间件(用于提供图像文件)和异常处理程序中间件(用于捕获任何错误)。

Creating this application requires only four pieces of middleware: routing middleware to choose a minimal API endpoint to execute, endpoint middleware to generate the response, static-file middleware to serve any image files from the wwwroot folder, and exception-handler middleware to handle any errors that might occur. Even though this example is still a Hello World! example, this architecture is much closer to a realistic example. The following listing shows an example of such an application.

创建此应用程序只需要四个中间件:用于选择要执行的最小 API 终端节点的路由中间件、用于生成响应的终端节点中间件、用于提供 wwwroot 文件夹中任何图像文件的静态文件中间件,以及用于处理可能发生的任何错误的异常处理程序中间件。即使此示例仍然是 Hello World! example,此体系结构更接近于实际示例。下面的清单显示了此类应用程序的一个示例。

Listing 4.3 A basic middleware pipeline for a minimal APIs application
清单 4.3 用于最小 API 应用程序的基本中间件管道

var builder = WebApplication.CreateBuilder(args);
var app = builder.Build();
app.UseDeveloperExceptionPage();         // ❶
app.UseStaticFiles();                    // ❷
app.UseRouting();                        // ❸
app.MapGet("/", () => "Hello World!");   // ❹

app.Run();

❶ This call isn’t strictly necessary, as it’s already added by WebApplication by default.
此调用并非绝对必要,因为默认情况下它已由 WebApplication 添加。

❷ Adds the StaticFileMiddleware to the pipeline
将 StaticFileMiddleware 添加到管道中

❸ Adds the RoutingMiddleware to the pipeline
将 RoutingMiddleware 添加到管道中

❹ Defines an endpoint for the application
为应用程序定义端点

The addition of middleware to WebApplication to form the pipeline should be familiar to you now, but several points are worth noting in this example:
您现在应该很熟悉向 WebApplication 添加中间件以形成管道,但在此示例中,有几点值得注意:

  • Middleware is added with Use() methods.
    中间件是使用 Use
    () 方法添加的。
  • MapGet defines an endpoint, not middleware. It defines the endpoints that the routing and endpoint middleware can use.
    MapGet 定义端点,而不是中间件。它定义路由和终端节点中间件可以使用的终端节点。
  • WebApplication automatically adds some middleware to the pipeline, such as the EndpointMiddleware.
    WebApplication 会自动向管道中添加一些中间件,例如 EndpointMiddleware。
  • The order of the Use() method calls is important and defines the order of the middleware pipeline.
    Use
    () 方法调用的顺序很重要,它定义了中间件管道的顺序。

First, all the methods for adding middleware start with Use. As I mentioned earlier, this is thanks to the convention of using extension methods to extend the functionality of WebApplication; prefixing the methods with Use should make them easier to discover.

首先,添加中间件的所有方法都以 Use 开头。正如我前面提到的,这要归功于使用扩展方法来扩展 WebApplication 功能的约定;为方法添加前缀 Use 应该会使它们更容易被发现。

Second, it’s important to understand that the MapGet method does not add middleware to the pipeline; it defines an endpoint in your application. These endpoints are used by the routing and endpoint middleware. You’ll learn more about endpoints and routing in chapter 5.

其次,请务必了解 MapGet 方法不会将中间件添加到管道中;它定义应用程序中的终端节点。这些终端节点由路由和终端节点中间件使用。您将在第 5 章中了解有关终端节点和路由的更多信息。

Tip You can define the endpoints for your app by using MapGet() anywhere in Program.cs before the call to app.Run(), but the calls are typically placed after the middleware pipeline definition.
提示 您可以使用MapGet() Program.cs在调用应用程序。Run(),但调用通常放在中间件管道定义之后。

In chapter 3, I mentioned that WebApplication automatically adds middleware to your app. You can see this process in action in listing 4.3 automatically adding the EndpointMiddleware to the end of the middleware pipeline. WebApplication also automatically adds the developer exception page middleware to the start of the middleware pipeline when you’re running in development. As a result, you can omit the call to UseDeveloperExceptionPage() from listing 4.3, and your middleware pipeline will be essentially the same.

在第 3 章中,我提到了 WebApplication 会自动将中间件添加到您的应用程序中。你可以在清单 4.3 中看到这个过程的实际效果,它自动将 EndpointMiddleware 添加到中间件管道的末尾。当您在开发中运行时,WebApplication 还会自动将开发人员异常页面中间件添加到中间件管道的开头。因此,您可以省略清单 4.3 中对 UseDeveloperExceptionPage() 的调用,您的中间件管道将基本相同。

WebApplication and autoadded middleware
WebApplication 和自动添加的中间件
WebApplication and WebApplicationBuilder were introduced in .NET 6 to try to reduce the amount of boilerplate code required for a Hello World! ASP.NET Core application. As part of this initiative, Microsoft chose to have WebApplication automatically add various middleware to the pipeline. This decision alleviates some of the common getting-started pain points of middleware ordering by ensuring that, for example, UseRouting() is always called before UseAuthorization().
WebApplication 和 WebApplicationBuilder 是在 .NET 6 中引入的,旨在尝试减少 "Hello World" ASP.NET Core 应用程序所需的样板代码量!。作为该计划的一部分,Microsoft 选择让 WebApplication 自动将各种中间件添加到管道中。此决定通过确保(例如)始终在 UseAuthorization() 之前调用 UseRouting(),缓解了中间件排序的一些常见入门痛点。
Everything has trade-offs, of course, and for WebApplication the trade-off is that it’s harder to understand exactly what’s in your middleware pipeline without having deep knowledge of the framework code itself.
当然,一切都有权衡,对于 WebApplication 来说,权衡是,如果不深入了解框架代码本身,就更难准确理解中间件管道中的内容。
Luckily, you don’t need to worry about the middleware that WebApplication adds for the most part. If you’re new to ASP.NET Core, generally you can accept that WebApplication will add the middleware only when it’s necessary and safe to do so.
幸运的是,您无需担心WebApplication 在很大程度上增加了。如果您是 ASP.NET Core 的新用户,通常,你可以接受 WebApplication 仅在必要且安全的情况下才会添加中间件。
Nevertheless, in some cases it may pay to know exactly what’s in your pipeline, especially if you’re familiar with ASP.NET Core. In .NET 7, WebApplication automatically adds some or all of the following middleware to the start of the middleware pipeline:
不过,在某些情况下,确切地了解你的管道中的内容可能是值得的,特别是如果你熟悉 ASP.NET Core。在 .NET 7 中,WebApplication 会自动将以下部分或全部中间件添加到中间件管道的开头:
· HostFilteringMiddleware—This middleware is security-related. You can read more about why it’s useful and how to configure it at http://mng.bz/zXxa.
HostFilteringMiddleware — 此中间件与安全性相关。您可以在 http://mng.bz/zXxa 中阅读有关它为何有用以及如何配置它的更多信息。
· ForwardedHeadersMiddleware—This middleware controls how forwarded headers are handled. You can read more about it in chapter 27.
ForwardedHeadersMiddleware — 此中间件控制如何处理转发的标头。您可以在第 27 章中阅读更多相关信息。
· DeveloperExceptionPageMiddleware—As already discussed, this middleware is added when you run in a development environment.
DeveloperExceptionPageMiddleware — 如前所述,当您在开发环境中运行时,会添加此中间件。
· RoutingMiddleware—If you add any endpoints to your application, UseRouting() runs before you add any custom middleware to your application.
RoutingMiddleware — 如果您向应用程序添加任何终端节点,则 UseRouting() 会在您向应用程序添加任何自定义中间件之前运行。
· AuthenticationMiddleware—If you configure authentication, this middleware authenticates a user for the request. Chapter 23 discusses authentication in detail.
AuthenticationMiddleware — 如果您配置身份验证,则此中间件将对请求的用户进行身份验证。第 23 章详细讨论了身份验证。
· AuthorizationMiddleware—The authorization middleware runs after authentication and determines whether a user is permitted to execute an endpoint. If the user doesn’t have permission, the request is short-circuited. I discuss authorization in detail in chapter 24.
AuthorizationMiddleware — 授权中间件在身份验证后运行,并确定是否允许用户执行终端节点。如果用户没有权限,则请求将短路。我在第 24 章中详细讨论了授权。
· EndpointMiddleware—This middleware pairs with the RoutingMiddleware to execute an endpoint. Unlike the other middleware described here, the EndpointMiddleware is added to the end of the middleware pipeline, after any other middleware you configure in Program.cs.
EndpointMiddleware — 此中间件与 RoutingMiddleware 配对以执行终端节点。与此处描述的其他中间件不同,EndpointMiddleware 被添加到中间件管道的末尾,位于您在 Program.cs 中配置的任何其他中间件之后。
Depending on your Program.cs configuration, WebApplication may not add all this middleware. Also, if you don’t want some of this automatic middleware to be at the start of your middleware pipeline, generally you can override the location. In listing 4.3, for example, we override the automatic RoutingMiddleware location by calling UseRouting() explicitly, ensuring that routing occurs exactly where we need it.
根据您的 Program.cs 配置,WebApplication 可能不会添加所有这些中间件。此外,如果您不希望某些自动中间件位于中间件管道的开头,通常可以覆盖该位置。例如,在清单 4.3 中,我们通过显式调用 UseRouting()来覆盖自动定位RoutingMiddleware,确保路由恰好发生在我们需要的地方。

Another important point about listing 4.3 is that the order in which you add the middleware to the WebApplication object is the order in which the middleware is added to the pipeline. The order of the calls in listing 4.3 creates a pipeline similar to that shown in figure 4.11.

清单 4.3 的另一个要点是,将中间件添加到 WebApplication 对象的顺序就是将中间件添加到管道的顺序。清单 4.3 中的调用顺序将创建一个类似于图 4.11 所示的管道。

alt text

Figure 4.11 The middleware pipeline for the example application in listing 4.3. The order in which you add the middleware to WebApplication defines the order of the middleware in the pipeline.
图 4.11 清单 4.3 中示例应用程序的中间件管道。将中间件添加到 WebApplication 的顺序定义了中间件在管道中的顺序。

The ASP.NET Core web server passes the incoming request to the developer exception page middleware first. This exception-handler middleware ignores the request initially; its purpose is to catch any exceptions thrown by later middleware in the pipeline, as you’ll see in section 4.3. It’s important for this middleware to be placed early in the pipeline so that it can catch errors produced by later middleware.

ASP.NET Core Web 服务器首先将传入请求传递给开发人员异常页面中间件。此异常处理程序中间件最初会忽略请求;它的目的是捕获管道中后续 middleware 抛出的任何异常,如 4.3 节所示。将此中间件放在管道的早期非常重要,这样它就可以捕获后续中间件产生的错误。

The developer exception page middleware passes the request on to the static-file middleware. The static-file handler generates a response if the request corresponds to a file; otherwise, it passes the request on to the routing middleware. The routing middleware selects a minimal API endpoint based on the endpoints defined and the request URL, and the endpoint middleware executes the selected minimal API endpoint. If no endpoint can handle the requested URL, the automatic dummy middleware returns a 404 response.

开发人员异常页面中间件将请求传递给静态文件中间件。如果请求对应于文件,则 static-file 处理程序会生成响应;否则,它将请求传递给路由中间件。路由中间件根据定义的端点和请求 URL 选择最小 API 端点,端点中间件执行选定的最小 API 端点。如果没有终端节点可以处理请求的 URL,则自动虚拟中间件将返回 404 响应。

In chapter 3, I mentioned that WebApplication adds the RoutingMiddleware to the start of the middleware pipeline automatically. So you may be wondering why I explicitly added it to the pipeline in listing 4.3 using UseRouting().

在第 3 章中,我提到 WebApplication 会自动将 RoutingMiddleware 添加到中间件管道的开头。因此,您可能想知道为什么我使用 UseRouting() 将它显式添加到清单 4.3 中的管道中。

The answer, again, is related to the order of the middleware. Adding an explicit call to UseRouting() tells WebApplication not to add the RoutingMiddleware automatically before the middleware defined in Program.cs. This allows us to “move” the RoutingMiddleware to be placed after the StaticFileMiddleware. Although this step isn’t strictly necessary in this case, it’s good practice. The StaticFileMiddleware doesn’t use routing, so it’s preferable to let this middleware check whether the incoming request is for a static file; if so, it can short-circuit the pipeline and avoid the unnecessary call to the RoutingMiddleware.

答案同样与中间件的顺序有关。添加对 UseRouting() 的显式调用会告诉 WebApplication 不要在 Program.cs 中定义的中间件之前自动添加 RoutingMiddleware。这允许我们将 RoutingMiddleware “移动” 为放置在 StaticFileMiddleware 之后。尽管在这种情况下,此步骤并非绝对必要,但这是一种很好的做法。StaticFileMiddleware 不使用路由,因此最好让这个中间件检查传入的请求是否是针对静态文件的;如果是这样,它可以使管道短路并避免对 RoutingMiddleware 的不必要调用。

Note In versions 1.x and 2.x of ASP.NET Core, the routing and endpoint middleware were combined in a single Model-View-Controller (MVC) middleware component. Splitting the responsibilities for routing from execution makes it possible to insert middleware between the routing and endpoint middleware. I discuss routing further in chapters 6 and 14.
注意 在 ASP.NET Core 的 1.x 和 2.x 版本中,路由和端点中间件组合在一个模型-视图-控制器 (MVC) 中间件组件中。将路由的责任与执行分开,可以在路由和终端节点中间件之间插入中间件。我在第 6 章和第 14 章中进一步讨论了路由。

The impact of ordering is most obvious when you have two pieces of middleware that are listening for the same path. The endpoint middleware in the example pipeline currently responds to a request to the home page of the application (with the / path) by returning the string "Hello World!", as shown in figure 4.10. Figure 4.12 shows what happens if you reintroduce a piece of middleware that you saw previously, WelcomePageMiddleware, and configure it to respond to the / path as well.

当你有两个 middleware 正在侦听同一路径时,排序的影响最为明显。示例管道中的终端节点中间件当前通过返回字符串 “Hello World!” 来响应对应用程序主页(使用 / 路径)的请求,如图 4.10 所示。图 4.12 显示了如果你重新引入之前看到的中间件 WelcomePageMiddleware,并将其配置为也响应 / 路径会发生什么。

alt text

Figure 4.12 The Welcome-page middleware response. The Welcome-page middleware comes before the endpoint middleware, so a request to the home page returns the Welcome-page middleware instead of the minimal API response.
图 4.12 Welcome-page 中间件响应。Welcome-page 中间件位于端点中间件之前,因此对主页的请求将返回 Welcome-page 中间件,而不是最小的 API 响应。

As you saw in section 4.2.1, WelcomePageMiddleware is designed to return a fixed HTML response, so you wouldn’t use it in a production app, but it illustrates the point nicely. In the following listing, it’s added to the start of the middleware pipeline and configured to respond only to the "/" path.

正如你在 4.2.1 节中看到的,WelcomePageMiddleware 被设计为返回一个固定的 HTML 响应,所以你不会在生产应用程序中使用它,但它很好地说明了这一点。在下面的清单中,它被添加到中间件管道的开头,并配置为仅响应 “/” 路径。

Listing 4.4 Adding WelcomePageMiddleware to the pipeline
清单 4.4 添加到管道WelcomePageMiddleware

WebApplicationBuilder builder = WebApplication.CreateBuilder(args);
WebApplication app = builder.Build();
app.UseWelcomePage("/");                                 //❶
app.UseDeveloperExceptionPage();
app.UseStaticFiles();
app.UseRouting();                                        //❷
app.MapGet("/", () => "Hello World!");                   //❷
app.Run();

❶ WelcomePageMiddleware handles all requests to the “/” path and returns a sample HTML response.
WelcomePageMiddleware 处理对 “/” 路径的所有请求,并返回一个示例 HTML 响应。
❷ Requests to “/” will never reach the endpoint middleware, so this endpoint won’t be called.
对 “/” 的请求永远不会到达端点中间件,因此不会调用此端点。

Even though you know that the endpoint middleware can also handle the "/" path, WelcomePageMiddleware is earlier in the pipeline, so it returns a response when it receives the request to "/", short-circuiting the pipeline, as shown in figure 4.13. None of the other middleware in the pipeline runs for the request, so none has an opportunity to generate a response.
即使您知道端点中间件也可以处理 “/” 路径,但 WelcomePageMiddleware 位于管道的早期,因此当它收到对 “/” 的请求时,它会返回响应,从而使管道短路,如图 4.13 所示。管道中的其他中间件都不会为请求运行,因此没有机会生成响应。

alt text

Figure 4.13 Overview of the application handling a request to the "/" path. The Welcome-page middleware is first in the middleware pipeline, so it receives the request before any other middleware. It generates an HTML response, short-circuiting the pipeline. No other middleware runs for the request.
图 4.13 处理对 “/” 路径请求的应用程序概述。欢迎页面middleware 在中间件管道中排在第一位,因此它会在任何其他中间件之前收到请求。它生成 HTML 响应,使管道短路。没有其他中间件为请求运行。

As WebApplication automatically adds EndpointMiddleware to the end of the middleware pipeline, the WelcomePageMiddleware will always be ahead of it, so it always generates a response before the endpoint can execute in this example.

由于 WebApplication 会自动将 EndpointMiddleware 添加到中间件管道的末尾,因此 WelcomePageMiddleware 将始终位于其前面,因此在此示例中,它总是在端点可以执行之前生成响应。

Tip You should always consider the order of middleware when adding it to WebApplication. Middleware added earlier in the pipeline will run (and potentially return a response) before middleware added later.
提示 在将中间件添加到 WebApplication 时,您应该始终考虑中间件的顺序。在管道中较早添加的中间件将在稍后添加的中间件之前运行 (并可能返回响应) 。

All the examples shown so far try to handle an incoming request and generate a response, but it’s important to remember that the middleware pipeline is bidirectional. Each middleware component gets an opportunity to handle both the incoming request and the outgoing response. The order of middleware is most important for those components that create or modify the outgoing response.

到目前为止显示的所有示例都尝试处理传入请求并生成响应,但请务必记住,中间件管道是双向的。每个中间件组件都有机会同时处理传入请求和传出响应。中间件的顺序对于创建或修改传出响应的组件最为重要。

In listing 4.3, I included DeveloperExceptionPageMiddleware at the start of the application’s middleware pipeline, but it didn’t seem to do anything. Error-handling middleware characteristically ignores the incoming request as it arrives in the pipeline; instead, it inspects the outgoing response, modifying it only when an error has occurred. In the next section, I discuss the types of error-handling middleware that are available to use with your application and when to use them.

在清单 4.3 中,我在应用程序的中间件管道的开头添加了 DeveloperExceptionPageMiddleware,但它似乎没有做任何事情。错误处理中间件通常在传入请求到达管道时忽略该请求;相反,它会检查传出响应,仅在发生错误时对其进行修改。在下一节中,我将讨论可用于应用程序的错误处理中间件的类型以及何时使用它们。

4.3 Handling errors using middleware

4.3 使用中间件处理错误

Errors are a fact of life when you’re developing applications. Even if you write perfect code, as soon as you release and deploy your application, users will find a way to break it, by accident or intentionally! The important thing is that your application handles these errors gracefully, providing a suitable response to the user and not causing your whole application to fail.

在开发应用程序时,错误是不可避免的事实。即使您编写了完美的代码,一旦您发布和部署了您的应用程序,用户也会找到一种方法来破坏它,无论是有意还是有意!重要的是,您的应用程序要妥善处理这些错误,为用户提供适当的响应,并且不会导致整个应用程序失败。

The design philosophy for ASP.NET Core is that every feature is opt-in. So because error handling is a feature, you need to enable it explicitly in your application. Many types of errors could occur in your application, and you have many ways to handle them, but in this section I focus on a single type of error: exceptions.

ASP.NET Core 的设计理念是每个功能都是可选的。因此,由于错误处理是一项功能,因此您需要在应用程序中显式启用它。您的应用程序中可能会发生许多类型的错误,您有多种方法可以处理这些错误,但在本节中,我将重点介绍一种类型的错误:异常。

Exceptions typically occur whenever you find an unexpected circumstance. A typical (and highly frustrating) exception you’ll no doubt have experienced before is NullReferenceException, which is thrown when you attempt to access a variable that hasn’t been initialized.[3] If an exception occurs in a middleware component, it propagates up the pipeline, as shown in figure 4.14. If the pipeline doesn’t handle the exception, the web server returns a 500 status code to the user.

每当发现意外情况时,通常会发生异常。您以前无疑会遇到一个典型的(且非常令人沮丧的)异常是 NullReferenceException,当您尝试访问尚未初始化的变量时,会引发该异常。3 如果中间件组件中发生异常,它会沿管道向上传播,如图 4.14 所示。如果管道未处理异常,则 Web 服务器将向用户返回 500 状态代码。

alt text

Figure 4.14 An exception in the endpoint middleware propagates through the pipeline. If the exception isn’t caught by middleware earlier in the pipeline, a 500 “Server error” status code is sent to the user’s browser.
图 4.14 端点中间件中的异常通过管道传播。如果管道中较早的中间件未捕获异常,则会向用户的浏览器发送 500 的“服务器错误”状态代码。

In some situations, an error won’t cause an exception. Instead, middleware might generate an error status code. One such case occurs when a requested path isn’t handled. In that situation, the pipeline returns a 404 error.
在某些情况下,错误不会导致异常。相反,中间件可能会生成错误状态代码。当请求的路径未得到处理时,就会出现一种情况。在这种情况下,管道将返回 404 错误。

For APIs, which typically are consumed by apps (as opposed to end users), that result probably is fine. But for apps that typically generate HTML, such as Razor Pages apps, returning a 404 typically results in a generic, unfriendly page being shown to the user, as you saw in figure 4.8. Although this behavior is correct, it doesn’t provide a great experience for users of these types of applications.

对于通常由应用程序 (而不是最终用户) 使用的 API,该结果可能很好。但对于通常生成 HTML 的应用程序(如 Razor Pages 应用程序),返回 404 通常会导致向用户显示通用的、不友好的页面,如图 4.8 所示。尽管此行为是正确的,但它不会为这些类型应用程序的用户提供出色的体验。

Error-handling middleware attempts to address these problems by modifying the response before the app returns it to the user. Typically, error-handling middleware returns either details on the error that occurred or a generic but friendly HTML page to the user. You’ll learn how to handle this use case in chapter 13 when you learn about generating responses with Razor Pages.

错误处理中间件尝试通过在应用程序将响应返回给用户之前修改响应来解决这些问题。通常,错误处理中间件会返回有关所发生错误的详细信息,或者向用户返回通用但友好的 HTML 页面。在第 13 章中,您将了解如何使用 Razor Pages 生成响应,从而了解如何处理此用例。

The remainder of this section looks at the two main types of exception-handling middleware that’s available for use in your application. Both are available as part of the base ASP.NET Core framework, so you don’t need to reference any additional NuGet packages to use them.

本节的其余部分将介绍可在应用程序中使用的两种主要类型的异常处理中间件。两者都作为基本 ASP.NET Core 框架的一部分提供,因此无需引用任何其他 NuGet 包即可使用它们。

4.3.1 Viewing exceptions in development: DeveloperExceptionPage

查看开发中的异常:DeveloperExceptionPage

When you’re developing an application, you typically want access to as much information as possible when an error occurs somewhere in your app. For that reason, Microsoft provides DeveloperExceptionPageMiddleware, which you can add to your middleware pipeline by using
在开发应用程序时,您通常希望在应用程序中的某个位置发生错误时访问尽可能多的信息。因此,Microsoft 提供了 DeveloperExceptionPageMiddleware,您可以使用

app.UseDeveloperExceptionPage();

Note As shown previously, WebApplication automatically adds this middleware to your middleware pipeline when you’re running in the Development environment, so you don’t need to add it explicitly. You’ll learn more about environments in chapter 10.
注意 如前所述,当您在 Development 环境中运行时,WebApplication 会自动将此中间件添加到您的中间件管道中,因此您无需显式添加它。您将在第 10 章中了解有关环境的更多信息。

When an exception is thrown and propagates up the pipeline to this middleware, it’s captured. Then the middleware generates a friendly HTML page, which it returns with a 500 status code, as shown in figure 4.15. This page contains a variety of details about the request and the exception, including the exception stack trace; the source code at the line the exception occurred; and details on the request, such as any cookies or headers that were sent.

当引发异常并沿管道向上传播到此中间件时,会捕获该异常。然后,中间件生成一个友好的 HTML 页面,该页面返回一个 500 状态代码,如图 4.15 所示。此页面包含有关请求和异常的各种详细信息,包括异常堆栈跟踪;发生异常的行处的源代码;以及有关请求的详细信息,例如发送的任何 Cookie 或标头。

alt text

Figure 4.15 The developer exception page shows details about the exception when it occurs during the process of a request. The location in the code that caused the exception, the source code line itself, and the stack trace are all shown by default. You can also click the Query, Cookies, Headers, and Routing buttons to reveal further details about the request that caused the exception.
图 4.15 开发者异常页面展示请求过程中发生的异常详情。默认情况下,将显示代码中导致异常的位置、源代码行本身和堆栈跟踪。您还可以单击 Query、Cookie、Headers 和 Routing 按钮,以显示有关导致异常的请求的更多详细信息。

Having these details available when an error occurs is invaluable for debugging a problem, but they also represent a security risk if used incorrectly. You should never return more details about your application to users than absolutely necessary, so you should use DeveloperExceptionPage only when developing your application. The clue is in the name!

在发生错误时提供这些详细信息对于调试问题非常有价值,但如果使用不当,它们也会带来安全风险。您绝不应向用户返回有关应用程序的更多详细信息,因此您只应在开发应用程序时使用 DeveloperExceptionPage。线索就在名字里!

Warning Never use the developer exception page when running in production. Doing so is a security risk, as it could publicly reveal details about your application’s code, making you an easy target for attackers. WebApplication uses the correct behavior by default and adds the middleware only when running in development.
警告 在生产环境中运行时,切勿使用开发人员异常页面。这样做会带来安全风险,因为它可能会公开泄露有关应用程序代码的详细信息,使您很容易成为攻击者的目标。默认情况下,WebApplication 使用正确的行为,并且仅在开发中运行时添加中间件。

If the developer exception page isn’t appropriate for production use, what should you use instead? Luckily, you can use another type of general-purpose error-handling middleware in production: ExceptionHandlerMiddleware.

如果开发人员例外页面不适合生产使用,您应该使用什么?幸运的是,您可以在生产中使用另一种类型的通用错误处理中间件:ExceptionHandlerMiddleware。

4.3.2 Handling exceptions in production: ExceptionHandlerMiddleware

4.3.2 在生产环境中处理异常:ExceptionHandlerMiddleware

The developer exception page is handy when you’re developing your applications, but you shouldn’t use it in production, as it can leak information about your app to potential attackers. You still want to catch errors, though; otherwise, users will see unfriendly error pages or blank pages, depending on the browser they’re using.
在开发应用程序时,开发人员异常页面很方便,但不应在生产环境中使用它,因为它可能会将有关应用程序的信息泄露给潜在的攻击者。不过,您仍然希望捕获错误;否则,用户将看到不友好的错误页面或空白页面,具体取决于他们使用的浏览器。

You can solve this problem by using ExceptionHandlerMiddleware. If an error occurs in your application, the user will see a custom error response that’s consistent with the rest of the application but provides only necessary details about the error. For a minimal API application, that response could be JSON or plain text, as shown in figure 4.16.

您可以使用 ExceptionHandlerMiddleware 来解决此问题。如果您的应用程序中发生错误,用户将看到一个自定义错误响应,该响应与应用程序的其余部分一致,但仅提供有关错误的必要详细信息。对于最小的 API 应用程序,该响应可以是 JSON 或纯文本,如图 4.16 所示。

alt text

Figure 4.16 Using the ExceptionHandlerMiddleware, you can return a generic error message when an exception occurs, ensuring that you don’t leak any sensitive details about your application in production.
图 4.16 使用 ExceptionHandlerMiddleware,您可以在发生异常时返回通用错误消息,从而确保在生产环境中不会泄露有关应用程序的任何敏感详细信息。

For Razor Pages apps, you can create a custom error response, such as the one shown in figure 4.17. You maintain the look and feel of the application by using the same header, displaying the currently logged-in user, and displaying an appropriate message to the user instead of full details on the exception.

对于 Razor Pages 应用程序,您可以创建自定义错误响应,如图 4.17 所示。通过使用相同的标头,显示当前登录的用户,并向用户显示适当的消息,而不是有关异常的完整详细信息,可以维护应用程序的外观。

alt text

Figure 4.17 A custom error page created by ExceptionHandlerMiddleware. The custom error page can have the same look and feel as the rest of the application by reusing elements such as the header and footer. More important, you can easily control the error details displayed to users.
图 4.17 由 ExceptionHandlerMiddleware 创建的自定义错误页面。通过重用 header 和 footer 等元素,自定义错误页面可以具有与应用程序其余部分相同的外观。更重要的是,您可以轻松控制向用户显示的错误详细信息。

Given the differing requirements for error handlers in development and production, most ASP.NET Core apps add their error-handler middleware conditionally, based on the hosting environment. WebApplication automatically adds the developer exception page when running in the development hosting environment, so you typically add ExceptionHandlerMiddleware when you’re not in the development environment, as shown in the following listing.

鉴于开发和生产中对错误处理程序的要求不同,大多数 ASP.NET Core 应用程序都会添加他们的 error-handler 中间件。WebApplication 在开发托管环境中运行时会自动添加开发人员异常页面,因此您通常在不在开发环境中时添加 ExceptionHandlerMiddleware,如下面的清单所示。

Listing 4.5 Adding exception-handler middleware when in production
列表 4.5 添加异常处理程序中间件在生产环境中

WebApplicationBuilder builder = WebApplication.CreateBuilder(args);
WebApplication app = builder.Build();                     // ❶
if (!app.Environment.IsDevelopment())                     // ❷
{
    app.UseExceptionHandler("/error");                    // ❸
}
// additional middleware configuration
app.MapGet("/error", () => "Sorry, an error occurred");   // ❹

❶ In development, WebApplication automatically adds the developer exception page middleware.
在开发中,WebApplication 会自动添加开发者异常页面中间件。
❷ Configures a different pipeline when not running in development
在开发中未运行时配置不同的管道
❸ The ExceptionHandlerMiddleware won’t leak sensitive details when running in production.
ExceptionHandlerMiddleware 在生产环境中运行时不会泄露敏感细节。
❹ This error endpoint will be executed when an exception is handled.
处理异常时将执行此错误端点。

As well as demonstrating how to add ExceptionHandlerMiddleware to your middleware pipeline, this listing shows that it’s perfectly acceptable to configure different middleware pipelines depending on the environment when the application starts. You could also vary your pipeline based on other values, such as settings loaded from configuration.

除了演示如何将 ExceptionHandlerMiddleware 添加到中间件管道之外,此清单还表明,在应用程序启动时,根据环境配置不同的中间件管道是完全可以接受的。您还可以根据其他值(例如从配置加载的设置)来改变管道。

Note You’ll see how to use configuration values to customize the middleware pipeline in chapter 10.
注意 您将在第 10 章中看到如何使用配置值来自定义中间件管道。

When adding ExceptionHandlerMiddleware to your application, you typically provide a path to the custom error page that will be displayed to the user. In the example in listing 4.5, you used an error handling path of "/error":
在将 ExceptionHandlerMiddleware 添加到应用程序时,通常会提供将向用户显示的自定义错误页面的路径。在清单 4.5 的示例中,您使用了 “/error” 的错误处理路径:

app.UseExceptionHandler("/error");

ExceptionHandlerMiddleware invokes this path after it captures an exception to generate the final response. The ability to generate a response dynamically is a key feature of ExceptionHandlerMiddleware; it allows you to reexecute a middleware pipeline to generate the response sent to the user.

ExceptionHandlerMiddleware 在捕获异常后调用此路径以生成最终响应。动态生成响应的能力是 ExceptionHandlerMiddleware 的一个关键功能;它允许您重新执行中间件管道以生成发送给用户的响应。

Figure 4.18 shows what happens when ExceptionHandlerMiddleware handles an exception. It shows the flow of events when the minimal API endpoint for the "/" path generates an exception. The final response returns an error status code but also provides an error string, using the "/error" endpoint.
图 4.18 显示了当 ExceptionHandlerMiddleware 处理异常时会发生什么。它显示当 “/” 路径的最小 API 端点生成异常时的事件流。最终响应返回错误状态代码,但也使用“/error”端点提供错误字符串。

alt text

Figure 4.18 ExceptionHandlerMiddleware handling an exception to generate a JSON response. A request to the / path generates an exception, which is handled by the middleware. The pipeline is reexecuted, using the /error path to generate the JSON response.
图 4.18 ExceptionHandlerMiddleware 处理异常以生成 JSON 响应。对 / 路径的请求会生成异常,该异常由中间件处理。管道将重新执行,使用 /error 路径生成 JSON 响应。

The sequence of events when an unhandled exception occurs somewhere in the middleware pipeline (or in an endpoint) after ExceptionHandlerMiddleware is as follows:

当 ExceptionHandlerMiddleware 之后的中间件管道(或端点)中的某个位置发生未经处理的异常时,事件序列如下:

  1. A piece of middleware throws an exception.
    一个 middleware 会引发一个异常。

  2. ExceptionHandlerMiddleware catches the exception.
    ExceptionHandlerMiddleware 捕获异常。

  3. Any partial response that has been defined is cleared.
    将清除已定义的任何部分响应。

  4. The ExceptionHandlerMiddleware overwrites the request path with the provided error-handling path.
    ExceptionHandlerMiddleware 使用提供的错误处理路径覆盖请求路径。

  5. The middleware sends the request back down the pipeline, as though the original request had been for the error-handling path.
    中间件将请求发送回管道,就像原始请求是针对错误处理路径的一样。

  6. The middleware pipeline generates a new response as normal.
    中间件管道照常生成新的响应。

  7. When the response gets back to ExceptionHandlerMiddleware, it modifies the status code to a 500 error and continues to pass the response up the pipeline to the web server.
    当响应返回到 ExceptionHandlerMiddleware 时,它会将状态代码修改为 500 错误,并继续将响应从管道向上传递到 Web 服务器。

One of the main advantages of reexecuting the pipeline for Razor Page apps is the ability to have your error messages integrated into your normal site layout, as shown in figure 4.17. It’s certainly possible to return a fixed response when an error occurs without reexecuting the pipeline, but you wouldn’t be able to have a menu bar with dynamically generated links or display the current user’s name in the menu, for example. By reexecuting the pipeline, you ensure that all the dynamic areas of your application are integrated correctly, as though the page were a standard page of your site.

重新执行 Razor Page 应用程序的管道的主要优点之一是能够将错误消息集成到正常的站点布局中,如图所示4.17. 当错误发生时,当然可以在不重新执行管道的情况下返回固定的响应,但你将无法拥有一个带有 dynamic 的菜单栏生成的链接或在菜单中显示当前用户的名称。通过重新执行管道,您可以确保应用程序的所有动态区域都已正确集成,就像该页面是网站的标准页面一样。

Note You don’t need to do anything other than add ExceptionHandlerMiddleware to your application and configure a valid error-handling path to enable reexecuting the pipeline, as shown in figure 4.18. The middleware will catch the exception and reexecute the pipeline for you. Subsequent middleware will treat the reexecution as a new request, but previous middleware in the pipeline won’t be aware that anything unusual happened.
注意 除了将 ExceptionHandlerMiddleware 添加到您的应用程序并配置有效的错误处理路径以启用重新执行管道之外,您不需要执行任何其他作,如图 4.18 所示。中间件将捕获异常并为您重新执行管道。后续中间件会将重新执行视为新请求,但管道中先前的中间件不会意识到发生了任何异常情况。

Reexecuting the middleware pipeline is a great way to keep consistency in your web application for error pages, but you should be aware of some gotchas. First, middleware can modify a response generated farther down the pipeline only if the response hasn’t yet been sent to the client. This situation can be a problem if, for example, an error occurs while ASP.NET Core is sending a static file to a client. In that case, ASP.NET Core may start streaming bytes to the client immediately for performance reasons. In that case, the error-handling middleware won’t be able to run, as it can’t reset the response. Generally speaking, you can’t do much about this problem, but it’s something to be aware of.

重新执行中间件管道是保持 Web 应用程序错误页面一致性的好方法,但您应该注意一些问题。首先,仅当响应尚未发送到客户端时,中间件才能修改在管道中较远处生成的响应。例如,如果在 ASP.NET Core 向客户端发送静态文件时发生错误,则这种情况可能是一个问题。在这种情况下,出于性能原因,ASP.NET Core 可能会立即开始将字节流式传输到客户端。发生这种情况时,错误处理中间件将无法运行,因为它无法重置响应。一般来说,您对此问题无能为力,但需要注意。

A more common problem occurs when the error-handling path throws an error during the reexecution of the pipeline. Imagine that there’s a bug in the code that generates the menu at the top of the page in a Razor Pages app:
当错误处理路径在重新执行管道期间引发错误时,会出现更常见的问题。假设在 Razor Pages 应用程序中生成页面顶部菜单的代码中存在一个 bug:

  1. When the user reaches your home page, the code for generating the menu bar throws an exception.
    当用户访问您的主页时,用于生成菜单栏的代码会引发异常。

  2. The exception propagates up the middleware pipeline.
    异常沿中间件管道向上传播。

  3. When reached, ExceptionHandlerMiddleware captures it, and the pipe is reexecuted, using the error-handling path.
    到达时,ExceptionHandlerMiddleware 会捕获它,并使用错误处理路径重新执行管道。

  4. When the error page executes, it attempts to generate the menu bar for your app, which again throws an exception.
    当错误页面执行时,它会尝试为您的应用程序生成菜单栏,这再次引发异常。

  5. The exception propagates up the middleware pipeline.
    异常沿中间件管道向上传播。

  6. ExceptionHandlerMiddleware has already tried to intercept a request, so it lets the error propagate all the way to the top of the middleware pipeline.
    ExceptionHandlerMiddleware 已经尝试拦截一个请求,所以它允许错误一直传播到中间件管道的顶部。

  7. The web server returns a raw 500 error, as though there were no error-handling middleware at all.
    Web 服务器返回原始 500 错误,就好像根本没有错误处理中间件一样。

Thanks to this problem, it’s often good practice to make your error-handling pages as simple as possible to reduce the possibility that errors will occur.
由于这个问题,通常最好让你的错误处理页面尽可能简单,以减少发生错误的可能性。

Warning If your error-handling path generates an error, the user will see a generic browser error. It’s often better to use a static error page that always works than a dynamic page that risks throwing more errors. You can see an alternative approach using a custom error handling function in this post: http://mng.bz/0Kmx.
警告 如果错误处理路径生成错误,则用户将看到通用浏览器错误。使用始终有效的静态错误页面通常比使用动态页面。您可以在这篇文章中看到使用自定义错误处理函数的替代方法:http://mng.bz/0Kmx

Another consideration when building minimal API applications is that you generally don’t want to return HTML. Returning an HTML page to an application that’s expecting JSON could easily break it. Instead, the HTTP 500 status code and a JSON body describing the error are more useful to a consuming application. Luckily, ASP.NET Core allows you to do exactly this when you create minimal APIs and web API controllers.

构建最小 API 应用程序时的另一个注意事项是,您通常不希望返回 HTML。 将 HTML 页面返回到需要 JSON 的应用程序很容易破坏它。相反,HTTP 500 状态代码和描述错误的 JSON 正文对于使用应用程序更有用。幸运的是,ASP.NET Core 允许您在创建最小 API 和 Web API 控制器时执行此作。

Note I discuss how to add this functionality with minimal APIs in chapter 5 and with web APIs in chapter 20.
注意:我在第 5 章中讨论了如何使用最少的 API 添加此功能,在第 20 章中讨论了如何使用 Web API 添加此功能。

That brings us to the end of middleware in ASP.NET Core for now. You’ve seen how to use and compose middleware to form a pipeline, as well as how to handle exceptions in your application. This information will get you a long way when you start building your first ASP.NET Core applications. Later, you’ll learn how to build your own custom middleware, as well as how to perform complex operations on the middleware pipeline, such as forking it in response to specific requests. In chapter 5, you’ll look in depth at minimal APIs and at how they can be used to build JSON APIs.

现在,我们来到了 ASP.NET Core 中中间件的结尾。您已经了解了如何使用和组合中间件来形成管道,以及如何处理应用程序中的异常。当您开始构建您的第一个 ASP.NET Core 应用程序时,此信息将对您有所帮助。稍后,您将学习如何构建自己的自定义中间件,以及如何在中间件管道上执行复杂的作,例如为响应特定请求而分叉。在第 5 章中,您将深入了解最小的 API 以及如何使用它们来构建 JSON API。

4.4 Summary

4.4 总结

  • Middleware has a similar role to HTTP modules and handlers in ASP.NET but is easier to reason about.
    中间件的作用与 ASP.NET 中的 HTTP 模块和处理程序类似,但更容易推理。
  • Middleware is composed in a pipeline, with the output of one middleware passing to the input of the next.
    中间件由管道组成,一个中间件的输出传递到下一个中间件的输入。
  • The middleware pipeline is two-way: requests pass through each middleware on the way in, and responses pass back through in reverse order on the way out.
    中间件管道是双向的:请求在传入时通过每个中间件,响应在传出时以相反的顺序传回。
  • Middleware can short-circuit the pipeline by handling a request and returning a response, or it can pass the request on to the next middleware in the pipeline.
    中间件可以通过处理请求并返回响应来使管道短路,也可以将请求传递给管道中的下一个中间件。
  • Middleware can modify a request by adding data to or changing the HttpContext object.
    中间件可以通过向 HttpContext 对象添加数据或更改 HttpContext 对象来修改请求。
  • If an earlier middleware short-circuits the pipeline, not all middleware will execute for all requests.
    如果较早的中间件使管道短路,则并非所有中间件都会针对所有请求执行。
  • If a request isn’t handled, the middleware pipeline returns a 404 status code.
    如果未处理请求,中间件管道将返回 404 状态代码。
  • The order in which middleware is added to WebApplication defines the order in which middleware will execute in the pipeline.
    中间件添加到 WebApplication 的顺序定义了中间件在管道中的执行顺序。
  • The middleware pipeline can be reexecuted as long as a response’s headers haven’t been sent.
    只要尚未发送响应的标头,就可以重新执行中间件管道。
  • When it’s added to a middleware pipeline, StaticFileMiddleware serves any requested files found in the wwwroot folder of your application.
    当它被添加到中间件管道时,StaticFileMiddleware 会提供在应用程序的 wwwroot 文件夹中找到的任何请求文件。
  • DeveloperExceptionPageMiddleware provides a lot of information about errors during development, but it should never be used in production.
    DeveloperExceptionPageMiddleware 在开发过程中提供了大量有关错误的信息,但绝不应该在生产中使用。
  • ExceptionHandlerMiddleware lets you provide user-friendly custom error-handling messages when an exception occurs in the pipeline. It’s safe for use in production, as it doesn’t expose sensitive details about your application.
    ExceptionHandlerMiddleware 允许您在管道中发生异常时提供用户友好的自定义错误处理消息。它可以安全地用于生产环境,因为它不会暴露有关应用程序的敏感详细信息。
  • Microsoft provides some common middleware, and many third-party options are available on NuGet and GitHub.
    Microsoft 提供了一些常见的中间件,NuGet 和 GitHub 上提供了许多第三方选项。

[1] Technically, middleware needs to be a function, as you’ll see in chapter 31, but it’s common to implement middleware as a C# class with a single method.
从技术上讲,中间件需要是一个函数,如第 31 章所示,但通常使用单个方法将中间件实现为 C# 类。

[2] The downside to this approach is that it can hide exactly which middleware is being added to the pipeline. When the answer isn’t clear, I typically search for the source code of the extension method directly in GitHub (https://github.com/aspnet/aspnetcore).
这种方法的缺点是它可以准确隐藏要添加到管道的中间件。当答案不明确时,我通常会直接在 GitHub (https://github.com/aspnet/aspnetcore) 中搜索扩展方法的源代码。

[3] C# 8.0 introduced non-nullable reference types, which provide a way to handle null values more clearly, with the promise of finally ridding .NET of NullReferenceExceptions! The ASP.NET Core framework libraries in .NET 7 have fully embraced nullable reference types. See the documentation to learn more: http://mng.bz/7V0g.
C# 8.0 引入了不可为 null 的引用类型,它提供了一种更清晰地处理 null 值的方法,并有望最终消除 .NET 的 NullReferenceExceptions!.NET 7 中的 ASP.NET Core 框架库已完全采用可为 null 的引用类型。请参阅文档以了解更多信息:http:// mng.bz/7V0g。